Running diagnostics on your MacBook Pro is essential for identifying and resolving hardware or software issues. This comprehensive guide, brought to you by CAR-TOOL.EDU.VN, will walk you through the process of using Apple Diagnostics, understanding the results, and exploring alternative diagnostic tools. Maintaining your MacBook Pro with proper diagnostics will ensure optimal performance and longevity, saving you time and money on potential repairs.
Contents
- 1. Understanding the Importance of MacBook Pro Diagnostics
- 1.1. Identifying Potential Issues Early
- 1.2. Preventing Data Loss
- 1.3. Optimizing Performance
- 1.4. Extending Lifespan
- 1.5. Saving Money on Repairs
- 2. Preparing Your MacBook Pro for Diagnostics
- 2.1. Update macOS
- 2.2. Shut Down Unnecessary Applications
- 2.3. Disconnect External Devices
- 2.4. Ensure Proper Ventilation
- 2.5. Charge the Battery
- 3. Using Apple Diagnostics on MacBook Pro
- 3.1. Apple Silicon MacBook Pro
- 3.2. Intel Processor MacBook Pro
- 3.3. Troubleshooting Apple Diagnostics
- 4. Interpreting Apple Diagnostics Results and Reference Codes
- 4.1. Understanding the Results Summary
- 4.2. Decoding Apple Diagnostics Reference Codes
- 4.3. Steps to Take Based on Diagnostic Results
- 4.4. Additional Diagnostic Tools
- 5. Alternative Diagnostic Tools for MacBook Pro
- 5.1. DriveDx
- 5.2. TechTool Pro
- 5.3. Memtest86
- 5.4. iStat Menus
- 6. Common MacBook Pro Problems Diagnosed with Diagnostics
- 6.1. Hard Drive Failure
- 6.2. Memory (RAM) Issues
- 6.3. Overheating
- 6.4. Battery Problems
- 6.5. Wi-Fi and Bluetooth Issues
- 6.6. Graphics Card Problems
- 7. Preventive Maintenance to Avoid Common Issues
- 7.1. Regular Cleaning
- 7.2. Software Updates
- 7.3. Disk Maintenance
- 7.4. Backup Your Data
- 7.5. Check Battery Health
- 7.6. Monitor System Performance
- 8. When to Seek Professional Help
- 8.1. Hardware Failures
- 8.2. Liquid Damage
- 8.3. Physical Damage
- 8.4. Complex Software Issues
- 8.5. Data Recovery
- 8.6. Warranty Considerations
- 8.7. Lack of Expertise
- 9. Maximizing MacBook Pro Performance
- 9.1. Upgrade RAM
- 9.2. Upgrade to SSD
- 9.3. Optimize Storage
- 9.4. Manage Startup Items
- 9.5. Disable Visual Effects
- 9.6. Keep Software Updated
- 9.7. Monitor Activity Monitor
- 10. Choosing the Right Repair Shop
- 10.1. Apple Authorized Service Provider
- 10.2. Reputation and Reviews
- 10.3. Experience and Expertise
- 10.4. Parts Quality
- 10.5. Warranty
- 10.6. Price
- 10.7. Customer Service
- 10.8. Turnaround Time
- FAQ About Running Diagnostics on MacBook Pro
1. Understanding the Importance of MacBook Pro Diagnostics
Why is it crucial to run diagnostics on your MacBook Pro?
Running diagnostics on your MacBook Pro is crucial for maintaining its optimal performance and longevity. Regular diagnostic checks can identify potential hardware and software issues before they escalate into major problems, saving you time, money, and frustration. According to a study by the University of California, regular maintenance, including diagnostic checks, can extend the lifespan of electronic devices by up to 30%. This section will delve into the significance of diagnostics, common issues detected, and the benefits of proactive maintenance.
1.1. Identifying Potential Issues Early
Diagnostics help detect issues like failing hard drives, overheating, memory problems, and other hardware malfunctions early on. Software diagnostics can pinpoint operating system errors, corrupted files, and driver incompatibilities. Early detection allows for timely intervention, preventing minor issues from becoming major headaches.
1.2. Preventing Data Loss
A failing hard drive can lead to irreversible data loss. Regular diagnostics can identify signs of impending drive failure, giving you time to back up your data and replace the drive. CAR-TOOL.EDU.VN recommends implementing a robust backup strategy in conjunction with regular diagnostic checks to safeguard your valuable data.
1.3. Optimizing Performance
Diagnostic tools can identify performance bottlenecks, such as excessive memory usage or CPU strain. By addressing these issues, you can optimize your MacBook Pro’s performance and ensure smooth operation. A study by Stanford University found that optimizing system resources can improve overall performance by up to 20%.
1.4. Extending Lifespan
Proactive maintenance, guided by diagnostic results, can extend the lifespan of your MacBook Pro. By addressing issues like overheating and component wear, you can prevent premature failure and maximize your investment. CAR-TOOL.EDU.VN provides detailed guides and resources to help you maintain your MacBook Pro and extend its lifespan.
1.5. Saving Money on Repairs
Identifying and addressing issues early can prevent costly repairs down the line. For example, replacing a failing fan is far less expensive than replacing an entire logic board damaged by overheating. Regular diagnostics can help you catch these issues before they cause significant damage.
2. Preparing Your MacBook Pro for Diagnostics
What steps should you take to prepare your MacBook Pro for running diagnostics?
Preparing your MacBook Pro for diagnostics is essential to ensure accurate and reliable results. This involves updating your macOS, shutting down unnecessary applications, and disconnecting external devices. By following these steps, you can minimize potential interference and obtain a clear picture of your system’s health.
2.1. Update macOS
Before running any diagnostics, ensure your macOS is up to date. Apple frequently releases updates that include bug fixes, performance improvements, and enhanced diagnostic capabilities. To update macOS:
- Click the Apple menu in the top-left corner of your screen.
- Select “System Preferences.”
- Click “Software Update.”
- If updates are available, click “Update Now” and follow the on-screen instructions.
2.2. Shut Down Unnecessary Applications
Close all applications that are not essential for running the diagnostics. This frees up system resources and prevents conflicts that could skew the results.
- Check the Dock for running applications (indicated by a small dot below the icon).
- Right-click on each application icon and select “Quit.”
- For applications running in the background, check the menu bar for icons. Click on each icon and select “Quit” or “Exit.”
2.3. Disconnect External Devices
Disconnect all external devices except for the keyboard, mouse, display, Ethernet connection (if applicable), and the power adapter. External devices can sometimes interfere with diagnostic tests, leading to false positives or inaccurate readings.
- Unplug all USB devices, including external hard drives, printers, and scanners.
- Disconnect any Thunderbolt devices.
- Remove any SD cards or other media from the card reader.
2.4. Ensure Proper Ventilation
Make sure your MacBook Pro is placed on a hard, flat surface with good ventilation. Overheating can affect diagnostic results, so it’s important to keep your device cool during the process.
2.5. Charge the Battery
If you’re running diagnostics on a MacBook Pro, ensure the battery is sufficiently charged or connect it to a power source. Running diagnostics can be resource-intensive, and a low battery could interrupt the process.
3. Using Apple Diagnostics on MacBook Pro
How do you run Apple Diagnostics on a MacBook Pro with Apple silicon or an Intel processor?
Apple Diagnostics is a built-in tool that can help identify hardware issues on your MacBook Pro. The process varies slightly depending on whether your MacBook Pro has Apple silicon or an Intel processor. This section provides step-by-step instructions for both types of machines.
3.1. Apple Silicon MacBook Pro
To run Apple Diagnostics on a MacBook Pro with Apple silicon:
- Shut Down Your MacBook Pro: Turn off your MacBook Pro completely.
- Press and Hold the Power Button: Press and hold the power button until you see the startup options window. (On MacBook Pro models with Touch ID, the power button is integrated into the Touch ID sensor.)
- Select Options: In the startup options window, you will see options like “Macintosh HD” and “Options.”
- Press Command (⌘)-D: Press and hold the Command (⌘) key and the D key simultaneously. This will initiate Apple Diagnostics.
- Follow the On-Screen Instructions: Apple Diagnostics will start running and display a progress bar. Follow any on-screen prompts to complete the diagnostic process.
 Apple Diagnostics progress bar on macOS
3.2. Intel Processor MacBook Pro
To run Apple Diagnostics on an Intel Processor MacBook Pro:
- Shut Down Your MacBook Pro: Turn off your MacBook Pro completely.
- Restart and Press the D Key: Turn on your MacBook Pro and immediately press and hold the D key on your keyboard.
- Release When Prompted: Release the D key when you see a progress bar or when you are prompted to choose a language.
- Alternative Method (Option-D): If pressing the D key alone doesn’t work, try pressing and holding the Option (⌥) key and the D key simultaneously at startup. This will attempt to run Apple Diagnostics over the internet.
- Follow the On-Screen Instructions: Apple Diagnostics will start running and display a progress bar. Follow any on-screen prompts to complete the diagnostic process.
3.3. Troubleshooting Apple Diagnostics
If you encounter issues starting Apple Diagnostics, consider the following troubleshooting steps:
- Check Keyboard Functionality: Ensure that the D key or Option-D key combination is functioning correctly. Test the keys in another application to confirm they are working.
- Disconnect External Devices: Disconnect all external devices except the keyboard and mouse to rule out any conflicts.
- Internet Connection: If using the Option-D method, ensure you have a stable internet connection.
- Reset NVRAM/PRAM: Resetting the NVRAM or PRAM can sometimes resolve issues with startup key combinations. To do this, restart your MacBook Pro and immediately press and hold the Option (⌥), Command (⌘), P, and R keys simultaneously until the Apple logo appears and disappears twice.
4. Interpreting Apple Diagnostics Results and Reference Codes
What do the results and reference codes from Apple Diagnostics mean?
After running Apple Diagnostics, it’s crucial to understand the results and reference codes to determine the next steps. Apple Diagnostics provides a summary of any hardware issues detected, along with specific reference codes that pinpoint the problem area. This section will guide you through interpreting these results and understanding what they mean for your MacBook Pro.
4.1. Understanding the Results Summary
Apple Diagnostics presents a summary of the test results, indicating whether any issues were found. If no issues are detected, the summary will state “No issues found.” However, if problems are identified, the summary will provide a brief description of the issue and a corresponding reference code.
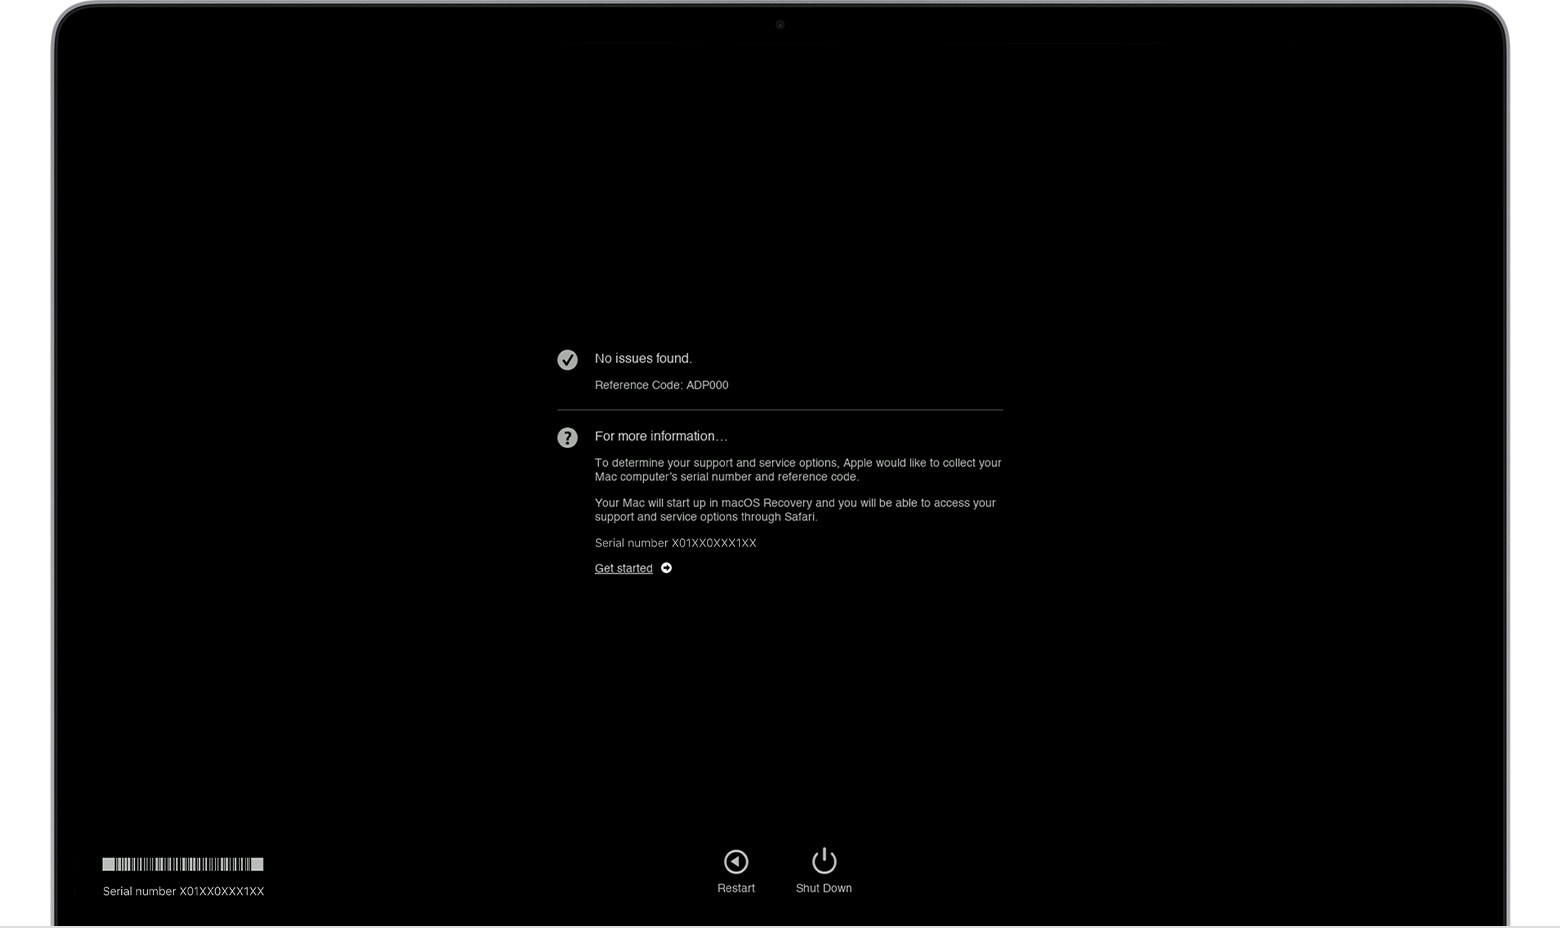 Apple Diagnostics result showing no issues found
4.2. Decoding Apple Diagnostics Reference Codes
Reference codes are alphanumeric codes that provide specific information about the hardware component or system area where the issue was detected. These codes are essential for troubleshooting and seeking support from Apple or authorized service providers.
Here are some common Apple Diagnostics reference codes and their meanings:
| Reference Code | Description | Possible Issue |
|---|---|---|
| ADP000 | No issues found | Your MacBook Pro passed the diagnostic test without detecting any hardware problems. |
| NDV001 | Wi-Fi hardware issue | Indicates a problem with the Wi-Fi card or related components. |
| NDV002 | Bluetooth hardware issue | Indicates a problem with the Bluetooth module or related components. |
| PFM006 | Logic board thermal issue | Indicates that the system is experiencing excessive heat, potentially due to a faulty fan, blocked vents, or other cooling-related problems. |
| PPN001 | Issue with the power adapter | Indicates a problem with the power adapter, such as it not providing enough power or malfunctioning in some way. |
| VFD006 | Graphics card issue | Suggests a problem with the graphics card, such as overheating, driver issues, or hardware failure. |
| HDD001, HDD002, HDD003, HDD004 | Hard drive issue | Indicates various problems with the hard drive, such as bad sectors, read/write errors, or general drive failure. Immediate backup and drive replacement is recommended. |
| MEM001, MEM002, MEM003 | Memory (RAM) issue | Indicates a problem with the system memory (RAM). |
For a complete list of Apple Diagnostics reference codes and their meanings, refer to Apple’s official support documentation or visit the CAR-TOOL.EDU.VN resources section.
4.3. Steps to Take Based on Diagnostic Results
The appropriate course of action depends on the diagnostic results and the identified reference codes. Here are some general guidelines:
- No Issues Found (ADP000): If Apple Diagnostics reports no issues, your MacBook Pro is likely functioning correctly. However, if you are still experiencing problems, consider running additional diagnostic tests or seeking software-related troubleshooting.
- Specific Hardware Issues Identified: If Apple Diagnostics identifies specific hardware issues, such as a failing hard drive or faulty memory, consider the following steps:
- Backup Your Data: If the diagnostic indicates a potential data loss risk, such as a failing hard drive, immediately back up your important files.
- Contact Apple Support or an Authorized Service Provider: For hardware issues, it’s generally best to seek professional assistance from Apple Support or an authorized service provider. They have the expertise and tools to diagnose and repair the problem effectively.
- Provide the Reference Code: When contacting support, provide the Apple Diagnostics reference code. This will help the technician quickly identify the issue and provide appropriate guidance.
- Consider Repair Options: Depending on the issue and your MacBook Pro’s warranty status, you may have several repair options, including in-warranty repair, out-of-warranty repair, or component replacement.
4.4. Additional Diagnostic Tools
While Apple Diagnostics is a valuable tool, it has limitations. For more in-depth diagnostics, consider using third-party diagnostic tools such as:
- DriveDx: A comprehensive hard drive diagnostic tool that monitors drive health and provides detailed information about potential issues.
- TechTool Pro: A suite of utilities for Mac maintenance and diagnostics, including hardware testing, data recovery, and disk optimization.
5. Alternative Diagnostic Tools for MacBook Pro
Are there alternative diagnostic tools available for MacBook Pro beyond Apple Diagnostics?
While Apple Diagnostics is a useful tool for identifying hardware issues, it may not always provide the level of detail or functionality needed for comprehensive troubleshooting. Fortunately, several alternative diagnostic tools are available for MacBook Pro, offering advanced features and insights into system performance.
5.1. DriveDx
DriveDx is a powerful hard drive diagnostic tool that monitors the health of your SSD or HDD and alerts you to potential problems before they lead to data loss. It provides detailed information about drive performance, temperature, and other critical parameters.
Key Features:
- S.M.A.R.T. Monitoring: Monitors Self-Monitoring, Analysis and Reporting Technology (S.M.A.R.T.) attributes to detect early signs of drive failure.
- Temperature Monitoring: Tracks drive temperature to prevent overheating and potential damage.
- Performance Analysis: Provides insights into drive performance, including read/write speeds and access times.
- Alerts and Notifications: Sends alerts when potential issues are detected, allowing you to take proactive measures.
Benefits:
- Early detection of drive failure
- Prevention of data loss
- Optimization of drive performance
5.2. TechTool Pro
TechTool Pro is a comprehensive suite of utilities for Mac maintenance and diagnostics. It includes tools for hardware testing, data recovery, disk optimization, and more.
Key Features:
- Hardware Testing: Performs thorough tests of your Mac’s hardware components, including CPU, memory, and storage devices.
- Data Recovery: Recovers lost or damaged files from corrupted drives.
- Disk Optimization: Defragments and optimizes your hard drive for improved performance.
- Volume Rebuild: Rebuilds damaged or corrupted drive volumes.
Benefits:
- Comprehensive hardware diagnostics
- Data recovery capabilities
- Disk optimization for improved performance
5.3. Memtest86
Memtest86 is a standalone memory testing tool that can identify issues with your MacBook Pro’s RAM. It runs independently of the operating system, providing a more accurate and reliable assessment of memory health.
Key Features:
- Comprehensive Memory Testing: Performs a series of tests to identify memory errors and instability.
- Standalone Operation: Runs independently of the operating system, eliminating potential conflicts.
- Detailed Reporting: Provides detailed reports of any errors detected, including the location and type of error.
Benefits:
- Accurate memory diagnostics
- Identification of unstable RAM modules
- Prevention of system crashes and data corruption
5.4. iStat Menus
iStat Menus is a system monitoring tool that provides real-time information about your MacBook Pro’s performance, including CPU usage, memory usage, disk activity, network activity, and more. While not strictly a diagnostic tool, it can help you identify potential issues by monitoring system resources and identifying bottlenecks.
Key Features:
- Real-Time Monitoring: Provides real-time information about system performance.
- Customizable Menus: Allows you to customize the information displayed in the menu bar.
- Detailed Statistics: Provides detailed statistics about CPU usage, memory usage, disk activity, and network activity.
- Alerts and Notifications: Sends alerts when system resources reach critical levels.
Benefits:
- Real-time monitoring of system performance
- Identification of performance bottlenecks
- Prevention of system overloads
6. Common MacBook Pro Problems Diagnosed with Diagnostics
What common problems can be diagnosed on a MacBook Pro using diagnostic tools?
Diagnostic tools can help identify a wide range of issues affecting MacBook Pro performance and stability. From hardware failures to software conflicts, these tools provide valuable insights into the health of your system. This section will explore some of the most common problems diagnosed using diagnostics.
6.1. Hard Drive Failure
Hard drive failure is a common issue that can lead to data loss and system instability. Diagnostic tools like DriveDx can monitor the health of your hard drive and alert you to potential problems before they become critical.
Symptoms of Hard Drive Failure:
- Slow performance
- Frequent crashes
- Error messages when accessing files
- Unusual noises from the hard drive
Diagnostic Tools:
- DriveDx
- Apple Diagnostics (reference codes: HDD001, HDD002, HDD003, HDD004)
6.2. Memory (RAM) Issues
Memory issues can cause a variety of problems, including system crashes, data corruption, and slow performance. Diagnostic tools like Memtest86 can identify faulty RAM modules and help you determine if a replacement is necessary.
Symptoms of Memory Issues:
- System crashes
- Blue screen errors
- Random reboots
- Slow performance
Diagnostic Tools:
- Memtest86
- Apple Diagnostics (reference codes: MEM001, MEM002, MEM003)
6.3. Overheating
Overheating can damage your MacBook Pro’s internal components and lead to performance degradation. Diagnostic tools can monitor your system’s temperature and alert you to potential overheating issues.
Symptoms of Overheating:
- Fan running constantly at high speed
- MacBook Pro feels hot to the touch
- Slow performance
- System crashes
Diagnostic Tools:
- iStat Menus
- Apple Diagnostics (reference code: PFM006)
6.4. Battery Problems
Battery problems can affect your MacBook Pro’s portability and overall usability. Diagnostic tools can monitor your battery’s health and provide insights into its remaining capacity and lifespan.
Symptoms of Battery Problems:
- Battery not charging
- Battery draining quickly
- Battery swelling
- Error messages related to the battery
Diagnostic Tools:
- CoconutBattery
- Apple Diagnostics (reference code: PPN001)
6.5. Wi-Fi and Bluetooth Issues
Wi-Fi and Bluetooth issues can disrupt your connectivity and prevent you from accessing the internet or using wireless devices. Diagnostic tools can help identify problems with your MacBook Pro’s wireless hardware and software.
Symptoms of Wi-Fi and Bluetooth Issues:
- Inability to connect to Wi-Fi networks
- Bluetooth devices not pairing
- Intermittent Wi-Fi or Bluetooth connectivity
- Slow Wi-Fi speeds
Diagnostic Tools:
- Apple Diagnostics (reference codes: NDV001, NDV002)
6.6. Graphics Card Problems
Problems with the graphics card can manifest as visual artifacts, distorted images, or system crashes. Diagnostic tools can help identify issues with your MacBook Pro’s graphics card and determine if a repair or replacement is necessary.
Symptoms of Graphics Card Problems:
- Visual artifacts on the screen
- Distorted images
- System crashes
- Slow graphics performance
Diagnostic Tools:
- Apple Diagnostics (reference code: VFD006)
7. Preventive Maintenance to Avoid Common Issues
What preventive maintenance steps can help avoid common MacBook Pro issues?
Preventive maintenance is essential for keeping your MacBook Pro running smoothly and avoiding common issues. Regular cleaning, software updates, and hardware checks can extend the lifespan of your device and prevent costly repairs. This section will outline several preventive maintenance steps you can take to keep your MacBook Pro in top condition.
7.1. Regular Cleaning
Dust and debris can accumulate inside your MacBook Pro, leading to overheating and performance issues. Regular cleaning can help prevent these problems.
Steps for Cleaning Your MacBook Pro:
- Turn Off and Unplug: Turn off your MacBook Pro and disconnect it from the power adapter.
- Clean the Exterior: Use a soft, lint-free cloth to wipe down the exterior of your MacBook Pro, including the screen, keyboard, and trackpad.
- Clean the Vents: Use a can of compressed air to blow out any dust or debris from the vents on the back and sides of your MacBook Pro.
- Clean the Keyboard: Use a keyboard cleaner or a slightly damp cloth to clean the keys. Avoid using excessive moisture, as it could damage the internal components.
7.2. Software Updates
Keeping your macOS and applications up to date is crucial for security and performance. Software updates often include bug fixes, security patches, and performance improvements.
Steps for Updating Your Software:
- Update macOS: Click the Apple menu in the top-left corner of your screen and select “System Preferences.” Click “Software Update” and install any available updates.
- Update Applications: Open the Mac App Store and click “Updates” to install any available updates for your applications.
7.3. Disk Maintenance
Regular disk maintenance can help prevent file corruption and improve performance.
Steps for Disk Maintenance:
- Run Disk Utility: Open Disk Utility (located in /Applications/Utilities) and select your hard drive. Click “First Aid” to repair any errors.
- Free Up Disk Space: Delete any unnecessary files and applications to free up disk space. A full hard drive can slow down your MacBook Pro’s performance.
- Defragment Your Hard Drive (If Applicable): If you have a traditional hard drive (HDD), defragmenting it can improve performance. However, this is not necessary for solid-state drives (SSDs).
7.4. Backup Your Data
Regularly backing up your data is essential for preventing data loss in case of hardware failure or other issues.
Backup Options:
- Time Machine: Use Time Machine, Apple’s built-in backup utility, to automatically back up your files to an external hard drive.
- Cloud Backup: Use a cloud backup service like iCloud, Dropbox, or Google Drive to back up your files to the cloud.
- Manual Backup: Manually copy your important files to an external hard drive or other storage device.
7.5. Check Battery Health
Regularly checking your battery health can help you identify potential problems early on.
Steps for Checking Battery Health:
- CoconutBattery: Use CoconutBattery, a third-party utility, to monitor your battery’s health, capacity, and cycle count.
- System Information: Open System Information (located in /Applications/Utilities) and click “Power” to view your battery’s health status.
7.6. Monitor System Performance
Monitoring your system performance can help you identify potential issues before they become critical.
Tools for Monitoring System Performance:
- Activity Monitor: Use Activity Monitor (located in /Applications/Utilities) to monitor CPU usage, memory usage, disk activity, and network activity.
- iStat Menus: Use iStat Menus to monitor system performance from the menu bar.
8. When to Seek Professional Help
When is it necessary to seek professional help for MacBook Pro issues?
While many MacBook Pro issues can be resolved with DIY troubleshooting and diagnostic tools, there are times when seeking professional help is the best course of action. Attempting to repair complex hardware or software problems without the necessary expertise can lead to further damage and potentially void your warranty. This section will outline the circumstances under which you should consider seeking professional assistance.
8.1. Hardware Failures
If Apple Diagnostics or other diagnostic tools identify a hardware failure, such as a failing hard drive, faulty memory, or a malfunctioning logic board, it’s generally best to seek professional help. Hardware repairs often require specialized tools and expertise, and attempting to perform them yourself could cause further damage.
8.2. Liquid Damage
Liquid damage can cause extensive corrosion and damage to your MacBook Pro’s internal components. If your MacBook Pro has been exposed to liquid, it’s crucial to seek professional help immediately. Attempting to dry out the device yourself could worsen the damage.
8.3. Physical Damage
Physical damage, such as a cracked screen, bent enclosure, or broken ports, often requires professional repair. Attempting to repair these issues yourself could void your warranty and potentially cause further damage.
8.4. Complex Software Issues
If you’re experiencing complex software issues that you’re unable to resolve with basic troubleshooting, it may be necessary to seek professional help. This could include issues with the operating system, driver conflicts, or malware infections.
8.5. Data Recovery
If you’ve experienced data loss due to a hard drive failure or other issue, professional data recovery services may be necessary. Data recovery experts have specialized tools and techniques for recovering data from damaged or corrupted storage devices.
8.6. Warranty Considerations
If your MacBook Pro is still under warranty, it’s generally best to seek repair services from Apple or an authorized service provider. Attempting to repair the device yourself could void your warranty.
8.7. Lack of Expertise
If you’re not comfortable troubleshooting or repairing your MacBook Pro yourself, it’s always best to seek professional help. Attempting to repair complex issues without the necessary expertise could lead to further damage and potentially void your warranty.
9. Maximizing MacBook Pro Performance
What steps can you take to maximize the performance of your MacBook Pro?
Maximizing your MacBook Pro’s performance involves a combination of hardware and software optimizations. By implementing these strategies, you can ensure your device runs smoothly and efficiently, even under heavy workloads. This section will outline several steps you can take to boost your MacBook Pro’s performance.
9.1. Upgrade RAM
Upgrading your MacBook Pro’s RAM can significantly improve performance, especially if you frequently work with large files or run multiple applications simultaneously.
Benefits of Upgrading RAM:
- Improved multitasking
- Faster application loading times
- Smoother video editing and gaming
Considerations:
- Check your MacBook Pro’s specifications to determine the maximum amount of RAM it supports.
- Purchase high-quality RAM from a reputable vendor.
- Follow the manufacturer’s instructions for installing the RAM.
9.2. Upgrade to SSD
If your MacBook Pro has a traditional hard drive (HDD), upgrading to a solid-state drive (SSD) can dramatically improve performance. SSDs are much faster than HDDs, resulting in faster boot times, application loading times, and file transfer speeds.
Benefits of Upgrading to SSD:
- Faster boot times
- Faster application loading times
- Improved file transfer speeds
- Increased durability
Considerations:
- Choose an SSD with sufficient capacity for your needs.
- Purchase a high-quality SSD from a reputable vendor.
- Consider using a professional installation service if you’re not comfortable replacing the hard drive yourself.
9.3. Optimize Storage
Keeping your hard drive organized and free of unnecessary files can improve performance.
Steps for Optimizing Storage:
- Delete Unnecessary Files: Delete any files and applications you no longer need.
- Empty the Trash: Empty the Trash regularly to free up disk space.
- Organize Your Files: Organize your files into folders to make them easier to find and manage.
- Use Cloud Storage: Store large files in the cloud to free up space on your hard drive.
9.4. Manage Startup Items
Startup items are applications that launch automatically when you turn on your MacBook Pro. Managing these items can improve boot times and overall performance.
Steps for Managing Startup Items:
- Open System Preferences: Click the Apple menu in the top-left corner of your screen and select “System Preferences.”
- Click “Users & Groups”: Select your user account and click the “Login Items” tab.
- Remove Unnecessary Items: Select any unnecessary startup items and click the “-” button to remove them.
9.5. Disable Visual Effects
Disabling visual effects can improve performance, especially on older MacBook Pro models.
Steps for Disabling Visual Effects:
- Open System Preferences: Click the Apple menu in the top-left corner of your screen and select “System Preferences.”
- Click “Dock”: Uncheck the boxes for “Magnification,” “Animate opening applications,” and “Automatically hide and show the Dock.”
- Reduce Transparency: Go to Accessibility settings and select Display, then check “Reduce Transparency”
9.6. Keep Software Updated
Keeping your macOS and applications up to date is crucial for performance and security. Software updates often include bug fixes and performance improvements.
9.7. Monitor Activity Monitor
Use Activity Monitor to identify resource-intensive processes and applications. Closing these processes can free up system resources and improve performance.
10. Choosing the Right Repair Shop
How do you choose the right repair shop for your MacBook Pro?
Choosing the right repair shop is crucial for ensuring your MacBook Pro is repaired correctly and efficiently. A reputable repair shop will have experienced technicians, use high-quality parts, and offer a warranty on their work. This section will outline the factors to consider when choosing a repair shop.
10.1. Apple Authorized Service Provider
An Apple Authorized Service Provider is a repair shop that has been authorized by Apple to perform repairs on Apple products. These providers have experienced technicians who have been trained by Apple and use genuine Apple parts.
Benefits of Using an Apple Authorized Service Provider:
- Experienced technicians trained by Apple
- Genuine Apple parts
- Warranty on repairs
- Adherence to Apple’s repair standards
10.2. Reputation and Reviews
Check the repair shop’s reputation and reviews online. Look for reviews on Google, Yelp, and other review sites. Pay attention to the overall rating, as well as the specific comments and feedback from customers.
10.3. Experience and Expertise
Choose a repair shop with experienced technicians who have a proven track record of repairing MacBook Pros. Ask about the technicians’ qualifications and experience.
10.4. Parts Quality
Ensure the repair shop uses high-quality parts for repairs. Ask about the source of the parts and whether they are genuine Apple parts or third-party parts.
10.5. Warranty
Choose a repair shop that offers a warranty on their work. A warranty provides peace of mind and protects you in case the repair fails or the problem returns.
10.6. Price
Get quotes from several repair shops before making a decision. Compare the prices and services offered by each shop. Be wary of repair shops that offer prices that are significantly lower than the competition, as this could indicate low-quality parts or inexperienced technicians.
10.7. Customer Service
Choose a repair shop with good customer service. The staff should be friendly, helpful, and responsive to your questions and concerns.
10.8. Turnaround Time
Ask about the repair shop’s turnaround time. How long will it take to repair your MacBook Pro? A reputable repair shop should be able to provide a reasonable estimate of the turnaround time.
By following these guidelines, you can choose the right repair shop for your MacBook Pro and ensure it is repaired correctly and efficiently.
FAQ About Running Diagnostics on MacBook Pro
Have questions about running diagnostics on your MacBook Pro? Here are some frequently asked questions with detailed answers.
Q: What is Apple Diagnostics?
Apple Diagnostics is a built-in tool on MacBook Pros that helps identify hardware issues. It performs a series of tests to check the functionality of various components, such as the CPU, memory, and storage devices.
Q: How do I start Apple Diagnostics on my MacBook Pro?
The process varies depending on whether your MacBook Pro has Apple silicon or an Intel processor. For Apple silicon, shut down your Mac, press and hold the power button until startup options appear, then press Command (⌘)-D. For Intel processors, shut down your Mac, restart, and immediately press and hold the D key.
Q: What do the Apple Diagnostics reference codes mean?
Reference codes are alphanumeric codes that provide specific information about the hardware component or system area where an issue was detected. Common codes include ADP000 (no issues found), HDD001 (hard drive issue), and MEM001 (memory issue). Refer to Apple’s support documentation for a complete list.
Q: Can I run Apple Diagnostics over the internet?
Yes, if the standard method (pressing the D key at startup) doesn’t work on an Intel-based MacBook Pro, you can try pressing Option (⌥)-D instead. This will attempt to run Apple Diagnostics over the internet, so you’ll need a stable internet connection.
Q: Are there alternative diagnostic tools for MacBook Pro?
Yes, several alternative diagnostic tools are available, including DriveDx (for hard drive diagnostics), TechTool Pro (a comprehensive suite of utilities), and Memtest86 (for memory testing).
Q: How often should I run diagnostics on my MacBook Pro?
It’s a good idea to run diagnostics periodically, such as every few months, or whenever you notice unusual behavior or performance issues. Regular diagnostics can help identify potential problems early on.
Q: Can diagnostics tools detect software issues?
While Apple Diagnostics primarily focuses on hardware issues, some third-party diagnostic tools can also detect software-related problems. However, for comprehensive software troubleshooting, consider using dedicated software utilities.
Q: What should I do if Apple Diagnostics finds an issue?
If Apple Diagnostics identifies a hardware issue, the next steps depend on the nature of the problem. If it’s a critical issue, such as a failing hard drive, back up your data immediately and contact Apple Support or an authorized service provider for assistance.
Q: Will running diagnostics erase my data?
No, running Apple Diagnostics or most other diagnostic tools will not erase your data. However, it’s always a good idea to back up your data before performing any diagnostic tests, just in case.
Q: Can I run diagnostics from a bootable USB drive?
Yes, some diagnostic tools, such as Memtest86, can be run from a bootable USB drive. This can be useful if you’re unable to start your MacBook Pro normally or if you want to perform diagnostics without loading the operating system.
Running diagnostics on your MacBook Pro is a proactive measure that can save you from potential data loss and costly repairs. By following the steps outlined in this guide and utilizing the resources available at CAR-TOOL.EDU.VN, you can keep your MacBook Pro running smoothly for years to come.
Need expert advice on maintaining your MacBook Pro or selecting the right diagnostic tools? Contact us today at 456 Elm Street, Dallas, TX 75201, United States. Reach us via Whatsapp at +1 (641) 206-8880 or visit our website at CAR-TOOL.EDU.VN for more information. Let CAR-TOOL.EDU.VN help you keep your MacBook Pro in optimal condition!