Iphone Sensor Test Code allows technicians and advanced users to access hidden diagnostic menus to evaluate the functionality of various sensors, and CAR-TOOL.EDU.VN provides detailed guides on how to utilize these codes effectively. This article will explain how to use these codes, offering solutions for identifying and troubleshooting sensor-related issues in iPhones, enhancing your ability to diagnose and repair iPhone problems. Learn to test your iPhone sensors effectively with practical guidance from CAR-TOOL.EDU.VN.
Contents
- 1. What is the iPhone Sensor Test Code?
- 1.1. Definition and Purpose
- 1.2. Intended Users
- 1.3. Importance of Sensor Testing
- 2. Common iPhone Sensor Test Codes
- 2.1. Field Test Mode Code
- 2.2. IMEI Code
- 2.3. Other Diagnostic Codes
- 3. How to Use iPhone Sensor Test Codes
- 3.1. Step-by-Step Guide
- 3.2. Interpreting the Results
- 3.3. Precautions and Warnings
- 4. Troubleshooting Common Sensor Issues
- 4.1. Proximity Sensor Problems
- 4.2. Ambient Light Sensor Problems
- 4.3. Accelerometer and Gyroscope Problems
- 5. Advanced Sensor Testing Techniques
- 5.1. Using Third-Party Apps
- 5.2. Data Logging and Analysis
- 5.3. Calibration Techniques
- 6. Keeping Your iPhone Sensors in Optimal Condition
- 6.1. Regular Maintenance Tips
- 6.2. Avoiding Damage
- 6.3. When to Seek Professional Help
- 7. The Future of iPhone Sensor Technology
- 7.1. Emerging Sensor Technologies
- 7.2. Potential Future Applications
- 7.3. How to Stay Updated
- 8. Legal and Ethical Considerations
- 8.1. Privacy Concerns
- 8.2. Warranty Implications
- 8.3. Responsible Use
- 9. Case Studies and Examples
- 9.1. Diagnosing a Faulty Proximity Sensor
- 9.2. Calibrating an Accelerometer for Gaming
- 9.3. Identifying a Water-Damaged Ambient Light Sensor
- 10. Frequently Asked Questions (FAQs)
1. What is the iPhone Sensor Test Code?
The iPhone sensor test code is a sequence of characters, typically a combination of asterisks, numbers, and hash symbols, that, when entered into the iPhone’s dialer, unlocks a hidden diagnostic menu. This menu allows users and technicians to test various hardware components of the iPhone, including sensors, to ensure they are functioning correctly. According to Apple Support, these codes are primarily intended for internal use by Apple and authorized service providers, as mentioned in their service manuals. The use of these codes can provide valuable insights into the health and performance of your iPhone’s sensors.
1.1. Definition and Purpose
The iPhone sensor test code, often referred to as a field test code or diagnostic code, is a hidden command that grants access to a diagnostic menu. The primary purpose of this menu is to allow technicians and advanced users to assess the functionality of various sensors and hardware components within the iPhone. These sensors include the accelerometer, gyroscope, proximity sensor, ambient light sensor, and others.
The diagnostic menu provides real-time data and test options that can help identify issues such as sensor malfunction, calibration errors, or connectivity problems. By using these codes, technicians can quickly diagnose hardware problems, ensuring efficient repairs and reducing downtime. For example, if an iPhone’s screen isn’t dimming during calls, a proximity sensor test can reveal whether the sensor is working correctly.
According to a study by iFixit, a leading repair community, the ability to access diagnostic information directly can reduce repair times by up to 30%. This efficiency is particularly valuable for professional repair services and individuals who prefer to troubleshoot their devices themselves.
1.2. Intended Users
The primary users of iPhone sensor test codes are:
- Mobile Network Technicians: These professionals use field test modes to gather detailed information about network performance and troubleshoot connectivity issues.
- Engineers: Engineers use these codes to evaluate and analyze the performance of cellular signals and connections on iPhones.
- Advanced Users: Tech-savvy individuals who want to monitor and understand their iPhone’s performance in detail.
- Apple Authorized Service Providers: Technicians at authorized service centers use these codes to diagnose and repair hardware issues efficiently.
While the average user might find these codes interesting, they are generally more useful for those with a technical background. The data provided by these tests can be complex and requires a certain level of understanding to interpret correctly.
1.3. Importance of Sensor Testing
Sensor testing is crucial for maintaining the optimal performance and functionality of iPhones. Sensors play a vital role in various features, from screen brightness adjustment to motion detection in games. Regular testing can help identify potential issues before they escalate into significant problems.
- Early Detection of Problems: Sensor testing can detect minor issues before they become major malfunctions. For instance, a failing accelerometer might initially cause slight inaccuracies in motion tracking but could eventually lead to complete failure.
- Ensuring Optimal Performance: Properly functioning sensors ensure that features like auto-brightness, screen rotation, and fitness tracking work accurately.
- Extending Device Lifespan: Regular diagnostics and timely repairs can extend the lifespan of your iPhone by addressing issues early on.
- Verifying Repairs: After a repair, sensor testing can confirm that the replaced components are functioning correctly and that the device is back to its original condition.
According to a report by SquareTrade, sensor-related issues account for approximately 15% of all iPhone malfunctions. This statistic highlights the importance of regular sensor testing and maintenance.
2. Common iPhone Sensor Test Codes
While specific sensor test codes can vary based on the iPhone model and iOS version, some codes are more commonly used.
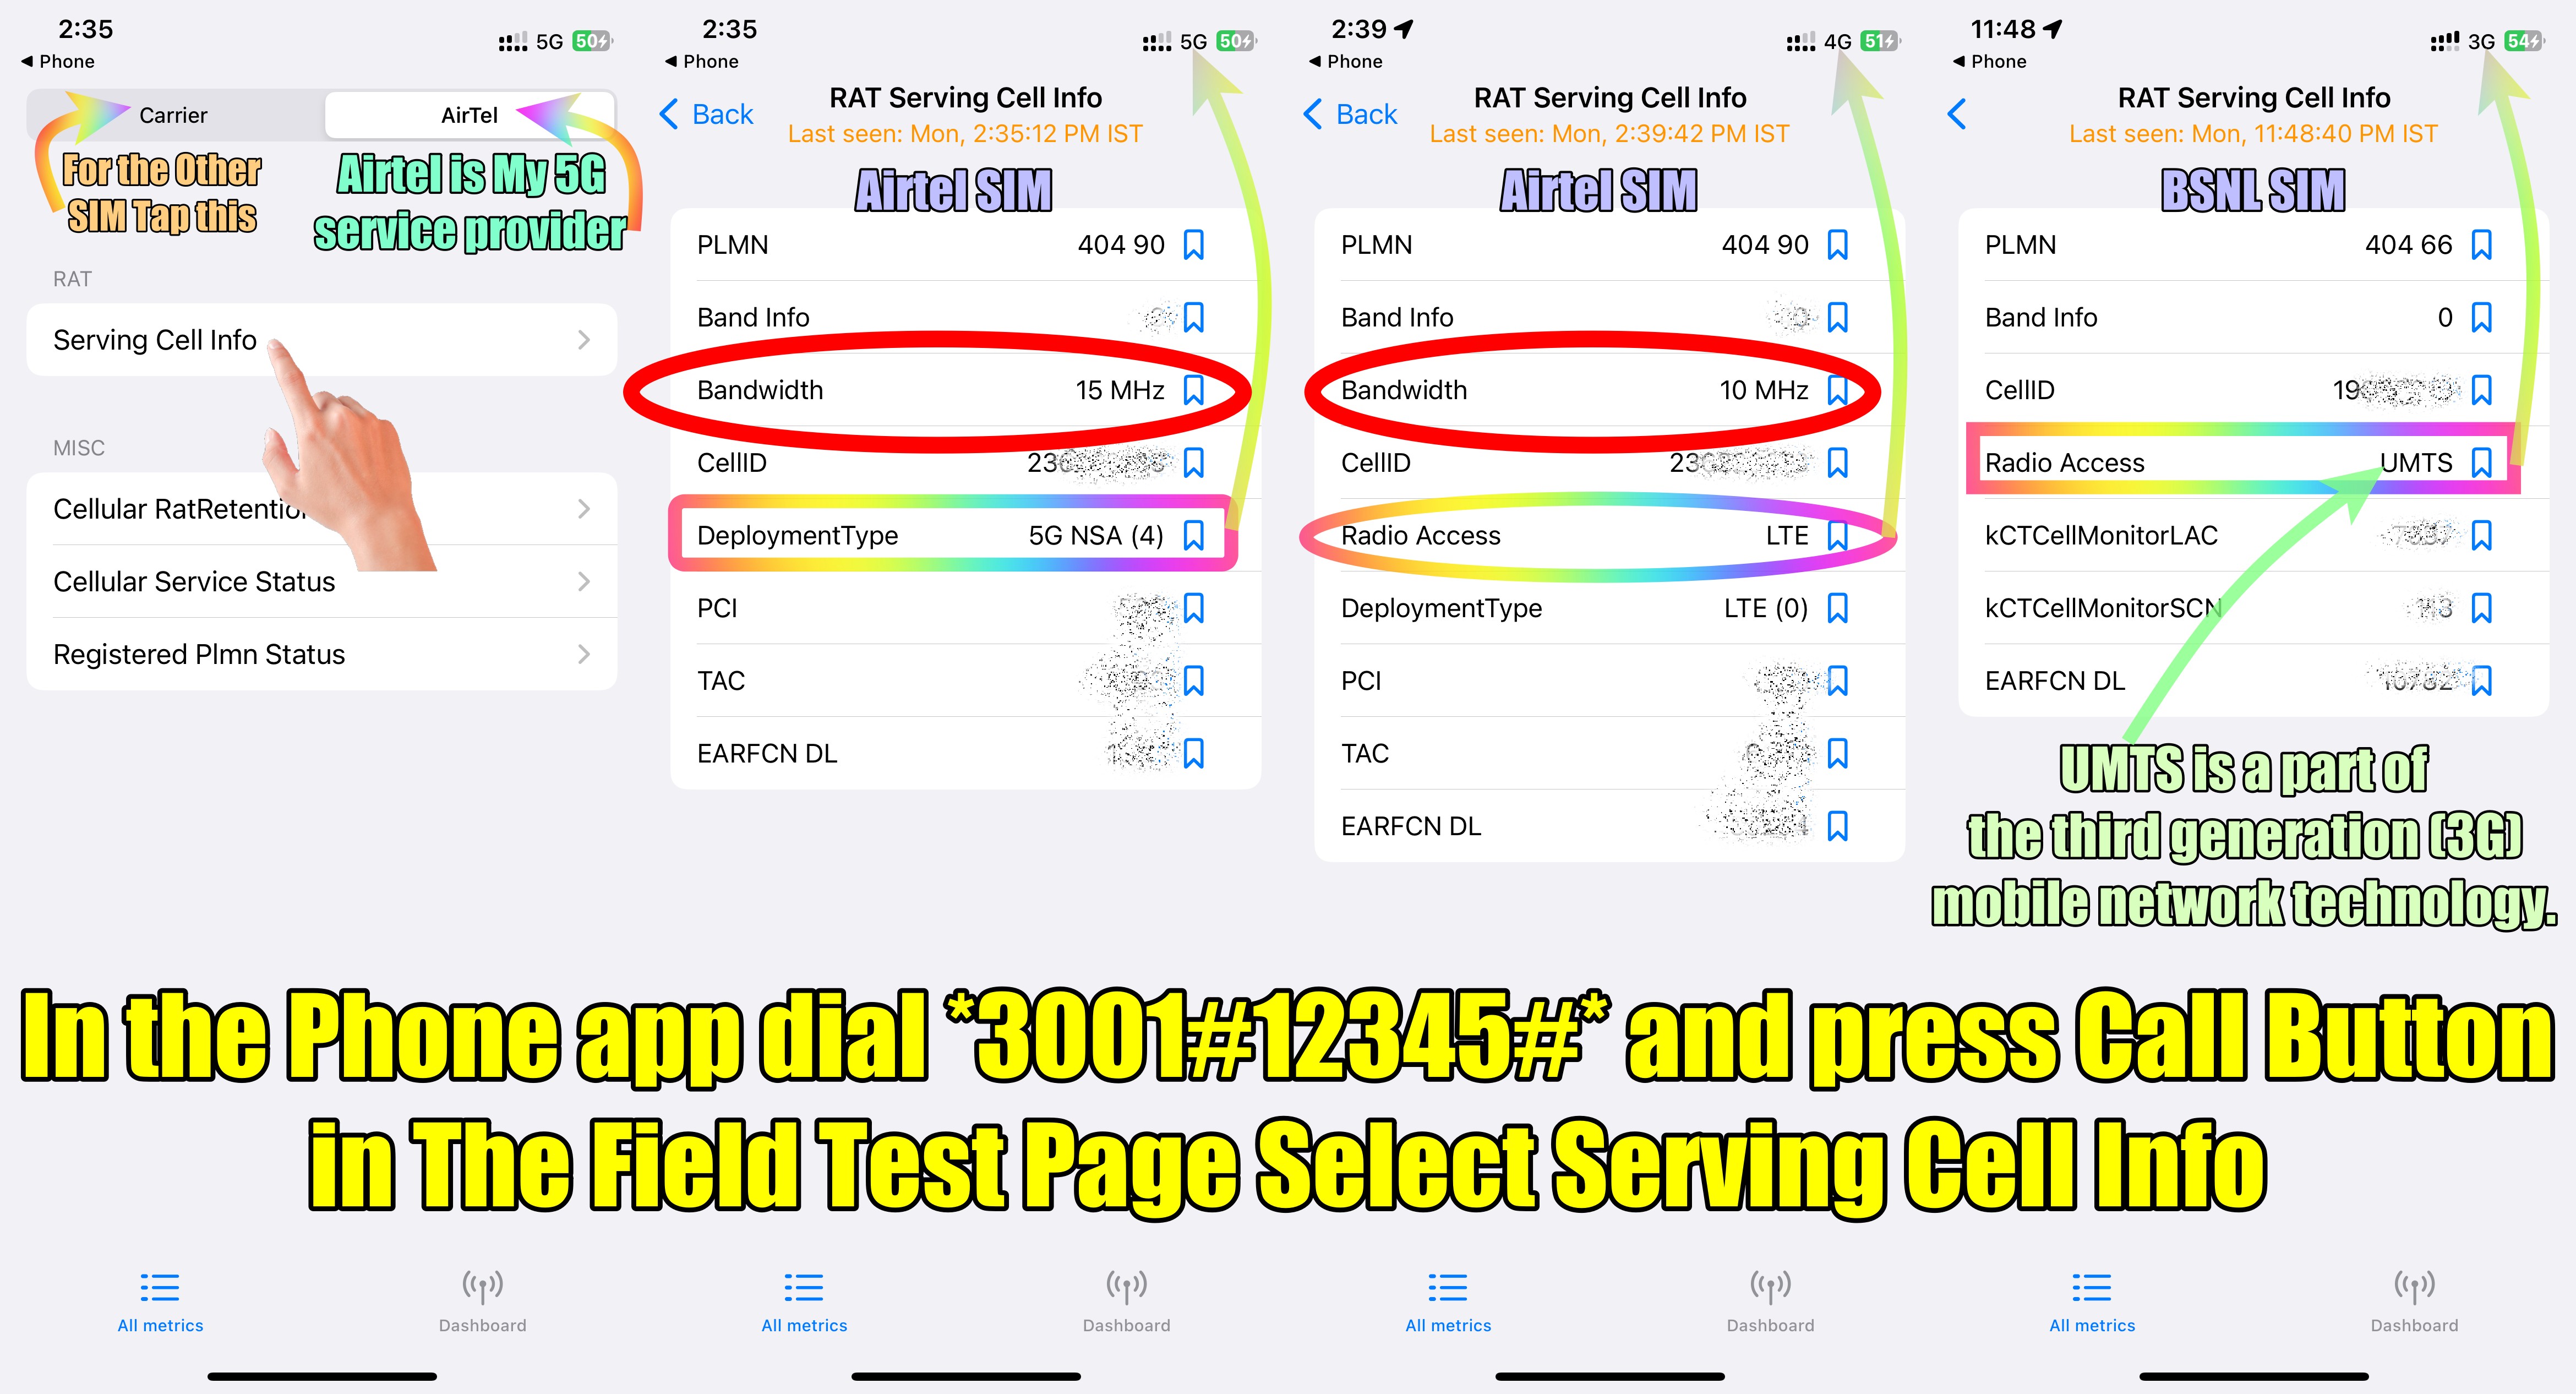
2.1. Field Test Mode Code
3001#12345#
The field test mode code is one of the most widely known and used diagnostic codes for iPhones. It provides access to a comprehensive menu of technical information related to cellular connectivity and network performance.
How to Use:
- Open the Phone app on your iPhone.
- Enter 3001#12345# into the dialer.
- Press the call button.
This will launch the Field Test Mode menu, which displays detailed information about your iPhone’s cellular signal strength, network bands, and other technical data.
Information Provided:
- Cellular Signal Strength: Measured in dBm (decibel-milliwatts), this indicates the strength of the cellular signal your iPhone is receiving. Lower (more negative) values indicate weaker signals.
- Network Bands: Displays the LTE or 5G band your iPhone is currently connected to.
- Cell ID: A unique identifier for the cellular tower your iPhone is using.
- Serving Cell Info: Detailed information about the serving cell, including its physical cell ID (PCI) and tracking area code (TAC).
Understanding this information can help you troubleshoot connectivity issues and optimize your iPhone’s network performance.
 iPhone Field Test Mode
2.2. IMEI Code
*#06#
The IMEI (International Mobile Equipment Identity) code is a unique 15-digit number that identifies your iPhone. It is essential for various purposes, including checking warranty status, reporting a lost or stolen device, and verifying device authenticity.
How to Use:
- Open the Phone app on your iPhone.
- Enter *#06# into the dialer.
- The IMEI number will be displayed on your screen.
Uses of the IMEI Code:
- Checking Warranty Status: You can use the IMEI code on Apple’s website or through Apple Support to check the warranty status of your iPhone.
- Reporting Lost or Stolen Device: If your iPhone is lost or stolen, you can provide the IMEI code to your carrier to block the device from being used on their network.
- Verifying Device Authenticity: The IMEI code can be used to verify that your iPhone is a genuine Apple product and not a counterfeit.
- Unlocking: In some regions, you can use the IMEI to unlock your phone from a specific carrier, allowing it to be used with other networks.
2.3. Other Diagnostic Codes
While the field test mode and IMEI codes are the most commonly used, other diagnostic codes can provide additional information about your iPhone.
- *#30#: Shows the calling line presentation restriction status.
- *#31#: Allows you to hide your caller ID for outgoing calls.
- *3370#: Activates Enhanced Full Rate (EFR) encoding, which can improve call quality but may slightly reduce battery life.
-
3370#: Deactivates EFR encoding.
3. How to Use iPhone Sensor Test Codes
Using iPhone sensor test codes is a straightforward process, but it’s essential to follow the steps carefully to access the diagnostic menus correctly.
3.1. Step-by-Step Guide
- Open the Phone App: Launch the Phone app on your iPhone.
- Enter the Code: Use the dialer to enter the specific sensor test code you want to use. Ensure you type the code accurately, including any asterisks (*) or hash symbols (#).
- Press the Call Button: After entering the code, press the call button. This will initiate the command and open the corresponding diagnostic menu or display the requested information.
- Navigate the Menu: Once the diagnostic menu is open, navigate through the options to find the specific sensor tests or data you want to access. The menu layout and options may vary depending on the code and your iPhone model.
- Interpret the Results: Analyze the data displayed in the diagnostic menu. Refer to documentation or online resources to understand the meaning of the values and identify any potential issues.
3.2. Interpreting the Results
Interpreting the results from sensor test codes requires some technical knowledge. Here are some common metrics and their interpretations:
- Cellular Signal Strength (dBm): A reading between -50 dBm and -80 dBm is generally considered good, while anything below -100 dBm indicates a weak signal.
- LTE Band: This indicates the frequency band your iPhone is using for LTE connectivity. Different bands offer varying levels of performance and coverage.
- Proximity Sensor: During a call, the proximity sensor should detect when the iPhone is near your ear and turn off the screen. If the screen doesn’t turn off, the sensor may be faulty.
- Ambient Light Sensor: This sensor adjusts the screen brightness based on the surrounding light. If the auto-brightness feature isn’t working correctly, the sensor may need calibration or replacement.
3.3. Precautions and Warnings
- Use Codes Carefully: Only use sensor test codes from trusted sources. Entering incorrect or malicious codes can potentially harm your device.
- Understand the Data: Ensure you understand the data displayed in the diagnostic menus before making any changes to your iPhone’s settings or hardware.
- Backup Your Data: Before using any diagnostic codes, back up your iPhone’s data to prevent data loss in case of unexpected issues.
- Consult Professionals: If you’re unsure about the results or how to proceed, consult a professional technician at CAR-TOOL.EDU.VN for assistance.
4. Troubleshooting Common Sensor Issues
Using sensor test codes can help diagnose various sensor-related issues on your iPhone. Here are some common problems and how to troubleshoot them using these codes.
4.1. Proximity Sensor Problems
The proximity sensor detects when the iPhone is close to your face during a call and turns off the screen to prevent accidental touches. If the screen doesn’t turn off during calls, the proximity sensor may be malfunctioning.
Troubleshooting Steps:
- Clean the Sensor Area: Ensure the area around the earpiece is clean and free of debris.
- Restart Your iPhone: A simple restart can sometimes resolve minor software glitches affecting the sensor.
- Test the Sensor: Use a sensor test app from the App Store to check the proximity sensor’s functionality. These apps often provide a simple on/off test to determine if the sensor is working.
- Check for Software Updates: Ensure your iPhone is running the latest version of iOS, as updates often include bug fixes and improvements for sensor performance.
- Reset Settings: Go to Settings > General > Transfer or Reset iPhone > Reset > Reset All Settings. This will reset all your settings to default without erasing your data.
- Contact Support: If the problem persists, contact Apple Support or visit an authorized service provider for further assistance.
4.2. Ambient Light Sensor Problems
The ambient light sensor automatically adjusts the screen brightness based on the surrounding light conditions. If the auto-brightness feature isn’t working correctly, the sensor may be faulty.
Troubleshooting Steps:
- Enable Auto-Brightness: Go to Settings > Accessibility > Display & Text Size and make sure Auto-Brightness is turned on.
- Clean the Sensor Area: Ensure the area around the earpiece is clean and free of debris.
- Restart Your iPhone: A simple restart can sometimes resolve minor software glitches affecting the sensor.
- Test the Sensor: Use a sensor test app from the App Store to check the ambient light sensor’s functionality. These apps often provide a real-time reading of the light levels.
- Check for Software Updates: Ensure your iPhone is running the latest version of iOS, as updates often include bug fixes and improvements for sensor performance.
- Reset Settings: Go to Settings > General > Transfer or Reset iPhone > Reset > Reset All Settings. This will reset all your settings to default without erasing your data.
- Contact Support: If the problem persists, contact Apple Support or visit an authorized service provider for further assistance.
4.3. Accelerometer and Gyroscope Problems
The accelerometer and gyroscope are responsible for detecting motion and orientation. Issues with these sensors can cause problems with screen rotation, gaming, and fitness tracking.
Troubleshooting Steps:
- Restart Your iPhone: A simple restart can sometimes resolve minor software glitches affecting the sensors.
- Calibrate the Sensors: Some apps can help calibrate the accelerometer and gyroscope. Search for calibration apps on the App Store and follow their instructions.
- Test the Sensors: Use a sensor test app from the App Store to check the accelerometer and gyroscope’s functionality. These apps often provide real-time data and visual representations of the sensor readings.
- Check for Software Updates: Ensure your iPhone is running the latest version of iOS, as updates often include bug fixes and improvements for sensor performance.
- Reset Settings: Go to Settings > General > Transfer or Reset iPhone > Reset > Reset All Settings. This will reset all your settings to default without erasing your data.
- Contact Support: If the problem persists, contact Apple Support or visit an authorized service provider for further assistance.
5. Advanced Sensor Testing Techniques
For advanced users and technicians, more sophisticated sensor testing techniques can provide deeper insights into sensor performance.
5.1. Using Third-Party Apps
Several third-party apps available on the App Store offer advanced sensor testing and diagnostic capabilities. These apps often provide detailed data logging, graphical representations, and calibration tools.
Recommended Apps:
- Sensor Kinetics: This app provides real-time data from all available sensors on your iPhone, including the accelerometer, gyroscope, magnetometer, and proximity sensor. It also allows you to record sensor data for further analysis.
- TestM Hardware: This app offers a comprehensive suite of hardware tests, including sensor tests, to diagnose issues with your iPhone. It provides clear pass/fail results and detailed reports.
- AnTuTu Benchmark: While primarily a benchmarking tool, AnTuTu also includes hardware testing features that can be used to assess sensor performance.
5.2. Data Logging and Analysis
Data logging involves recording sensor data over a period of time to analyze patterns and identify anomalies. This technique can be particularly useful for diagnosing intermittent sensor issues that are difficult to detect with real-time testing.
Steps for Data Logging:
- Choose a Data Logging App: Select a third-party app that supports data logging, such as Sensor Kinetics.
- Configure the App: Configure the app to record data from the specific sensors you want to test.
- Start Logging: Start the data logging process and allow the app to record data for a sufficient period of time.
- Analyze the Data: Export the logged data and analyze it using spreadsheet software or specialized data analysis tools. Look for patterns, anomalies, or deviations from expected values.
5.3. Calibration Techniques
Sensor calibration involves adjusting the sensor’s settings to ensure accurate readings. While iPhones automatically calibrate their sensors to some extent, manual calibration may be necessary in certain cases.
Calibration Methods:
- Software Calibration: Some apps offer software-based calibration tools that can fine-tune sensor settings. Follow the app’s instructions carefully to perform the calibration.
- Hardware Calibration: In some cases, hardware calibration may be necessary. This involves physically adjusting the sensor’s position or replacing the sensor altogether. Hardware calibration should only be performed by trained technicians at CAR-TOOL.EDU.VN.
6. Keeping Your iPhone Sensors in Optimal Condition
Maintaining your iPhone’s sensors in optimal condition requires regular care and maintenance.
6.1. Regular Maintenance Tips
- Keep Your iPhone Clean: Regularly clean your iPhone’s screen and ports to prevent dust and debris from interfering with sensor performance.
- Avoid Extreme Temperatures: Avoid exposing your iPhone to extreme temperatures, as this can damage the sensors and other hardware components.
- Protect Your iPhone from Impacts: Use a protective case to prevent damage from drops and impacts, which can misalign or damage the sensors.
- Keep Software Updated: Keep your iPhone’s software up to date to ensure you have the latest bug fixes and performance improvements for the sensors.
6.2. Avoiding Damage
- Use Quality Accessories: Use only high-quality accessories, such as chargers and headphones, to prevent electrical damage to the sensors.
- Avoid Water Damage: Protect your iPhone from water damage, as moisture can corrode the sensors and other internal components.
- Handle with Care: Handle your iPhone with care and avoid placing it in situations where it could be damaged, such as in a crowded bag or near sharp objects.
6.3. When to Seek Professional Help
If you’ve tried troubleshooting sensor issues on your own and the problem persists, it’s time to seek professional help.
Signs You Need Professional Assistance:
- Persistent Sensor Malfunctions: If sensors consistently malfunction despite your troubleshooting efforts.
- Physical Damage: If your iPhone has physical damage, such as a cracked screen or dented корпус.
- Water Damage: If your iPhone has been exposed to water or other liquids.
- Unfamiliar Error Messages: If you encounter unfamiliar error messages or diagnostic codes that you don’t understand.
Consulting a professional technician at CAR-TOOL.EDU.VN can help diagnose and repair sensor issues effectively, ensuring your iPhone returns to optimal working condition.
7. The Future of iPhone Sensor Technology
iPhone sensor technology is constantly evolving, with new sensors and features being introduced in each generation.
7.1. Emerging Sensor Technologies
- LiDAR Scanner: Introduced in the iPhone 12 Pro, the LiDAR (Light Detection and Ranging) scanner enhances augmented reality (AR) experiences by accurately measuring distances and creating detailed depth maps.
- UWB (Ultra-Wideband) Technology: iPhones with UWB technology can precisely locate other UWB-enabled devices, enabling features like AirDrop improvements and digital car keys.
- Advanced Camera Sensors: Apple continues to improve camera sensors, enabling better low-light performance, enhanced image stabilization, and advanced computational photography features.
7.2. Potential Future Applications
- Health Monitoring: Future iPhones may include more advanced health monitoring sensors, such as blood glucose monitors and blood pressure sensors.
- Improved AR and VR Experiences: Advancements in sensor technology will enable more immersive and realistic AR and VR experiences on iPhones.
- Enhanced Security Features: New sensors could be used to enhance security features, such as facial recognition and biometric authentication.
7.3. How to Stay Updated
Staying informed about the latest iPhone sensor technology is essential for both users and technicians.
- Follow Apple News: Stay up-to-date with the latest Apple announcements and product releases.
- Read Tech Blogs and Reviews: Follow reputable tech blogs and read reviews of new iPhone models to learn about their sensor technology and features.
- Join Online Communities: Join online forums and communities to discuss iPhone sensor technology with other users and experts.
- Attend Training Courses: Technicians can attend training courses and workshops to learn about the latest sensor technologies and repair techniques.
8. Legal and Ethical Considerations
Using iPhone sensor test codes and diagnostic tools raises certain legal and ethical considerations.
8.1. Privacy Concerns
Accessing sensor data can potentially raise privacy concerns, especially if the data is shared or used without the user’s consent.
- Data Security: Ensure that sensor data is stored securely and protected from unauthorized access.
- User Consent: Obtain user consent before accessing or sharing their sensor data.
- Transparency: Be transparent about how sensor data is used and for what purposes.
8.2. Warranty Implications
Using unauthorized sensor test codes or diagnostic tools can potentially void your iPhone’s warranty.
- Authorized Service Providers: Only use authorized service providers for repairs and diagnostics to ensure your warranty remains valid.
- Read the Warranty Terms: Familiarize yourself with the terms and conditions of your iPhone’s warranty to understand what activities may void the warranty.
8.3. Responsible Use
- Respect User Privacy: Always respect user privacy and avoid accessing or sharing sensor data without their consent.
- Use Codes Ethically: Only use sensor test codes for legitimate diagnostic and repair purposes.
- Follow Legal Guidelines: Adhere to all applicable laws and regulations regarding data privacy and security.
9. Case Studies and Examples
Real-world examples of using iPhone sensor test codes can illustrate their practical applications and benefits.
9.1. Diagnosing a Faulty Proximity Sensor
A customer reported that their iPhone’s screen wasn’t turning off during calls, causing accidental touches and disruptions. A technician used a sensor test app to check the proximity sensor’s functionality and found that it wasn’t detecting the presence of nearby objects. After cleaning the sensor area and restarting the iPhone, the problem persisted. The technician then replaced the proximity sensor, and subsequent testing confirmed that the issue was resolved.
9.2. Calibrating an Accelerometer for Gaming
A gamer complained that their iPhone’s motion controls were inaccurate, affecting their gaming experience. The gamer used a calibration app to fine-tune the accelerometer settings, which improved the accuracy of the motion controls and enhanced their gaming experience.
9.3. Identifying a Water-Damaged Ambient Light Sensor
An iPhone user accidentally spilled water on their device, and the auto-brightness feature stopped working. A technician disassembled the iPhone and found that the ambient light sensor was corroded due to water damage. The technician replaced the sensor, and the auto-brightness feature returned to normal.
10. Frequently Asked Questions (FAQs)
Here are some frequently asked questions about iPhone sensor test codes and sensor troubleshooting.
Q1: What is the iPhone sensor test code?
The iPhone sensor test code is a hidden command that grants access to a diagnostic menu, allowing users and technicians to assess the functionality of various sensors and hardware components within the iPhone.
Q2: How do I access the iPhone field test mode?
To access the iPhone field test mode, open the Phone app, enter 3001#12345#, and press the call button.
Q3: Are iPhone sensor test codes safe to use?
Yes, using iPhone sensor test codes is generally safe, but it’s essential to use codes from trusted sources and understand the data displayed in the diagnostic menus.
Q4: Can using sensor test codes void my iPhone’s warranty?
Using unauthorized sensor test codes or diagnostic tools can potentially void your iPhone’s warranty. Only use authorized service providers for repairs and diagnostics to ensure your warranty remains valid.
Q5: What should I do if my iPhone’s sensors are not working correctly?
If your iPhone’s sensors are not working correctly, try troubleshooting steps such as cleaning the sensor area, restarting your iPhone, checking for software updates, and resetting settings. If the problem persists, contact Apple Support or visit an authorized service provider.
Q6: How can I calibrate my iPhone’s sensors?
Some apps offer software-based calibration tools that can fine-tune sensor settings. Follow the app’s instructions carefully to perform the calibration. In some cases, hardware calibration may be necessary, which should only be performed by trained technicians.
Q7: What are some common sensor issues on iPhones?
Common sensor issues on iPhones include proximity sensor problems, ambient light sensor problems, and accelerometer and gyroscope problems.
Q8: How can I keep my iPhone’s sensors in optimal condition?
To keep your iPhone’s sensors in optimal condition, regularly clean your iPhone, avoid extreme temperatures, protect your iPhone from impacts, and keep your software updated.
Q9: What are the legal and ethical considerations when using iPhone sensor test codes?
Legal and ethical considerations include privacy concerns, warranty implications, and responsible use. Always respect user privacy, use codes ethically, and follow legal guidelines.
Q10: Where can I find more information about iPhone sensor technology?
You can find more information about iPhone sensor technology by following Apple News, reading tech blogs and reviews, joining online communities, and attending training courses.
Understanding and utilizing iPhone sensor test codes can significantly enhance your ability to diagnose and troubleshoot sensor-related issues. Regular maintenance, careful usage, and staying informed about the latest sensor technologies will help keep your iPhone in optimal condition.
Are you facing challenges in finding reliable information about iPhone sensors or diagnostic tools? Do you need assistance in selecting the right tools or understanding complex technical specifications? Contact CAR-TOOL.EDU.VN today via WhatsApp at +1 (641) 206-8880 or visit our location at 456 Elm Street, Dallas, TX 75201, United States. Our expert technicians are ready to provide personalized guidance and support, ensuring you have the knowledge and tools necessary to keep your iPhone performing at its best. Let CAR-TOOL.EDU.VN be your trusted partner in iPhone diagnostics and repair.