Hyundai Troubleshooting involves pinpointing and resolving issues in Hyundai vehicles, and CAR-TOOL.EDU.VN is here to guide you through the process with comprehensive information and solutions. By understanding common problems and effective diagnostic techniques, you can ensure your Hyundai runs smoothly and efficiently. Let’s explore how you can keep your vehicle in top condition and where you can get reliable auto repair tools and parts.
Contents
- 1. Understanding Hyundai Troubleshooting: A Comprehensive Guide
- 1.1. Why is Hyundai Troubleshooting Important?
- 1.2. Key Areas of Hyundai Troubleshooting
- 1.3. Tools and Equipment for Hyundai Troubleshooting
- 1.4. Resources for Hyundai Troubleshooting
- 2. What Are Common Hyundai Engine Problems and Solutions?
- 2.1. Misfires
- 2.2. Oil Leaks
- 2.3. Overheating
- 2.4. Knocking or Pinging
- 2.5. Loss of Power
- 3. What Are Common Hyundai Transmission Problems and Solutions?
- 3.1. Slipping Gears
- 3.2. Rough Shifting
- 3.3. Delayed Engagement
- 3.4. Unusual Noises
- 3.5. Transmission Fluid Leaks
- 4. What Are Common Hyundai Electrical Problems and Solutions?
- 4.1. Battery Problems
- 4.2. Alternator Problems
- 4.3. Starter Problems
- 4.4. Lighting Problems
- 4.5. Sensor Problems
- 5. What Are Common Hyundai Brake System Problems and Solutions?
- 5.1. Brake Pad Wear
- 5.2. Brake Rotor Problems
- 5.3. Brake Caliper Problems
- 5.4. Brake Line Problems
- 5.5. Brake Fluid Problems
- 6. What Are Common Hyundai Suspension and Steering Problems and Solutions?
- 6.1. Worn Shocks and Struts
- 6.2. Worn Ball Joints
- 6.3. Worn Tie Rod Ends
- 6.4. Power Steering Problems
- 6.5. Wheel Alignment Problems
- 7. What Are Common Hyundai HVAC Problems and Solutions?
- 7.1. Air Conditioning Not Working
- 7.2. Heater Not Working
- 7.3. Weak Airflow
- 7.4. Unusual Noises
- 7.5. Musty Odors
- 8. How to Use Diagnostic Codes for Hyundai Troubleshooting?
- 8.1. Retrieving Diagnostic Codes
- 8.2. Interpreting Diagnostic Codes
- 8.3. Diagnosing the Problem
- 8.4. Repairing the Problem
- 8.5. Common Hyundai Diagnostic Codes
- 9. Maintaining Your Hyundai for Optimal Performance
- 9.1. Regular Oil Changes
- 9.2. Fluid Checks and Top-Ups
- 9.3. Tire Maintenance
- 9.4. Brake Inspections
- 9.5. Filter Replacements
- 9.6. Battery Maintenance
- 9.7. Scheduled Maintenance
- 10. Where to Find Reliable Auto Repair Tools and Parts for Hyundai Troubleshooting?
- 10.1. Online Retailers
- 10.2. Auto Parts Stores
1. Understanding Hyundai Troubleshooting: A Comprehensive Guide
Hyundai troubleshooting refers to the process of identifying and resolving issues that may arise in Hyundai vehicles. This can range from simple maintenance tasks to diagnosing complex mechanical or electrical problems. The goal of troubleshooting is to pinpoint the root cause of the issue and implement the appropriate solution to restore the vehicle to its optimal operating condition. Effective troubleshooting can save time, money, and prevent further damage to the vehicle.
1.1. Why is Hyundai Troubleshooting Important?
Effective Hyundai troubleshooting is crucial for several reasons:
- Safety: Addressing mechanical and electrical issues promptly ensures the vehicle operates safely, reducing the risk of accidents.
- Performance: Identifying and fixing problems maintains the vehicle’s performance, ensuring it runs smoothly and efficiently.
- Longevity: Regular troubleshooting and maintenance can extend the lifespan of the vehicle by preventing minor issues from escalating into major repairs.
- Cost Savings: Early detection and resolution of problems can prevent costly repairs down the line, saving you money in the long run.
- Resale Value: A well-maintained vehicle with a history of regular troubleshooting and repairs retains a higher resale value.
1.2. Key Areas of Hyundai Troubleshooting
Hyundai troubleshooting covers a wide range of areas, including:
- Engine Performance: Addressing issues such as misfires, rough idling, and poor acceleration.
- Transmission Problems: Diagnosing and resolving issues with shifting, slipping, and unusual noises.
- Electrical Systems: Troubleshooting problems with the battery, alternator, starter, and wiring.
- Brake System: Identifying and fixing issues with brake pads, rotors, calipers, and brake lines.
- Suspension and Steering: Resolving problems with shocks, struts, steering components, and alignment.
- HVAC System: Troubleshooting issues with the air conditioning and heating systems.
- Diagnostic Codes: Interpreting and addressing diagnostic trouble codes (DTCs) generated by the vehicle’s onboard computer.
1.3. Tools and Equipment for Hyundai Troubleshooting
Having the right tools and equipment is essential for effective Hyundai troubleshooting. Here are some essential tools:
- Diagnostic Scanner: A diagnostic scanner is a crucial tool for reading and interpreting diagnostic trouble codes (DTCs) from the vehicle’s onboard computer.
- Multimeter: A multimeter is used to measure voltage, current, and resistance in electrical circuits.
- OBD-II Scanner: An OBD-II scanner is a tool used to retrieve diagnostic trouble codes (DTCs) from a vehicle’s computer system, helping to identify issues.
- Scan Tool: A scan tool is an electronic device used to communicate with a vehicle’s onboard computer, allowing technicians to diagnose and troubleshoot problems.
- Socket Set: A socket set is a collection of sockets of various sizes used to tighten or loosen nuts and bolts.
- Wrench Set: A wrench set includes wrenches of different sizes for various mechanical tasks.
- Pliers: Pliers are used for gripping, cutting, and bending wires and other components.
- Screwdrivers: Screwdrivers are essential for removing and installing screws.
- Torque Wrench: A torque wrench is used to tighten bolts and nuts to a specific torque setting.
- Compression Tester: A compression tester measures the compression in each cylinder to diagnose engine problems.
- Fuel Pressure Tester: A fuel pressure tester measures the fuel pressure in the fuel system to diagnose fuel-related issues.
- Brake Bleeder Kit: A brake bleeder kit is used to remove air from the brake lines during brake bleeding.
1.4. Resources for Hyundai Troubleshooting
There are numerous resources available to assist with Hyundai troubleshooting:
- Repair Manuals: Repair manuals provide detailed information on vehicle systems, diagnostic procedures, and repair instructions.
- Online Forums: Online forums and communities offer a platform for sharing information, asking questions, and getting advice from other Hyundai owners and technicians.
- Technical Service Bulletins (TSBs): TSBs are issued by Hyundai to address common problems and provide updated repair procedures.
- Diagnostic Databases: Diagnostic databases provide information on DTCs, symptoms, and possible causes for various vehicle problems.
- CAR-TOOL.EDU.VN: Websites like CAR-TOOL.EDU.VN offer comprehensive information on Hyundai troubleshooting, including guides, tips, and product recommendations.
2. What Are Common Hyundai Engine Problems and Solutions?
Engine problems can significantly affect your Hyundai’s performance and reliability. Addressing these issues promptly is crucial to maintaining your vehicle’s health. Here are some common engine problems and their solutions:
2.1. Misfires
- Problem: Misfires occur when one or more cylinders in the engine fail to ignite the air-fuel mixture properly.
- Symptoms: Rough idling, poor acceleration, engine hesitation, and a noticeable decrease in fuel economy.
- Causes: Faulty spark plugs, ignition coils, fuel injectors, vacuum leaks, or low compression.
- Solutions:
- Replace Spark Plugs: Inspect and replace worn or damaged spark plugs.
- Check Ignition Coils: Test the ignition coils and replace any that are not functioning correctly.
- Inspect Fuel Injectors: Clean or replace clogged or malfunctioning fuel injectors.
- Check for Vacuum Leaks: Inspect vacuum lines and intake manifold gaskets for leaks and repair or replace as needed.
- Perform Compression Test: Perform a compression test to check for low compression in any cylinders, which may indicate valve or piston ring problems.
2.2. Oil Leaks
- Problem: Oil leaks can occur from various locations in the engine, leading to low oil levels and potential engine damage.
- Symptoms: Visible oil leaks under the vehicle, burning oil smell, low oil levels, and engine overheating.
- Causes: Worn valve cover gaskets, oil pan gaskets, crankshaft seals, or camshaft seals.
- Solutions:
- Replace Valve Cover Gaskets: Replace worn or damaged valve cover gaskets to prevent oil leaks from the top of the engine.
- Replace Oil Pan Gasket: Replace the oil pan gasket to prevent oil leaks from the bottom of the engine.
- Check Crankshaft and Camshaft Seals: Inspect the crankshaft and camshaft seals for leaks and replace if necessary.
- Use Oil Leak Detection Dye: Add oil leak detection dye to the engine oil and use a UV light to identify the source of the leak.
2.3. Overheating
- Problem: Overheating can cause severe engine damage, including cracked cylinder heads and blown head gaskets.
- Symptoms: High temperature gauge reading, steam coming from the engine bay, coolant leaks, and engine knocking.
- Causes: Low coolant levels, faulty thermostat, radiator problems, water pump failure, or a blown head gasket.
- Solutions:
- Check Coolant Levels: Ensure the coolant level is adequate and top off as needed.
- Test Thermostat: Test the thermostat to ensure it is opening and closing properly and replace if necessary.
- Inspect Radiator: Check the radiator for leaks or blockages and repair or replace as needed.
- Check Water Pump: Inspect the water pump for leaks or bearing failure and replace if necessary.
- Test for Head Gasket Leak: Perform a block test to check for combustion gases in the coolant, which indicates a head gasket leak.
2.4. Knocking or Pinging
- Problem: Knocking or pinging is a metallic noise that occurs when the air-fuel mixture in the cylinders ignites prematurely.
- Symptoms: Metallic knocking or pinging noise, especially under acceleration, and reduced engine performance.
- Causes: Low octane fuel, carbon buildup in the combustion chambers, overheating, or a faulty knock sensor.
- Solutions:
- Use High Octane Fuel: Use the recommended octane fuel for your Hyundai model.
- Clean Combustion Chambers: Use a fuel system cleaner to remove carbon deposits from the combustion chambers.
- Check Cooling System: Ensure the cooling system is functioning properly to prevent overheating.
- Replace Knock Sensor: Test and replace the knock sensor if it is faulty.
2.5. Loss of Power
- Problem: Loss of power can occur due to various engine-related issues, affecting the vehicle’s acceleration and overall performance.
- Symptoms: Reduced acceleration, difficulty climbing hills, and sluggish engine response.
- Causes: Clogged air filter, faulty mass airflow (MAF) sensor, restricted exhaust system, or a failing fuel pump.
- Solutions:
- Replace Air Filter: Replace the air filter to ensure proper airflow to the engine.
- Clean or Replace MAF Sensor: Clean or replace the MAF sensor to ensure accurate air-fuel mixture.
- Check Exhaust System: Inspect the exhaust system for restrictions, such as a clogged catalytic converter.
- Test Fuel Pump: Test the fuel pump to ensure it is delivering adequate fuel pressure and volume.
3. What Are Common Hyundai Transmission Problems and Solutions?
Transmission problems can lead to significant drivability issues and costly repairs. Identifying and addressing these problems early can save you time and money. Here are some common transmission problems and their solutions:
3.1. Slipping Gears
- Problem: Slipping gears occur when the transmission fails to maintain the selected gear, causing the engine to rev without a corresponding increase in speed.
- Symptoms: Engine revving without acceleration, difficulty maintaining speed, and the transmission shifting erratically.
- Causes: Low transmission fluid, worn clutch plates (in manual transmissions), or malfunctioning solenoids.
- Solutions:
- Check Transmission Fluid Level: Check the transmission fluid level and add fluid if necessary.
- Replace Transmission Fluid: Replace the transmission fluid to ensure it is clean and properly lubricated.
- Replace Clutch Plates: In manual transmissions, replace worn clutch plates to restore proper engagement.
- Check Solenoids: Test the transmission solenoids and replace any that are malfunctioning.
3.2. Rough Shifting
- Problem: Rough shifting refers to harsh or jerky shifts between gears.
- Symptoms: Hard or abrupt shifts, jerking motion during acceleration, and difficulty shifting smoothly.
- Causes: Low transmission fluid, worn synchronizers (in manual transmissions), or malfunctioning shift solenoids.
- Solutions:
- Check Transmission Fluid Level: Ensure the transmission fluid level is correct and add fluid if necessary.
- Replace Transmission Fluid: Replace the transmission fluid to ensure proper lubrication and smooth shifting.
- Replace Synchronizers: In manual transmissions, replace worn synchronizers to improve shift quality.
- Check Shift Solenoids: Test the shift solenoids and replace any that are not functioning properly.
3.3. Delayed Engagement
- Problem: Delayed engagement occurs when there is a noticeable delay between shifting into gear and the transmission engaging.
- Symptoms: Delay when shifting into drive or reverse, hesitation before the vehicle starts moving, and a clunking noise when the transmission engages.
- Causes: Low transmission fluid, worn valve body, or internal transmission damage.
- Solutions:
- Check Transmission Fluid Level: Verify the transmission fluid level and add fluid if needed.
- Replace Transmission Fluid and Filter: Replace the transmission fluid and filter to ensure proper fluid flow and filtration.
- Rebuild Valve Body: Rebuild or replace the valve body to restore proper hydraulic control.
- Inspect Internal Transmission Components: Inspect the internal transmission components for damage and repair or replace as necessary.
3.4. Unusual Noises
- Problem: Unusual noises coming from the transmission can indicate various internal problems.
- Symptoms: Whining, buzzing, or clunking noises from the transmission area, especially during shifting or acceleration.
- Causes: Worn bearings, damaged gears, or low transmission fluid.
- Solutions:
- Check Transmission Fluid Level: Check the transmission fluid level and add fluid if necessary.
- Inspect Transmission Bearings: Inspect the transmission bearings for wear or damage and replace if needed.
- Inspect Transmission Gears: Inspect the transmission gears for damage, such as chipped or broken teeth, and replace if necessary.
- Rebuild or Replace Transmission: If internal damage is extensive, consider rebuilding or replacing the transmission.
3.5. Transmission Fluid Leaks
- Problem: Transmission fluid leaks can lead to low fluid levels and potential transmission damage.
- Symptoms: Visible leaks under the vehicle, red or brown fluid on the ground, and a burning smell.
- Causes: Worn seals, damaged gaskets, or cracked transmission housing.
- Solutions:
- Replace Seals and Gaskets: Replace worn seals and gaskets to prevent fluid leaks.
- Repair Cracked Transmission Housing: Repair or replace a cracked transmission housing to prevent fluid leaks.
- Check Transmission Cooler Lines: Inspect the transmission cooler lines for leaks and repair or replace as needed.
4. What Are Common Hyundai Electrical Problems and Solutions?
Electrical problems can be frustrating and affect various systems in your Hyundai. Addressing these issues promptly is essential for maintaining your vehicle’s reliability and safety. Here are some common electrical problems and their solutions:
4.1. Battery Problems
- Problem: Battery problems can range from a dead battery to issues with charging and maintaining a charge.
- Symptoms: Difficulty starting the vehicle, dim headlights, and a clicking noise when trying to start the engine.
- Causes: Old battery, corroded terminals, parasitic drain, or a faulty alternator.
- Solutions:
- Test Battery: Use a multimeter or battery tester to check the battery’s voltage and condition.
- Clean Battery Terminals: Clean corroded battery terminals with a wire brush and baking soda solution.
- Check for Parasitic Drain: Use a multimeter to check for excessive parasitic drain, which can indicate a short circuit or a component that is drawing power when the vehicle is off.
- Test Alternator: Test the alternator to ensure it is charging the battery properly and replace if necessary.
- Replace Battery: If the battery is old or damaged, replace it with a new one.
4.2. Alternator Problems
- Problem: Alternator problems can prevent the battery from charging properly, leading to a dead battery and other electrical issues.
- Symptoms: Dim headlights, warning lights on the dashboard, a dead battery, and the engine stalling.
- Causes: Worn brushes, faulty voltage regulator, or damaged diodes.
- Solutions:
- Test Alternator Output: Use a multimeter to check the alternator’s voltage output to ensure it is within the specified range.
- Inspect Alternator Wiring: Inspect the wiring connections to the alternator for damage or corrosion.
- Replace Alternator: If the alternator is faulty, replace it with a new or rebuilt unit.
4.3. Starter Problems
- Problem: Starter problems can prevent the engine from cranking and starting.
- Symptoms: Clicking noise when trying to start the engine, the engine failing to crank, and a grinding noise during starting.
- Causes: Worn starter motor, faulty solenoid, or loose wiring connections.
- Solutions:
- Test Starter Motor: Use a multimeter to test the starter motor for voltage and ground.
- Inspect Starter Solenoid: Check the starter solenoid for proper operation and replace if necessary.
- Check Wiring Connections: Inspect the wiring connections to the starter for corrosion or loose connections.
- Replace Starter: If the starter is faulty, replace it with a new or rebuilt unit.
4.4. Lighting Problems
- Problem: Lighting problems can affect headlights, taillights, turn signals, and interior lights.
- Symptoms: Dim or non-functional lights, warning lights on the dashboard, and flickering lights.
- Causes: Burned-out bulbs, faulty wiring, or a bad switch.
- Solutions:
- Check Bulbs: Inspect the bulbs to ensure they are not burned out and replace as needed.
- Inspect Wiring: Check the wiring for damage, corrosion, or loose connections.
- Test Switches: Test the switches to ensure they are functioning properly and replace if necessary.
- Check Fuses: Check the fuses related to the lighting system and replace any that are blown.
4.5. Sensor Problems
- Problem: Sensor problems can affect various engine and vehicle systems, leading to performance issues and diagnostic trouble codes.
- Symptoms: Check engine light on, poor engine performance, and erratic sensor readings.
- Causes: Faulty sensors, damaged wiring, or corrosion.
- Solutions:
- Scan for Diagnostic Trouble Codes: Use a diagnostic scanner to retrieve diagnostic trouble codes (DTCs) related to the sensors.
- Test Sensors: Use a multimeter to test the sensors for proper voltage, resistance, and signal output.
- Inspect Wiring: Check the wiring to the sensors for damage, corrosion, or loose connections.
- Replace Sensors: Replace faulty sensors with new or reliable aftermarket sensors.
5. What Are Common Hyundai Brake System Problems and Solutions?
Brake system problems can compromise your safety and should be addressed immediately. Regular maintenance and timely repairs are essential for ensuring your brakes function correctly. Here are some common brake system problems and their solutions:
5.1. Brake Pad Wear
- Problem: Worn brake pads reduce braking performance and can damage the rotors.
- Symptoms: Squealing or grinding noises when braking, reduced stopping power, and a pulsating brake pedal.
- Causes: Normal wear and tear, aggressive driving habits, or contaminated brake pads.
- Solutions:
- Inspect Brake Pads: Regularly inspect the brake pads for wear and replace them when they are worn to the minimum thickness.
- Replace Brake Pads: Replace worn brake pads with new high-quality brake pads.
- Resurface or Replace Rotors: If the rotors are damaged or worn, resurface or replace them to ensure proper braking performance.
5.2. Brake Rotor Problems
- Problem: Brake rotor problems can cause vibrations, noise, and reduced braking performance.
- Symptoms: Vibrations or pulsations when braking, squealing or grinding noises, and uneven brake pad wear.
- Causes: Warped rotors, uneven wear, or corrosion.
- Solutions:
- Inspect Rotors: Regularly inspect the rotors for damage, wear, and corrosion.
- Resurface Rotors: Resurface the rotors if they are warped or have uneven wear.
- Replace Rotors: Replace the rotors if they are severely damaged or worn beyond the resurfacing limit.
5.3. Brake Caliper Problems
- Problem: Brake caliper problems can cause uneven brake pad wear, reduced braking performance, and brake drag.
- Symptoms: Uneven brake pad wear, pulling to one side when braking, and brake drag (the brakes remain partially applied).
- Causes: Seized caliper pistons, damaged seals, or corrosion.
- Solutions:
- Inspect Calipers: Inspect the calipers for damage, corrosion, and proper operation.
- Rebuild Calipers: Rebuild the calipers by replacing the seals and pistons.
- Replace Calipers: Replace the calipers if they are severely damaged or cannot be rebuilt.
5.4. Brake Line Problems
- Problem: Brake line problems can cause brake fluid leaks, reduced braking performance, and brake failure.
- Symptoms: Brake fluid leaks, spongy brake pedal, and reduced stopping power.
- Causes: Corrosion, damage from road debris, or worn brake lines.
- Solutions:
- Inspect Brake Lines: Regularly inspect the brake lines for corrosion, damage, and leaks.
- Replace Brake Lines: Replace corroded, damaged, or leaking brake lines with new ones.
- Bleed Brakes: Bleed the brakes after replacing brake lines to remove air from the system.
5.5. Brake Fluid Problems
- Problem: Brake fluid problems can reduce braking performance and damage the brake system components.
- Symptoms: Spongy brake pedal, reduced stopping power, and brake system warning lights.
- Causes: Contaminated brake fluid, low brake fluid level, or air in the brake lines.
- Solutions:
- Check Brake Fluid Level: Regularly check the brake fluid level and add fluid if necessary.
- Flush Brake Fluid: Flush the brake fluid to remove contaminants and moisture.
- Bleed Brakes: Bleed the brakes to remove air from the brake lines.
6. What Are Common Hyundai Suspension and Steering Problems and Solutions?
Suspension and steering problems can affect your vehicle’s handling, comfort, and safety. Addressing these issues promptly is crucial for maintaining a smooth and controlled ride. Here are some common suspension and steering problems and their solutions:
6.1. Worn Shocks and Struts
- Problem: Worn shocks and struts can cause a bouncy ride, poor handling, and increased braking distances.
- Symptoms: Bouncy ride, excessive body roll during turns, nose-diving during braking, and uneven tire wear.
- Causes: Normal wear and tear, rough road conditions, or overloaded vehicle.
- Solutions:
- Inspect Shocks and Struts: Regularly inspect the shocks and struts for leaks, damage, and wear.
- Replace Shocks and Struts: Replace worn shocks and struts with new high-quality replacements.
6.2. Worn Ball Joints
- Problem: Worn ball joints can cause loose steering, clunking noises, and uneven tire wear.
- Symptoms: Loose or wandering steering, clunking noises from the front suspension, and uneven tire wear.
- Causes: Normal wear and tear, rough road conditions, or lack of lubrication.
- Solutions:
- Inspect Ball Joints: Regularly inspect the ball joints for wear, looseness, and damage.
- Replace Ball Joints: Replace worn ball joints with new replacements.
6.3. Worn Tie Rod Ends
- Problem: Worn tie rod ends can cause loose steering, vibrations, and uneven tire wear.
- Symptoms: Loose or wandering steering, vibrations in the steering wheel, and uneven tire wear.
- Causes: Normal wear and tear, rough road conditions, or damage from impacts.
- Solutions:
- Inspect Tie Rod Ends: Regularly inspect the tie rod ends for wear, looseness, and damage.
- Replace Tie Rod Ends: Replace worn tie rod ends with new replacements.
- Perform Wheel Alignment: After replacing tie rod ends, perform a wheel alignment to ensure proper steering geometry.
6.4. Power Steering Problems
- Problem: Power steering problems can cause hard steering, noises, and leaks.
- Symptoms: Difficulty steering, especially at low speeds, whining or groaning noises from the power steering pump, and power steering fluid leaks.
- Causes: Low power steering fluid, worn power steering pump, or damaged power steering lines.
- Solutions:
- Check Power Steering Fluid Level: Check the power steering fluid level and add fluid if necessary.
- Inspect Power Steering Pump: Inspect the power steering pump for leaks, damage, and proper operation.
- Replace Power Steering Pump: Replace a worn or damaged power steering pump with a new or rebuilt unit.
- Check Power Steering Lines: Inspect the power steering lines for leaks, damage, or corrosion and replace if necessary.
6.5. Wheel Alignment Problems
- Problem: Wheel alignment problems can cause uneven tire wear, pulling to one side, and poor handling.
- Symptoms: Uneven tire wear, pulling to one side while driving, and a crooked steering wheel.
- Causes: Impact from potholes or curbs, worn suspension components, or improper wheel alignment.
- Solutions:
- Perform Wheel Alignment: Perform a wheel alignment to adjust the angles of the wheels to the manufacturer’s specifications.
- Inspect Suspension Components: Inspect the suspension components for wear or damage that may be affecting the wheel alignment.
7. What Are Common Hyundai HVAC Problems and Solutions?
HVAC (Heating, Ventilation, and Air Conditioning) problems can affect your comfort while driving. Addressing these issues promptly is essential for maintaining a comfortable driving environment. Here are some common HVAC problems and their solutions:
7.1. Air Conditioning Not Working
- Problem: The air conditioning system fails to produce cold air.
- Symptoms: Warm air blowing from the vents, no cooling effect, and the A/C compressor not engaging.
- Causes: Low refrigerant level, faulty A/C compressor, blocked condenser, or a bad blend door actuator.
- Solutions:
- Check Refrigerant Level: Check the refrigerant level and recharge the system if necessary.
- Inspect A/C Compressor: Inspect the A/C compressor for proper operation and replace if necessary.
- Check Condenser: Check the condenser for blockages and clean or replace if needed.
- Test Blend Door Actuator: Test the blend door actuator to ensure it is functioning properly.
7.2. Heater Not Working
- Problem: The heating system fails to produce warm air.
- Symptoms: Cold air blowing from the vents when the heater is on, no heating effect, and the engine overheating.
- Causes: Low coolant level, faulty thermostat, clogged heater core, or a bad blend door actuator.
- Solutions:
- Check Coolant Level: Check the coolant level and add coolant if necessary.
- Test Thermostat: Test the thermostat to ensure it is opening and closing properly and replace if needed.
- Flush Heater Core: Flush the heater core to remove any blockages.
- Test Blend Door Actuator: Test the blend door actuator to ensure it is functioning properly.
7.3. Weak Airflow
- Problem: The HVAC system produces weak airflow from the vents.
- Symptoms: Low airflow from the vents, even when the fan is on high, and difficulty heating or cooling the cabin.
- Causes: Clogged cabin air filter, blocked air ducts, or a faulty blower motor.
- Solutions:
- Replace Cabin Air Filter: Replace the cabin air filter to ensure proper airflow.
- Check Air Ducts: Check the air ducts for blockages and clean if necessary.
- Test Blower Motor: Test the blower motor to ensure it is functioning properly and replace if needed.
7.4. Unusual Noises
- Problem: The HVAC system produces unusual noises.
- Symptoms: Clicking, squealing, or grinding noises from the HVAC system.
- Causes: Worn blower motor, damaged fan blades, or a faulty blend door actuator.
- Solutions:
- Inspect Blower Motor: Inspect the blower motor for wear and damage and replace if needed.
- Check Fan Blades: Check the fan blades for damage and replace if necessary.
- Test Blend Door Actuator: Test the blend door actuator to ensure it is functioning properly.
7.5. Musty Odors
- Problem: The HVAC system produces musty odors.
- Symptoms: Unpleasant musty or moldy odors coming from the vents.
- Causes: Mold or bacteria growth in the evaporator core or air ducts.
- Solutions:
- Clean Evaporator Core: Clean the evaporator core with an HVAC cleaner to remove mold and bacteria.
- Disinfect Air Ducts: Disinfect the air ducts to kill mold and bacteria.
- Replace Cabin Air Filter: Replace the cabin air filter to prevent the spread of odors.
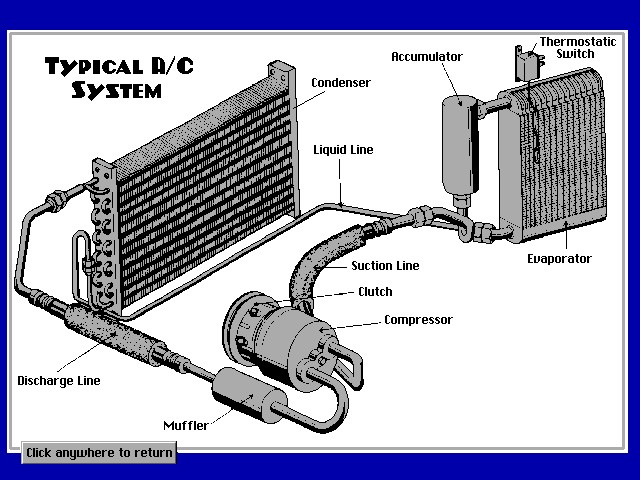 HVAC System
8. How to Use Diagnostic Codes for Hyundai Troubleshooting?
Diagnostic codes, also known as Diagnostic Trouble Codes (DTCs), are codes stored in a vehicle’s onboard computer that indicate a specific problem or malfunction. Understanding how to use these codes is essential for effective troubleshooting. Here’s how to use diagnostic codes for Hyundai troubleshooting:
8.1. Retrieving Diagnostic Codes
- Use a Scan Tool: Connect a scan tool or OBD-II scanner to the vehicle’s diagnostic port, typically located under the dashboard.
- Turn on the Ignition: Turn the ignition key to the “on” position without starting the engine.
- Read Codes: Follow the scan tool’s instructions to read the diagnostic codes stored in the vehicle’s computer.
- Record Codes: Write down all the retrieved codes, as they will be needed for further diagnosis.
8.2. Interpreting Diagnostic Codes
- Understand the Code Structure: Diagnostic codes usually consist of a letter followed by four digits. The letter indicates the system the code refers to:
- P: Powertrain (engine and transmission)
- B: Body (interior and exterior components)
- C: Chassis (brakes, suspension, and steering)
- U: Network (communication systems)
- Refer to a Code Database: Use a reliable code database or repair manual to look up the meaning of each code. Websites like CAR-TOOL.EDU.VN and reputable repair manuals provide detailed information on DTCs.
- Identify Possible Causes: The code description will provide a list of possible causes for the problem.
8.3. Diagnosing the Problem
- Prioritize Codes: Address the most critical codes first, especially those that affect safety or drivability.
- Verify the Problem: Before replacing any parts, verify that the problem actually exists. Check for obvious issues like loose connections, damaged wiring, or low fluid levels.
- Use Diagnostic Procedures: Follow the diagnostic procedures outlined in the repair manual or code database to pinpoint the exact cause of the problem. This may involve testing sensors, checking circuits, or inspecting components.
- Use Appropriate Tools: Use the appropriate tools, such as a multimeter, compression tester, or fuel pressure tester, to perform the necessary tests.
8.4. Repairing the Problem
- Replace Faulty Components: Once the problem has been identified, replace any faulty components with new or reliable aftermarket parts.
- Repair Wiring or Connections: Repair any damaged wiring or loose connections.
- Clear Diagnostic Codes: After completing the repairs, use the scan tool to clear the diagnostic codes from the vehicle’s computer.
- Test the Vehicle: Test the vehicle to ensure the problem has been resolved and that no new codes appear.
8.5. Common Hyundai Diagnostic Codes
Here are some common diagnostic codes for Hyundai vehicles:
- P0300: Random/Multiple Cylinder Misfire Detected
- P0171: System Too Lean (Bank 1)
- P0420: Catalyst System Efficiency Below Threshold (Bank 1)
- P0102: Mass Air Flow (MAF) Circuit Low Input
- P0113: Intake Air Temperature Circuit High Input
9. Maintaining Your Hyundai for Optimal Performance
Maintaining your Hyundai regularly can prevent many common problems and ensure optimal performance. Here are some essential maintenance tasks:
9.1. Regular Oil Changes
- Why It’s Important: Regular oil changes keep the engine lubricated, reduce friction, and remove contaminants.
- How Often: Follow the manufacturer’s recommended oil change interval, typically every 5,000 to 7,500 miles, or as indicated by the vehicle’s oil life monitoring system.
- What to Use: Use the recommended oil type and filter for your Hyundai model.
9.2. Fluid Checks and Top-Ups
- Why It’s Important: Checking and topping up fluids ensures that all systems are functioning properly.
- Fluids to Check: Engine oil, coolant, brake fluid, power steering fluid, transmission fluid, and windshield washer fluid.
- How Often: Check fluid levels at least once a month and top up as needed.
9.3. Tire Maintenance
- Why It’s Important: Proper tire maintenance ensures safe handling, even wear, and optimal fuel efficiency.
- Tasks: Check tire pressure, inspect tires for wear and damage, rotate tires every 6,000 to 8,000 miles, and balance wheels as needed.
- What to Use: Use a tire pressure gauge to check tire pressure and inflate tires to the recommended PSI.
9.4. Brake Inspections
- Why It’s Important: Regular brake inspections ensure safe braking performance.
- Tasks: Inspect brake pads, rotors, calipers, and brake lines for wear, damage, and leaks.
- How Often: Inspect brakes at least twice a year or as recommended by the manufacturer.
9.5. Filter Replacements
- Why It’s Important: Replacing filters ensures proper airflow and filtration.
- Filters to Replace: Air filter, cabin air filter, and fuel filter.
- How Often: Replace filters according to the manufacturer’s recommendations.
9.6. Battery Maintenance
- Why It’s Important: Proper battery maintenance ensures reliable starting and electrical system performance.
- Tasks: Clean battery terminals, check battery voltage, and test battery condition.
- How Often: Check the battery at least twice a year and replace it when it reaches the end of its lifespan.
9.7. Scheduled Maintenance
- Why It’s Important: Following the manufacturer’s scheduled maintenance ensures that all necessary services are performed at the correct intervals.
- Tasks: Follow the maintenance schedule outlined in the vehicle’s owner’s manual.
- How Often: Adhere to the recommended maintenance intervals.
10. Where to Find Reliable Auto Repair Tools and Parts for Hyundai Troubleshooting?
Finding reliable auto repair tools and parts is essential for effective Hyundai troubleshooting. Here are some trusted sources:
10.1. Online Retailers
- Amazon: Amazon offers a wide selection of auto repair tools, parts, and accessories from various brands.
- eBay: eBay is a good source for finding discounted or hard-to-find auto parts and tools.
- CAR-TOOL.EDU.VN: CAR-TOOL.EDU.VN specializes in providing high-quality auto repair tools and parts, with detailed product information and customer reviews to help you make informed decisions.
10.2. Auto Parts Stores
- AutoZone: AutoZone is a leading retailer of auto parts and accessories, offering a wide selection of products and helpful customer service.
- Advance Auto Parts: Advance Auto Parts offers a wide range of auto parts, tools, and accessories, as well