Are you wondering How To Use An Obd Scanner to diagnose car problems efficiently? An OBD scanner, also known as a car diagnostic tool, is a valuable asset for mechanics and car enthusiasts alike, helping to identify issues quickly and accurately. CAR-TOOL.EDU.VN provides detailed information on OBD scanners, their uses, and their benefits in automotive diagnostics, along with repair solutions. By understanding how to effectively utilize an OBD scanner, you can save time and money while ensuring your vehicle runs smoothly.
Contents
- 1. What is an OBD Scanner and Why Do You Need One?
- 1.1. Understanding the Basics of OBD Systems
- 1.2. Benefits of Using an OBD Scanner
- 1.3. Types of OBD Scanners Available
- 1.4. Choosing the Right OBD Scanner for Your Needs
- 2. Identifying the OBD-II Port in Your Vehicle
- 2.1. Common Locations for the OBD-II Port
- 2.2. How to Locate the Port if You Can’t Find It
- 2.3. Ensuring Proper Connection to the OBD-II Port
- 3. Step-by-Step Guide to Using an OBD Scanner
- 3.1. Preparing Your Vehicle for the Scan
- 3.2. Connecting the OBD Scanner to the Port
- 3.3. Powering On the Scanner and Navigating the Menu
- 3.4. Reading Diagnostic Trouble Codes (DTCs)
- 3.5. Understanding Freeze Frame Data
- 3.6. Clearing Diagnostic Trouble Codes (DTCs)
- 3.7. Using Live Data for Real-Time Monitoring
- 4. Interpreting Diagnostic Trouble Codes (DTCs)
- 4.1. Understanding the Code Structure
- 4.2. Common DTCs and Their Meanings
- 4.3. Resources for Looking Up DTCs
- 5. Advanced Features and Functions of OBD Scanners
- 5.1. Live Data Streaming and Analysis
- 5.2. Bidirectional Control and System Testing
- 5.3. Module Programming and Reprogramming
- 5.4. I/M Readiness Testing and Emissions Monitoring
- 6. Common Mistakes to Avoid When Using an OBD Scanner
- 6.1. Ignoring Freeze Frame Data
- 6.2. Clearing Codes Without Diagnosing the Problem
- 6.3. Misinterpreting DTCs
- 6.4. Neglecting Regular Scanner Updates
- 6.5. Over-Reliance on the Scanner
- 7. Tips for Maintaining Your OBD Scanner
- 7.1. Keeping the Scanner Clean and Dry
- 7.2. Storing the Scanner in a Safe Place
- 7.3. Updating the Scanner Software Regularly
- 7.4. Checking the Cables and Connectors for Damage
- 8. Troubleshooting Common OBD Scanner Issues
- 8.1. Scanner Won’t Power On
- 8.2. Scanner Can’t Read DTCs
- 8.3. Scanner Freezes or Crashes
- 9. The Future of OBD Scanning Technology
- 9.1. Advancements in Wireless Scanning Technology
- 9.2. Integration with Smartphone Apps
- 9.3. Enhanced Data Analysis and Reporting
- 9.4. Artificial Intelligence (AI) in Diagnostics
- 10. Conclusion: Maximizing the Benefits of Your OBD Scanner
- FAQ: Mastering Your OBD Scanner
- What is an OBD scanner, and why should I use one?
- Where is the OBD-II port located in my car?
- How do I connect an OBD scanner to my car?
- What does it mean when my OBD scanner displays a diagnostic trouble code (DTC)?
- Can I clear the diagnostic trouble codes (DTCs) with an OBD scanner?
- What is “freeze frame” data, and why is it important?
- What is “live data,” and how can I use it for diagnostics?
- How often should I update the software on my OBD scanner?
- Are there any common mistakes to avoid when using an OBD scanner?
- Where can I find more information about specific diagnostic trouble codes (DTCs)?
1. What is an OBD Scanner and Why Do You Need One?
An On-Board Diagnostics (OBD) scanner is an electronic tool used to interface with a vehicle’s computer system. It reads Diagnostic Trouble Codes (DTCs) and provides real-time data, aiding in the diagnosis and repair of automotive issues. Why is it essential? Because according to a study by the National Institute for Automotive Service Excellence (ASE), using diagnostic tools like OBD scanners can reduce diagnostic time by up to 40%, leading to quicker and more accurate repairs.
1.1. Understanding the Basics of OBD Systems
The OBD system monitors various vehicle systems, including the engine, transmission, emissions, and more. OBD-I was introduced in the early 1980s, but it wasn’t standardized, meaning each manufacturer had its own system. OBD-II, introduced in the mid-1990s, standardized the diagnostic process across all vehicles sold in the United States, making it easier to diagnose issues regardless of the car’s make or model.
1.2. Benefits of Using an OBD Scanner
- Early Problem Detection: Identifies potential issues before they become major problems.
- Cost Savings: Reduces the need for expensive diagnostic services at a repair shop.
- Informed Decision Making: Provides clear information about the car’s condition, allowing you to make informed decisions about repairs.
- Verification of Repairs: Confirms that repairs have been completed successfully by clearing codes and monitoring system performance.
1.3. Types of OBD Scanners Available
There are several types of OBD scanners, ranging from basic code readers to advanced diagnostic tools:
- Basic Code Readers: These scanners read and clear DTCs. They are simple to use and affordable, making them suitable for basic diagnostics.
- Enhanced OBD Scanners: These provide additional features such as live data streaming, freeze frame data, and I/M readiness testing.
- Professional-Grade Scanners: Designed for professional mechanics, these scanners offer advanced functions like bidirectional control, module programming, and access to manufacturer-specific codes.
- Smartphone-Based Scanners: These use a Bluetooth or Wi-Fi adapter that connects to the OBD-II port and pairs with a smartphone app. They offer portability and convenience, with many apps providing extensive diagnostic capabilities.
 OBD-II Scanner Port Location Under Dashboard
1.4. Choosing the Right OBD Scanner for Your Needs
Selecting the right OBD scanner depends on your needs and budget. A basic code reader might suffice for simple tasks like reading and clearing codes. However, if you’re a professional mechanic or require more advanced diagnostic capabilities, a professional-grade scanner is necessary. Consider the following factors:
- Compatibility: Ensure the scanner is compatible with your vehicle’s make and model.
- Features: Determine which features are essential for your diagnostic needs.
- Ease of Use: Opt for a scanner with an intuitive interface and clear instructions.
- Budget: Set a budget and explore options within your price range.
- Updates: Check if the scanner supports software updates to ensure it remains current with the latest vehicle models and diagnostic protocols.
2. Identifying the OBD-II Port in Your Vehicle
The OBD-II port is typically located under the dashboard on the driver’s side. However, its exact location may vary depending on the vehicle’s make and model.
2.1. Common Locations for the OBD-II Port
- Under the Dashboard: The most common location is under the dashboard, near the steering column.
- Near the Center Console: Some vehicles have the OBD-II port located near the center console, often hidden behind a small panel.
- Behind the Glove Compartment: In rare cases, the port might be behind the glove compartment.
2.2. How to Locate the Port if You Can’t Find It
If you’re having trouble finding the OBD-II port, consult your vehicle’s owner’s manual. The manual should provide a diagram or description of the port’s location. You can also search online forums or contact a local mechanic for assistance.
2.3. Ensuring Proper Connection to the OBD-II Port
To ensure a proper connection, follow these steps:
- Turn Off the Ignition: Make sure the vehicle’s ignition is turned off before connecting the scanner.
- Locate the Port: Find the OBD-II port, as described above.
- Align the Connector: Align the scanner’s connector with the OBD-II port.
- Insert the Connector: Firmly insert the connector into the port until it clicks into place.
- Turn On the Ignition: Turn the ignition to the “ON” position without starting the engine.
- Power On the Scanner: The scanner should power on automatically or may require you to press a power button.
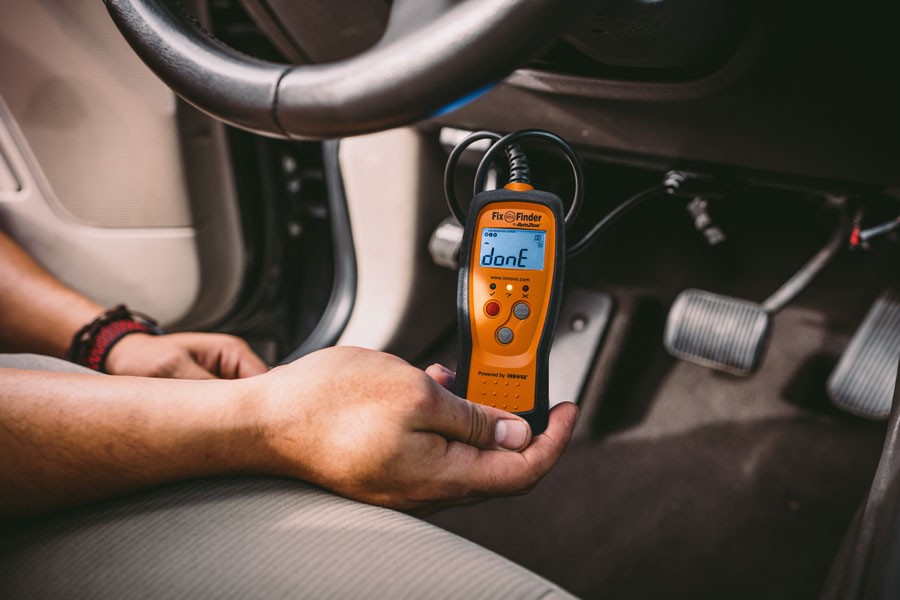
3. Step-by-Step Guide to Using an OBD Scanner
Using an OBD scanner is straightforward. Here’s a step-by-step guide to help you get started:
3.1. Preparing Your Vehicle for the Scan
Before connecting the OBD scanner, ensure your vehicle is in the correct state:
- Park the Vehicle: Park the vehicle in a safe location.
- Turn Off the Ignition: Ensure the ignition is turned off.
- Locate the OBD-II Port: Find the OBD-II port under the dashboard.
3.2. Connecting the OBD Scanner to the Port
- Align the Connector: Align the OBD scanner’s connector with the OBD-II port.
- Insert the Connector: Firmly insert the connector into the port until it clicks into place.
3.3. Powering On the Scanner and Navigating the Menu
- Turn On the Ignition: Turn the ignition to the “ON” position without starting the engine.
- Power On the Scanner: The scanner should power on automatically. If not, press the power button.
- Navigate the Menu: Use the scanner’s buttons to navigate the menu. Common options include “Read Codes,” “Erase Codes,” “Live Data,” and “Freeze Frame.”
3.4. Reading Diagnostic Trouble Codes (DTCs)
- Select “Read Codes”: Use the scanner’s buttons to select the “Read Codes” option.
- View the Codes: The scanner will display any stored DTCs. Note down the codes for further investigation.
- Understand the Codes: Each code corresponds to a specific issue. For example, P0300 indicates a random or multiple cylinder misfire.
3.5. Understanding Freeze Frame Data
Freeze frame data captures the vehicle’s operating conditions at the moment a DTC was set. This data can provide valuable insights into the cause of the problem. To access freeze frame data:
- Select “Freeze Frame”: Navigate to the “Freeze Frame” option in the scanner’s menu.
- View the Data: The scanner will display data such as engine RPM, vehicle speed, and engine load at the time the code was triggered.
3.6. Clearing Diagnostic Trouble Codes (DTCs)
Clearing DTCs should be done after you have diagnosed and repaired the underlying issue. Here’s how to do it:
- Select “Erase Codes”: Navigate to the “Erase Codes” option in the scanner’s menu.
- Confirm the Action: The scanner may ask you to confirm that you want to erase the codes.
- Wait for Confirmation: The scanner will display a message confirming that the codes have been cleared.
- Verify the Repair: After clearing the codes, drive the vehicle to see if the issue returns. If the code reappears, the problem has not been resolved.
3.7. Using Live Data for Real-Time Monitoring
Live data allows you to monitor various parameters in real-time, such as engine RPM, coolant temperature, and oxygen sensor readings. This can be helpful for diagnosing intermittent issues or monitoring system performance.
- Select “Live Data”: Navigate to the “Live Data” option in the scanner’s menu.
- Choose Parameters: Select the parameters you want to monitor.
- View the Data: The scanner will display the real-time values of the selected parameters.
4. Interpreting Diagnostic Trouble Codes (DTCs)
Interpreting DTCs is crucial for understanding the underlying issues affecting your vehicle.
4.1. Understanding the Code Structure
DTCs follow a standardized format:
- First Character: Indicates the system:
- P: Powertrain (engine, transmission)
- B: Body (airbags, interior)
- C: Chassis (brakes, suspension)
- U: Network (communication)
- Second Character: Indicates whether the code is generic or manufacturer-specific:
- 0: Generic (SAE) code
- 1: Manufacturer-specific code
- Third Character: Indicates the subsystem:
- 1: Fuel and air metering
- 2: Fuel and air metering (injector circuit)
- 3: Ignition system or misfire
- 4: Auxiliary emission controls
- 5: Vehicle speed control or idle system
- 6: Computer output system
- 7, 8, 9: Transmission
- Fourth and Fifth Characters: Specify the exact fault within the subsystem.
4.2. Common DTCs and Their Meanings
Here are some common DTCs and their meanings:
| Code | Description | Possible Causes |
|---|---|---|
| P0171 | System Too Lean (Bank 1) | Vacuum leak, faulty oxygen sensor, MAF sensor issue, fuel pump problem |
| P0300 | Random/Multiple Cylinder Misfire Detected | Faulty spark plugs, ignition coils, fuel injectors, vacuum leaks, low compression |
| P0420 | Catalyst System Efficiency Below Threshold (Bank 1) | Faulty catalytic converter, oxygen sensor issues, exhaust leaks |
| P0401 | Insufficient EGR Flow | Clogged EGR valve, faulty EGR solenoid, vacuum line issues |
| P0135 | O2 Sensor Heater Circuit Malfunction (Bank 1, Sensor 1) | Faulty oxygen sensor, wiring issues, blown fuse |
| P0505 | Idle Air Control System Malfunction | Faulty IAC valve, vacuum leaks, throttle body issues |
| P0113 | Intake Air Temperature Sensor Circuit High Input | Faulty IAT sensor, wiring issues |
| P0301 | Cylinder 1 Misfire Detected | Faulty spark plug, ignition coil, fuel injector, low compression in cylinder 1 |
| P0101 | Mass Air Flow Sensor Circuit Range/Performance Problem | Dirty or faulty MAF sensor, vacuum leaks, air intake restrictions |
| P0011 | “A” Camshaft Position Timing – Over-Advanced or System Performance (Bank 1) | Faulty camshaft position actuator, low oil level, incorrect oil viscosity, timing chain issue, variable valve timing (VVT) issues |
4.3. Resources for Looking Up DTCs
There are several resources for looking up DTCs and their meanings:
- Online Databases: Websites like OBD-Codes.com and AutoCodes.com offer extensive databases of DTCs.
- Repair Manuals: Repair manuals for your specific vehicle model provide detailed information about DTCs and their potential causes.
- OBD Scanner Apps: Many smartphone-based OBD scanner apps include DTC lookup features.
5. Advanced Features and Functions of OBD Scanners
Advanced OBD scanners offer a range of features beyond basic code reading, enhancing diagnostic capabilities.
5.1. Live Data Streaming and Analysis
Live data streaming allows you to monitor real-time sensor data, providing insights into how various components are performing. Analyzing this data can help identify issues that might not trigger a DTC.
- Monitoring Key Parameters: Monitor parameters such as engine RPM, coolant temperature, oxygen sensor readings, and fuel trim values.
- Identifying Out-of-Range Values: Look for values that are outside the normal operating range, indicating a potential problem.
- Graphing Data: Use the scanner’s graphing capabilities to visualize data trends and identify anomalies.
5.2. Bidirectional Control and System Testing
Bidirectional control allows you to send commands to the vehicle’s computer and control certain functions. This is useful for testing components and verifying repairs.
- Activating Solenoids and Relays: Test solenoids and relays to ensure they are functioning correctly.
- Performing Cylinder Balance Tests: Check the performance of individual cylinders by cutting off fuel injectors one at a time.
- Running EVAP System Tests: Test the evaporative emission control system for leaks.
5.3. Module Programming and Reprogramming
Some advanced scanners support module programming and reprogramming, allowing you to update or replace the software in various control modules.
- Flashing ECUs: Update the engine control unit (ECU) with the latest software.
- Programming New Modules: Program new control modules after replacement.
- Accessing OEM Databases: Access original equipment manufacturer (OEM) databases for software updates and programming information.
5.4. I/M Readiness Testing and Emissions Monitoring
I/M readiness testing checks whether the vehicle’s systems are ready for an emissions test. This feature can help you avoid failing an emissions test due to unresolved issues.
- Checking Readiness Monitors: Verify that all readiness monitors have completed and passed.
- Identifying Incomplete Monitors: Identify any incomplete monitors and address the underlying issues before taking the vehicle for an emissions test.
6. Common Mistakes to Avoid When Using an OBD Scanner
To ensure accurate and reliable diagnostic results, avoid these common mistakes:
6.1. Ignoring Freeze Frame Data
Freeze frame data provides valuable information about the conditions under which a DTC was set. Ignoring this data can lead to misdiagnosis.
6.2. Clearing Codes Without Diagnosing the Problem
Clearing codes without diagnosing and fixing the underlying issue will only temporarily hide the problem. The code will likely return, and the issue may worsen over time.
6.3. Misinterpreting DTCs
DTCs provide a starting point for diagnosis, but they don’t always pinpoint the exact cause of the problem. Misinterpreting DTCs can lead to unnecessary repairs.
6.4. Neglecting Regular Scanner Updates
OBD scanners require regular software updates to remain current with the latest vehicle models and diagnostic protocols. Neglecting these updates can lead to compatibility issues and inaccurate results.
6.5. Over-Reliance on the Scanner
While OBD scanners are valuable tools, they should not be the sole basis for diagnosis. Consider other factors, such as vehicle symptoms, visual inspections, and technical service bulletins (TSBs).
7. Tips for Maintaining Your OBD Scanner
Proper maintenance will ensure your OBD scanner remains in good working condition and provides accurate results.
7.1. Keeping the Scanner Clean and Dry
Keep the scanner clean and dry to prevent damage to the electronic components.
7.2. Storing the Scanner in a Safe Place
Store the scanner in a safe place when not in use to prevent physical damage.
7.3. Updating the Scanner Software Regularly
Update the scanner software regularly to ensure compatibility with the latest vehicle models and diagnostic protocols.
7.4. Checking the Cables and Connectors for Damage
Regularly check the cables and connectors for damage, such as frayed wires or bent pins. Replace any damaged components to ensure a reliable connection.
8. Troubleshooting Common OBD Scanner Issues
If you encounter issues while using your OBD scanner, try these troubleshooting tips:
8.1. Scanner Won’t Power On
- Check the Connection: Ensure the scanner is properly connected to the OBD-II port.
- Check the Vehicle’s Battery: Make sure the vehicle’s battery is charged and in good condition.
- Check the Scanner’s Power Supply: If the scanner has an external power supply, ensure it is working correctly.
8.2. Scanner Can’t Read DTCs
- Verify Compatibility: Ensure the scanner is compatible with your vehicle’s make and model.
- Check the Connection: Make sure the scanner is properly connected to the OBD-II port.
- Try a Different Scanner: If possible, try a different scanner to see if the issue is with the scanner itself.
8.3. Scanner Freezes or Crashes
- Update the Software: Ensure the scanner has the latest software updates.
- Reset the Scanner: Try resetting the scanner by turning it off and on again.
- Contact the Manufacturer: If the issue persists, contact the manufacturer for support.
9. The Future of OBD Scanning Technology
OBD scanning technology is continuously evolving, with new features and capabilities being introduced regularly.
9.1. Advancements in Wireless Scanning Technology
Wireless scanning technology, such as Bluetooth and Wi-Fi, is becoming increasingly common, offering greater flexibility and convenience.
9.2. Integration with Smartphone Apps
Integration with smartphone apps is expanding the capabilities of OBD scanners, providing access to cloud-based databases, advanced diagnostic features, and remote monitoring.
9.3. Enhanced Data Analysis and Reporting
Enhanced data analysis and reporting tools are making it easier to interpret diagnostic data and generate comprehensive reports.
9.4. Artificial Intelligence (AI) in Diagnostics
AI is being integrated into OBD scanners to provide more accurate and efficient diagnostics. AI-powered scanners can analyze data patterns, predict potential issues, and provide guided troubleshooting.
10. Conclusion: Maximizing the Benefits of Your OBD Scanner
Using an OBD scanner effectively can save you time and money while ensuring your vehicle runs smoothly. By understanding the basics of OBD systems, selecting the right scanner, interpreting DTCs, and avoiding common mistakes, you can maximize the benefits of this valuable tool. CAR-TOOL.EDU.VN is committed to providing you with the latest information and resources to help you master OBD scanning and automotive diagnostics.
Are you looking for reliable and detailed information about automotive parts and diagnostic tools? Visit CAR-TOOL.EDU.VN today to explore our extensive resources, compare products, and read user reviews. Our goal is to help you make informed decisions and find the perfect tools for your automotive needs.
Need personalized advice or have specific questions? Contact us today!
- Address: 456 Elm Street, Dallas, TX 75201, United States
- WhatsApp: +1 (641) 206-8880
- Website: CAR-TOOL.EDU.VN
Let CAR-TOOL.EDU.VN be your trusted partner in automotive diagnostics and repair!
FAQ: Mastering Your OBD Scanner
What is an OBD scanner, and why should I use one?
An OBD scanner, or On-Board Diagnostics scanner, is a tool that accesses your vehicle’s computer to read diagnostic trouble codes (DTCs). Using one can save money by allowing you to diagnose and potentially fix issues yourself, rather than relying solely on a mechanic. According to a 2022 report by AAA, the average car repair costs between $500 and $600, so identifying problems early can prevent costly repairs.
Where is the OBD-II port located in my car?
The OBD-II port is typically located under the dashboard on the driver’s side. It may be near the steering column or center console. If you’re unsure, consult your vehicle’s owner’s manual for a diagram or description of the port’s location.
How do I connect an OBD scanner to my car?
To connect an OBD scanner, first turn off the ignition. Locate the OBD-II port, align the scanner’s connector with the port, and firmly insert the connector until it clicks into place. Then, turn the ignition to the “ON” position without starting the engine, and power on the scanner.
What does it mean when my OBD scanner displays a diagnostic trouble code (DTC)?
A DTC indicates a specific issue with your vehicle. The code structure consists of a letter (P, B, C, or U) indicating the system (powertrain, body, chassis, or network), followed by four numbers that specify the exact fault within that system. For example, P0300 indicates a random or multiple cylinder misfire.
Can I clear the diagnostic trouble codes (DTCs) with an OBD scanner?
Yes, you can clear DTCs with an OBD scanner after you have diagnosed and repaired the underlying issue. To do so, navigate to the “Erase Codes” option in the scanner’s menu and confirm the action. However, be cautious: clearing codes without fixing the problem will only temporarily hide it, and the code will likely return.
What is “freeze frame” data, and why is it important?
Freeze frame data captures the vehicle’s operating conditions at the moment a DTC was set. This data can provide valuable insights into the cause of the problem, such as engine RPM, vehicle speed, and engine load. It helps mechanics pinpoint the exact circumstances leading to the fault.
What is “live data,” and how can I use it for diagnostics?
Live data allows you to monitor various parameters in real-time, such as engine RPM, coolant temperature, and oxygen sensor readings. This can be helpful for diagnosing intermittent issues or monitoring system performance. By observing these parameters, you can identify out-of-range values or anomalies that indicate a potential problem.
How often should I update the software on my OBD scanner?
You should update the software on your OBD scanner regularly to ensure compatibility with the latest vehicle models and diagnostic protocols. Manufacturers often release updates to address bugs, add new features, and support newer vehicles. Check the scanner’s manual or manufacturer’s website for update instructions.
Are there any common mistakes to avoid when using an OBD scanner?
Yes, common mistakes include ignoring freeze frame data, clearing codes without diagnosing the problem, misinterpreting DTCs, neglecting regular scanner updates, and over-relying on the scanner without considering other factors such as vehicle symptoms and visual inspections.
Where can I find more information about specific diagnostic trouble codes (DTCs)?
You can find more information about specific DTCs on websites like OBD-Codes.com and AutoCodes.com, in repair manuals for your specific vehicle model, or through smartphone-based OBD scanner apps that include DTC lookup features.