Running a diagnostic on your Mac is crucial for identifying potential hardware and software issues, and with CAR-TOOL.EDU.VN, you’ll gain insights into the tools and techniques needed to keep your system running smoothly. This guide explores how to use Apple Diagnostics and third-party tools to troubleshoot your Mac, ensuring optimal performance and longevity for automotive repair professionals, supported by expert advice and reliable solutions.
Contents
- 1. What is Apple Diagnostics and Why is it Important?
- 2. Preparing Your Mac for Diagnostics
- 3. Starting Apple Diagnostics on Apple Silicon Macs
- 4. Starting Apple Diagnostics on Intel Processor Macs
- 5. Navigating the Language Selection and Network Connection
- 6. Understanding the Apple Diagnostics Progress Bar
- 7. Interpreting Apple Diagnostics Results
- 8. Acting on Test Results: Repeating the Test, Restarting, or Shutting Down
- 9. Getting Service and Support Information
- 10. Decoding Apple Diagnostics Reference Codes
- 11. Common Apple Diagnostics Reference Codes and Their Meanings
- 12. When to Seek Professional Help
- 13. Third-Party Diagnostic Tools for Mac
- 14. TechTool Pro: Comprehensive Mac Diagnostic Utility
- 15. DriveDx: Monitoring Your Mac’s Storage Health
- 16. iStat Menus: Real-Time System Monitoring
- 17. Using Activity Monitor to Diagnose Performance Issues
- 18. Identifying CPU Intensive Processes
- 19. Managing Memory Usage on Your Mac
- 20. Troubleshooting Disk Performance Issues
- 21. Addressing Network Performance Problems
- 22. Using Console App for Advanced Troubleshooting
- 23. Understanding System Logs
- 24. Filtering Logs for Specific Issues
- 25. Interpreting Common Log Messages
- 26. Resetting NVRAM/PRAM
- 27. Booting into Safe Mode
- 28. Reinstalling macOS
- 29. The Importance of Regular Maintenance
- 30. Preventing Overheating
- 31. Managing Startup Items
- 32. Optimizing Storage
- 33. Staying Informed About Mac Issues and Solutions
- 34. The Role of CAR-TOOL.EDU.VN in Mac Diagnostics for Automotive Professionals
- 35. Benefits of Using CAR-TOOL.EDU.VN for Automotive Mac Diagnostics
- 36. How CAR-TOOL.EDU.VN Can Help You
- 37. Getting Expert Advice and Support from CAR-TOOL.EDU.VN
- 38. Frequently Asked Questions (FAQ) About Mac Diagnostics
- Call to Action
1. What is Apple Diagnostics and Why is it Important?
Apple Diagnostics is a built-in tool that helps identify hardware issues on your Mac. According to Apple Support, this diagnostic tool can detect problems related to the logic board, memory, and wireless components. Using Apple Diagnostics is crucial because it:
- Identifies potential hardware failures early.
- Reduces downtime by quickly pinpointing the source of issues.
- Provides reference codes for targeted troubleshooting.
Early detection of hardware problems can save time and money, making Apple Diagnostics a vital first step for any Mac user experiencing performance issues, as detailed by Apple’s official support pages.
2. Preparing Your Mac for Diagnostics
Before running any diagnostic tests, it’s essential to prepare your Mac to ensure accurate results. This preparation includes:
- Updating macOS: Install the latest updates to rule out software-related issues.
- Shutting Down: Completely power off your Mac.
- Disconnecting Peripherals: Remove all external devices except the keyboard, mouse, display, Ethernet (if applicable), and power connection.
- Ensuring Proper Ventilation: Place your Mac on a hard, flat surface with good ventilation to prevent overheating during the diagnostic process.
These steps minimize potential interference and ensure the diagnostic test focuses on the core hardware components of your Mac.
3. Starting Apple Diagnostics on Apple Silicon Macs
For Macs with Apple silicon (M1, M2, M3 chips), the process to start Apple Diagnostics is slightly different than Intel-based Macs. Here’s how to do it:
- Press and Hold Power Button: Press and hold the power button (or Touch ID button on laptops) until the startup options appear.
- Startup Options: When you see “Options,” release the power button.
- Command-D: Press and hold Command (⌘)-D on your keyboard to initiate the diagnostic test.
This method ensures that your Mac starts directly into the diagnostic mode, bypassing the regular startup process and allowing the system to perform a thorough check.
4. Starting Apple Diagnostics on Intel Processor Macs
If you have an Intel-based Mac, follow these steps to start Apple Diagnostics:
- Turn On and Hold D Key: Turn on your Mac and immediately press and hold the D key on your keyboard.
- Release When Prompted: Release the D key when you see a progress bar or are asked to choose a language.
If the D key method doesn’t work, try holding Option (⌥)-D at startup. This alternative method forces the Mac to start diagnostics over the internet if the built-in diagnostics are unavailable.
5. Navigating the Language Selection and Network Connection
After initiating Apple Diagnostics, you may be prompted to choose a language. Ensure you have an active network connection, which can be selected from the Wi-Fi menu in the upper-right corner of your screen. A stable network connection is required for some diagnostic tests that rely on online resources.
6. Understanding the Apple Diagnostics Progress Bar
Once the diagnostic test begins, a progress bar will appear on your screen, indicating that your Mac is being checked for hardware issues. This process may take several minutes, so it’s important to be patient and allow the test to complete without interruption.
 macOS Diagnostics running progress bar
7. Interpreting Apple Diagnostics Results
Upon completion of the diagnostic test, Apple Diagnostics will display the results. These results may include:
- No Issues Found: Indicates that no hardware problems were detected.
- Reference Codes: Specific codes that identify potential hardware issues.
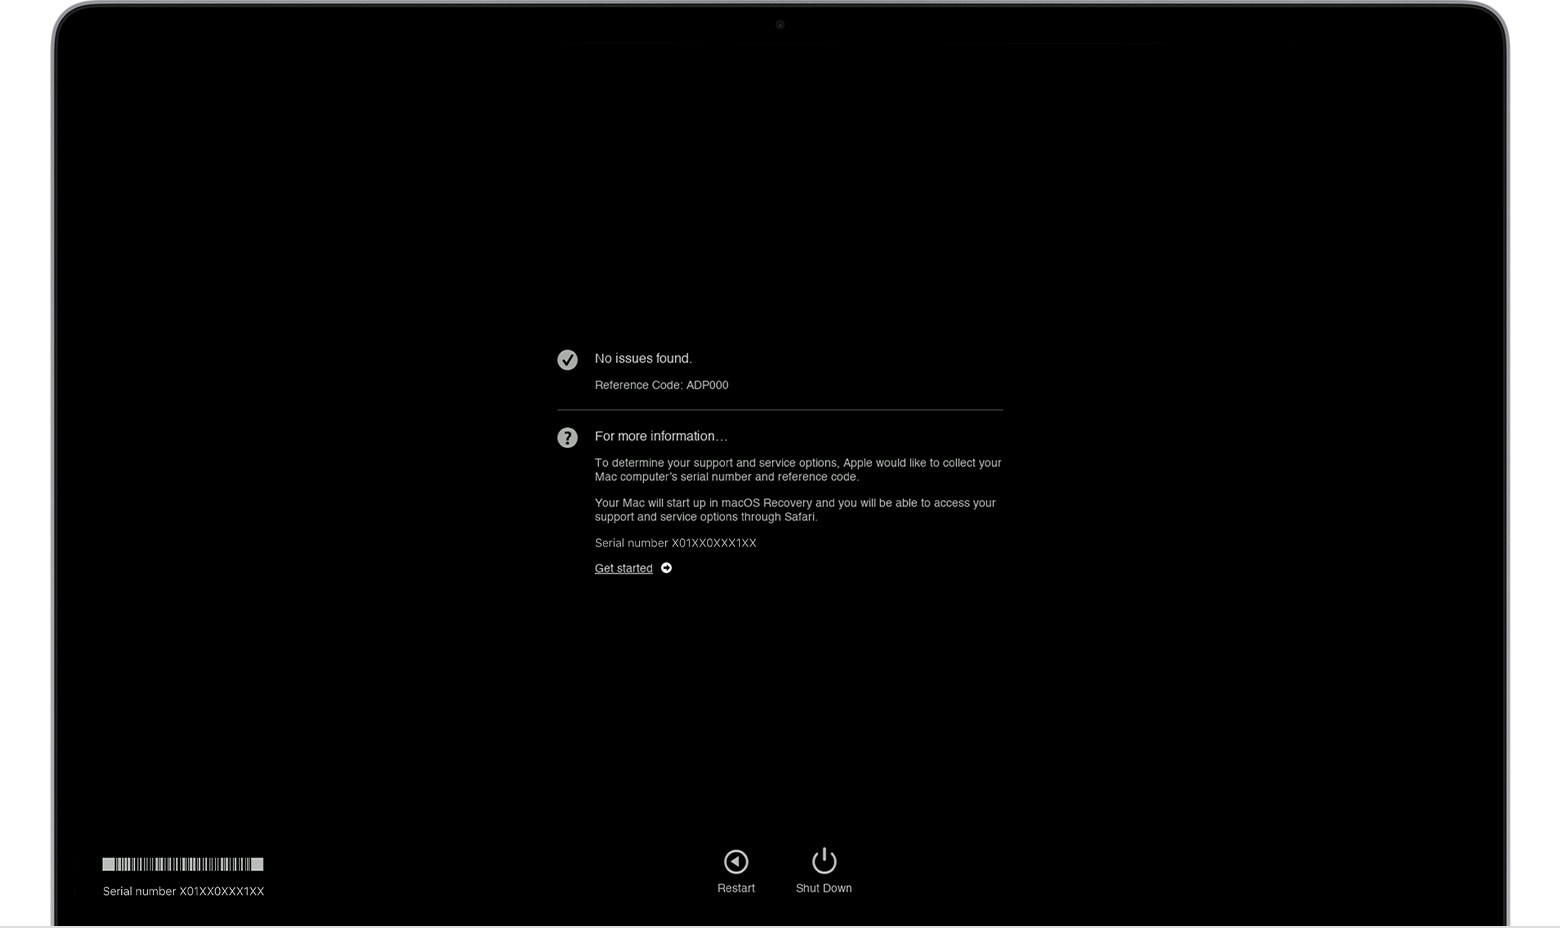 macOS Diagnostics results. No issues found.
If reference codes are provided, it’s essential to look them up in Apple’s documentation or consult with a certified technician to understand the nature of the problem and the recommended solutions.
8. Acting on Test Results: Repeating the Test, Restarting, or Shutting Down
After viewing the test results, you have several options:
- Repeat the Test: Click “Run the test again” or press Command-R to re-run the diagnostic test.
- Restart: Click “Restart” or press R to restart your Mac.
- Shut Down: Click “Shut Down” or press S to turn off your Mac.
If you encounter issues, repeating the test can sometimes provide a clearer diagnosis, especially if the initial test encountered temporary glitches.
9. Getting Service and Support Information
For more detailed information about service and support options, ensure your Mac is connected to the internet and click “Get started” or press Command-G. This will restart your Mac and open a webpage with additional information. From there, you can choose to restart or shut down your Mac after reviewing the support options.
10. Decoding Apple Diagnostics Reference Codes
Apple Diagnostics reference codes are critical for understanding the specific hardware issues detected during the test. Here’s a general overview of what these codes mean:
- Prefixes: Codes typically start with a prefix (e.g., “ADP,” “NDD,” “VFD”) that indicates the type of hardware component affected.
- Suffixes: Codes end with a suffix (e.g., “000”) that provides additional details about the specific issue.
Refer to Apple’s official list of diagnostic reference codes for a comprehensive understanding of each code.
11. Common Apple Diagnostics Reference Codes and Their Meanings
Here are some common Apple Diagnostics reference codes and their potential meanings:
| Reference Code | Description | Potential Issue |
|---|---|---|
| ADP000 | No issues found | Indicates that no hardware problems were detected. |
| NDD001 | Potential issue with the NAND flash memory | Storage problems, data corruption, or slow performance. |
| VFD006 | Issue with the graphics processor | Display problems, graphical glitches, or system crashes. |
| PFM006 | Issue with the system’s power management | Battery not charging, unexpected shutdowns. |
| PPN001 | Issue with the system’s memory (RAM) | System instability, kernel panics. |
Understanding these codes can help you quickly identify and address the most common hardware issues on your Mac.
12. When to Seek Professional Help
While Apple Diagnostics is a useful tool, it’s not always definitive. Consider seeking professional help if:
- You receive error codes you don’t understand.
- You’ve tried basic troubleshooting steps without success.
- Your Mac is exhibiting severe performance issues or hardware failures.
Certified Apple technicians have the expertise and tools to diagnose and repair complex hardware problems that Apple Diagnostics might not detect.
13. Third-Party Diagnostic Tools for Mac
In addition to Apple Diagnostics, several third-party tools can provide more detailed insights into your Mac’s performance and hardware health. Some popular options include:
- TechTool Pro: Offers comprehensive hardware testing and repair utilities.
- DriveDx: Monitors the health of your SSD or HDD, providing early warnings of potential failures.
- iStat Menus: Provides real-time monitoring of CPU usage, memory, disk activity, and network performance.
These tools can complement Apple Diagnostics by providing more granular data and advanced testing capabilities.
14. TechTool Pro: Comprehensive Mac Diagnostic Utility
TechTool Pro is a powerful diagnostic utility that goes beyond the capabilities of Apple Diagnostics. It offers features such as:
- Hardware Testing: Extensive tests for CPU, memory, and other critical components.
- Drive Repair: Utilities to repair damaged hard drives and SSDs.
- Data Recovery: Tools to recover lost data from failing drives.
- eDrive Creation: Allows you to create a bootable partition with diagnostic tools.
According to Micromat, the developers of TechTool Pro, the software is designed to provide a comprehensive suite of tools for maintaining and troubleshooting Macs.
15. DriveDx: Monitoring Your Mac’s Storage Health
DriveDx is specifically designed to monitor the health of your Mac’s storage devices. It provides real-time data on:
- SMART Attributes: Monitors critical health indicators reported by the drive.
- Temperature Monitoring: Tracks the temperature of the drive to prevent overheating.
- Error Logging: Logs any errors or warnings reported by the drive.
By proactively monitoring these parameters, DriveDx can help you identify potential drive failures before they lead to data loss.
16. iStat Menus: Real-Time System Monitoring
iStat Menus provides real-time monitoring of your Mac’s system resources, including:
- CPU Usage: Tracks CPU load to identify processes that are consuming excessive resources.
- Memory Usage: Monitors RAM usage to identify memory leaks or bottlenecks.
- Disk Activity: Tracks read and write speeds to identify storage performance issues.
- Network Performance: Monitors network traffic to identify bandwidth issues.
This information can help you diagnose performance problems and optimize your Mac’s resource usage.
17. Using Activity Monitor to Diagnose Performance Issues
Activity Monitor is a built-in macOS utility that provides insights into your Mac’s performance. To use Activity Monitor for diagnostics:
- Open Activity Monitor: Go to Applications > Utilities > Activity Monitor.
- Monitor CPU Usage: Check the CPU tab to see which processes are using the most CPU resources.
- Monitor Memory Usage: Check the Memory tab to see how much RAM is being used and identify memory-intensive processes.
- Monitor Disk Activity: Check the Disk tab to see which processes are reading and writing the most data.
- Monitor Network Activity: Check the Network tab to see which processes are using the most network bandwidth.
By monitoring these parameters, you can identify resource-intensive processes that may be causing performance issues.
18. Identifying CPU Intensive Processes
High CPU usage can significantly slow down your Mac. To identify CPU-intensive processes:
- Open Activity Monitor: Launch Activity Monitor from the Utilities folder.
- Sort by CPU: Click the CPU column to sort processes by CPU usage.
- Identify Culprits: Look for processes that are consistently using a high percentage of CPU resources.
If you find a process that’s consuming excessive CPU, consider quitting the application or process if it’s not essential.
19. Managing Memory Usage on Your Mac
Insufficient RAM can lead to performance issues, especially when running multiple applications. To manage memory usage:
- Close Unnecessary Applications: Quit applications that you’re not currently using.
- Monitor Memory Pressure: In Activity Monitor, check the Memory Pressure graph. If it’s consistently high, consider adding more RAM.
- Identify Memory Leaks: Look for processes that are gradually consuming more and more memory over time.
Addressing memory issues can significantly improve your Mac’s performance, especially when working with resource-intensive applications.
20. Troubleshooting Disk Performance Issues
Slow disk performance can be a major bottleneck. To troubleshoot disk performance issues:
- Check Disk Space: Ensure you have sufficient free space on your hard drive or SSD.
- Run Disk Utility: Use Disk Utility to repair any file system errors.
- Defragment Your Hard Drive: If you’re using a traditional hard drive, defragmenting can improve performance.
- Monitor Disk Activity: Use Activity Monitor to identify processes that are excessively reading or writing data.
Addressing disk performance issues can significantly improve your Mac’s overall responsiveness.
21. Addressing Network Performance Problems
Slow network performance can impact your ability to access online resources and collaborate with others. To troubleshoot network performance problems:
- Check Your Internet Connection: Ensure you have a stable internet connection.
- Monitor Network Activity: Use Activity Monitor to identify processes that are consuming excessive network bandwidth.
- Reset Your Router: Try resetting your router to resolve any network connectivity issues.
- Run Network Diagnostics: Use macOS’s built-in Network Diagnostics tool to identify potential problems.
Addressing network performance issues can improve your online experience and productivity.
22. Using Console App for Advanced Troubleshooting
The Console app in macOS is a powerful tool for advanced troubleshooting. It allows you to view system logs, which can provide valuable insights into the causes of errors and performance issues. To use the Console app:
- Open Console: Go to Applications > Utilities > Console.
- Filter Logs: Use the search bar to filter logs by keyword, process name, or time range.
- Identify Errors: Look for error messages or warnings that may indicate the source of the problem.
The Console app can be particularly useful for diagnosing complex issues that are not easily identified by other diagnostic tools.
23. Understanding System Logs
System logs contain detailed information about the events and activities that occur on your Mac. These logs can include:
- Error Messages: Indications of software or hardware failures.
- Warnings: Notifications of potential problems.
- Informational Messages: Records of normal system activities.
By analyzing these logs, you can gain a deeper understanding of your Mac’s behavior and identify the root causes of issues.
24. Filtering Logs for Specific Issues
To effectively use the Console app, it’s essential to filter logs for specific issues. You can filter logs by:
- Keyword: Search for specific error messages or process names.
- Process Name: Filter logs for a particular application or system process.
- Time Range: Limit the log entries to a specific time period.
By filtering logs, you can quickly identify the relevant information and focus your troubleshooting efforts.
25. Interpreting Common Log Messages
Interpreting log messages can be challenging, but understanding some common messages can be helpful. Here are a few examples:
- “kernel[0]:”: Messages from the macOS kernel, which is the core of the operating system.
- “error”: Indicates a significant problem that requires attention.
- “warning”: Suggests a potential issue that may need to be investigated.
By learning to recognize these common log messages, you can more effectively troubleshoot your Mac.
26. Resetting NVRAM/PRAM
NVRAM (Non-Volatile Random-Access Memory) or PRAM (Parameter RAM) stores certain system settings, such as volume, display resolution, and startup disk selection. Resetting NVRAM/PRAM can resolve various issues:
- Shut Down Your Mac: Completely power off your Mac.
- Turn On and Press Keys: Turn on your Mac and immediately press and hold Option (⌥) + Command (⌘) + P + R keys.
- Hold Until Restart: Hold these keys until the Apple logo appears and disappears twice.
- Release Keys: Release the keys and allow your Mac to start up normally.
Resetting NVRAM/PRAM can often resolve issues related to display, sound, and startup behavior.
27. Booting into Safe Mode
Safe Mode starts your Mac with a minimal set of drivers and system extensions. This can help you diagnose whether a software issue is causing problems:
- Shut Down Your Mac: Completely power off your Mac.
- Start in Safe Mode: Turn on your Mac and immediately press and hold the Shift key.
- Release When Logged In: Release the Shift key when you see the login window.
In Safe Mode, your Mac will perform certain checks and may resolve some issues automatically.
28. Reinstalling macOS
If other troubleshooting steps fail, reinstalling macOS can be a last resort. This will replace the operating system with a fresh copy, potentially resolving software-related issues:
- Back Up Your Data: Before reinstalling macOS, back up your important data using Time Machine or another backup solution.
- Boot into Recovery Mode: Restart your Mac and hold Command (⌘) + R keys until the Apple logo appears.
- Reinstall macOS: Choose “Reinstall macOS” from the macOS Utilities window and follow the on-screen instructions.
Reinstalling macOS can be a time-consuming process, but it can often resolve persistent software problems.
29. The Importance of Regular Maintenance
Regular maintenance can help prevent many of the issues that require diagnostic testing. This includes:
- Keeping Your Software Up to Date: Install the latest macOS updates and application updates.
- Running Disk Utility Regularly: Use Disk Utility to repair any file system errors.
- Removing Unnecessary Files: Delete files and applications that you no longer need.
- Backing Up Your Data: Regularly back up your data to protect against data loss.
By following these maintenance practices, you can keep your Mac running smoothly and reduce the need for diagnostic testing.
30. Preventing Overheating
Overheating can cause performance issues and potentially damage your Mac’s hardware. To prevent overheating:
- Ensure Proper Ventilation: Place your Mac on a hard, flat surface with good ventilation.
- Clean Vents Regularly: Use compressed air to clean the vents and remove dust.
- Avoid Direct Sunlight: Keep your Mac out of direct sunlight.
- Monitor Temperature: Use iStat Menus or another monitoring tool to track your Mac’s temperature.
Preventing overheating can extend the lifespan of your Mac and improve its performance.
31. Managing Startup Items
Too many startup items can slow down your Mac’s boot time and impact performance. To manage startup items:
- Go to System Preferences: Open System Preferences from the Apple menu.
- Go to Users & Groups: Click on Users & Groups.
- Select Your Account: Select your user account.
- Click Login Items: Click on the Login Items tab.
- Remove Unnecessary Items: Select items that you don’t need to start automatically and click the “-” button.
By managing startup items, you can improve your Mac’s boot time and overall performance.
32. Optimizing Storage
Optimizing your Mac’s storage can improve performance and prevent issues related to disk space. To optimize storage:
- Use Optimized Storage: Enable Optimized Storage in System Preferences > Apple ID > iCloud.
- Remove Large and Old Files: Use the Manage Storage feature to identify and remove large and old files.
- Empty the Trash Regularly: Empty the Trash to free up disk space.
By optimizing storage, you can ensure that your Mac has sufficient free space and improve its overall performance.
33. Staying Informed About Mac Issues and Solutions
Staying informed about common Mac issues and their solutions can help you troubleshoot problems more effectively. Resources for staying informed include:
- Apple Support Website: Apple’s official support website provides a wealth of information about troubleshooting and maintaining your Mac.
- Online Forums: Online forums such as the Apple Support Communities and MacRumors forums can provide valuable insights and solutions from other Mac users.
- Tech Blogs: Tech blogs such as iMore and Macworld offer news, reviews, and tutorials about macOS and Mac hardware.
By staying informed, you can be better prepared to address any issues that may arise.
34. The Role of CAR-TOOL.EDU.VN in Mac Diagnostics for Automotive Professionals
For automotive professionals relying on Macs in their workshops, CAR-TOOL.EDU.VN provides invaluable resources:
- Specialized Diagnostic Tools: Information on diagnostic tools tailored for automotive repair.
- Troubleshooting Guides: Step-by-step guides for diagnosing and resolving common issues.
- Community Support: A platform for connecting with other professionals and sharing knowledge.
CAR-TOOL.EDU.VN ensures that automotive professionals have the support they need to keep their Macs running smoothly, minimizing downtime and maximizing productivity.
35. Benefits of Using CAR-TOOL.EDU.VN for Automotive Mac Diagnostics
Using CAR-TOOL.EDU.VN offers several benefits:
- Expert Advice: Access to expert advice and insights from experienced automotive technicians.
- Reliable Solutions: Proven solutions for diagnosing and resolving common Mac issues.
- Time Savings: Quick access to the information you need, saving you time and effort.
- Cost Savings: Preventing costly repairs by identifying and addressing issues early.
CAR-TOOL.EDU.VN is committed to providing automotive professionals with the resources they need to keep their Macs running at peak performance.
36. How CAR-TOOL.EDU.VN Can Help You
At CAR-TOOL.EDU.VN, we understand the critical role that Macs play in automotive diagnostics. Our platform offers detailed guides, expert advice, and a supportive community to help you:
- Identify Hardware Issues: Learn how to use Apple Diagnostics and third-party tools to diagnose hardware problems.
- Troubleshoot Software Issues: Discover effective strategies for resolving software-related issues.
- Optimize Performance: Implement best practices for maintaining and optimizing your Mac’s performance.
Our goal is to empower you with the knowledge and resources you need to keep your Macs running smoothly, minimizing downtime and maximizing productivity.
37. Getting Expert Advice and Support from CAR-TOOL.EDU.VN
If you’re facing persistent Mac issues or need expert advice, CAR-TOOL.EDU.VN is here to help. Contact us today for personalized support and guidance:
- Address: 456 Elm Street, Dallas, TX 75201, United States
- WhatsApp: +1 (641) 206-8880
- Website: CAR-TOOL.EDU.VN
Our team of experienced technicians is ready to assist you with any Mac-related issues, ensuring that you have the support you need to keep your automotive business running smoothly.
38. Frequently Asked Questions (FAQ) About Mac Diagnostics
1. What type of diagnostic should I run on my Mac if it’s running slowly?
Run Apple Diagnostics first to check for hardware issues, then use Activity Monitor to identify resource-intensive processes.
2. Are third-party diagnostic tools better than Apple Diagnostics?
Third-party tools offer more detailed insights, but Apple Diagnostics is a good starting point for hardware checks.
3. How often should I run diagnostics on my Mac?
Run diagnostics if you notice performance issues or suspect hardware problems; otherwise, a monthly check is sufficient.
4. Can diagnostics fix software issues on my Mac?
Diagnostics primarily identify hardware issues; software problems may require troubleshooting or reinstalling macOS.
5. What does a specific reference code from Apple Diagnostics mean?
Refer to Apple’s official list of diagnostic reference codes for detailed information about each code.
6. How do I prevent my Mac from overheating?
Ensure proper ventilation, clean vents regularly, avoid direct sunlight, and monitor temperature.
7. What should I do if my Mac fails the diagnostic test?
Seek professional help from a certified Apple technician.
8. Can I run diagnostics on an external drive connected to my Mac?
Yes, use Disk Utility or third-party tools like DriveDx to check the health of external drives.
9. How do I back up my data before running diagnostics?
Use Time Machine or another backup solution to create a backup of your important data.
10. Where can I find reliable diagnostic tools for my Mac?
CAR-TOOL.EDU.VN offers recommendations and information on reliable diagnostic tools tailored for automotive repair professionals.
Call to Action
Struggling with Mac issues and need reliable solutions for your automotive business? Contact CAR-TOOL.EDU.VN today! Our expert team is ready to provide personalized support and guidance to keep your Macs running smoothly. Reach out now for a consultation and discover how we can help you maximize your productivity and minimize downtime.
Contact Information:
- Address: 456 Elm Street, Dallas, TX 75201, United States
- WhatsApp: +1 (641) 206-8880
- Website: CAR-TOOL.EDU.VN