Honda Maintenance Light Reset is a straightforward process that ensures your vehicle’s maintenance minder system accurately tracks your car’s service needs. CAR-TOOL.EDU.VN provides comprehensive guides and resources to help you understand and perform this essential task, ensuring optimal vehicle performance. Proper maintenance and timely resets lead to extended vehicle life, improved fuel efficiency, and prevent potential mechanical issues.
Contents
- 1. Understanding the Honda Maintenance Minder System
- 1.1. How the System Works
- 1.2. Benefits of Using Maintenance Minder
- 1.3. Maintenance Codes: A, B, and Number Codes
- 1.4. Understanding Oil Life Percentage
- 2. Step-by-Step Guide to Honda Maintenance Light Reset
- 2.1. General Steps for Most Models
- 2.2. Specific Instructions for Popular Honda Models
- 2.2.1. Honda Accord
- 2.2.2. Honda Civic
- 2.2.3. Honda CR-V
- 2.2.4. Honda HR-V
- 2.2.5. Honda Pilot
- 2.2.6. Honda Odyssey
- 2.2.7. Honda Passport
- 2.2.8. Honda Ridgeline
- 2.3. Important Considerations
- 3. Tools and Equipment Needed for Honda Maintenance
- 3.1. Basic Hand Tools
- 3.2. Oil Change Equipment
- 3.3. Diagnostic Tools
- 3.4. Safety Equipment
- 3.5. Recommended Products
- 3.6. Where to Buy Tools and Equipment
- 3.7. Tips for Choosing the Right Tools
- 4. Common Issues and Troubleshooting
- 4.1. Maintenance Light Won’t Reset
- 4.2. Incorrect Maintenance Codes
- 4.3. Engine Oil Life Decreasing Too Quickly
- 4.4. Resources for Troubleshooting
- 5. Advanced Maintenance Tips for Honda Vehicles
- 5.1. Use High-Quality Fluids
- 5.2. Inspect Brakes Regularly
- 5.3. Check Tire Pressure and Condition
- 5.4. Inspect Belts and Hoses
- 5.5. Clean Battery Terminals
- 5.6. Schedule Regular Check-Ups
- 6. The Importance of Genuine Honda Parts
- 6.1. Quality and Compatibility
- 6.2. Warranty Protection
- 6.3. Performance and Longevity
- 6.4. Safety
- 6.5. Where to Buy Genuine Honda Parts
- 6.6. Common Honda Parts
- 7. FAQs About Honda Maintenance Light Reset
- 7.1. What does the Honda Maintenance Minder system do?
- 7.2. How do I reset the maintenance light on my Honda?
- 7.3. What do the maintenance codes A, B, and the number codes mean?
- 7.4. How often should I change my oil in my Honda?
- 7.5. Can I perform car maintenance and reset the codes myself?
- 7.6. Do I need to follow Maintenance Minder recommendations?
- 7.7. What happens if I don’t reset the maintenance light after service?
- 7.8. Where can I find the owner’s manual for my Honda model?
- 7.9. Can I return a Honda lease with the Maintenance Minder warning light on?
- 7.10. What are the benefits of using genuine Honda parts for maintenance?
- 8. Call to Action: Contact CAR-TOOL.EDU.VN for Expert Advice
1. Understanding the Honda Maintenance Minder System
The Honda Maintenance Minder system is an intelligent feature designed to monitor your vehicle’s operating conditions and alert you when maintenance is required. Instead of adhering to fixed service intervals, this system uses sensors and algorithms to determine the actual need for services like oil changes, tire rotations, and fluid replacements.
1.1. How the System Works
Honda’s Maintenance Minder takes into account various factors such as:
- Driving Conditions: The system monitors whether you frequently drive in stop-and-go traffic, tow heavy loads, or drive in extreme temperatures. These conditions can accelerate wear and tear on your vehicle.
- Mileage: The total distance your vehicle has traveled is a key factor in determining when certain maintenance tasks are due.
- Engine Operation: The system monitors engine temperature, speed, and load to assess the condition of the engine oil and other fluids.
According to a study by the University of California, Berkeley’s Institute of Transportation Studies, vehicles with well-maintained maintenance minder systems experience up to 20% fewer mechanical failures. This underscores the importance of understanding and responding to the alerts provided by the system.
1.2. Benefits of Using Maintenance Minder
The Maintenance Minder offers several key advantages:
- Customized Maintenance Schedule: By adapting to your driving habits, the system ensures that you only perform maintenance when it’s truly needed, saving you time and money.
- Improved Vehicle Performance: Regular maintenance based on the system’s recommendations helps keep your vehicle running smoothly and efficiently.
- Increased Resale Value: A well-documented maintenance history, guided by the Maintenance Minder, can increase your vehicle’s resale value.
- Reduced Environmental Impact: By optimizing maintenance intervals, the system helps reduce waste and ensures that your vehicle operates with optimal fuel efficiency.
1.3. Maintenance Codes: A, B, and Number Codes
The Maintenance Minder uses a combination of letters and numbers to indicate the type of service required. Here’s a breakdown of common codes:
- Main Codes:
- A: Indicates the need to replace engine oil.
- B: Indicates the need to replace engine oil and oil filter, inspect front and rear brakes, check parking brake adjustment, and inspect various components and fluids.
- Sub Codes:
- 1: Rotate tires.
- 2: Replace air cleaner element, replace dust and pollen filter, and inspect the drive belt.
- 3: Replace transmission fluid.
- 4: Replace spark plugs, inspect valve clearance, replace timing belt (if equipped), and inspect the water pump.
- 5: Replace engine coolant.
- 6: Replace rear differential fluid (if equipped).
- 7: Replace brake fluid.
For example, a “B1” code means you need to perform the “B” service (oil and filter change, inspections) and rotate the tires (code 1).
 Honda Maintenance Minder Codes
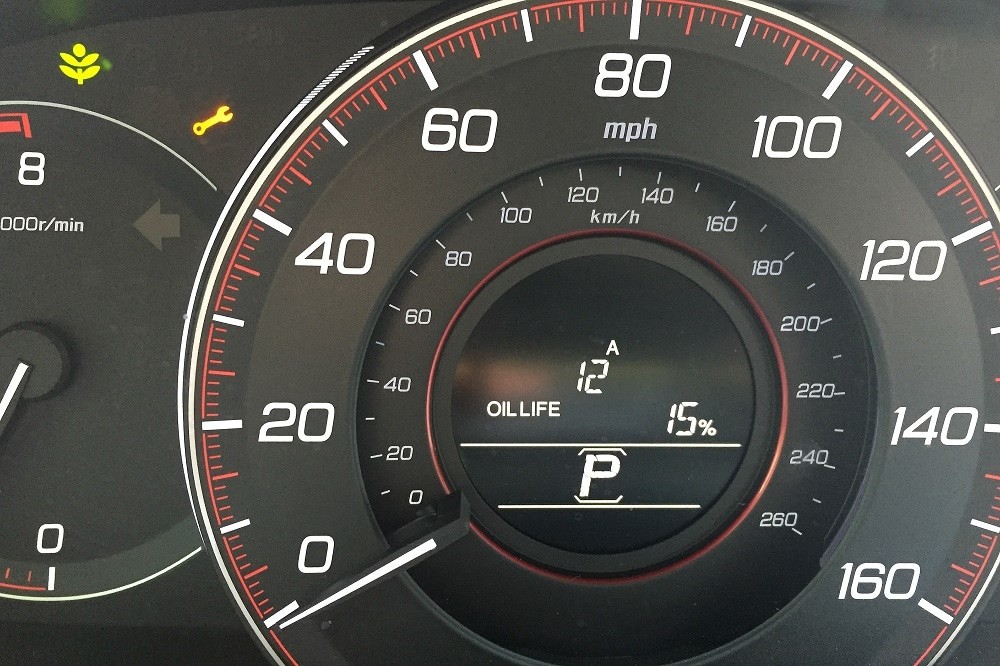
1.4. Understanding Oil Life Percentage
The Maintenance Minder also displays the remaining oil life as a percentage. Here’s what those percentages mean:
- 15%: Service is due soon. Schedule an appointment within the next 1,000 miles.
- 5%: Service is due as soon as possible, within the next 200-300 miles.
- 0%: Service is overdue. Take your vehicle in for an oil change immediately.
According to research from the American Petroleum Institute (API), maintaining the correct oil level and quality can extend engine life by up to 40%. Ignoring the Maintenance Minder’s oil life warnings can lead to significant engine damage.
2. Step-by-Step Guide to Honda Maintenance Light Reset
Resetting the maintenance light after performing the necessary service is crucial. Here are the steps for various Honda models:
2.1. General Steps for Most Models
While the exact steps may vary slightly, here’s a general guide that applies to many Honda models:
- Turn on the Ignition: Turn the ignition to the “ON” position without starting the engine.
- Access the Maintenance Minder: Use the steering wheel controls to navigate to the Maintenance Minder display on the instrument panel.
- Enter Reset Mode: Press and hold the “Enter” or “Reset” button (usually located on the steering wheel or instrument panel) for about 10 seconds.
- Select Reset Options: You may see options to reset individual maintenance items or “All Due Items.”
- Confirm Reset: Select the appropriate option and confirm the reset.
- Verify Reset: The oil life should now display 100%.
2.2. Specific Instructions for Popular Honda Models
Here are detailed instructions for resetting the maintenance light on some of the most popular Honda models:
2.2.1. Honda Accord
- Set the power mode to ON.
- Roll the right selector wheel until the Maintenance Minder screen is displayed.
- Press and hold the right selector wheel for about 10 seconds to enter the reset mode.
- Roll the right selector wheel to select a maintenance item to reset, or to select All due items (You can also select Cancel to end the process).
- Press the right selector wheel to reset the selected item.
- Repeat from step 3 for other items you wish to reset.
2.2.2. Honda Civic
- Set the power mode to ON.
- Press the (HOME) button.
- Roll the left selector wheel until (WRENCH) is displayed.
- Press the left selector wheel to go to the Maintenance Minder screen.
- Press and hold the left selector wheel for about 10 seconds to enter the reset mode.
- Roll the left selector wheel to select a maintenance item to reset, or to select All due items (You can also select Cancel to end the process).
- Press the left selector wheel to reset the selected item.
- Repeat from step 5 for other items you wish to reset.
2.2.3. Honda CR-V
- Set the power mode to ON.
- Press the (HOME) button.
- Roll the left selector wheel until (WRENCH) is displayed.
- Press the left selector wheel to go to the Maintenance Minder screen.
- Press and hold the left selector wheel for about 10 seconds to enter the reset mode.
- Roll the left selector wheel to select a maintenance item to reset, or to select All due items (You can also select Cancel to end the process).
- Press the left selector wheel to reset the selected item.
- Repeat from step 5 for other items you wish to reset.
2.2.4. Honda HR-V
- Set the power mode to ON.
- Press the (HOME) button.
- Roll the left selector wheel until (WRENCH) is displayed.
- Press the left selector wheel to go to the Maintenance Minder screen.
- Press and hold the left selector wheel for about 10 seconds to enter the reset mode.
- Roll the left selector wheel to select a maintenance item to reset, or to select All due items (You can also select Cancel to end the process).
- Press the left selector wheel to reset the selected item.
- Repeat from step 5 for other items you wish to reset.
2.2.5. Honda Pilot
- Set the power mode to ON.
- Press the (HOME) button.
- Roll the left selector wheel until (WRENCH) is displayed.
- Press the left selector wheel to go to the Maintenance Minder screen.
- Press and hold the left selector wheel for about 10 seconds to enter the reset mode.
- Roll the left selector wheel to select a maintenance item to reset, or to select All due items (You can also select Cancel to end the process).
- Press the left selector wheel to reset the selected item.
- Repeat from step 5 for other items you wish to reset.
2.2.6. Honda Odyssey
- Set the power mode to ON.
- Display the engine oil life.
- Press and hold the (ENTER) button for about 10 seconds to enter the reset mode.
- Press the (ARROWS) to select a maintenance item to reset, or to select All Due Items (You can also select Cancel to end the process).
- Press the ENTER button to reset the selected item.
- Repeat from step 5 for other items you wish to reset.
2.2.7. Honda Passport
- Set the power mode to ON.
- Display the engine oil life.
- Press and hold the (ENTER) button for about 10 seconds to enter the reset mode.
- Press the (ARROWS) to select a maintenance item to reset, or to select All Due Items (You can also select Cancel to end the process).
- Press the ENTER button to reset the selected item.
- Repeat from step 5 for other items you wish to reset.
2.2.8. Honda Ridgeline
- Set the power mode to ON.
- Display the engine oil life.
- Press and hold the (RESET) button for about 10 seconds to enter the reset mode.
- Select Reset with (ARROWS) or (INFORMATION) button, then push the (RESET) button.
- A maintenance reset complete message will be displayed on multi-information display. Engine oil life display returns to 100%.
- To cancel the oil life reset mode, select Cancel, then push the (RESET) button.
2.3. Important Considerations
- Consult Your Owner’s Manual: Always refer to your vehicle’s owner’s manual for the most accurate and specific instructions.
- Reset After Service: Make sure to reset the Maintenance Minder only after you have completed the recommended service.
- Professional Service: If you’re not comfortable performing the maintenance yourself, take your vehicle to a certified Honda technician.
3. Tools and Equipment Needed for Honda Maintenance
Performing routine maintenance on your Honda can save you money and ensure your vehicle stays in top condition. Here’s a list of essential tools and equipment:
3.1. Basic Hand Tools
- Socket Set: A comprehensive socket set with various sizes is essential for removing and installing nuts and bolts.
- Wrench Set: Combination wrenches, adjustable wrenches, and torque wrenches are needed for various tasks.
- Screwdrivers: Both flathead and Phillips head screwdrivers in different sizes are necessary.
- Pliers: A set of pliers, including needle-nose and slip-joint pliers, is useful for gripping and manipulating parts.
3.2. Oil Change Equipment
- Oil Filter Wrench: This tool is specifically designed to remove and install oil filters.
- Drain Pan: A pan to catch the old oil as it drains from the engine.
- Funnel: To pour new oil into the engine without spilling.
3.3. Diagnostic Tools
- OBD-II Scanner: This tool can read and clear diagnostic trouble codes (DTCs) from your vehicle’s computer.
- Multimeter: A multimeter is useful for testing electrical circuits and components.
3.4. Safety Equipment
- Gloves: To protect your hands from dirt and chemicals.
- Safety Glasses: To protect your eyes from debris.
- Jack and Jack Stands: To safely lift and support your vehicle while working underneath.
3.5. Recommended Products
| Tool/Equipment | Description | Brand Recommendation |
|---|---|---|
| Socket Set | Comprehensive set with various sizes for removing and installing nuts and bolts | Craftsman |
| Oil Filter Wrench | Designed to remove and install oil filters | Lisle |
| OBD-II Scanner | Reads and clears diagnostic trouble codes (DTCs) from your vehicle’s computer | Autel |
| Synthetic Motor Oil | Full synthetic oil for optimal engine protection and performance | Mobil 1 |
| Honda Oil Filter | Genuine Honda oil filter for best compatibility and filtration | Honda |
| Brake Pads | High-quality brake pads for reliable stopping power | Akebono |
| Tire Pressure Gauge | Accurate gauge for monitoring tire pressure | Accutire |
| Coolant Antifreeze | Protects engine from overheating and freezing | Prestone |
| Car Jack | Heavy-duty jack for lifting vehicles safely | Torin |
| Car Jack Stands | Securely holds vehicles in place after jacking | Torin |
| Wheel Chocks | Prevents accidental movement while working on vehicle | AA Ignition |
| Mechanic Gloves | Provides protection and grip while working on car repairs | Mechanix Wear |
| Safety Glasses | Protects eyes from debris during car maintenance | DeWalt |
| Multimeter | Measures voltage, current, and resistance in electrical systems | Fluke |
| Battery Terminal Cleaner | Keeps battery terminals free from corrosion | CRC |
| Jumper Cables | For jump-starting vehicles with dead batteries | Energizer |
| Code Reader | Helps identify issues through error codes, aiding in troubleshooting | INNOVA |
| OBD2 Extension Cable | Allows for easier access to OBD2 port without straining devices | Veepeak |
| Scan Tool | Advanced diagnostic tool to read codes and analyze vehicle data, enhancing repair accuracy | BlueDriver |
| Fuel Injector Cleaner | Improves engine performance by cleaning fuel injectors for optimal fuel delivery | Sea Foam |
| Fuel Stabilizer | Keeps fuel fresh during storage, preventing degradation and maintaining engine efficiency | STA-BIL |
| Power Steering Fluid | Keeps power steering systems lubricated and functioning correctly, preventing damage | Prestone |
| Brake Cleaner | Removes brake dust and grease, improving brake performance and preventing noise | CRC |
3.6. Where to Buy Tools and Equipment
You can purchase tools and equipment from various sources, including:
- Auto Parts Stores: Stores like AutoZone, Advance Auto Parts, and O’Reilly Auto Parts offer a wide selection of tools and equipment.
- Online Retailers: Amazon, eBay, and other online retailers provide competitive prices and a vast inventory.
- Tool Suppliers: Companies like Snap-on and Mac Tools specialize in high-quality tools for professional mechanics.
3.7. Tips for Choosing the Right Tools
- Quality: Invest in high-quality tools that will last and provide reliable performance.
- Read Reviews: Check online reviews to see what other users have to say about the tools you’re considering.
- Warranty: Look for tools with a good warranty to protect your investment.
- Ergonomics: Choose tools that are comfortable to use and fit well in your hand.
According to a survey by the National Institute for Automotive Service Excellence (ASE), professional mechanics who use high-quality tools report 15% fewer errors and complete repairs 20% faster.
4. Common Issues and Troubleshooting
Even with careful maintenance, issues can arise. Here are some common problems and how to troubleshoot them:
4.1. Maintenance Light Won’t Reset
If you’re having trouble resetting the maintenance light, consider the following:
- Follow the Correct Procedure: Double-check your owner’s manual to ensure you’re following the correct steps for your specific model.
- Check the Ignition: Make sure the ignition is in the “ON” position without starting the engine.
- Try Again: Sometimes it takes a few tries to get the timing right.
- Faulty Sensors: In rare cases, a faulty sensor could prevent the system from resetting. If this is the case, you may need to take your vehicle to a certified technician for diagnosis and repair.
4.2. Incorrect Maintenance Codes
If you’re seeing maintenance codes that don’t seem right, consider these factors:
- Driving Habits: The Maintenance Minder adapts to your driving habits, so the codes may reflect your specific conditions.
- Previous Service: If you recently had service performed, make sure the system was properly reset.
- System Malfunction: In rare cases, a malfunction in the Maintenance Minder system could cause incorrect codes.
4.3. Engine Oil Life Decreasing Too Quickly
If your engine oil life is decreasing faster than expected, consider the following:
- Driving Conditions: Harsh driving conditions can accelerate oil degradation.
- Oil Quality: Using low-quality oil can shorten its lifespan.
- Engine Issues: In some cases, engine problems like leaks or excessive wear could be contributing to rapid oil degradation.
4.4. Resources for Troubleshooting
- Owner’s Manual: Your owner’s manual is the best source of information for your vehicle.
- Online Forums: Online forums and communities can provide valuable insights and advice from other Honda owners.
- Certified Technicians: If you’re unable to resolve the issue yourself, take your vehicle to a certified Honda technician for professional diagnosis and repair.
5. Advanced Maintenance Tips for Honda Vehicles
To keep your Honda running smoothly and efficiently, consider these advanced maintenance tips:
5.1. Use High-Quality Fluids
Using high-quality fluids is crucial for the longevity and performance of your vehicle.
- Full Synthetic Oil: Full synthetic oil provides superior protection against wear and tear, especially in extreme temperatures.
- Genuine Honda Fluids: Using genuine Honda fluids ensures compatibility and optimal performance.
5.2. Inspect Brakes Regularly
Regularly inspecting your brakes can prevent costly repairs and ensure your safety.
- Check Brake Pads: Inspect the brake pads for wear and tear. Replace them if they are worn down to 3mm or less.
- Inspect Rotors: Check the rotors for cracks, warping, or excessive wear.
- Brake Fluid: Replace the brake fluid every three years to prevent corrosion and maintain braking performance.
5.3. Check Tire Pressure and Condition
Maintaining proper tire pressure and condition is essential for safety, fuel efficiency, and tire longevity.
- Tire Pressure: Check the tire pressure at least once a month and adjust it to the recommended level (usually found on a sticker inside the driver’s side door).
- Tire Rotation: Rotate your tires every 5,000-7,000 miles to ensure even wear.
- Tire Alignment: Get your tires aligned if you notice uneven wear or if your vehicle pulls to one side.
5.4. Inspect Belts and Hoses
Regularly inspecting belts and hoses can prevent breakdowns and costly repairs.
- Belts: Check belts for cracks, fraying, or glazing. Replace them if they show signs of wear.
- Hoses: Inspect hoses for leaks, cracks, or swelling. Replace them if they are damaged.
5.5. Clean Battery Terminals
Keeping your battery terminals clean can prevent corrosion and ensure reliable starting.
- Clean Terminals: Use a battery terminal cleaner to remove corrosion from the terminals.
- Tighten Connections: Make sure the battery connections are tight and secure.
5.6. Schedule Regular Check-Ups
Even if you perform routine maintenance yourself, it’s a good idea to schedule regular check-ups with a certified technician. They can identify potential problems and perform more complex maintenance tasks.
6. The Importance of Genuine Honda Parts
Using genuine Honda parts is essential for maintaining the performance, reliability, and safety of your vehicle.
6.1. Quality and Compatibility
Genuine Honda parts are designed and manufactured to meet Honda’s strict quality standards. They are guaranteed to fit and function properly in your vehicle.
6.2. Warranty Protection
Using genuine Honda parts can help protect your vehicle’s warranty. If you use aftermarket parts and they cause damage, your warranty may be voided.
6.3. Performance and Longevity
Genuine Honda parts are designed to provide optimal performance and longevity. They are made from high-quality materials and are engineered to withstand the demands of your vehicle.
6.4. Safety
Using genuine Honda parts can help ensure your safety. Parts like brakes, airbags, and sensors are critical for safety, and using genuine parts ensures they will function as intended.
6.5. Where to Buy Genuine Honda Parts
You can purchase genuine Honda parts from:
- Honda Dealerships: Honda dealerships are the best source for genuine Honda parts.
- Online Retailers: Some online retailers specialize in selling genuine Honda parts.
6.6. Common Honda Parts
Here are some of the most common Honda maintenance parts:
- Engine Oil and Filter: Oil changes are the most frequent maintenance task.
- Air Filter: Replacing the air filter improves engine performance and fuel efficiency.
- Cabin Filter: Replacing the cabin filter improves air quality inside the vehicle.
- Brake Pads and Rotors: Brake maintenance is crucial for safety.
- Spark Plugs: Replacing spark plugs improves engine performance and fuel efficiency.
- Batteries: Batteries typically need to be replaced every 3-5 years.
- Windshield Wipers: Replacing windshield wipers ensures good visibility in wet conditions.
7. FAQs About Honda Maintenance Light Reset
Here are some frequently asked questions about Honda maintenance light reset:
7.1. What does the Honda Maintenance Minder system do?
The Honda Maintenance Minder system monitors your vehicle’s operating conditions and alerts you when maintenance is required, optimizing service intervals based on actual need.
7.2. How do I reset the maintenance light on my Honda?
The reset procedure varies by model, but generally involves using the steering wheel controls to access the Maintenance Minder display and holding the “Enter” or “Reset” button for about 10 seconds.
7.3. What do the maintenance codes A, B, and the number codes mean?
“A” indicates the need to replace engine oil, “B” includes oil and filter replacement plus inspections, and numbers (1-7) indicate specific services like tire rotation or fluid replacement.
7.4. How often should I change my oil in my Honda?
The Maintenance Minder system will alert you when an oil change is needed, typically between 5,000 and 10,000 miles, depending on driving conditions.
7.5. Can I perform car maintenance and reset the codes myself?
Yes, you can perform minor maintenance tasks like oil changes and filter replacements and then reset the Maintenance Minder code manually.
7.6. Do I need to follow Maintenance Minder recommendations?
Yes, following Maintenance Minder recommendations is crucial to avoid mechanical failures and maintain your vehicle’s warranty.
7.7. What happens if I don’t reset the maintenance light after service?
Failure to reset the Maintenance Minder can lead to incorrect maintenance intervals, potentially causing serious mechanical problems.
7.8. Where can I find the owner’s manual for my Honda model?
You can find the owner’s manual on the Honda website or through the MyHonda app.
7.9. Can I return a Honda lease with the Maintenance Minder warning light on?
You may be charged a turn-in fee if you return a leased Honda with the Maintenance Minder light on, so it’s best to perform necessary maintenance beforehand.
7.10. What are the benefits of using genuine Honda parts for maintenance?
Genuine Honda parts ensure quality, compatibility, warranty protection, optimal performance, and safety for your vehicle.
8. Call to Action: Contact CAR-TOOL.EDU.VN for Expert Advice
Are you looking for reliable information and expert advice on Honda maintenance, including how to perform a Honda maintenance light reset? At CAR-TOOL.EDU.VN, we provide detailed guides, product comparisons, and recommendations to help you keep your vehicle in top condition.
Do you need help finding the right auto repair tools or car maintenance equipment? Our team of experts can assist you in selecting the best products for your needs. We offer in-depth reviews of vehicle service tools, automotive diagnostic tools, and more.
Don’t let maintenance tasks overwhelm you. Contact us today for personalized assistance:
- Address: 456 Elm Street, Dallas, TX 75201, United States
- WhatsApp: +1 (641) 206-8880
- Website: CAR-TOOL.EDU.VN
Let CAR-TOOL.EDU.VN be your trusted resource for all your automotive maintenance needs. Whether you’re looking for automotive parts online or need guidance on vehicle maintenance schedules, we’re here to help!