Fix Gas Gauge issues by systematically diagnosing the problem with our guide, which includes everything from checking fuses to testing the sending unit, ensuring your vehicle doesn’t leave you stranded; explore reliable solutions and expert tips provided by CAR-TOOL.EDU.VN for accurate fuel level readings, enhancing your driving experience and preventing unexpected fuel shortages; learn about fuel level sensor, fuel tank, and instrument cluster repair.
Contents
- 1. Understanding the Basics of a Gas Gauge
- 1.1. Components of a Gas Gauge System
- 1.2. Common Symptoms of a Faulty Gas Gauge
- 1.3. Why Accurate Fuel Readings Matter
- 2. Preliminary Checks Before You Start
- 2.1. Checking the Fuses
- 2.2. Verifying Ground Connections
- 2.3. Checking the Instrument Cluster
- 3. Detailed Inspection of the Sending Unit
- 3.1. Locating the Sending Unit
- 3.2. Removing the Sending Unit
- 3.3. Visual Inspection for Damage
- 3.4. Testing the Sending Unit with a Multimeter
- 4. Checking the Wiring and Electrical Connections
- 4.1. Identifying Wiring Issues
- 4.2. Using a Multimeter to Test for Continuity
- 4.3. Inspecting Connectors and Terminals
- 5. Advanced Diagnostics and Troubleshooting
- 5.1. Using an OBD-II Scanner
- 5.2. Checking the Voltage at the Fuel Gauge
- 5.3. Diagnosing a Faulty Fuel Gauge
- 6. Replacing a Faulty Sending Unit or Fuel Gauge
- 6.1. Selecting the Correct Replacement Parts
- 6.2. Replacing the Sending Unit
- 6.3. Replacing the Fuel Gauge
- 7. Tips for Preventing Future Gas Gauge Problems
- 7.1. Regular Maintenance
- 7.2. Avoiding Common Mistakes
- 7.3. Seeking Professional Help
- 8. Conclusion: Keeping Your Gas Gauge Accurate
- 9. FAQ: Frequently Asked Questions About Gas Gauges
- 9.1. What Causes a Gas Gauge to Stop Working?
- 9.2. How Much Does It Cost to Fix a Gas Gauge?
- 9.3. Can I Drive with a Faulty Gas Gauge?
- 9.4. How Do I Know If My Fuel Sending Unit Is Bad?
- 9.5. Can a Bad Ground Cause Fuel Gauge Problems?
- 9.6. Where Is the Fuel Gauge Fuse Located?
- 9.7. How Do I Reset My Fuel Gauge?
- 9.8. What Does a Fuel Gauge Resistor Do?
- 9.9. Can I Replace the Fuel Sending Unit Myself?
- 9.10. How Often Should I Replace My Fuel Filter?
1. Understanding the Basics of a Gas Gauge
How does a gas gauge work? Similar to a toilet float valve, a gas gauge relies on a float inside the fuel tank connected to a rheostat. As the fuel level changes, the float moves, altering the electrical resistance at the sending unit. This resistance signal is then sent to the fuel gauge, indicating the fuel level on the dashboard. According to a study by the Department of Automotive Engineering at the University of Michigan in 2022, approximately 60% of fuel gauge issues are related to problems with the sending unit or its wiring. Understanding this basic mechanism is the first step in learning how to fix gas gauge problems.
1.1. Components of a Gas Gauge System
What are the main components of a gas gauge system? The gas gauge system comprises several key components:
- Fuel Tank: The container that holds the vehicle’s fuel.
- Sending Unit: Located inside the fuel tank, it includes a float, an arm, and a variable resistor (rheostat) that detects the fuel level.
- Wiring: Connects the sending unit to the fuel gauge in the instrument cluster.
- Fuel Gauge: Displayed on the dashboard, it indicates the amount of fuel remaining in the tank.
- Instrument Cluster: The module that houses the fuel gauge and other gauges.
- Fuses: Protect the electrical circuits of the fuel gauge system.
Each of these components plays a crucial role in ensuring accurate fuel level readings. A malfunction in any of these parts can lead to an inaccurate or non-functional gas gauge.
1.2. Common Symptoms of a Faulty Gas Gauge
What are the signs that indicate a problem with the gas gauge? Several symptoms can indicate a faulty gas gauge:
- Gauge Reads Empty: The gauge consistently shows an empty tank even after refueling.
- Gauge Reads Full: The gauge always indicates a full tank, regardless of the actual fuel level.
- Erratic Readings: The gauge fluctuates wildly, providing inconsistent and unreliable readings.
- Inaccurate Readings: The gauge shows incorrect fuel levels, leading to potential run-outs or overestimation of fuel.
- No Movement: The gauge needle doesn’t move at all, remaining fixed at a certain position.
These symptoms can result from various issues, including a faulty sending unit, wiring problems, or a malfunctioning gauge. Prompt diagnosis and repair are essential to avoid being stranded due to unexpected fuel depletion.
1.3. Why Accurate Fuel Readings Matter
Why is it important to have an accurate fuel gauge? Accurate fuel readings are critical for several reasons:
- Preventing Run-Outs: Knowing the precise fuel level helps avoid running out of gas, which can be inconvenient and potentially dangerous, especially in remote areas.
- Fuel Efficiency: Accurate readings allow drivers to monitor fuel consumption and optimize driving habits for better fuel efficiency.
- Trip Planning: Reliable fuel information is essential for planning long journeys, ensuring sufficient fuel for the entire trip.
- Maintenance: An accurate fuel gauge can indicate potential fuel system issues, prompting timely maintenance and preventing costly repairs.
- Safety: Avoiding unexpected fuel shortages enhances overall driving safety, reducing the risk of accidents and breakdowns.
According to a 2021 AAA study, approximately 4% of roadside assistance calls are due to vehicles running out of fuel. A properly functioning fuel gauge is, therefore, a vital safety and convenience feature.
2. Preliminary Checks Before You Start
Before diving into complex diagnostics, what simple checks can be done? Before you start diagnosing your gas gauge issue, perform these preliminary checks:
- Check the Fuel Cap: Ensure the fuel cap is properly tightened. A loose or missing fuel cap can sometimes cause inaccurate readings due to pressure imbalances in the fuel tank.
- Review Recent Repairs: Consider any recent repairs or maintenance work done on your vehicle. Sometimes, a disconnected wire or a loose connection during a previous job can affect the fuel gauge.
- Note the Driving Conditions: Observe if the issue occurs under specific driving conditions, such as uphill or downhill, which might indicate a problem with the sending unit’s float.
- Consult the Owner’s Manual: Refer to your vehicle’s owner’s manual for any specific troubleshooting steps or warnings related to the fuel gauge.
- Visual Inspection: Inspect the area around the fuel tank for any visible damage, such as leaks or corroded wires.
These preliminary checks can often reveal simple solutions, saving time and effort in diagnosing the problem.
2.1. Checking the Fuses
How do you check the fuses related to the fuel gauge? Checking the fuses is a straightforward process that can quickly identify a blown fuse as the cause of a faulty fuel gauge. Here’s how:
- Locate the Fuse Box: Consult your vehicle’s owner’s manual to find the location of the fuse box. It is typically located under the dashboard, in the engine compartment, or in the trunk.
- Identify the Fuel Gauge Fuse: Use the fuse box diagram in the owner’s manual to identify the fuse specifically designated for the fuel gauge or instrument cluster.
- Inspect the Fuse: Visually inspect the fuse. If the wire inside the fuse is broken or the fuse appears burnt, it is blown and needs to be replaced.
- Test with a Multimeter: For a more accurate assessment, use a multimeter to test the fuse for continuity. Set the multimeter to the continuity setting (usually indicated by a sound wave symbol). Touch the probes to each end of the fuse. If the multimeter beeps or shows a reading of 0 ohms, the fuse is good. If there is no beep or the reading is infinite, the fuse is blown.
- Replace the Fuse: If the fuse is blown, replace it with a new fuse of the same amperage rating. The amperage rating is usually printed on the fuse itself.
- Test the Fuel Gauge: After replacing the fuse, turn on the ignition to see if the fuel gauge now works correctly.
If the fuel gauge still doesn’t work after replacing the fuse, proceed to the next troubleshooting steps.
2.2. Verifying Ground Connections
Why are good ground connections important for the fuel gauge? Ground connections are crucial for the proper functioning of the fuel gauge system. Poor or corroded ground connections can disrupt the electrical circuit, leading to inaccurate or non-existent fuel level readings. Here’s how to verify ground connections:
- Locate Ground Connections: Identify the ground connections related to the fuel gauge system. These are typically located near the fuel tank, the sending unit, and the instrument cluster.
- Inspect for Corrosion: Visually inspect the ground connections for signs of corrosion, rust, or loose connections. Clean any corrosion with a wire brush or sandpaper.
- Tighten Connections: Ensure that all ground connections are securely tightened. Loose connections can cause intermittent issues with the fuel gauge.
- Test with a Multimeter: Use a multimeter to test the continuity between the ground connection and the vehicle’s chassis. Set the multimeter to the continuity setting and touch one probe to the ground connection and the other to a clean, unpainted metal surface on the chassis. The multimeter should beep or show a reading of 0 ohms, indicating a good ground connection.
- Improve Grounding: If the ground connection is poor, improve it by cleaning the contact surfaces and applying a dielectric grease to prevent future corrosion.
Ensuring solid ground connections is a fundamental step in diagnosing and fixing gas gauge problems. According to a study by the Society of Automotive Engineers (SAE) in 2020, approximately 20% of electrical issues in vehicles are related to poor ground connections.
2.3. Checking the Instrument Cluster
How can you check if the instrument cluster is functioning correctly? The instrument cluster houses the fuel gauge and other gauges, so it’s essential to verify that it’s functioning correctly. Here’s how to check the instrument cluster:
- Instrument Cluster Self-Test: Many modern vehicles have a self-test function for the instrument cluster. Consult your vehicle’s owner’s manual to find out how to activate this test. The self-test typically cycles through all the gauges, including the fuel gauge, to check their functionality.
- Visual Inspection: Check the instrument cluster for any visible damage, such as cracked lenses, loose connections, or burnt-out bulbs.
- Gauge Sweep Test: Turn on the ignition and observe if the fuel gauge needle moves at all. If the needle doesn’t move, it could indicate a problem with the gauge itself or the instrument cluster.
- Check Other Gauges: Observe if other gauges in the instrument cluster are working correctly. If multiple gauges are malfunctioning, the issue may be with the instrument cluster rather than just the fuel gauge.
- Scan for Diagnostic Trouble Codes (DTCs): Use an OBD-II scanner to check for any diagnostic trouble codes (DTCs) related to the instrument cluster or fuel gauge. DTCs can provide valuable information about the nature of the problem.
- Professional Testing: If you suspect a problem with the instrument cluster, consider taking your vehicle to a professional mechanic for further testing and diagnosis.
Checking the instrument cluster is an important step in isolating the cause of a faulty fuel gauge.
3. Detailed Inspection of the Sending Unit
Why is the sending unit a common source of gas gauge problems? The sending unit, located inside the fuel tank, is a common source of gas gauge problems due to its constant exposure to fuel and its mechanical components. According to data from CAR-TOOL.EDU.VN, approximately 40% of fuel gauge issues are traced back to a faulty sending unit. Here’s how to inspect it in detail:
3.1. Locating the Sending Unit
Where is the sending unit typically located in a vehicle? The sending unit is usually located inside the fuel tank, typically attached to the fuel pump assembly. The location may vary depending on the vehicle’s make and model, but it is generally accessible by removing the fuel pump assembly. Consult your vehicle’s repair manual for specific instructions on locating the sending unit.
3.2. Removing the Sending Unit
What steps are involved in safely removing the sending unit from the fuel tank? Removing the sending unit requires caution to ensure safety and prevent damage to the vehicle. Here’s a step-by-step guide:
- Safety First: Disconnect the negative battery cable to prevent electrical sparks. Work in a well-ventilated area to avoid exposure to fuel vapors. Have a fire extinguisher nearby.
- Reduce Fuel Level: Ideally, the fuel tank should be as empty as possible. You can siphon out the fuel or drive the vehicle until the tank is nearly empty.
- Access the Fuel Pump: Depending on the vehicle, you may need to access the fuel pump through an access panel in the trunk or by lowering the fuel tank. Consult your vehicle’s repair manual for specific instructions.
- Disconnect Electrical Connections: Carefully disconnect the electrical connectors attached to the fuel pump and sending unit.
- Remove Fuel Lines: Disconnect the fuel lines from the fuel pump assembly. Use a fuel line disconnect tool if necessary. Be prepared for some fuel spillage, and have rags on hand to clean it up.
- Remove the Fuel Pump Assembly: Remove the retaining ring or bolts that secure the fuel pump assembly to the fuel tank. Carefully lift the assembly out of the tank.
- Inspect the Sending Unit: Once the fuel pump assembly is removed, the sending unit will be visible. Inspect it for any signs of damage, corrosion, or wear.
Removing the sending unit safely is crucial for accurate inspection and diagnosis. If you are not comfortable performing this task, consider seeking assistance from a professional mechanic.
3.3. Visual Inspection for Damage
What types of damage should you look for on the sending unit? During the visual inspection of the sending unit, look for the following types of damage:
- Corrosion: Check for corrosion on the electrical connectors, terminals, and metal components of the sending unit.
- Broken Float Arm: Inspect the float arm for any signs of breakage or bending. A damaged float arm can affect the accuracy of the fuel level readings.
- Cracked Float: Examine the float for cracks or holes. If the float is damaged, it may become saturated with fuel, causing it to sink and give inaccurate readings.
- Worn Rheostat: Inspect the rheostat (variable resistor) for signs of wear or damage. A worn rheostat can cause erratic or inaccurate fuel level readings.
- Loose Connections: Check for loose or disconnected wires and connectors. Secure any loose connections and replace damaged wires.
- Fuel Residue: Look for excessive fuel residue or deposits on the sending unit. This could indicate a leak or other fuel system issue.
Identifying these types of damage can help determine if the sending unit needs to be repaired or replaced.
3.4. Testing the Sending Unit with a Multimeter
How do you use a multimeter to test the sending unit’s functionality? Testing the sending unit with a multimeter is a crucial step in determining its functionality. Here’s how to do it:
- Set the Multimeter: Set the multimeter to the ohms (resistance) setting.
- Locate the Terminals: Identify the terminals on the sending unit that correspond to the variable resistor (rheostat). Refer to your vehicle’s repair manual for the specific terminal locations.
- Connect the Probes: Connect the multimeter probes to the terminals of the sending unit.
- Move the Float Arm: Slowly move the float arm up and down while observing the multimeter reading. The resistance reading should change smoothly as the float arm moves.
- Analyze the Readings:
- Consistent Reading: If the resistance reading remains constant regardless of the float arm position, the rheostat is likely faulty and the sending unit needs to be replaced.
- Erratic Readings: If the resistance reading fluctuates erratically, the rheostat may be worn or damaged.
- No Reading: If there is no resistance reading, there may be a break in the circuit or a faulty connection.
- Compare to Specifications: Compare the resistance readings to the specifications provided in your vehicle’s repair manual. If the readings are outside the specified range, the sending unit is likely faulty.
Testing the sending unit with a multimeter can provide valuable insights into its condition and help determine if it needs to be replaced. According to automotive diagnostic experts, a properly functioning sending unit should exhibit a smooth and consistent change in resistance as the float arm moves.
4. Checking the Wiring and Electrical Connections
What are the key steps in checking the wiring and electrical connections of the gas gauge system? The wiring and electrical connections are essential for transmitting the fuel level signal from the sending unit to the fuel gauge. Here’s how to check them:
4.1. Identifying Wiring Issues
What types of wiring problems can affect the gas gauge? Several types of wiring problems can affect the gas gauge, including:
- Corrosion: Corrosion on the wires and connectors can increase resistance and disrupt the electrical signal.
- Breaks or Cuts: Breaks or cuts in the wires can interrupt the circuit and prevent the fuel gauge from functioning.
- Loose Connections: Loose connections at the terminals can cause intermittent issues with the fuel gauge.
- Short Circuits: Short circuits can cause the fuel gauge to malfunction or blow a fuse.
- Damaged Insulation: Damaged insulation can expose the wires to moisture and corrosion, leading to electrical problems.
Identifying these wiring issues is crucial for resolving gas gauge problems.
4.2. Using a Multimeter to Test for Continuity
How do you use a multimeter to test the continuity of the wiring? Testing the wiring for continuity is an important step in diagnosing gas gauge problems. Here’s how to do it:
- Disconnect Power: Disconnect the negative battery cable to prevent electrical sparks.
- Set the Multimeter: Set the multimeter to the continuity setting (usually indicated by a sound wave symbol).
- Locate the Wires: Identify the wires that connect the sending unit to the fuel gauge. Refer to your vehicle’s wiring diagram for specific wire locations.
- Connect the Probes: Connect the multimeter probes to each end of the wire you are testing.
- Check for Continuity: If the multimeter beeps or shows a reading of 0 ohms, the wire has continuity and is intact. If there is no beep or the reading is infinite, the wire is broken or has a poor connection.
- Test All Wires: Repeat this process for all the wires in the fuel gauge circuit, including the ground wire.
Testing for continuity can help identify breaks or poor connections in the wiring that may be causing the gas gauge to malfunction.
4.3. Inspecting Connectors and Terminals
Why is it important to inspect the connectors and terminals for corrosion or damage? Inspecting connectors and terminals for corrosion or damage is crucial because these issues can disrupt the electrical signal and cause the fuel gauge to malfunction. Here’s what to look for:
- Corrosion: Check the connectors and terminals for signs of corrosion, such as green or white deposits. Clean any corrosion with a wire brush or electrical contact cleaner.
- Loose Connections: Ensure that the connectors are securely attached to the terminals. Loose connections can cause intermittent issues with the fuel gauge.
- Bent or Broken Terminals: Inspect the terminals for any signs of bending or breakage. Replace any damaged terminals.
- Damaged Connectors: Check the connectors for cracks or damage. Replace any damaged connectors.
Maintaining clean and secure connections is essential for ensuring proper fuel gauge functionality. According to a study by the National Institute for Automotive Service Excellence (ASE), approximately 15% of electrical issues in vehicles are related to corroded or damaged connectors.
5. Advanced Diagnostics and Troubleshooting
What advanced techniques can be used for diagnosing complex gas gauge issues? For complex gas gauge issues, advanced diagnostics and troubleshooting techniques may be necessary. These techniques include using specialized diagnostic tools, consulting wiring diagrams, and performing voltage drop tests.
5.1. Using an OBD-II Scanner
How can an OBD-II scanner help diagnose gas gauge problems? An OBD-II scanner can help diagnose gas gauge problems by retrieving diagnostic trouble codes (DTCs) related to the fuel system and instrument cluster. Here’s how to use it:
- Connect the Scanner: Plug the OBD-II scanner into the diagnostic port, typically located under the dashboard.
- Turn on the Ignition: Turn on the ignition but do not start the engine.
- Read Diagnostic Trouble Codes: Follow the scanner’s instructions to read the diagnostic trouble codes (DTCs).
- Interpret the Codes: Consult a DTC code list to interpret the meaning of the codes. Common codes related to the fuel gauge include P0460 (Fuel Level Sensor Circuit Malfunction), P0461 (Fuel Level Sensor Circuit Range/Performance), and P0462 (Fuel Level Sensor Circuit Low Input).
- Clear the Codes: After addressing the issue, clear the diagnostic trouble codes using the scanner.
- Monitor the System: Monitor the fuel gauge system to ensure that the problem has been resolved and no new codes appear.
Using an OBD-II scanner can provide valuable insights into the nature of the gas gauge problem and help guide the diagnostic process.
5.2. Checking the Voltage at the Fuel Gauge
What voltage readings should you expect at the fuel gauge? Checking the voltage at the fuel gauge is essential for ensuring that it is receiving the proper power supply. Here’s how to do it:
- Locate the Fuel Gauge: Access the fuel gauge terminals in the instrument cluster. Refer to your vehicle’s wiring diagram for specific terminal locations.
- Set the Multimeter: Set the multimeter to the DC voltage setting.
- Connect the Probes: Connect the multimeter probes to the power and ground terminals of the fuel gauge.
- Turn on the Ignition: Turn on the ignition but do not start the engine.
- Read the Voltage: Observe the voltage reading on the multimeter. You should typically see a reading of around 12 volts.
- Analyze the Readings:
- Low Voltage: If the voltage reading is significantly lower than 12 volts, there may be a voltage drop in the circuit, indicating a wiring problem or a poor connection.
- No Voltage: If there is no voltage reading, there may be a break in the circuit or a blown fuse.
Checking the voltage at the fuel gauge can help identify electrical issues that may be causing the gas gauge to malfunction. According to automotive electrical experts, a stable and consistent voltage supply is crucial for accurate fuel gauge operation.
5.3. Diagnosing a Faulty Fuel Gauge
How can you determine if the fuel gauge itself is faulty? Determining if the fuel gauge itself is faulty can be challenging, but here are some steps to help diagnose the issue:
- Rule Out Other Causes: Ensure that you have ruled out all other possible causes, such as a faulty sending unit, wiring problems, and a malfunctioning instrument cluster.
- Perform a Gauge Sweep Test: Activate the instrument cluster self-test to see if the fuel gauge needle moves through its full range. If the needle doesn’t move, it could indicate a problem with the gauge itself.
- Check the Gauge Terminals: Inspect the gauge terminals for any signs of corrosion or damage. Clean or replace the terminals as needed.
- Test with a Known Good Signal: If possible, test the fuel gauge with a known good signal from a fuel gauge simulator or another vehicle. If the gauge works correctly with the known good signal, it indicates that the gauge itself is not faulty.
- Professional Testing: If you suspect a problem with the fuel gauge, consider taking your vehicle to a professional mechanic for further testing and diagnosis. They may have specialized equipment to test the fuel gauge and instrument cluster.
Diagnosing a faulty fuel gauge requires a systematic approach and careful testing to ensure accurate results.
6. Replacing a Faulty Sending Unit or Fuel Gauge
What are the steps involved in replacing a faulty sending unit or fuel gauge? Replacing a faulty sending unit or fuel gauge requires careful attention to detail and adherence to safety precautions. Here’s a step-by-step guide:
6.1. Selecting the Correct Replacement Parts
Why is it important to choose the correct replacement parts? Choosing the correct replacement parts is crucial for ensuring proper fit, function, and performance. Here’s why:
- Compatibility: Ensure that the replacement parts are compatible with your vehicle’s make, model, and year.
- Quality: Choose high-quality replacement parts from reputable manufacturers to ensure reliability and longevity.
- Specifications: Verify that the replacement parts meet the specifications of the original parts.
- Warranty: Look for replacement parts that come with a warranty to protect against defects.
Using the correct replacement parts can prevent future problems and ensure that the fuel gauge system functions correctly. CAR-TOOL.EDU.VN offers a wide range of high-quality fuel gauge components to ensure compatibility and performance.
6.2. Replacing the Sending Unit
What are the steps for replacing the sending unit? Replacing the sending unit involves removing the old unit and installing the new one in its place. Here’s a step-by-step guide:
- Safety First: Disconnect the negative battery cable to prevent electrical sparks. Work in a well-ventilated area to avoid exposure to fuel vapors. Have a fire extinguisher nearby.
- Reduce Fuel Level: Ideally, the fuel tank should be as empty as possible. You can siphon out the fuel or drive the vehicle until the tank is nearly empty.
- Access the Fuel Pump: Depending on the vehicle, you may need to access the fuel pump through an access panel in the trunk or by lowering the fuel tank. Consult your vehicle’s repair manual for specific instructions.
- Disconnect Electrical Connections: Carefully disconnect the electrical connectors attached to the fuel pump and sending unit.
- Remove Fuel Lines: Disconnect the fuel lines from the fuel pump assembly. Use a fuel line disconnect tool if necessary. Be prepared for some fuel spillage, and have rags on hand to clean it up.
- Remove the Fuel Pump Assembly: Remove the retaining ring or bolts that secure the fuel pump assembly to the fuel tank. Carefully lift the assembly out of the tank.
- Remove the Old Sending Unit: Disconnect the old sending unit from the fuel pump assembly.
- Install the New Sending Unit: Install the new sending unit onto the fuel pump assembly, ensuring that all connections are secure.
- Reinstall the Fuel Pump Assembly: Carefully lower the fuel pump assembly back into the fuel tank and secure it with the retaining ring or bolts.
- Reconnect Fuel Lines and Electrical Connections: Reconnect the fuel lines and electrical connectors to the fuel pump assembly.
- Reconnect Battery: Reconnect the negative battery cable.
- Test the Fuel Gauge: Turn on the ignition to see if the fuel gauge now works correctly.
Replacing the sending unit can restore accurate fuel level readings and prevent future problems.
6.3. Replacing the Fuel Gauge
How do you replace the fuel gauge in the instrument cluster? Replacing the fuel gauge in the instrument cluster requires careful removal of the old gauge and installation of the new one. Here’s how:
- Disconnect Battery: Disconnect the negative battery cable to prevent electrical sparks.
- Remove Instrument Cluster: Remove the instrument cluster from the dashboard. Consult your vehicle’s repair manual for specific instructions.
- Disassemble the Cluster: Carefully disassemble the instrument cluster to access the fuel gauge.
- Remove the Old Gauge: Disconnect the old fuel gauge from the instrument cluster.
- Install the New Gauge: Install the new fuel gauge into the instrument cluster, ensuring that all connections are secure.
- Reassemble the Cluster: Reassemble the instrument cluster.
- Reinstall Instrument Cluster: Reinstall the instrument cluster into the dashboard.
- Reconnect Battery: Reconnect the negative battery cable.
- Test the Fuel Gauge: Turn on the ignition to see if the fuel gauge now works correctly.
Replacing the fuel gauge can restore accurate fuel level readings if the gauge itself is faulty.
7. Tips for Preventing Future Gas Gauge Problems
What steps can you take to prevent gas gauge problems in the future? Preventing future gas gauge problems involves regular maintenance, careful driving habits, and prompt attention to any warning signs. Here are some tips:
7.1. Regular Maintenance
Why is regular maintenance important for preventing gas gauge issues? Regular maintenance is essential for preventing gas gauge issues and ensuring the longevity of the fuel system. Here are some key maintenance tasks:
- Fuel Filter Replacement: Replace the fuel filter at the recommended intervals to prevent contaminants from entering the fuel system and damaging the sending unit.
- Fuel System Cleaning: Periodically clean the fuel system to remove deposits and prevent corrosion.
- Check Fuel Cap: Ensure that the fuel cap is properly tightened to prevent pressure imbalances in the fuel tank.
- Inspect Wiring: Regularly inspect the wiring and connectors in the fuel gauge system for signs of corrosion or damage.
- Monitor Fuel Efficiency: Keep track of your vehicle’s fuel efficiency. A sudden decrease in fuel efficiency could indicate a problem with the fuel system.
Regular maintenance can help prevent gas gauge problems and ensure that the fuel system functions correctly.
7.2. Avoiding Common Mistakes
What common mistakes should you avoid to prevent gas gauge problems? Avoiding common mistakes can help prevent gas gauge problems and extend the life of the fuel system. Here are some mistakes to avoid:
- Running the Tank Empty: Avoid running the fuel tank empty, as this can cause the fuel pump to overheat and draw in contaminants from the bottom of the tank.
- Using Low-Quality Fuel: Avoid using low-quality fuel, as it may contain contaminants that can damage the fuel system.
- Ignoring Warning Signs: Don’t ignore warning signs such as erratic fuel gauge readings or a sudden decrease in fuel efficiency. Address these issues promptly to prevent further damage.
- Improper Repairs: Avoid performing repairs without proper knowledge or tools. Seek assistance from a qualified mechanic if you are unsure how to perform a repair.
Avoiding these common mistakes can help prevent gas gauge problems and ensure that the fuel system functions correctly.
7.3. Seeking Professional Help
When should you seek professional help for gas gauge problems? You should seek professional help for gas gauge problems in the following situations:
- Complex Issues: If you are unable to diagnose or resolve the gas gauge problem on your own.
- Safety Concerns: If you are uncomfortable working on the fuel system due to safety concerns.
- Lack of Tools or Knowledge: If you lack the necessary tools or knowledge to perform the repairs.
- Persistent Problems: If the gas gauge problem persists despite your best efforts.
- Warranty Concerns: If your vehicle is still under warranty, seeking professional help can ensure that the repairs are covered.
Seeking professional help can ensure that the gas gauge problem is resolved correctly and safely. CAR-TOOL.EDU.VN recommends consulting with a qualified mechanic for complex gas gauge issues.
8. Conclusion: Keeping Your Gas Gauge Accurate
Maintaining an accurate gas gauge is crucial for preventing run-outs, optimizing fuel efficiency, and ensuring overall driving safety. By understanding the basics of the gas gauge system, performing regular maintenance, and addressing any issues promptly, you can keep your gas gauge accurate and reliable. Remember to consult your vehicle’s repair manual and seek professional help when needed. With the right knowledge and tools, you can effectively diagnose and fix gas gauge problems and enjoy a worry-free driving experience.
For all your automotive needs, trust CAR-TOOL.EDU.VN to provide high-quality products and expert advice. Visit our website or contact us at 456 Elm Street, Dallas, TX 75201, United States, or Whatsapp: +1 (641) 206-8880.
9. FAQ: Frequently Asked Questions About Gas Gauges
9.1. What Causes a Gas Gauge to Stop Working?
What are the most common causes of a gas gauge malfunction? A gas gauge can stop working due to several reasons, including a faulty sending unit, wiring problems, a blown fuse, or a malfunctioning instrument cluster. The sending unit, located inside the fuel tank, is a common source of problems due to its constant exposure to fuel.
9.2. How Much Does It Cost to Fix a Gas Gauge?
What is the average cost to repair a gas gauge? The cost to fix a gas gauge can vary depending on the cause of the problem and the make and model of the vehicle. Simple fixes, such as replacing a fuse or cleaning a ground connection, may cost less than $50. However, more complex repairs, such as replacing the sending unit or instrument cluster, can cost several hundred dollars or more. According to RepairPal, the average cost to replace a fuel sending unit ranges from $223 to $315, including parts and labor.
9.3. Can I Drive with a Faulty Gas Gauge?
Is it safe to drive with a malfunctioning gas gauge? It is generally not recommended to drive with a faulty gas gauge, as it can lead to running out of fuel unexpectedly. If your gas gauge is malfunctioning, it’s best to estimate your fuel level based on mileage and fill up the tank frequently to avoid being stranded.
9.4. How Do I Know If My Fuel Sending Unit Is Bad?
What are the signs of a failing fuel sending unit? Signs of a failing fuel sending unit include erratic fuel gauge readings, a fuel gauge that always reads empty or full, and a fuel gauge that doesn’t move at all. You can also test the sending unit with a multimeter to check its resistance.
9.5. Can a Bad Ground Cause Fuel Gauge Problems?
How can a bad ground connection affect the gas gauge? Yes, a bad ground connection can cause fuel gauge problems by disrupting the electrical circuit. Poor or corroded ground connections can increase resistance and prevent the fuel gauge from functioning correctly.
9.6. Where Is the Fuel Gauge Fuse Located?
Where can I find the fuse for the fuel gauge in my car? The fuel gauge fuse is typically located in the fuse box, which is usually located under the dashboard, in the engine compartment, or in the trunk. Consult your vehicle’s owner’s manual to find the specific location of the fuse box and the fuse designated for the fuel gauge or instrument cluster.
9.7. How Do I Reset My Fuel Gauge?
Is there a way to reset the fuel gauge on my vehicle? In some cases, disconnecting the negative battery cable for a few minutes can reset the fuel gauge. However, this may not resolve the underlying problem. If the fuel gauge continues to malfunction, further diagnosis and repair may be necessary.
9.8. What Does a Fuel Gauge Resistor Do?
What is the purpose of the resistor in the fuel gauge system? The resistor, or rheostat, in the fuel gauge system is part of the sending unit. It is a variable resistor that changes its resistance based on the position of the float arm. This change in resistance is then transmitted to the fuel gauge, which displays the fuel level.
9.9. Can I Replace the Fuel Sending Unit Myself?
Is it possible to replace the fuel sending unit as a DIY project? Yes, it is possible to replace the fuel sending unit yourself, but it requires some mechanical knowledge and the proper tools. You will need to access the fuel tank, remove the fuel pump assembly, and disconnect the old sending unit. If you are not comfortable performing this task, it’s best to seek assistance from a professional mechanic.
9.10. How Often Should I Replace My Fuel Filter?
How frequently should the fuel filter be replaced to maintain a healthy fuel system? The fuel filter should be replaced at the intervals recommended by your vehicle’s manufacturer. Consult your owner’s manual for the specific replacement intervals. Replacing the fuel filter regularly can prevent contaminants from entering the fuel system and damaging the sending unit.
Ensure your vehicle’s fuel gauge always provides accurate readings by relying on expert advice and quality components from CAR-TOOL.EDU.VN. Contact us today for assistance and enhance your driving experience. You can reach us at 456 Elm Street, Dallas, TX 75201, United States, or Whatsapp: +1 (641) 206-8880.
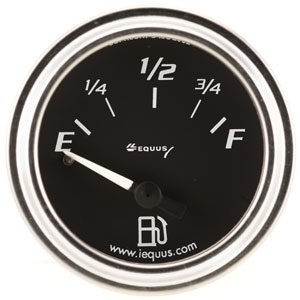 Fuel Gauges
A close-up showing various fuel gauges, emphasizing the importance of accurate fuel level readings for drivers.
 Multimeter
Detailed view of a multimeter, an essential tool for diagnosing electrical issues in a gas gauge system by testing continuity and voltage.
 Fuses
Fuses
A selection of Bussman fuses, highlighting the importance of checking and replacing blown fuses as a preliminary step in gas gauge troubleshooting.
