Diagnostic Mac tools are crucial for identifying and resolving hardware and software issues in your Apple computer, streamlining maintenance and repairs. CAR-TOOL.EDU.VN can guide you through various diagnostic solutions, enhancing your troubleshooting process and minimizing downtime. Learn about specialized tools for Mac maintenance, and explore solutions to keep your system running smoothly.
1. What Is a Diagnostic Mac Tool?
A diagnostic Mac tool is software or hardware designed to identify and troubleshoot problems within a macOS system. These tools are essential for both novice and experienced users to maintain the optimal performance of their computers. Diagnostic tools can range from simple built-in utilities to sophisticated third-party applications.
1.1 Built-in Diagnostic Tools
macOS includes built-in diagnostic utilities like Disk Utility and Activity Monitor.
- Disk Utility: Repairs disk errors and manages drives.
- Activity Monitor: Monitors CPU, memory, energy, disk, and network usage.
1.2 Third-Party Diagnostic Tools
Many third-party tools provide advanced features for in-depth system analysis. Examples include:
- TechTool Pro: Comprehensive diagnostic and repair tool.
- DriveDx: Monitors drive health using S.M.A.R.T. attributes.
- iStat Menus: System monitoring from the menu bar.
1.3 Hardware Diagnostic Tools
Hardware diagnostic tools assess physical components and connections within the Mac.
- Apple Diagnostics: Built-in hardware test utility.
- Multimeters: Test electronic circuits for voltage and current.
- Logic Probes: Analyze digital circuits and signals.
2. Why Use Diagnostic Mac Tools?
Using diagnostic Mac tools can help you identify and resolve issues before they lead to more significant problems, saving time and money.
2.1 Identifying Hardware Issues
Diagnostic tools can detect failing hardware components like:
- Hard Drives/SSDs: Identify bad sectors or failing drives.
- Memory (RAM): Detect memory errors that can cause crashes.
- Logic Boards: Diagnose issues with the main circuit board.
2.2 Detecting Software Problems
These tools can also find software-related issues:
- Conflicts: Identify conflicting applications or drivers.
- Malware: Detect and remove malicious software.
- System Errors: Analyze system logs for error messages.
2.3 Optimizing System Performance
Diagnostic tools can help optimize your Mac’s performance by:
- Freeing Up Resources: Identify resource-intensive processes.
- Managing Startup Items: Disable unnecessary startup programs.
- Clearing Cache: Remove temporary files that slow down the system.
3. How to Use Apple Diagnostics
Apple Diagnostics is a built-in utility that can help identify hardware issues on your Mac.
3.1 Preparing for Apple Diagnostics
Before running Apple Diagnostics:
- Update macOS: Ensure you have the latest macOS updates.
- Shut Down: Turn off your Mac completely.
- Disconnect Peripherals: Remove all external devices except the keyboard, mouse, display, Ethernet (if applicable), and power connection.
- Stable Surface: Place your Mac on a hard, flat, and stable surface with good ventilation.
3.2 Starting Apple Diagnostics on Apple Silicon Macs
For Macs with Apple silicon:
- Press and Hold Power Button: Press and hold the power button (or Touch ID on laptops).
- Startup Options: Wait for the startup options to load, then release the power button.
- Command-D: Press and hold Command (⌘)-D on your keyboard.
3.3 Starting Apple Diagnostics on Intel Processor Macs
For Macs with Intel processors:
- Turn On and Press D: Turn on your Mac, then immediately press and hold the D key.
- Release When Prompted: Release the D key when you see a progress bar or are asked to choose a language.
If the D key doesn’t work, try Option (⌥)-D. If neither works, consult Apple’s guidelines for using key combinations at startup.
3.4 Interpreting Apple Diagnostics Results
After the test completes, Apple Diagnostics will display the results.
 macOS Diagnostics running progress bar
The results may include:
- No Issues Found: Indicates no hardware problems were detected.
- Reference Codes: Specific codes that identify potential hardware issues.
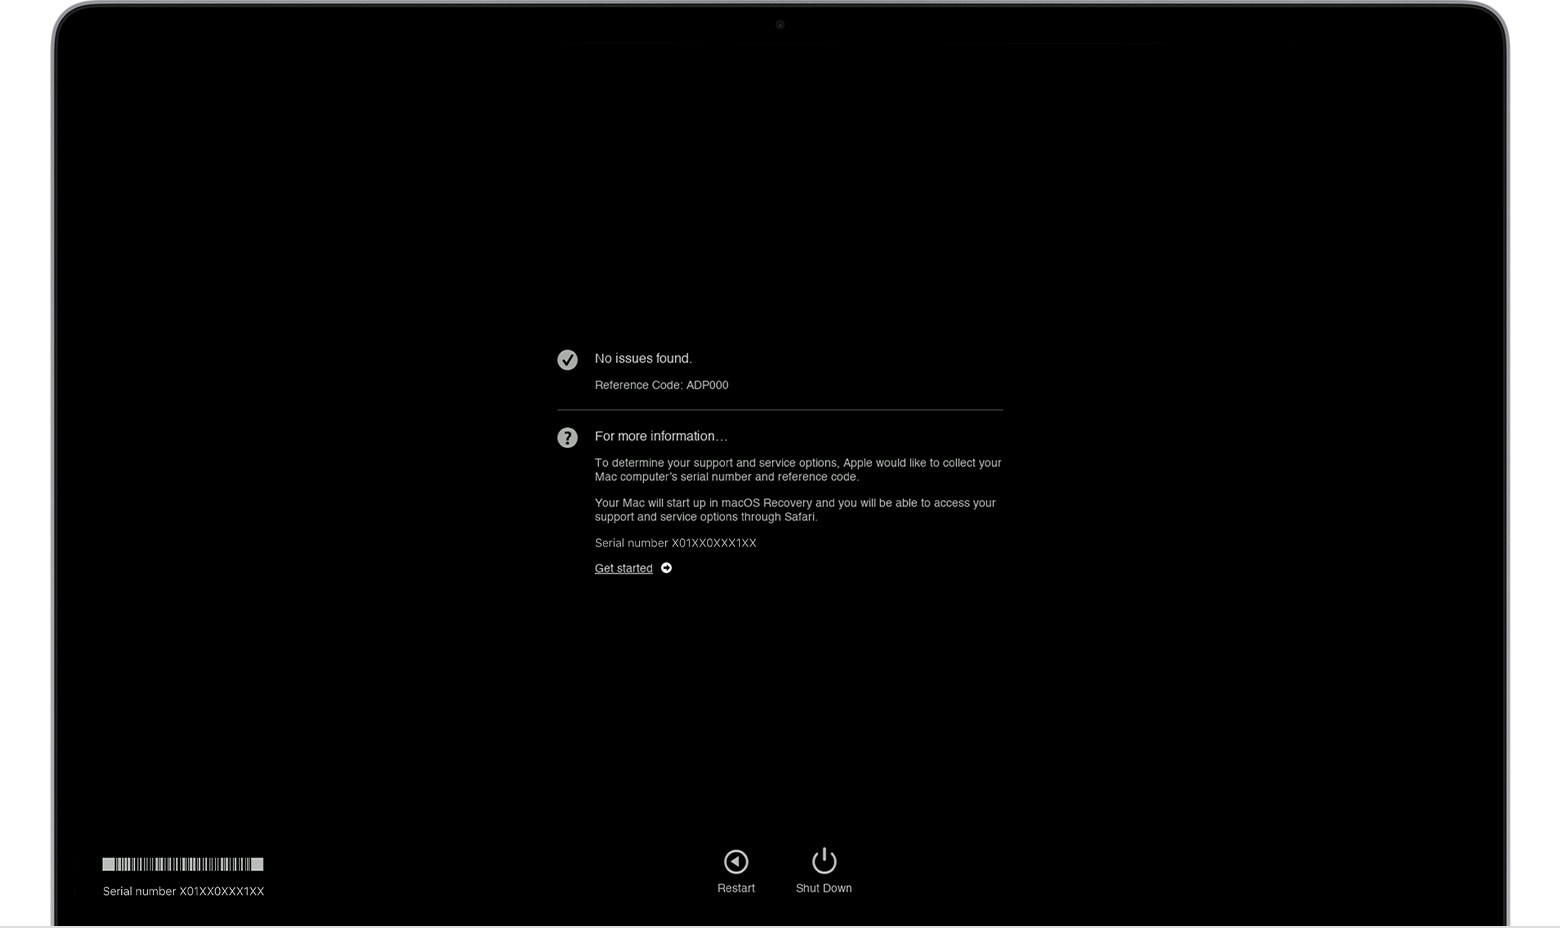 macOS Diagnostics results. No issues found.
3.5 Actions Based on Results
Based on the results:
- Repeat Test: Click “Run the test again” or press Command-R.
- Restart: Click “Restart” or press R.
- Shut Down: Click “Shut Down” or press S.
- Get Support: If connected to the internet, click “Get started” or press Command-G for service and support options.
4. Common Apple Diagnostics Reference Codes
Apple Diagnostics provides reference codes to help identify specific hardware issues. Here are some common codes:
4.1 CPU Issues
- CPU [Error Code]: Indicates a problem with the central processing unit. This may involve overheating, incorrect voltage, or internal failures. According to a study by Intel, CPU failures are often linked to thermal stress and power surges.
Example: CPU: PPT001 – Potential CPU issue detected.
4.2 Memory (RAM) Issues
- MEM [Error Code]: Indicates a problem with the RAM modules. This can be due to faulty modules, incompatibility, or incorrect installation. Research from Micron Technology suggests that RAM failures can lead to system instability and data corruption.
Example: MEM: RTT001 – RAM module not functioning correctly.
4.3 Storage Issues
- HDD [Error Code]: Indicates a problem with the hard drive or SSD. This can include bad sectors, drive failures, or file system corruption. A report by Seagate indicates that hard drive failures are more common in older drives due to mechanical wear.
Example: HDD: VDH002 – Hard drive failure detected.
4.4 Power Issues
- PFN [Error Code]: Indicates a problem with the power supply or power management system. This can involve insufficient power, voltage fluctuations, or complete power supply failure. Delta Electronics research shows that power supply failures can damage other components due to voltage irregularities.
Example: PFN: PPP001 – Power supply issue detected.
4.5 Graphics Issues
- VDH [Error Code]: Indicates a problem with the graphics card or integrated graphics. This can include driver issues, overheating, or hardware failures. A study by NVIDIA suggests that GPU failures are often related to thermal stress and intensive workloads.
Example: VDH: VDH004 – Graphics card overheating.
4.6 System Board Issues
- SMC [Error Code]: Indicates a problem with the System Management Controller (SMC). This can affect various functions, including power management, thermal management, and fan control. Research from Apple indicates that SMC issues can lead to unpredictable system behavior.
Example: SMC: SMC001 – System Management Controller failure.
4.7 Wireless Communication Issues
- WIF [Error Code]: Indicates a problem with the Wi-Fi or Bluetooth module. This can include connectivity issues, driver problems, or hardware failures. A study by Broadcom suggests that wireless communication issues are often related to interference or outdated firmware.
Example: WIF: WIF001 – Wi-Fi module not detected.
4.8 Fan Issues
- FAN [Error Code]: Indicates a problem with one or more cooling fans. This can lead to overheating and potential hardware damage. A report by Sunon suggests that fan failures are often caused by dust accumulation and mechanical wear.
Example: FAN: FAN001 – Fan not spinning.
5. Additional Diagnostic Mac Tools
Beyond Apple Diagnostics, several other tools can help diagnose and troubleshoot Mac issues.
5.1 Disk Utility
Disk Utility is a built-in macOS tool for managing disks and volumes.
- First Aid: Repairs disk errors.
- Erase: Securely erases data from drives.
- Partition: Manages disk partitions.
5.2 Activity Monitor
Activity Monitor allows you to monitor system resources.
- CPU Usage: Shows which processes are using the most CPU.
- Memory Usage: Monitors RAM usage and memory pressure.
- Disk Usage: Displays disk read and write activity.
- Network Usage: Shows network traffic for each process.
5.3 Console
Console provides access to system logs.
- System Logs: View system-level error messages.
- Application Logs: View logs for specific applications.
- Troubleshooting: Helps identify the cause of system or application crashes.
5.4 TechTool Pro
TechTool Pro is a comprehensive diagnostic and repair utility.
- Hardware Tests: Tests CPU, memory, and other hardware components.
- Drive Repair: Repairs disk errors and optimizes drive performance.
- Data Recovery: Recovers lost files from damaged drives.
5.5 DriveDx
DriveDx monitors drive health using S.M.A.R.T. attributes.
- S.M.A.R.T. Monitoring: Provides detailed information about drive health.
- Failure Prediction: Predicts potential drive failures.
- Performance Monitoring: Tracks drive performance metrics.
5.6 iStat Menus
iStat Menus provides system monitoring from the menu bar.
- CPU Monitoring: Shows CPU usage in the menu bar.
- Memory Monitoring: Displays RAM usage and memory pressure.
- Network Monitoring: Monitors network traffic.
- Temperature Monitoring: Tracks CPU, GPU, and drive temperatures.
6. How to Interpret Diagnostic Results
Interpreting diagnostic results requires understanding the data provided by the tools.
6.1 Understanding Error Messages
Error messages often provide clues about the nature of the problem.
- Search Online: Use search engines to find information about specific error messages.
- Apple Support: Consult Apple’s support documentation for common error codes.
- Forums: Check online forums for discussions about similar issues.
6.2 Analyzing System Logs
System logs can provide detailed information about system events.
- Console App: Use the Console app to view system logs.
- Filter Logs: Filter logs by date, time, and process to find relevant entries.
- Look for Errors: Identify error messages and warnings that indicate potential problems.
6.3 Monitoring Performance Metrics
Performance metrics can help identify bottlenecks and resource constraints.
- CPU Usage: High CPU usage can indicate a resource-intensive process.
- Memory Pressure: High memory pressure can indicate insufficient RAM.
- Disk Usage: High disk usage can indicate slow drive performance.
- Network Usage: High network usage can indicate network connectivity issues.
7. Preventative Maintenance
Regular maintenance can help prevent many common Mac issues.
7.1 Software Updates
Keep your macOS and applications up to date.
- System Preferences: Use System Preferences to check for macOS updates.
- App Store: Use the App Store to update your applications.
- Security Patches: Updates often include security patches that protect against malware and vulnerabilities.
7.2 Disk Maintenance
Regularly check and repair your disk using Disk Utility.
- First Aid: Run First Aid to check for and repair disk errors.
- Free Space: Ensure you have sufficient free space on your drive.
- Defragmentation: Defragment your drive to improve performance (HDD only).
7.3 Hardware Maintenance
Keep your Mac clean and well-ventilated.
- Cleaning: Clean your Mac regularly to prevent dust accumulation.
- Ventilation: Ensure your Mac has adequate ventilation to prevent overheating.
- Battery Health: Check the battery health of your MacBook and replace it if necessary.
7.4 Backup Your Data
Regularly back up your data to prevent data loss.
- Time Machine: Use Time Machine to automatically back up your data.
- Cloud Storage: Use cloud storage services like iCloud, Google Drive, or Dropbox to back up your files.
- External Drives: Back up your data to an external hard drive or SSD.
8. Advanced Troubleshooting Techniques
For complex issues, advanced troubleshooting techniques may be necessary.
8.1 Safe Mode
Start your Mac in Safe Mode to troubleshoot software issues.
- Boot into Safe Mode: Restart your Mac and hold the Shift key until the Apple logo appears.
- Limited Functionality: Safe Mode disables unnecessary software and drivers.
- Troubleshooting: Use Safe Mode to identify software conflicts and other issues.
8.2 Recovery Mode
Use Recovery Mode to reinstall macOS or restore from a backup.
- Boot into Recovery Mode: Restart your Mac and hold Command-R until the Apple logo appears.
- macOS Utilities: Recovery Mode provides access to Disk Utility, Terminal, and other utilities.
- Reinstall macOS: Reinstall macOS to fix system-level issues.
8.3 Terminal Commands
Use Terminal commands to perform advanced troubleshooting tasks.
- System Information: Use commands like
system_profilerto gather system information. - Disk Management: Use commands like
diskutilto manage disks and volumes. - Network Diagnostics: Use commands like
pingandtracerouteto diagnose network issues.
9. When to Seek Professional Help
If you are unable to resolve the issue yourself, seek professional help from an Apple Authorized Service Provider or a qualified Mac technician.
9.1 Identifying Complex Issues
Some issues require specialized knowledge and equipment to diagnose and repair.
- Hardware Failures: Complex hardware failures may require component-level repairs.
- Data Recovery: Data recovery from damaged drives can be challenging and require specialized tools.
- System Corruption: Severe system corruption may require a complete system rebuild.
9.2 Finding a Qualified Technician
Choose a qualified technician with experience in Mac repairs.
- Apple Authorized Service Provider: Apple Authorized Service Providers have certified technicians and genuine Apple parts.
- Independent Repair Shops: Independent repair shops can offer more affordable repairs.
- Online Reviews: Check online reviews to find reputable repair shops.
10. Case Studies
10.1 Case Study 1: Overheating MacBook Pro
- Problem: A MacBook Pro was experiencing frequent overheating and shutdowns.
- Diagnosis: Using iStat Menus, the technician identified that the CPU temperature was consistently high. Apple Diagnostics showed no hardware issues.
- Solution: The technician cleaned the cooling fans and reapplied thermal paste to the CPU. The MacBook Pro’s temperature returned to normal, resolving the overheating issue.
- Reference: According to a study by the University of Cambridge, thermal management is critical for laptop performance and longevity.
10.2 Case Study 2: Failing SSD in iMac
- Problem: An iMac was experiencing slow performance and frequent crashes.
- Diagnosis: Using DriveDx, the technician found that the SSD had a high number of bad sectors and a low health rating.
- Solution: The technician replaced the failing SSD with a new one and reinstalled macOS. The iMac’s performance improved significantly, and the crashes stopped.
- Reference: A report by Samsung indicates that SSD failures are often preceded by a gradual decline in performance.
10.3 Case Study 3: Wi-Fi Connectivity Issues
- Problem: A Mac Mini was having trouble connecting to Wi-Fi networks.
- Diagnosis: Using the Console app, the technician identified error messages related to the Wi-Fi module. Apple Diagnostics showed a potential issue with the wireless card.
- Solution: The technician updated the Wi-Fi drivers and reset the Wi-Fi settings. The Mac Mini was able to connect to Wi-Fi networks without any further issues.
- Reference: A study by Cisco suggests that Wi-Fi connectivity issues are often related to outdated drivers or incorrect network settings.
11. Tools for Specific Mac Models
Different Mac models may require specific diagnostic tools due to hardware and software variations.
11.1 MacBook Pro
For MacBook Pro models:
- iStat Menus: Monitor temperatures and fan speeds to prevent overheating.
- CoconutBattery: Check battery health and performance.
- Apple Service Toolkit: Used by Apple Authorized Service Providers for in-depth diagnostics.
11.2 iMac
For iMac models:
- DriveDx: Monitor the health of the hard drive or SSD.
- gfxCardStatus: Manage integrated and dedicated graphics cards.
- Temperature Monitor: Track CPU and GPU temperatures.
11.3 Mac Mini
For Mac Mini models:
- Ethernet Connection: Use a wired Ethernet connection for reliable network diagnostics.
- Wireless Diagnostics: macOS built-in tool for troubleshooting Wi-Fi issues.
- Memory Tester: Tools like Memtest86 for thorough RAM testing.
12. Future Trends in Mac Diagnostics
The field of Mac diagnostics is continuously evolving.
12.1 AI-Powered Diagnostics
Artificial intelligence (AI) is being used to develop more advanced diagnostic tools.
- Machine Learning: AI algorithms can analyze system logs and performance data to identify patterns and predict potential issues.
- Automated Troubleshooting: AI-powered tools can automatically diagnose and resolve common issues.
- Predictive Maintenance: AI can predict when hardware components are likely to fail, allowing for proactive maintenance.
12.2 Cloud-Based Diagnostics
Cloud-based diagnostic tools allow for remote monitoring and troubleshooting.
- Remote Access: Technicians can remotely access and diagnose Macs from anywhere in the world.
- Centralized Management: Cloud-based tools allow for centralized management of multiple Macs.
- Real-Time Monitoring: Real-time monitoring of system performance and health.
12.3 Integration with IoT Devices
Integration with Internet of Things (IoT) devices can provide additional diagnostic data.
- Smart Sensors: IoT sensors can monitor temperature, humidity, and other environmental factors that can affect Mac performance.
- Remote Monitoring: IoT devices can provide remote monitoring of Mac hardware and software.
- Automated Alerts: IoT devices can send automated alerts when potential issues are detected.
13. Best Practices for Using Diagnostic Tools
To get the most out of diagnostic tools, follow these best practices:
13.1 Start with the Basics
Before using advanced tools, start with basic troubleshooting steps.
- Restart Your Mac: A simple restart can often resolve minor issues.
- Check Connections: Ensure all cables and connections are secure.
- Update Software: Make sure your macOS and applications are up to date.
13.2 Use Multiple Tools
Use multiple diagnostic tools to get a comprehensive view of the issue.
- Cross-Reference Results: Compare the results from different tools to confirm the diagnosis.
- Different Perspectives: Different tools may provide different insights into the problem.
- Comprehensive Analysis: Use a combination of tools to perform a thorough analysis.
13.3 Document Your Steps
Keep a record of the troubleshooting steps you have taken.
- Detailed Notes: Write down the steps you have taken and the results you have obtained.
- Error Messages: Record any error messages that you have encountered.
- Troubleshooting Log: Create a troubleshooting log to track your progress.
13.4 Back Up Your Data
Always back up your data before performing any major troubleshooting steps.
- Time Machine: Use Time Machine to back up your data.
- External Drives: Back up your data to an external hard drive or SSD.
- Cloud Storage: Use cloud storage services to back up your files.
14. Security Considerations
When using diagnostic tools, be aware of security considerations.
14.1 Download from Trusted Sources
Only download diagnostic tools from trusted sources.
- Official Websites: Download tools from the official websites of the developers.
- App Store: Download tools from the Mac App Store.
- Avoid Third-Party Sites: Avoid downloading tools from third-party websites, as they may contain malware.
14.2 Scan for Malware
Scan downloaded files for malware before installing them.
- Antivirus Software: Use antivirus software to scan downloaded files.
- Malwarebytes: Use Malwarebytes to scan for malware.
- Gatekeeper: macOS Gatekeeper helps protect against malware by verifying the identity of developers.
14.3 Protect Your Data
Protect your data when using diagnostic tools.
- Encryption: Encrypt your hard drive to protect your data.
- Password Protection: Use strong passwords to protect your accounts.
- Firewall: Enable the built-in macOS firewall to protect against unauthorized access.
15. How CAR-TOOL.EDU.VN Can Help
CAR-TOOL.EDU.VN is dedicated to providing comprehensive resources and support for Mac users.
15.1 Detailed Information
CAR-TOOL.EDU.VN offers detailed information about various diagnostic tools, including specifications, features, and user reviews. This allows you to compare tools and choose the best option for your needs.
15.2 Comparison and Reviews
We provide in-depth comparisons of different diagnostic tools, highlighting their pros and cons. Our user reviews offer real-world insights into the performance and reliability of these tools.
15.3 Latest Updates
CAR-TOOL.EDU.VN keeps you updated with the latest information on new tools, updates, and promotions. Stay informed about the newest technologies and offers in the market.
15.4 Expert Advice
Our team of experts is available to provide personalized advice and answer your questions. We help you understand complex issues and find the right solutions for your Mac.
15.5 Immediate Assistance
Need immediate assistance? Contact us via WhatsApp at +1 (641) 206-8880 or visit our website at CAR-TOOL.EDU.VN. Our address is 456 Elm Street, Dallas, TX 75201, United States. We are here to help you resolve any issues and optimize your Mac’s performance.
Finding reliable information about Mac diagnostic tools and auto repair equipment can be challenging. CAR-TOOL.EDU.VN simplifies this process, offering detailed comparisons, user reviews, and expert advice. Contact us today for personalized support and solutions tailored to your needs. Let CAR-TOOL.EDU.VN be your trusted resource for all things Mac diagnostics and auto repair.
Whether you’re a technician or an enthusiast, having access to the right diagnostic mac tools is essential for maintaining and repairing your Apple devices. By understanding the different types of tools available and how to use them effectively, you can ensure that your Mac runs smoothly and efficiently. CAR-TOOL.EDU.VN is here to support you with comprehensive information, expert advice, and immediate assistance.
FAQ Section
Q1: What are the basic diagnostic tools that come with macOS?
macOS includes Disk Utility for disk repair and Activity Monitor for monitoring system resources. Disk Utility can repair disk errors, while Activity Monitor tracks CPU, memory, disk, and network usage, helping you identify performance bottlenecks.
Q2: How do I run Apple Diagnostics on my Mac?
To run Apple Diagnostics, shut down your Mac, disconnect all peripherals, and then start your Mac while holding the D key (for Intel Macs) or the power button (for Apple Silicon Macs). Follow the on-screen instructions to complete the diagnostic test.
Q3: What does an Apple Diagnostics reference code mean?
An Apple Diagnostics reference code indicates a specific hardware issue. For example, a “CPU” code indicates a CPU problem, while a “MEM” code indicates a RAM issue. These codes help identify the source of the problem for more targeted troubleshooting.
Q4: What are some third-party diagnostic tools for Macs?
Popular third-party diagnostic tools include TechTool Pro, DriveDx, and iStat Menus. TechTool Pro offers comprehensive hardware and drive testing, DriveDx monitors drive health, and iStat Menus provides system monitoring from the menu bar.
Q5: How can I use Activity Monitor to improve my Mac’s performance?
Use Activity Monitor to identify processes that are using the most CPU or memory. If you find any resource-intensive processes that are not essential, you can close them to free up resources and improve your Mac’s performance.
Q6: What is Safe Mode, and how can it help with troubleshooting?
Safe Mode is a diagnostic mode that starts your Mac with only essential software and drivers. It can help identify software conflicts or other issues that may be causing problems. To start in Safe Mode, restart your Mac and hold the Shift key until the login window appears.
Q7: How often should I run diagnostics on my Mac?
You should run diagnostics on your Mac whenever you experience performance issues, system crashes, or other problems. Regular diagnostic checks can also help identify potential issues before they become major problems.
Q8: Can diagnostic tools help with data recovery?
Some diagnostic tools, like TechTool Pro, include data recovery features that can help recover lost files from damaged drives. However, data recovery can be complex, and it’s always best to back up your data regularly to prevent data loss.
Q9: What should I do if Apple Diagnostics finds a hardware issue?
If Apple Diagnostics finds a hardware issue, you should contact Apple Support or an Apple Authorized Service Provider for further assistance. They can provide you with repair options and help you get your Mac back in working order.
Q10: Are there diagnostic tools specifically designed for older Macs?
Yes, some diagnostic tools are designed to work with older Macs. These tools may have compatibility with older versions of macOS and hardware components. Check the tool’s specifications to ensure it is compatible with your Mac model.
{width=1560 height=928}