Check Engine Light On Kia vehicles can signal a range of issues, from minor to severe, but understanding the cause is crucial, and CAR-TOOL.EDU.VN is here to assist you in understanding the issue. Addressing it promptly can prevent further damage and expensive repairs, and getting the right information and tools for the job is key. Use our site to get the insights to resolve your automotive problems efficiently.
Contents
- 1. What Does the Check Engine Light On Kia Mean?
- 1.1. Understanding the Basics of the Check Engine Light
- 1.2. Common Reasons for the Check Engine Light On Kia
- 1.3. Importance of Addressing the Check Engine Light Promptly
- 2. How to Diagnose the Check Engine Light On Kia
- 2.1. Using an OBD-II Scanner
- 2.2. Interpreting Diagnostic Trouble Codes (DTCs)
- 2.3. When to Seek Professional Help
- 3. Step-by-Step Guide to Fixing Common Check Engine Light Issues On Kia
- 3.1. Loose Gas Cap
- 3.2. Faulty Oxygen Sensor
- 3.3. Catalytic Converter Failure
- 3.4. Mass Airflow (MAF) Sensor Issues
- 3.5. Spark Plug or Ignition Coil Problems
- 3.6. EVAP System Leaks
- 4. Preventing Check Engine Light Issues On Kia
- 4.1. Regular Maintenance
- 4.2. Proper Driving Habits
- 4.3. Using Quality Parts and Fluids
- 4.4. Regular Inspections
- 5. Advanced Diagnostic Tools for Check Engine Light Issues On Kia
- 5.1. Professional-Grade Scan Tools
- 5.2. Multimeters and Electrical Testing Equipment
- 5.3. Smoke Machines
- 5.4. Compression Testers
- 6. Case Studies: Real-World Check Engine Light Scenarios On Kia
- 6.1. Case Study 1: 2015 Kia Optima with P0420 Code
- 6.2. Case Study 2: 2018 Kia Sportage with P0300 Code
- 6.3. Case Study 3: 2020 Kia Seltos with P0442 Code
- 7. Top Brands and Suppliers for Kia Parts and Diagnostic Tools
- 7.1. OEM (Original Equipment Manufacturer) Parts
- 7.2. Aftermarket Parts
- 7.3. Diagnostic Tool Brands
- 7.4. Where to Buy Parts and Tools
- 8. The Role of CAR-TOOL.EDU.VN in Resolving Check Engine Light Issues On Kia
- 8.1. Finding the Right Parts and Tools with CAR-TOOL.EDU.VN
- 8.2. Step-by-Step Repair Guides On CAR-TOOL.EDU.VN
- 8.3. Expert Support and Community Assistance On CAR-TOOL.EDU.VN
- 9. FAQ: Addressing Common Questions About Check Engine Light On Kia
- 9.1. Can I Drive My Kia with The Check Engine Light On?
- 9.2. How Do I Reset The Check Engine Light On My Kia?
- 9.3. Will The Check Engine Light Turn Off Automatically?
- 9.4. How Much Does It Cost to Diagnose The Check Engine Light On A Kia?
- 9.5. What Should I Do If My Kia Fails An Emissions Test Because of The Check Engine Light?
- 9.6. Can A Loose Gas Cap Really Cause The Check Engine Light to Come On?
- 9.7. How Often Should I Get My Kia Serviced to Prevent Check Engine Light Issues?
- 9.8. What Are Some Common Problems That Can Cause The Check Engine Light On A Kia?
- 9.9. Is It Safe to Drive My Kia with A Flashing Check Engine Light?
- 9.10. Where Can I Find A Trusted Mechanic to Diagnose and Repair My Kia?
- 10. Conclusion: Empowering Kia Owners to Resolve Check Engine Light Issues
1. What Does the Check Engine Light On Kia Mean?
The check engine light on a Kia indicates that the vehicle’s onboard diagnostic system has detected a problem. This could range from a loose gas cap to a more serious engine or transmission issue. According to the National Institute for Automotive Service Excellence (ASE), modern vehicles have sophisticated computer systems that monitor various sensors and systems, triggering the light when something deviates from the norm.
1.1. Understanding the Basics of the Check Engine Light
The check engine light, also known as the malfunction indicator lamp (MIL), is a component of your Kia’s onboard diagnostic (OBD) system. The OBD system monitors the performance of the engine, transmission, and other critical systems. When a problem is detected, the system stores a diagnostic trouble code (DTC) and illuminates the check engine light.
- Solid Light: A steady check engine light typically indicates a minor to moderate issue that needs attention.
- Flashing Light: A flashing check engine light signals a more severe problem that requires immediate attention. This could indicate a misfire that can damage the catalytic converter.
1.2. Common Reasons for the Check Engine Light On Kia
Several common issues can trigger the check engine light on a Kia. These include:
- Loose Gas Cap: This is one of the most frequent causes. A loose or damaged gas cap can cause fuel vapors to escape, leading to a drop in fuel pressure and triggering the light.
- Faulty Oxygen Sensor: Oxygen sensors monitor the amount of oxygen in the exhaust. A malfunctioning sensor can affect fuel efficiency and emissions.
- Catalytic Converter Failure: The catalytic converter reduces harmful emissions. If it fails, the check engine light will illuminate, and the vehicle may not pass an emissions test.
- Mass Airflow (MAF) Sensor Issues: The MAF sensor measures the amount of air entering the engine. A dirty or faulty sensor can cause poor performance and fuel economy.
- Spark Plug or Ignition Coil Problems: Worn or damaged spark plugs or ignition coils can cause misfires, leading to the check engine light coming on.
- EVAP System Leaks: The Evaporative Emission Control System (EVAP) prevents fuel vapors from escaping into the atmosphere. Leaks in this system can trigger the light.
1.3. Importance of Addressing the Check Engine Light Promptly
Ignoring the check engine light can lead to more severe and costly repairs. For example, a minor issue like a faulty oxygen sensor can, if left unattended, damage the catalytic converter, resulting in a much more expensive repair. Regular maintenance and prompt attention to warning lights can save you money and keep your Kia running smoothly. CAR-TOOL.EDU.VN provides detailed information and guidance to help you address these issues effectively.
2. How to Diagnose the Check Engine Light On Kia
Diagnosing the check engine light on your Kia involves retrieving the diagnostic trouble codes (DTCs) stored in the vehicle’s computer and interpreting them to identify the problem. Here’s a step-by-step guide:
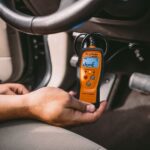
2.1. Using an OBD-II Scanner
An OBD-II scanner is a tool that connects to your vehicle’s diagnostic port and retrieves the stored DTCs. Here’s how to use it:
- Locate the OBD-II Port: The OBD-II port is typically located under the dashboard on the driver’s side.
- Connect the Scanner: Plug the scanner into the OBD-II port.
- Turn On the Ignition: Turn the ignition key to the “on” position without starting the engine.
- Read the Codes: Follow the scanner’s instructions to read the DTCs. The scanner will display the codes and a brief description of the problem.
According to a study by the University of California, Berkeley, using an OBD-II scanner can help diagnose up to 70% of check engine light issues accurately.
2.2. Interpreting Diagnostic Trouble Codes (DTCs)
DTCs are standardized codes that provide information about the detected problem. Here are some common Kia DTCs and their meanings:
| Code | Description | Possible Cause |
|---|---|---|
| P0171 | System Too Lean (Bank 1) | Vacuum leak, faulty oxygen sensor, MAF sensor issue |
| P0174 | System Too Lean (Bank 2) | Vacuum leak, faulty oxygen sensor, MAF sensor issue |
| P0300 | Random/Multiple Cylinder Misfire Detected | Worn spark plugs, faulty ignition coils, vacuum leak |
| P0420 | Catalyst System Efficiency Below Threshold | Faulty catalytic converter, oxygen sensor issue |
| P0442 | EVAP System Small Leak Detected | Loose gas cap, faulty EVAP system components |
| P0455 | EVAP System Large Leak Detected | Loose gas cap, damaged EVAP system components |
| P0102 | Mass or Volume Air Flow Circuit Low Input | Dirty or faulty MAF sensor, wiring issue |
| P0113 | Intake Air Temperature Circuit High Input | Faulty IAT sensor, wiring issue |
| P0301 | Cylinder 1 Misfire Detected | Worn spark plug, faulty ignition coil, fuel injector issue |
| P0304 | Cylinder 4 Misfire Detected | Worn spark plug, faulty ignition coil, fuel injector issue |
2.3. When to Seek Professional Help
While you can diagnose many check engine light issues yourself, some problems require professional expertise. Seek help from a certified mechanic if:
- You are uncomfortable using an OBD-II scanner.
- The DTCs indicate a complex or severe issue.
- You have tried basic troubleshooting steps and the light persists.
- The vehicle is experiencing significant performance problems.
CAR-TOOL.EDU.VN recommends consulting with a trusted mechanic to ensure accurate diagnosis and repair, especially for complex issues.
3. Step-by-Step Guide to Fixing Common Check Engine Light Issues On Kia
Once you have diagnosed the cause of the check engine light, you can take steps to fix the problem. Here are some common issues and how to address them:
3.1. Loose Gas Cap
A loose gas cap is a common cause of the check engine light. Here’s how to fix it:
- Remove and Reinstall the Gas Cap: Remove the gas cap and inspect it for damage.
- Tighten the Cap: Reinstall the gas cap and tighten it until it clicks several times.
- Clear the Code: Use an OBD-II scanner to clear the DTC. The light may turn off automatically after a few drive cycles.
3.2. Faulty Oxygen Sensor
A faulty oxygen sensor can affect fuel efficiency and emissions. Here’s how to replace it:
- Locate the Oxygen Sensor: Oxygen sensors are typically located in the exhaust manifold or near the catalytic converter.
- Disconnect the Sensor: Disconnect the electrical connector from the sensor.
- Remove the Sensor: Use an oxygen sensor socket to remove the sensor from the exhaust pipe.
- Install the New Sensor: Install the new sensor and tighten it to the specified torque.
- Reconnect the Electrical Connector: Reconnect the electrical connector to the sensor.
- Clear the Code: Use an OBD-II scanner to clear the DTC.
3.3. Catalytic Converter Failure
A failing catalytic converter requires replacement. This is a more complex repair that may be best left to a professional. Here’s a general overview:
- Locate the Catalytic Converter: The catalytic converter is located in the exhaust system.
- Disconnect the Exhaust System: Disconnect the exhaust system components to access the catalytic converter.
- Remove the Old Converter: Unbolt or cut the old catalytic converter from the exhaust pipes.
- Install the New Converter: Install the new catalytic converter and bolt it to the exhaust pipes.
- Reconnect the Exhaust System: Reconnect the exhaust system components.
- Clear the Code: Use an OBD-II scanner to clear the DTC.
3.4. Mass Airflow (MAF) Sensor Issues
A dirty or faulty MAF sensor can cause performance problems. Here’s how to clean or replace it:
- Locate the MAF Sensor: The MAF sensor is located in the intake air duct, near the air filter housing.
- Disconnect the Electrical Connector: Disconnect the electrical connector from the sensor.
- Remove the Sensor: Remove the MAF sensor from the intake air duct.
- Clean the Sensor (If Applicable): Use a MAF sensor cleaner to clean the sensor. Allow it to dry completely before reinstalling.
- Install the New Sensor (If Replacing): Install the new MAF sensor into the intake air duct.
- Reconnect the Electrical Connector: Reconnect the electrical connector to the sensor.
- Clear the Code: Use an OBD-II scanner to clear the DTC.
3.5. Spark Plug or Ignition Coil Problems
Worn or damaged spark plugs or ignition coils can cause misfires. Here’s how to replace them:
- Locate the Spark Plugs: Spark plugs are located in the engine cylinder head.
- Disconnect the Ignition Coil: Disconnect the electrical connector from the ignition coil.
- Remove the Ignition Coil: Remove the ignition coil from the spark plug.
- Remove the Spark Plug: Use a spark plug socket to remove the spark plug from the cylinder head.
- Install the New Spark Plug: Install the new spark plug and tighten it to the specified torque.
- Install the Ignition Coil: Install the ignition coil onto the spark plug.
- Reconnect the Electrical Connector: Reconnect the electrical connector to the ignition coil.
- Repeat for All Spark Plugs: Repeat the process for all spark plugs and ignition coils.
- Clear the Code: Use an OBD-II scanner to clear the DTC.
3.6. EVAP System Leaks
Diagnosing and repairing EVAP system leaks can be complex. Here’s a general approach:
- Inspect the Gas Cap: Ensure the gas cap is properly tightened and in good condition.
- Check the EVAP Hoses: Inspect the EVAP hoses for cracks, leaks, or damage.
- Test the EVAP System Components: Use a smoke machine to introduce smoke into the EVAP system and identify leaks.
- Replace Faulty Components: Replace any faulty EVAP system components, such as the purge valve or vent valve.
- Clear the Code: Use an OBD-II scanner to clear the DTC.
CAR-TOOL.EDU.VN provides detailed guides and resources to help you with these repairs.
4. Preventing Check Engine Light Issues On Kia
Preventive maintenance is key to avoiding check engine light issues on your Kia. Here are some tips to keep your vehicle running smoothly:
4.1. Regular Maintenance
Follow your Kia’s recommended maintenance schedule to ensure that all systems are functioning properly. This includes:
- Oil Changes: Regular oil changes keep the engine lubricated and prevent wear.
- Filter Replacements: Replacing air, fuel, and cabin filters ensures optimal performance.
- Spark Plug Replacement: Replace spark plugs according to the recommended interval.
- Fluid Checks: Regularly check and top off fluids, including coolant, brake fluid, and power steering fluid.
- Tune-Ups: Schedule regular tune-ups to address any potential issues before they become major problems.
4.2. Proper Driving Habits
Driving habits can also affect the longevity and performance of your Kia. Avoid:
- Aggressive Acceleration and Braking: This can put unnecessary stress on the engine and transmission.
- Idling for Long Periods: Excessive idling can cause carbon buildup and affect engine performance.
- Ignoring Warning Signs: Pay attention to any unusual noises, smells, or performance issues and address them promptly.
4.3. Using Quality Parts and Fluids
Using high-quality parts and fluids can help prevent premature wear and failure. CAR-TOOL.EDU.VN recommends using parts and fluids that meet or exceed Kia’s specifications.
4.4. Regular Inspections
Conduct regular inspections of your vehicle to identify potential issues early. Check:
- Tires: Inspect tires for wear and proper inflation.
- Brakes: Check brake pads and rotors for wear.
- Lights: Ensure all lights are functioning properly.
- Hoses and Belts: Inspect hoses and belts for cracks, leaks, or damage.
According to a study by AAA, regular vehicle maintenance can reduce the likelihood of breakdowns by up to 40%.
5. Advanced Diagnostic Tools for Check Engine Light Issues On Kia
For more complex check engine light issues, advanced diagnostic tools may be necessary. These tools provide more detailed information and capabilities than basic OBD-II scanners.
5.1. Professional-Grade Scan Tools
Professional-grade scan tools offer advanced features such as:
- Live Data Streaming: View real-time data from various sensors and systems.
- Bi-Directional Control: Activate and test components to diagnose problems.
- Advanced Diagnostics: Perform advanced diagnostic tests, such as cylinder balance tests and relative compression tests.
- Programming and Coding: Program and code new modules and components.
Examples of professional-grade scan tools include Snap-on, Launch, and Autel scanners.
5.2. Multimeters and Electrical Testing Equipment
A multimeter is an essential tool for diagnosing electrical problems. It can be used to measure voltage, current, and resistance in circuits. Other useful electrical testing equipment includes:
- Test Lights: Used to check for power and ground in circuits.
- Wire Tracers: Used to locate and trace wires in a wiring harness.
- Oscilloscopes: Used to analyze electrical signals and waveforms.
5.3. Smoke Machines
Smoke machines are used to detect leaks in the EVAP system, intake system, and exhaust system. They work by introducing smoke into the system and identifying where the smoke escapes.
5.4. Compression Testers
Compression testers are used to measure the compression in each cylinder. Low compression can indicate worn piston rings, damaged valves, or a blown head gasket.
6. Case Studies: Real-World Check Engine Light Scenarios On Kia
To illustrate the importance of addressing check engine light issues, here are a few real-world case studies:
6.1. Case Study 1: 2015 Kia Optima with P0420 Code
A 2015 Kia Optima with 120,000 miles illuminated the check engine light and displayed a P0420 code (Catalyst System Efficiency Below Threshold). The owner initially ignored the light, but after a few weeks, the vehicle’s fuel economy decreased, and it began to run rough.
Diagnosis: A professional mechanic diagnosed a faulty catalytic converter. The converter had deteriorated over time, reducing its ability to effectively reduce emissions.
Solution: The mechanic replaced the catalytic converter and the oxygen sensors. The check engine light was cleared, and the vehicle’s performance and fuel economy returned to normal.
Lesson Learned: Ignoring a P0420 code can lead to reduced fuel economy and performance issues. Prompt replacement of the catalytic converter can prevent further damage.
6.2. Case Study 2: 2018 Kia Sportage with P0300 Code
A 2018 Kia Sportage with 60,000 miles started experiencing a rough idle and illuminated the check engine light. The OBD-II scanner revealed a P0300 code (Random/Multiple Cylinder Misfire Detected).
Diagnosis: The mechanic performed a series of tests and found that the spark plugs were worn and the ignition coils were failing.
Solution: The mechanic replaced the spark plugs and ignition coils. The check engine light was cleared, and the vehicle’s performance returned to normal.
Lesson Learned: Misfires can cause significant performance issues. Replacing worn spark plugs and ignition coils can resolve misfire problems and prevent further damage to the engine.
6.3. Case Study 3: 2020 Kia Seltos with P0442 Code
A 2020 Kia Seltos with 30,000 miles illuminated the check engine light and displayed a P0442 code (EVAP System Small Leak Detected).
Diagnosis: The mechanic inspected the EVAP system and found a loose gas cap.
Solution: The mechanic tightened the gas cap and cleared the DTC. The check engine light turned off after a few drive cycles.
Lesson Learned: A loose gas cap is a common cause of EVAP system leaks. Ensuring the gas cap is properly tightened can prevent this issue.
7. Top Brands and Suppliers for Kia Parts and Diagnostic Tools
When addressing check engine light issues on your Kia, it’s essential to use high-quality parts and reliable diagnostic tools. Here are some top brands and suppliers:
7.1. OEM (Original Equipment Manufacturer) Parts
OEM parts are made by the same manufacturer that produced the original parts for your Kia. They offer the best fit, performance, and reliability. Some top OEM suppliers for Kia include:
- Hyundai/Kia Parts: Directly from the manufacturer.
- Mobis: A subsidiary of Hyundai Motor Group that supplies OEM parts.
7.2. Aftermarket Parts
Aftermarket parts are made by third-party manufacturers and can be a more affordable alternative to OEM parts. Some top aftermarket brands for Kia include:
- Bosch: Known for high-quality sensors, spark plugs, and fuel system components.
- Denso: A leading supplier of automotive components, including oxygen sensors and ignition coils.
- NGK: A reputable brand for spark plugs and ignition components.
- ACDelco: Offers a wide range of automotive parts, including batteries, filters, and brakes.
7.3. Diagnostic Tool Brands
Reliable diagnostic tools are crucial for accurately diagnosing check engine light issues. Some top brands for OBD-II scanners and advanced diagnostic tools include:
- Autel: Offers a wide range of scan tools, from basic OBD-II scanners to professional-grade diagnostic tools.
- Launch: Known for innovative and user-friendly scan tools.
- Snap-on: A leading brand for professional-grade diagnostic tools and equipment.
- Innova: Offers affordable and reliable OBD-II scanners for DIYers.
7.4. Where to Buy Parts and Tools
You can purchase Kia parts and diagnostic tools from various sources, including:
- Local Auto Parts Stores: Such as AutoZone, O’Reilly Auto Parts, and Advance Auto Parts.
- Online Retailers: Such as Amazon, eBay, and CAR-TOOL.EDU.VN
- Kia Dealerships: Offer OEM parts and professional service.
- Specialty Automotive Suppliers: Offer a wide range of parts and tools for specific automotive needs.
8. The Role of CAR-TOOL.EDU.VN in Resolving Check Engine Light Issues On Kia
CAR-TOOL.EDU.VN is dedicated to providing comprehensive information and resources to help you resolve check engine light issues on your Kia. Our website offers:
- Detailed Diagnostic Guides: Step-by-step guides for diagnosing common check engine light issues.
- Troubleshooting Tips: Practical tips and advice for troubleshooting various problems.
- Product Reviews: Honest reviews of parts, tools, and equipment.
- Expert Advice: Access to expert advice from experienced mechanics and automotive professionals.
- Community Forum: A forum where you can ask questions, share experiences, and get help from other Kia owners.
8.1. Finding the Right Parts and Tools with CAR-TOOL.EDU.VN
CAR-TOOL.EDU.VN makes it easy to find the right parts and tools for your Kia. Our website features:
- Parts Finder: A tool that helps you find the correct parts for your specific Kia model and year.
- Tool Recommendations: Recommendations for the best diagnostic tools and equipment.
- Supplier Directory: A directory of trusted suppliers for Kia parts and tools.
8.2. Step-by-Step Repair Guides On CAR-TOOL.EDU.VN
Our step-by-step repair guides provide detailed instructions and illustrations to help you perform repairs safely and effectively. These guides cover a wide range of check engine light issues, including:
- Replacing oxygen sensors
- Replacing catalytic converters
- Cleaning or replacing MAF sensors
- Replacing spark plugs and ignition coils
- Diagnosing and repairing EVAP system leaks
8.3. Expert Support and Community Assistance On CAR-TOOL.EDU.VN
CAR-TOOL.EDU.VN offers expert support and community assistance to help you resolve your check engine light issues. Our team of experienced mechanics and automotive professionals is available to answer your questions and provide guidance. Our community forum allows you to connect with other Kia owners, share experiences, and get help from fellow enthusiasts.
9. FAQ: Addressing Common Questions About Check Engine Light On Kia
Here are some frequently asked questions about the check engine light on Kia vehicles:
9.1. Can I Drive My Kia with The Check Engine Light On?
It depends on the nature of the problem. If the light is solid and the vehicle is running normally, you can usually drive it to a repair shop. However, if the light is flashing or the vehicle is experiencing performance problems, it’s best to avoid driving it and have it towed to a mechanic.
9.2. How Do I Reset The Check Engine Light On My Kia?
You can reset the check engine light using an OBD-II scanner. After addressing the underlying issue, use the scanner to clear the DTCs. The light may also turn off automatically after a few drive cycles if the problem is resolved.
9.3. Will The Check Engine Light Turn Off Automatically?
Yes, the check engine light may turn off automatically after a few drive cycles if the underlying issue is resolved. However, it’s still important to address the problem to prevent further damage.
9.4. How Much Does It Cost to Diagnose The Check Engine Light On A Kia?
The cost to diagnose the check engine light can vary depending on the repair shop. Many auto parts stores offer free code scanning services. However, a professional diagnosis from a mechanic can cost anywhere from $75 to $150.
9.5. What Should I Do If My Kia Fails An Emissions Test Because of The Check Engine Light?
If your Kia fails an emissions test because of the check engine light, you’ll need to address the underlying issue and have the vehicle retested. Common problems that can cause an emissions failure include a faulty catalytic converter, oxygen sensor, or EVAP system leak.
9.6. Can A Loose Gas Cap Really Cause The Check Engine Light to Come On?
Yes, a loose gas cap is a common cause of the check engine light. A loose or damaged gas cap can cause fuel vapors to escape, leading to a drop in fuel pressure and triggering the light.
9.7. How Often Should I Get My Kia Serviced to Prevent Check Engine Light Issues?
Follow your Kia’s recommended maintenance schedule to ensure that all systems are functioning properly. This typically includes oil changes every 5,000 to 7,500 miles, filter replacements every 12,000 to 30,000 miles, and spark plug replacements every 30,000 to 100,000 miles.
9.8. What Are Some Common Problems That Can Cause The Check Engine Light On A Kia?
Common problems that can cause the check engine light on a Kia include a loose gas cap, faulty oxygen sensor, catalytic converter failure, MAF sensor issues, spark plug or ignition coil problems, and EVAP system leaks.
9.9. Is It Safe to Drive My Kia with A Flashing Check Engine Light?
No, it’s not safe to drive your Kia with a flashing check engine light. A flashing light indicates a more severe problem that requires immediate attention. This could indicate a misfire that can damage the catalytic converter.
9.10. Where Can I Find A Trusted Mechanic to Diagnose and Repair My Kia?
You can find a trusted mechanic by asking for recommendations from friends, family, or online reviews. CAR-TOOL.EDU.VN also provides a directory of trusted mechanics and automotive professionals.
10. Conclusion: Empowering Kia Owners to Resolve Check Engine Light Issues
The check engine light on your Kia can be a source of anxiety, but with the right information, tools, and resources, you can effectively diagnose and resolve many common issues. By understanding the basics of the check engine light, using an OBD-II scanner, performing regular maintenance, and seeking expert help when needed, you can keep your Kia running smoothly and avoid costly repairs.
CAR-TOOL.EDU.VN is committed to empowering Kia owners with the knowledge and resources they need to address check engine light issues confidently. Our website offers detailed diagnostic guides, troubleshooting tips, product reviews, expert advice, and a community forum to help you every step of the way.
Don’t let the check engine light ruin your day. Visit CAR-TOOL.EDU.VN today and take control of your Kia’s health.
Are you struggling with a check engine light on your Kia and need expert guidance on finding the right parts or diagnostic tools? Don’t hesitate to reach out for personalized assistance. Contact us at 456 Elm Street, Dallas, TX 75201, United States, or connect via Whatsapp at +1 (641) 206-8880. You can also explore our website at CAR-TOOL.EDU.VN for more information. Our team is ready to help you resolve your automotive issues efficiently and effectively.