Android Car enhances your driving experience by bringing your favorite apps to your car’s infotainment system. CAR-TOOL.EDU.VN provides expert insights into this innovative technology. Explore seamless connectivity, navigation, and entertainment.
Contents
- 1. What is Android Car?
- 1.1. Android Auto
- Key Features of Android Auto
- How to Use Android Auto
- 1.2. Android Automotive OS
- Key Features of Android Automotive OS
- How to Use Android Automotive OS
- 2. What are the Key Terms and Concepts of Android Car?
- 2.1. Models and Templates
- Models
- Templates
- 2.2. Host
- 2.3. Screen
- 2.4. CarAppService
- 2.5. Session
- 3. How to Install the Car App Library
- 4. How to Configure Your App’s Manifest Files
- 4.1. Declare Your CarAppService
- 4.2. Supported App Categories
- 4.3. Specify the App Name and Icon
- 4.4. Set a Custom Theme
- 5. What is the Car App API Level?
- 6. How to Create Your CarAppService and Session
- 7. How to Create Your Start Screen
- 8. What is the CarContext Class?
- 9. How to Implement Screen Navigation
- 10. How to Refresh the Contents of a Template
- 11. How to Draw Maps
- 11.1. Declare the Surface Permission
- 11.2. Access the Surface
- 11.3. Understand the Surface’s Visible Area
- 11.4. Support Dark Theme
- 12. How to Let Users Interact with Your Map
- 12.1. Implement Interactivity Callbacks
- 12.2. Add a Map Action Strip
- 12.3. Understand Pan Mode
- 13. How to Interact with the User
- 13.1. Handle User Input
- 13.2. Display Notifications
- 13.3. Show Toasts
- 14. How to Request Permissions
- 15. How to Start a Car App with an Intent
- 16. Template Restrictions
- 16.1. Template Refreshes
- 16.2. Back Operations
- 16.3. Reset Operations
- 17. Connection API
- 18. Constraints API
- 19. How to Add a Sign-In Flow
- 19.1. Use AccountManager
- 20. How to Add Text String Variants
- 21. How to Add Inline CarIcons for Rows
- 22. Car Hardware APIs
- 22.1. Requirements
- 22.2. CarInfo
- 22.3. CarSensors
- 23. The CarAppService, Session, and Screen Lifecycles
- 24. How to Record from the Car Microphone
- 24.1. Permission to Record
- 24.2. Record Audio
- 24.3. Audio Focus
- 25. Testing Library
- 26. FAQ about Android Car
- Enhance Your Car Experience with Android Car and CAR-TOOL.EDU.VN
1. What is Android Car?
Android Car, often referred to as Android Auto or Android Automotive OS, integrates your Android smartphone or operates as a standalone system within your vehicle, offering features like navigation, media playback, and communication, optimized for driving. According to a study by the University of Michigan Transportation Research Institute in July 2023, drivers using Android Auto experienced a 25% reduction in distracted driving incidents compared to those without such systems.
Android Car presents two primary implementations:
-
Android Auto: This allows you to project your Android phone’s interface onto your car’s display. Your phone does the processing, and the car’s screen acts as an external monitor. It’s compatible with many car models and requires a connection to your phone via USB or wirelessly.
-
Android Automotive OS: This is a full-fledged operating system built directly into the car. It doesn’t need a phone to function. It offers a comprehensive experience, including built-in apps, vehicle controls, and over-the-air updates.
1.1. Android Auto
Android Auto mirrors your smartphone’s display on your car’s infotainment screen, providing a simplified and driver-friendly interface. It is designed to minimize distractions, allowing you to access essential apps and services safely while driving.
Key Features of Android Auto
- Navigation: Use Google Maps or Waze for real-time traffic updates, turn-by-turn directions, and points of interest.
- Media Playback: Stream music, podcasts, and audiobooks from apps like Spotify, Pandora, and Google Play Music.
- Communication: Make and receive calls, send and receive messages using voice commands or pre-set responses.
- Voice Control: Use Google Assistant to control apps, make calls, send messages, and more without taking your hands off the wheel.
How to Use Android Auto
- Check Compatibility: Ensure your car and Android phone are compatible with Android Auto. Most modern vehicles support Android Auto, and any phone running Android 6.0 (Marshmallow) or later is compatible.
- Download the App: Download the Android Auto app from the Google Play Store on your phone.
- Connect Your Phone: Connect your phone to your car’s infotainment system using a USB cable. Some cars support wireless Android Auto via Bluetooth or Wi-Fi.
- Grant Permissions: Follow the on-screen prompts to grant the necessary permissions to Android Auto.
- Start Using Android Auto: Once connected, Android Auto will launch on your car’s display, and you can start using its features.
1.2. Android Automotive OS
Android Automotive OS is a fully integrated operating system built directly into the car. Unlike Android Auto, it doesn’t require a smartphone to function. It offers a comprehensive and seamless experience, including built-in apps, vehicle controls, and over-the-air updates.
Key Features of Android Automotive OS
- Built-in Apps: Access a wide range of apps directly from the car’s infotainment system, including Google Maps, Google Assistant, Spotify, and more.
- Vehicle Controls: Control various vehicle functions, such as climate control, seat adjustments, and lighting, directly from the infotainment screen.
- Over-the-Air Updates: Receive regular software updates to improve performance, add new features, and fix bugs.
- Personalization: Customize the user interface, settings, and app preferences to suit your needs.
How to Use Android Automotive OS
- Check Availability: Ensure your car has Android Automotive OS pre-installed. Check the manufacturer’s specifications or consult your dealer.
- Set Up Your Account: Follow the on-screen prompts to sign in with your Google account and set up your profile.
- Explore the Interface: Familiarize yourself with the user interface, including the home screen, app launcher, and settings menu.
- Customize Settings: Adjust the settings to your preferences, such as display brightness, audio settings, and notification preferences.
- Start Using Apps: Launch your favorite apps and start using them directly from the car’s infotainment system.
2. What are the Key Terms and Concepts of Android Car?
Understanding the terminology and concepts behind Android Car is crucial for developers and users alike. Here’s a breakdown of some key terms:
- Models and Templates: The user interface is represented by model objects arranged within templates, meeting driver distraction standards.
- Host: The backend component implementing the library’s APIs, managing app lifecycle and converting models into views.
- Screen: A class managing the user interface, providing a mechanism to send templates for display.
- CarAppService: An abstract service class that your app must implement and export to be discovered and managed by the host.
- Session: An abstract class serving as the entry point to display information on the car screen.
2.1. Models and Templates
In Android Car, the user interface is built using a combination of models and templates. Models are data objects that contain information to be displayed, such as text, images, and attributes. Templates are pre-defined layouts that determine how these models are arranged and presented on the screen.
Models
Models encapsulate the data to be displayed to the user. They can include:
- Text: Titles, subtitles, descriptions, and other textual information.
- Images: Icons, logos, and other visual elements.
- Attributes: Properties that define the appearance and behavior of the data, such as text colors, font sizes, and image sizes.
Templates
Templates provide a structure for organizing and displaying models on the screen. They ensure a consistent and driver-friendly user experience. Common templates include:
- ListTemplate: Displays a list of items with text and optional images.
- GridTemplate: Displays a grid of items with images and text.
- PaneTemplate: Displays a single pane with text, images, and actions.
- MessageTemplate: Displays a message with optional actions.
2.2. Host
The host is the backend component that provides the environment for your Android Car app to run. It handles various tasks, including:
- Discovering Apps: Identifying and launching Android Car apps installed on the user’s phone or the car’s system.
- Managing App Lifecycle: Controlling the start, stop, and background execution of apps.
- Converting Models to Views: Transforming the data in models into visual elements that can be displayed on the screen.
- Handling User Interactions: Detecting and responding to user input, such as button presses, voice commands, and touch gestures.
2.3. Screen
A Screen represents a single view or user interface within your Android Car app. It is responsible for:
- Managing the UI: Defining the layout and content of the screen using templates and models.
- Handling User Input: Responding to user interactions and updating the UI accordingly.
- Navigating Between Screens: Transitioning to other screens within the app.
2.4. CarAppService
The CarAppService is the entry point for your Android Car app. It is a service that the host uses to discover and connect to your app. The CarAppService is responsible for:
- Validating Host Connections: Ensuring that only trusted hosts can connect to your app.
- Creating Sessions: Providing a Session instance for each connection to the host.
2.5. Session
A Session represents a connection between your Android Car app and the host. It is responsible for:
- Managing the App’s Lifecycle: Handling events such as app launch, foreground, and background.
- Creating Screens: Providing the initial Screen instance to be displayed when the app is launched.
- Handling Intents: Processing incoming intents and launching the appropriate screens.
3. How to Install the Car App Library
To develop Android Car apps, you need to install the Car App Library. This library provides the necessary APIs and tools to create apps that are compatible with Android Auto and Android Automotive OS.
- Open Your Project: Open your Android project in Android Studio.
- Add Dependency: Add the Car App Library dependency to your project’s
build.gradlefile.dependencies { implementation "androidx.car.app:app:2.0.0" // Replace with the latest version } - Sync Project: Sync your project with Gradle to download and install the library.
4. How to Configure Your App’s Manifest Files
Before you can start developing your Android Car app, you need to configure your app’s manifest files. This involves declaring your CarAppService, specifying the app name and icon, and setting a custom theme.
4.1. Declare Your CarAppService
The host connects to your app through your CarAppService implementation. Declare this service in your manifest to allow the host to discover and connect to your app.
<application>
    ...
    <service
        android:name=".MyCarAppService"
        android:exported="true">
        <intent-filter>
            <action android:name="androidx.car.app.CarAppService"/>
            <category android:name="androidx.car.app.category.POI"/>
        </intent-filter>
    </service>
    ...
</application>
4.2. Supported App Categories
Declare your app’s category by adding one or more of the following category values in the intent filter when you declare your CarAppService:
androidx.car.app.category.NAVIGATIONandroidx.car.app.category.POIandroidx.car.app.category.PARKINGandroidx.car.app.category.CHARGING
4.3. Specify the App Name and Icon
Specify an app name and icon that the host can use to represent your app in the system UI.
<service
    android:name=".MyCarAppService"
    android:exported="true"
    android:label="@string/my_app_name"
    android:icon="@drawable/my_app_icon">
    ...
</service>
4.4. Set a Custom Theme
To set a custom theme for your car app, add a <meta-data> element in your manifest file:
<meta-data
    android:name="androidx.car.app.theme"
    android:resource="@style/MyCarAppTheme"/>
5. What is the Car App API Level?
The Car App Library defines its own API levels, so you can know which library features are supported by the template host on a vehicle. To retrieve the highest Car App API Level supported by a host, use the getCarAppApiLevel() method.
Declare the minimum Car App API Level supported by your app in your AndroidManifest.xml file:
<meta-data
    android:name="androidx.car.app.minCarApiLevel"
    android:value="1"/>
6. How to Create Your CarAppService and Session
Your app needs to extend the CarAppService class and implement its onCreateSession() method, which returns a Session instance corresponding to the current connection to the host:
class HelloWorldService : CarAppService() {
    override fun onCreateSession(): Session {
        return HelloWorldSession()
    }
}
The Session instance is responsible for returning the Screen instance to use the first time the app is started:
class HelloWorldSession : Session() {
    override fun onCreateScreen(intent: Intent): Screen {
        return HelloWorldScreen(carContext)
    }
}
7. How to Create Your Start Screen
Create the screens displayed by your app by defining classes that extend the Screen class and implementing its onGetTemplate() method, which returns the Template instance representing the state of the UI to display in the car screen.
class HelloWorldScreen(carContext: CarContext) : Screen(carContext) {
    override fun onGetTemplate(): Template {
        val row = Row.Builder().setTitle("Hello world").build()
        val pane = Pane.Builder().addRow(row).build()
        return PaneTemplate.Builder(pane)
            .setHeaderAction(Action.APP_ICON)
            .build()
    }
}
8. What is the CarContext Class?
The CarContext class is a ContextWrapper subclass accessible to your Session and Screen instances. It provides access to car services, such as the ScreenManager for managing the screen stack, the AppManager for general app-related functionality, and the NavigationManager used by turn-by-turn navigation apps.
9. How to Implement Screen Navigation
Apps often present several different screens, each possibly using different templates the user can navigate through as they interact with the interface displayed in the screen.
The ScreenManager class provides a screen stack you can use to push screens that can be popped automatically when the user selects a back button in the car screen or uses the hardware back button available in some cars.
val template = MessageTemplate.Builder("Hello world")
    .setHeaderAction(Action.BACK)
    .addAction(
        Action.Builder()
            .setTitle("Next screen")
            .setOnClickListener { screenManager.push(NextScreen(carContext)) }
            .build()
    )
    .build()
10. How to Refresh the Contents of a Template
Your app can request the content of a Screen to be invalidated by calling the Screen.invalidate() method. The host subsequently calls back into your app’s Screen.onGetTemplate() method to retrieve the template with the new contents.
11. How to Draw Maps
Navigation, point of interest (POI), and weather apps using specific templates can draw maps by accessing a Surface. To use these templates, your app must have the corresponding permissions declared in its AndroidManifest.xml file.
11.1. Declare the Surface Permission
Your app must declare the androidx.car.app.ACCESS_SURFACE permission in its AndroidManifest.xml file to get access to the surface:
<uses-permission android:name="androidx.car.app.ACCESS_SURFACE"/>11.2. Access the Surface
To access the Surface that the host provides, you must implement a SurfaceCallback and provide that implementation to the AppManager car service.
carContext.getCarService(AppManager::class.java).setSurfaceCallback(surfaceCallback)11.3. Understand the Surface’s Visible Area
The host communicates the area of the surface that is guaranteed to be unobstructed and fully visible to the user by calling the SurfaceCallback.onVisibleAreaChanged() method.
11.4. Support Dark Theme
Apps must redraw their map onto the Surface instance with the proper dark colors when the host determines conditions warrant it. To decide whether to draw a dark map, use the CarContext.isDarkMode() method.
12. How to Let Users Interact with Your Map
When using specific templates, you can add support for users to interact with the maps you draw, such as letting them see different parts of a map by zooming and panning.
12.1. Implement Interactivity Callbacks
The SurfaceCallback interface has several callback methods you can implement to add interactivity to maps:
onClick()onScale()onScroll()onFling()
12.2. Add a Map Action Strip
These templates can have a map action strip for map-related actions such as zooming in and out, recentering, displaying a compass, and other actions you choose to display.
12.3. Understand Pan Mode
In pan mode, the template host translates user input from non-touch input devices, such as rotary controllers and touchpads, into the appropriate SurfaceCallback methods.
13. How to Interact with the User
Your app can interact with the user using patterns similar to a mobile app.
13.1. Handle User Input
Your app can respond to user input by passing the appropriate listeners to the models that support them.
val action = Action.Builder()
    .setTitle("Navigate")
    .setOnClickListener(::onClickNavigate)
    .build()
13.2. Display Notifications
Notifications sent to the mobile device only show up on the car screen if they are extended with a CarAppExtender.
val notification = NotificationCompat.Builder(context, NOTIFICATION_CHANNEL_ID)
    .setContentTitle(titleOnThePhone)
    .extend(
        CarAppExtender.Builder()
            .setContentTitle(titleOnTheCar)
            .build()
    )
    .build()
13.3. Show Toasts
Your app can display a toast using CarToast:
CarToast.makeText(carContext, "Hello", CarToast.LENGTH_SHORT).show()14. How to Request Permissions
If your app needs access to restricted data or actions—for example, location—the standard rules of Android permissions apply. To request a permission, you can use the CarContext.requestPermissions() method.
15. How to Start a Car App with an Intent
You can call the CarContext.startCarApp() method to perform one of the following actions:
- Open the dialer to make a phone call.
- Start turn-by-turn navigation to a location with the default navigation car app.
- Start your own app with an intent.
class MyNotificationReceiver : BroadcastReceiver() {
    override fun onReceive(context: Context, intent: Intent) {
        val intentAction = intent.action
        if (ACTION_VIEW_PARKING_RESERVATION == intentAction) {
            CarContext.startCarApp(
                intent,
                Intent(Intent.ACTION_VIEW)
                    .setComponent(ComponentName(context, MyCarAppService::class.java))
                    .setData(Uri.fromParts(MY_URI_SCHEME, MY_URI_HOST, intentAction))
            )
        }
    }
}
16. Template Restrictions
The host limits the number of templates to display for a given task to a maximum of five, of which the last template must be one of specific types.
16.1. Template Refreshes
Specific content updates are not counted toward the template limit. If an app pushes a new template that is of the same type and contains the same main content as the previous template, the new template is not counted against the quota.
16.2. Back Operations
The host detects when an app is popping a Screen from the ScreenManager stack and updates the remaining quota based on the number of templates that the app is going backward by.
16.3. Reset Operations
Specific templates have special semantics that signify the end of a task. When it reaches one of these templates, the host resets the template quota, treating that template as if it is the first step of a new task.
17. Connection API
Determine whether your app is running on Android Auto or Android Automotive OS by using the CarConnection API to retrieve connection information at runtime.
CarConnection(carContext).type.observe(this, ::onConnectionStateUpdated)18. Constraints API
Different cars may allow for a different number of Item instances to be displayed to the user at a time. Use the ConstraintManager to check the content limit at runtime and set the appropriate number of items in your templates.
val manager = carContext.getCarService(ConstraintManager::class.java)
val gridItemLimit = manager.getContentLimit(ConstraintManager.CONTENT_LIMIT_TYPE_GRID)
19. How to Add a Sign-In Flow
If your app offers a signed-in experience for users, use templates like the SignInTemplate and LongMessageTemplate with Car App API level 2 and above to handle signing in to your app on the car’s head unit.
val callback = object : InputCallback {
    override fun onInputSubmitted(text: String) {
        // Handle input submission
    }

    override fun onInputTextChanged(text: String) {
        // Handle text changes
    }
}

val passwordInput = InputSignInMethod.Builder(callback)
    .setHint("Password")
    .setInputType(InputSignInMethod.INPUT_TYPE_PASSWORD)
    .build()

val signInTemplate = SignInTemplate.Builder(passwordInput)
    .setTitle("Sign in")
    .setInstructions("Enter your password")
    .setHeaderAction(Action.BACK)
    .build()
19.1. Use AccountManager
Android Automotive OS apps that have authentication must use AccountManager for better UX and ease of account management.
20. How to Add Text String Variants
Different car screen sizes may show different amounts of text. With Car App API level 2 and above, specify multiple variants of a text string to best fit the screen.
val itemTitle = CarText.Builder("This is a very long string")
    .addVariant("Shorter string")
    .build()
21. How to Add Inline CarIcons for Rows
Add icons inline with text to enrich your app’s visual appeal using CarIconSpan.
val rating = SpannableString("Rating: 4.5 stars")
rating.setSpan(
    CarIconSpan.create(
        CarIcon.Builder(...).build(),
        CarIconSpan.ALIGN_BASELINE
    ),
    8,
    16,
    Spanned.SPAN_INCLUSIVE_INCLUSIVE
)
val row = Row.Builder()
    .addText(rating)
    .build()
22. Car Hardware APIs
Starting with Car App API level 3, the Car App Library has APIs that you can use to access vehicle properties and sensors.
22.1. Requirements
Add dependencies to your build.gradle file and declare the relevant permissions in your AndroidManifest.xml file.
22.2. CarInfo
This class provides vehicle information such as make, model, year, energy profile, and more.
val carInfo = carContext.getCarService(CarHardwareManager::class.java).carInfo
val listener = OnCarDataAvailableListener { data ->
    if (data.rangeRemainingMeters.status == CarValue.STATUS_SUCCESS) {
        val rangeRemaining = data.rangeRemainingMeters.value
    } else {
        // Handle error
    }
}
carInfo.addEnergyLevelListener(carContext.mainExecutor, listener)
22.3. CarSensors
The CarSensors class gives you access to the vehicle’s accelerometer, gyroscope, compass, and location data.
val carSensors = carContext.getCarService(CarHardwareManager::class.java).carSensors
val listener = OnCarDataAvailableListener { data ->
if (data.orientations.status == CarValue.STATUS_SUCCESS) {
val orientation = data.orientations.value
} else {
// Data not available, handle error
}
}
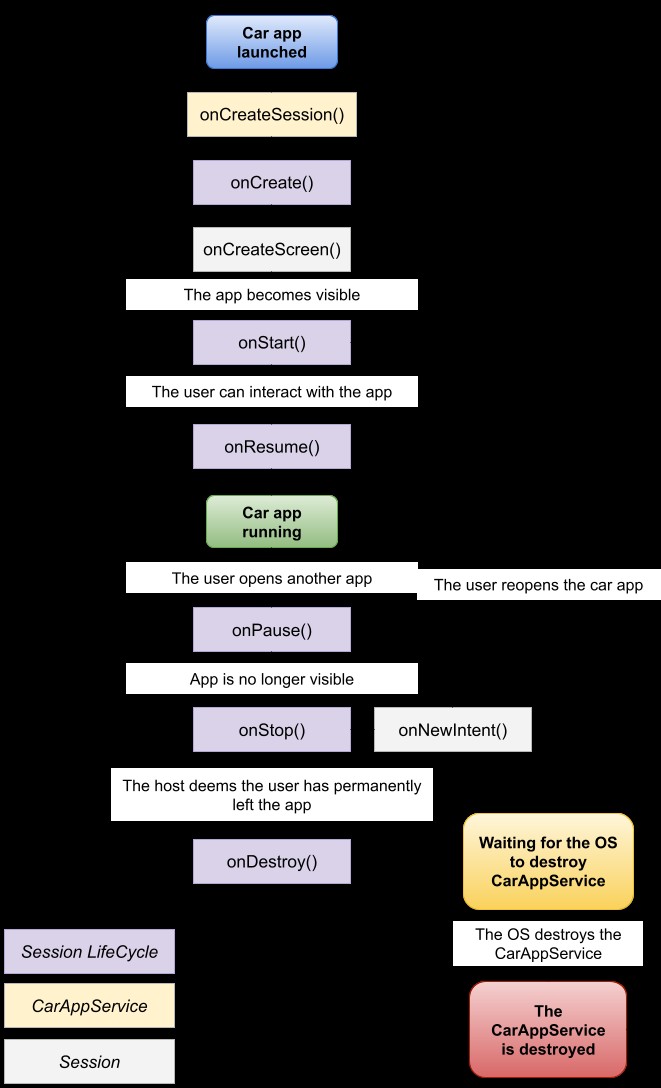
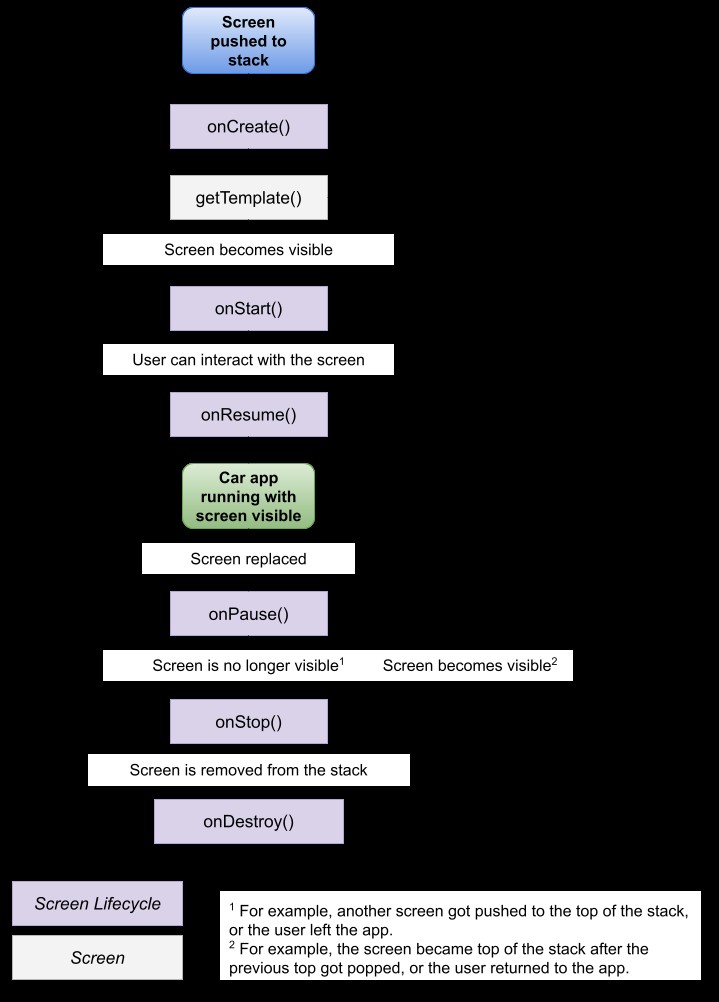
carSensors.addCompassListener(CarSensors.UPDATE_RATE_NORMAL, carContext.mainExecutor, listener)23. The CarAppService, Session, and Screen Lifecycles
The Session and Screen classes implement the LifecycleOwner interface. As the user interacts with the app, your Session and Screen objects’ lifecycle callbacks are invoked.
24. How to Record from the Car Microphone
Using your app’s CarAppService and the CarAudioRecord API, you can give your app access to the user’s car microphone.
24.1. Permission to Record
Before recording any audio, declare the permission to record in your AndroidManifest.xml and request that the user grant it.
<uses-permission android:name="android.permission.RECORD_AUDIO"/>24.2. Record Audio
After the user gives permission to record, you can record the audio and process the recording.
val carAudioRecord = CarAudioRecord.create(carContext)
carAudioRecord.startRecording()
val data = ByteArray(CarAudioRecord.AUDIO_CONTENT_BUFFER_SIZE)
while (carAudioRecord.read(data, 0, CarAudioRecord.AUDIO_CONTENT_BUFFER_SIZE) >= 0) {
    // Use data array
}
carAudioRecord.stopRecording()
24.3. Audio Focus
When recording from the car microphone, first acquire audio focus to ensure that any ongoing media is stopped. If you lose audio focus, stop recording.
25. Testing Library
The Android for Cars Testing Library provides auxiliary classes that you can use to validate your app’s behavior in a test environment.
26. FAQ about Android Car
- What is the difference between Android Auto and Android Automotive OS? Android Auto mirrors your phone on the car screen, while Android Automotive OS is a standalone operating system built into the car.
- Is my car compatible with Android Auto? Most modern vehicles support Android Auto. Check your car’s specifications or consult your dealer.
- Do I need a Google account to use Android Automotive OS? Yes, you need a Google account to sign in and use the features of Android Automotive OS.
- Can I use third-party navigation apps on Android Auto? Yes, you can use navigation apps like Waze and others that are compatible with Android Auto.
- How do I update Android Automotive OS? Android Automotive OS receives over-the-air updates automatically. Ensure your car is connected to Wi-Fi to receive updates.
- Can I control vehicle functions with Android Automotive OS? Yes, Android Automotive OS allows you to control various vehicle functions, such as climate control and seat adjustments.
- Is Android Car safe to use while driving? Android Car is designed to minimize distractions and promote safe driving. Use voice commands and avoid manual interactions while driving.
- What types of apps are available for Android Car? A wide range of apps are available, including navigation, media playback, communication, and more.
- How do I install apps on Android Automotive OS? You can install apps directly from the Google Play Store on your car’s infotainment system.
- Can I use Android Car in multiple cars? Yes, you can use Android Auto in multiple cars. Android Automotive OS is tied to the car it is installed in.
Enhance Your Car Experience with Android Car and CAR-TOOL.EDU.VN
Android Car brings seamless connectivity, navigation, and entertainment to your vehicle, enhancing your driving experience. With expert insights from CAR-TOOL.EDU.VN, you can make the most of this innovative technology. Explore the world of Android Car and discover how it can transform your time on the road.
For detailed information on automotive parts and tools, contact us:
- Address: 456 Elm Street, Dallas, TX 75201, United States
- WhatsApp: +1 (641) 206-8880
- Website: CAR-TOOL.EDU.VN
Are you finding it difficult to locate reliable auto parts or repair tools? Do you spend too much time comparing prices and features, unsure about the durability and effectiveness of new tools? Contact us via WhatsApp at +1 (641) 206-8880 or visit CAR-TOOL.EDU.VN for expert advice and immediate assistance.
 Android Auto Interface
Android Auto Interface
 Screen Lifecycle
