Connecting a car diagnostic tool allows you to read and interpret vehicle data, aiding in troubleshooting and maintenance, and CAR-TOOL.EDU.VN provides the resources to do it effectively. This article will explore connecting and utilizing a car diagnostic tool, understanding diagnostic trouble codes (DTCs), saving on auto repairs, and answering frequently asked questions. Learn about scan tool connections, accessing menus, and leveraging live data for informed automotive decisions.
Contents
- 1. Where Do I Plug In My Car Diagnostic Tool?
- 1.1 How To Connect The OBD2 Scanner
- 1.2 Precautions While Connecting The OBD2 Scanner
- 2. How To Access The Menu On Your Car Diagnostic Tool?
- 2.1 Common Menu Options
- 2.2 Navigating The Menu
- 2.3 Advanced Menu Features
- 3. What Does A Diagnostic Trouble Code (DTC) Mean?
- 3.1 Understanding The Code Structure
- 3.2 Example DTC: P0301
- 3.3 Finding DTC Definitions
- 4. How Can A Car Diagnostic Tool Save You Money On Auto Repairs?
- 4.1 Case Study: Saving Money with a Car Diagnostic Tool
- 4.2 Benefits of Using CAR-TOOL.EDU.VN
- 5. Understanding Live Data
- 5.1 Key Live Data Parameters
- 5.2 Interpreting Live Data
- 5.3 Using Live Data for Diagnostics
- 6. Importance Of Freeze Frame Data
- 6.1 Key Freeze Frame Parameters
- 6.2 Using Freeze Frame Data for Diagnostics
- 6.3 Benefits of CAR-TOOL.EDU.VN
- 7. Inspection/Maintenance (I/M) Readiness Explained
- 7.1 Key I/M Readiness Monitors
- 7.2 Interpreting I/M Readiness Status
- 7.3 Clearing I/M Readiness Monitors
- 7.4 Ensuring I/M Readiness
- 8. Selecting The Right Car Diagnostic Tool
- 8.1 Types of Scanners
- 8.2 Compatibility
- 8.3 Features
- 8.4 Budget
- 8.5 Reviews and Ratings
- 8.6 Recommendations from CAR-TOOL.EDU.VN
- 9. Maintaining Your Car Diagnostic Tool
- 9.1 Cleaning
- 9.2 Storage
- 9.3 Software Updates
- 9.4 Battery Care
- 9.5 Cable Care
- 9.6 Regular Checks
- 10. Frequently Asked Questions (FAQ)
- 10.1 How do you use an OBD II scanner?
- 10.2 Does car have to be running to use OBD2 scanner?
- 10.3 How do I read my OBD scanner?
- 10.4 Can you plug in OBD scanner while car is running?
- 10.5 What Type Of Diagnostic Tool Do I Need For My Car?
- 10.6 How Often Should I Use A Car Diagnostic Tool?
- 10.7 Can A Car Diagnostic Tool Damage My Car’s Computer?
- 10.8 Where Can I Get Reliable Information About Car Diagnostics?
- 10.9 What Are The Benefits Of Using A Wireless Car Diagnostic Tool?
- 10.10 How Do I Update The Software On My Car Diagnostic Tool?
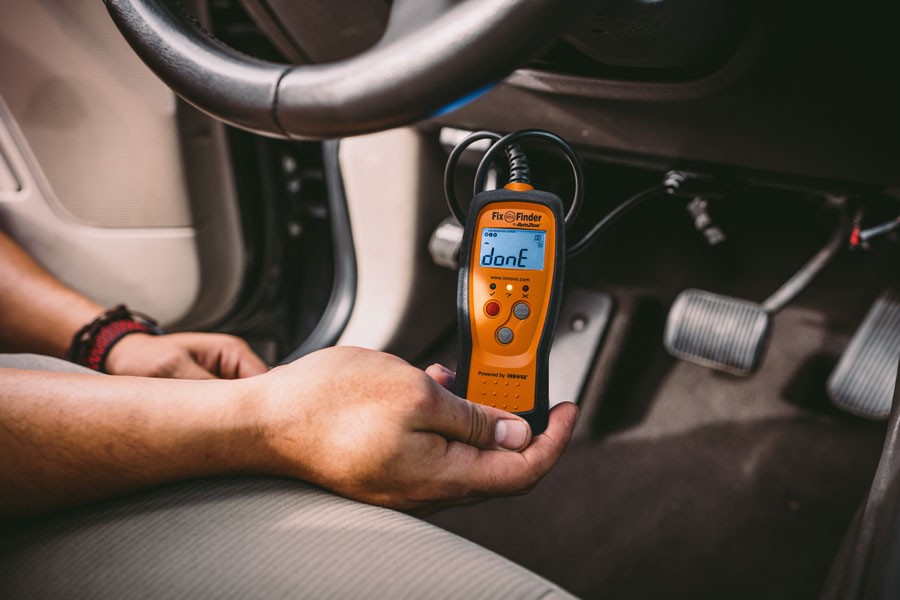
1. Where Do I Plug In My Car Diagnostic Tool?
The car diagnostic tool, or OBD2 scanner, connects to your vehicle’s OBDII port, and this port is typically located under the driver’s side dashboard. According to the Environmental Protection Agency (EPA), all cars and light trucks manufactured after 1996 are required to have an OBDII port. This standardization makes it easy to access critical vehicle data.
- Location: The OBDII port is almost always found under the driver’s side of the dashboard.
- Shape: It’s a female 16-pin connector shaped like a trapezoid.
- Exceptions: In rare cases, the connector might be hidden in the center console or under the passenger side of the dash.
 OBDII Port Location
1.1 How To Connect The OBD2 Scanner
Connecting an OBD2 scanner is straightforward. Here’s a step-by-step guide:
- Turn Off Ignition: Ensure the ignition is off before connecting the scanner.
- Locate the OBDII Port: Find the trapezoid-shaped 16-pin connector under the dashboard.
- Connect the Scanner: Match the trapezoidal shape of the scanner’s male end to the port and gently but firmly push them together. A slight wiggle might be necessary.
- Turn Ignition On: Cycle the ignition to the “on” position without starting the engine.
- Power Up the Scanner: The OBD2 port will power up the scan tool in most cases.
- Wait for Boot Sequence: Allow the device to complete its boot sequence.
After the initial connection, the scan tool may prompt you for additional information, such as engine size, VIN number, or instructions to start the engine.
1.2 Precautions While Connecting The OBD2 Scanner
While connecting an OBD2 scanner is relatively simple, here are a few precautions to keep in mind:
- Check Compatibility: Ensure the scanner is compatible with your vehicle’s make, model, and year.
- Inspect the Port: Before connecting, inspect the OBDII port for any damage or debris.
- Secure Connection: Make sure the connection is secure to prevent interruptions during data reading.
- Read the Manual: Always refer to the scanner’s manual for specific instructions and safety guidelines.
2. How To Access The Menu On Your Car Diagnostic Tool?
Once the OBD2 scanner is connected and powered on, you’ll need to navigate its menu to access the diagnostic functions. The menu options can vary depending on whether you have a basic code reader or an advanced diagnostic device.
2.1 Common Menu Options
Here are some common menu options you might find on your OBD2 scanner:
- Read Codes: This option displays diagnostic trouble codes (DTCs) and a brief description of the fault.
- Erase Codes: Selecting this option clears stored DTCs from the vehicle’s computer.
- Live Data: This feature allows you to monitor real-time sensor readings to identify values outside of normal thresholds.
- Freeze Frame: Freeze frame data captures specific parameters at the time a DTC was set, providing valuable diagnostic information.
- Vehicle Info: This section provides data related to the vehicle’s build and specifications.
- I/M Readiness: Also known as Inspection and Maintenance Readiness, this section shows emission-related areas and their readiness for smog testing.
2.2 Navigating The Menu
Most OBD2 scanners have buttons to navigate the menu, even Bluetooth or Wi-Fi scanners controlled by a smartphone. The buttons typically include:
- Arrow Keys: Used to scroll through menu options.
- Enter/Select Button: Used to select a menu option.
- Back Button: Used to return to the previous menu.
2.3 Advanced Menu Features
Advanced diagnostic tools may offer additional menu features such as:
- Actuation Tests: These tests allow you to control specific vehicle components to verify their functionality.
- Data Logging: Data logging enables you to record sensor data over time for in-depth analysis.
- Module Programming: Some advanced tools can perform module programming and software updates.
3. What Does A Diagnostic Trouble Code (DTC) Mean?
When you select the “Read Codes” option on your OBD2 scanner, it displays a code that needs to be deciphered. Diagnostic Trouble Codes (DTCs) are standardized codes used to identify specific issues within a vehicle. The format is always one letter followed by four numbers, such as P0301.
3.1 Understanding The Code Structure
The letter in the DTC indicates which system has experienced the fault:
- P: Powertrain systems like the engine, transmission, emissions, and fuel system.
- B: Body control systems, including airbags and interior-related problems.
- C: Chassis codes, like suspension, power steering, and other exterior issues.
- U: Network-related issues.
The subsequent numbers are also descriptive:
- First Number: Either a 0 or 1. If it’s 0, it’s a generic code applicable to virtually all manufacturers. If it’s 1, it’s specific to the carmaker.
- Second Number: Identifies the system.
- 1: Fuel and air metering
- 2: Fuel and air metering for injector circuits
- 3: Ignition system fault or misfire
- 4: Auxiliary emission controls
- 5: Vehicle speed control or idle system control fault
- 7, 8, and 9: Transmission-related codes
- A, B, and C: Hybrid-specific codes
- Third and Fourth Numbers: Further identify the specific problem, with hundreds of potential combinations and descriptions.
3.2 Example DTC: P0301
Using the example code P0301, we can decipher the meaning:
- P: Powertrain control module code
- 0: Generic code
- 3: Ignition system or misfire
- 01: Cylinder #1 misfire present
This code indicates that there is a misfire in cylinder #1.
3.3 Finding DTC Definitions
While some OBD2 scanners provide a brief description of the DTC, it’s often necessary to consult additional resources for a more detailed explanation. Here are some options:
- Online Databases: Websites like OBD-Codes.com and CarMD.com offer comprehensive DTC databases.
- Repair Manuals: Vehicle-specific repair manuals provide detailed information on DTCs and troubleshooting procedures.
- CAR-TOOL.EDU.VN: CAR-TOOL.EDU.VN offers resources and information to help you understand DTCs and find the right tools for diagnosing and repairing vehicle issues.
4. How Can A Car Diagnostic Tool Save You Money On Auto Repairs?
Using a car diagnostic tool can save you money in several ways:
- Identify Potential Problems Early: A quick scan can reveal the source of performance-related issues or a Check Engine light.
- Assess Smog Check Readiness: The I/M Readiness test shows if there’s a fault that could prevent you from passing a smog check.
- DIY Repairs: If you can track down the source of the fault without taking it to a shop, you can save money on both the diagnosis and the repair.
For example, a diagnostic scan showing P0138 indicates that the bank 1 sensor 2 oxygen sensor has high voltage. Replacing the sensor yourself after scanning and clearing the codes can save money on labor costs.
4.1 Case Study: Saving Money with a Car Diagnostic Tool
Consider a scenario where your car’s Check Engine light comes on. Without a diagnostic tool, you might take your car to a mechanic, who could charge you for a diagnostic test just to identify the problem. With an OBD2 scanner, you can read the code yourself, understand the issue, and decide whether you can fix it yourself or need professional help.
Scenario:
- Problem: Check Engine light is on.
- Without OBD2 Scanner:
- Mechanic Diagnostic Fee: $75 – $150
- Uncertainty about the issue
- With OBD2 Scanner:
- Scan the code yourself: $0
- Identify the problem: e.g., P0420 – Catalytic Converter Efficiency Below Threshold
- Decide whether to DIY or seek professional help
In this case, identifying the P0420 code allows you to research the issue, understand the potential causes, and decide if it’s something you can address yourself or if you need to take it to a professional.
4.2 Benefits of Using CAR-TOOL.EDU.VN
CAR-TOOL.EDU.VN provides valuable resources and tools to help you save money on auto repairs:
- Detailed Product Information: Find detailed specifications and comparisons of various car diagnostic tools.
- User Reviews: Read reviews from other users to make informed purchasing decisions.
- Expert Advice: Access expert advice and guidance on diagnosing and repairing vehicle issues.
By leveraging the resources at CAR-TOOL.EDU.VN, you can confidently choose the right diagnostic tool for your needs and save money on auto repairs.
5. Understanding Live Data
One of the most powerful features of advanced OBD2 scanners is the ability to monitor live data. Live data allows you to view real-time sensor readings and parameters as the engine is running. This can be incredibly useful for diagnosing intermittent issues or identifying sensors that are not functioning correctly.
5.1 Key Live Data Parameters
Here are some key live data parameters to monitor:
- Engine RPM: Revolutions per minute of the engine.
- Engine Load: Percentage of maximum engine power being used.
- Coolant Temperature: Temperature of the engine coolant.
- Intake Air Temperature: Temperature of the air entering the engine.
- Mass Air Flow (MAF): Amount of air entering the engine.
- Oxygen Sensor Readings: Voltage readings from the oxygen sensors.
- Fuel Trim: Adjustments made to fuel delivery by the engine control unit (ECU).
- Throttle Position: Percentage of throttle opening.
- Vehicle Speed: Current speed of the vehicle.
5.2 Interpreting Live Data
Interpreting live data requires understanding the normal operating ranges for each parameter. Here are some general guidelines:
- Engine RPM: Should be stable at idle (around 600-800 RPM) and increase smoothly with throttle input.
- Engine Load: Should vary with throttle input and driving conditions.
- Coolant Temperature: Should reach and maintain the normal operating temperature range (typically 195-220°F or 90-104°C).
- Oxygen Sensor Readings: Should fluctuate between low and high voltage, indicating proper sensor function.
- Fuel Trim: Should be close to 0%, indicating that the ECU is not making significant adjustments to fuel delivery.
5.3 Using Live Data for Diagnostics
Here’s an example of how live data can be used for diagnostics:
Scenario:
- Problem: Rough idling and poor fuel economy.
- Diagnostic Steps:
- Connect the OBD2 scanner and select the “Live Data” option.
- Monitor the following parameters:
- Engine RPM
- Mass Air Flow (MAF)
- Oxygen Sensor Readings
- Fuel Trim
- Analyze the data:
- If the Engine RPM is fluctuating erratically, it could indicate a vacuum leak or faulty idle air control valve.
- If the MAF reading is out of range, it could indicate a faulty MAF sensor.
- If the Oxygen Sensor Readings are not fluctuating properly, it could indicate a faulty oxygen sensor.
- If the Fuel Trim values are significantly positive or negative, it could indicate a fuel delivery issue.
By analyzing the live data, you can narrow down the potential causes of the problem and perform targeted repairs.
6. Importance Of Freeze Frame Data
Freeze Frame data is a snapshot of sensor values captured by the vehicle’s computer at the moment a Diagnostic Trouble Code (DTC) is set. It provides valuable information about the conditions that led to the fault.
6.1 Key Freeze Frame Parameters
Freeze Frame data typically includes the following parameters:
- DTC: The Diagnostic Trouble Code that triggered the Freeze Frame.
- Engine RPM: Revolutions per minute of the engine.
- Engine Load: Percentage of maximum engine power being used.
- Vehicle Speed: Current speed of the vehicle.
- Coolant Temperature: Temperature of the engine coolant.
- Intake Air Temperature: Temperature of the air entering the engine.
- Fuel Trim: Adjustments made to fuel delivery by the engine control unit (ECU).
6.2 Using Freeze Frame Data for Diagnostics
Here’s an example of how Freeze Frame data can be used for diagnostics:
Scenario:
- Problem: Intermittent Check Engine light with DTC P0171 (System Too Lean, Bank 1).
- Diagnostic Steps:
- Connect the OBD2 scanner and read the Freeze Frame data associated with DTC P0171.
- Analyze the data:
- If the Engine Load is high and the Vehicle Speed is low, it could indicate a lean condition under heavy load.
- If the Fuel Trim values are significantly positive, it confirms that the ECU is adding fuel to compensate for the lean condition.
- If the Coolant Temperature is low, it could indicate a faulty thermostat causing the engine to run too cool.
By analyzing the Freeze Frame data, you can gain insights into the conditions that triggered the DTC and focus your diagnostic efforts accordingly.
6.3 Benefits of CAR-TOOL.EDU.VN
CAR-TOOL.EDU.VN provides resources to help you interpret Freeze Frame data and troubleshoot vehicle issues:
- Diagnostic Guides: Access diagnostic guides that provide step-by-step instructions for interpreting Freeze Frame data.
- Troubleshooting Tips: Find troubleshooting tips and common causes for various DTCs.
- Product Recommendations: Get recommendations for diagnostic tools and equipment to help you analyze Freeze Frame data.
By leveraging the resources at CAR-TOOL.EDU.VN, you can effectively use Freeze Frame data to diagnose and repair vehicle issues.
7. Inspection/Maintenance (I/M) Readiness Explained
The Inspection/Maintenance (I/M) Readiness monitors are a set of tests that the vehicle’s computer performs to ensure that the emission control systems are functioning correctly. These monitors must be complete before the vehicle can pass a smog check.
7.1 Key I/M Readiness Monitors
Here are some key I/M Readiness monitors:
- Misfire Monitor: Detects engine misfires that can increase emissions.
- Fuel System Monitor: Checks the fuel delivery system for proper operation.
- Comprehensive Components Monitor: Monitors various engine components for proper function.
- Oxygen Sensor Monitor: Checks the oxygen sensors for proper operation.
- Catalyst Monitor: Monitors the efficiency of the catalytic converter.
- Evaporative System Monitor: Checks the evaporative emission control system for leaks.
- Secondary Air System Monitor: Monitors the secondary air injection system for proper operation.
- A/C Refrigerant Monitor: Checks the air conditioning system for refrigerant leaks.
7.2 Interpreting I/M Readiness Status
The I/M Readiness status is typically displayed as either “Ready” or “Not Ready” for each monitor. “Ready” indicates that the monitor has completed its test and passed. “Not Ready” indicates that the monitor has not completed its test or has failed.
7.3 Clearing I/M Readiness Monitors
Clearing DTCs can also reset the I/M Readiness monitors, requiring the vehicle to complete a drive cycle to reset them. A drive cycle involves specific driving conditions that allow the vehicle to run all the necessary tests.
7.4 Ensuring I/M Readiness
To ensure that your vehicle is ready for a smog check, follow these steps:
- Check for DTCs: Use an OBD2 scanner to check for any Diagnostic Trouble Codes (DTCs).
- Address Any Issues: Repair any issues identified by the DTCs.
- Clear DTCs: Clear the DTCs using the OBD2 scanner.
- Complete a Drive Cycle: Perform a drive cycle to reset the I/M Readiness monitors.
- Verify I/M Readiness: Use the OBD2 scanner to verify that all I/M Readiness monitors are “Ready.”
By following these steps, you can ensure that your vehicle is ready for a smog check and avoid potential failures.
8. Selecting The Right Car Diagnostic Tool
Choosing the right car diagnostic tool depends on your needs and budget. Here are some factors to consider:
8.1 Types of Scanners
- Basic Code Readers: These scanners can read and clear DTCs. They are suitable for basic troubleshooting and maintenance.
- Advanced Diagnostic Tools: These scanners offer advanced features such as live data monitoring, actuation tests, and module programming. They are suitable for more complex diagnostics and repairs.
- Smartphone-Based Scanners: These scanners connect to your smartphone via Bluetooth or Wi-Fi and use a mobile app for diagnostics. They are often more affordable and convenient.
8.2 Compatibility
Ensure that the scanner is compatible with your vehicle’s make, model, and year. Some scanners are designed to work with specific vehicle brands or models.
8.3 Features
Consider the features that are important to you, such as:
- Live Data Monitoring: Allows you to view real-time sensor readings.
- Freeze Frame Data: Captures sensor values at the time a DTC is set.
- Actuation Tests: Allows you to control specific vehicle components.
- Bi-Directional Control: Allows you to send commands to the vehicle’s computer.
- Module Programming: Allows you to program and update vehicle modules.
8.4 Budget
Set a budget and choose a scanner that offers the features you need within your price range.
8.5 Reviews and Ratings
Read reviews and ratings from other users to get an idea of the scanner’s performance and reliability.
8.6 Recommendations from CAR-TOOL.EDU.VN
CAR-TOOL.EDU.VN offers recommendations for car diagnostic tools based on your needs and budget. Our experts can help you choose the right scanner for your vehicle.
9. Maintaining Your Car Diagnostic Tool
Proper maintenance of your car diagnostic tool ensures its longevity and accuracy. Here are some tips:
9.1 Cleaning
Clean the scanner regularly with a soft, dry cloth. Avoid using harsh chemicals or solvents, as they can damage the scanner’s components.
9.2 Storage
Store the scanner in a safe, dry place when not in use. Avoid exposing the scanner to extreme temperatures or humidity.
9.3 Software Updates
Keep the scanner’s software up to date. Software updates often include bug fixes, new features, and improved compatibility.
9.4 Battery Care
If the scanner has a rechargeable battery, follow the manufacturer’s instructions for charging and storing the battery.
9.5 Cable Care
Handle the scanner’s cable with care. Avoid bending or twisting the cable excessively, as this can damage the wires inside.
9.6 Regular Checks
Periodically check the scanner for any signs of damage, such as cracks, loose connections, or frayed wires. If you notice any damage, have the scanner repaired by a qualified technician.
10. Frequently Asked Questions (FAQ)
10.1 How do you use an OBD II scanner?
Plug the scan tool connector into the connector under your dash, turn the ignition to the on position, and follow the instructions on the screen.
10.2 Does car have to be running to use OBD2 scanner?
No, in most instances, you can read trouble codes with the ignition in the ON position.
10.3 How do I read my OBD scanner?
Select “read codes” on your screen and mark down the diagnostic codes that are active and pending. The letter indicates the system involved and the numbers identify the specifics.
10.4 Can you plug in OBD scanner while car is running?
It’s possible to plug in an OBD scanner while the engine is on, but it isn’t advised. You may need to cycle the ignition off and back on to initiate the test.
10.5 What Type Of Diagnostic Tool Do I Need For My Car?
The type of diagnostic tool you need depends on the complexity of the issues you’re addressing. Basic code readers are suitable for simple tasks like reading and clearing codes, while advanced diagnostic tools offer more features like live data monitoring and bi-directional control. Consult CAR-TOOL.EDU.VN for specific recommendations based on your car’s make and model.
10.6 How Often Should I Use A Car Diagnostic Tool?
You should use a car diagnostic tool whenever your Check Engine light comes on or if you notice any unusual symptoms or performance issues. Regular checks can help you identify potential problems early and prevent costly repairs. CAR-TOOL.EDU.VN can guide you on establishing a maintenance schedule.
10.7 Can A Car Diagnostic Tool Damage My Car’s Computer?
When used correctly, a car diagnostic tool should not damage your car’s computer. However, it’s essential to use a tool that is compatible with your vehicle and follow the manufacturer’s instructions carefully. Incorrect usage or incompatible tools can potentially cause issues. CAR-TOOL.EDU.VN provides compatibility information for various diagnostic tools.
10.8 Where Can I Get Reliable Information About Car Diagnostics?
CAR-TOOL.EDU.VN is your go-to source for reliable information about car diagnostics. Our website offers detailed guides, product reviews, expert advice, and troubleshooting tips to help you diagnose and repair your vehicle issues effectively.
10.9 What Are The Benefits Of Using A Wireless Car Diagnostic Tool?
Wireless car diagnostic tools offer convenience and flexibility by connecting to your smartphone or tablet via Bluetooth or Wi-Fi. This allows you to perform diagnostics from anywhere around the vehicle and view data on a larger screen. CAR-TOOL.EDU.VN offers a range of wireless diagnostic tools to suit your needs.
10.10 How Do I Update The Software On My Car Diagnostic Tool?
Software updates for car diagnostic tools are typically available from the manufacturer’s website or through a dedicated software application. Follow the manufacturer’s instructions to download and install the latest software version to ensure optimal performance and compatibility. CAR-TOOL.EDU.VN provides links to software updates for various diagnostic tools.
Connecting a car diagnostic tool is a valuable skill that can save you time and money on auto repairs. By following the steps outlined in this guide, you can confidently connect your scanner, interpret diagnostic trouble codes, and make informed decisions about your vehicle’s maintenance. Remember to leverage the resources available at CAR-TOOL.EDU.VN for expert advice, product recommendations, and troubleshooting tips.
Do you need help finding the right car diagnostic tools for your vehicle? Contact us today for expert advice and guidance. Visit CAR-TOOL.EDU.VN or call us at +1 (641) 206-8880. Our address is 456 Elm Street, Dallas, TX 75201, United States. Let us help you keep your vehicle running smoothly!