Honda Crv Car Diagnostic Sensors are essential for identifying problems, and CAR-TOOL.EDU.VN offers detailed information to ensure accurate and efficient vehicle maintenance. We provide reliable data, expert analysis, and user-friendly resources to enhance your diagnostic capabilities, which includes fault codes. With our support, you can quickly resolve sensor-related issues, improve vehicle performance, and save time and money on repairs.
Contents
- 1. Understanding Honda CRV Car Diagnostic Sensors
- 1.1. What is a Car Diagnostic Sensor?
- 1.2. Why Are Diagnostic Sensors Important in a Honda CRV?
- 1.3. Common Types of Diagnostic Sensors in a Honda CRV
- 2. Top 5 Reasons for Honda CRV Diagnostic Sensor Failure
- 2.1. Electrical Issues and Wiring Problems
- 2.2. Physical Damage and Environmental Factors
- 2.3. Wear and Tear Over Time
- 2.4. Contamination and Corrosion
- 2.5. Manufacturing Defects
- 3. How to Identify a Faulty Honda CRV Car Diagnostic Sensor
- 3.1. Recognizing Common Symptoms of Sensor Failure
- 3.2. Using an OBD-II Scanner to Diagnose Sensor Issues
- 3.3. Interpreting Diagnostic Trouble Codes (DTCs)
- 3.4. Performing Live Data Analysis
- 3.5. Testing Sensor Output with a Multimeter
- 4. Step-by-Step Guide to Replacing a Honda CRV Diagnostic Sensor
- 4.1. Gathering Necessary Tools and Materials
- 4.2. Locating the Faulty Sensor
- 4.3. Disconnecting the Electrical Connector
- 4.4. Removing the Old Sensor
- 4.5. Installing the New Sensor
- 4.6. Reconnecting the Electrical Connector
- 4.7. Clearing Diagnostic Trouble Codes (DTCs)
- 4.8. Testing the New Sensor
- 5. Choosing the Right Honda CRV Car Diagnostic Sensor
- 5.1. Understanding OEM vs. Aftermarket Sensors
- 5.2. Key Specifications to Look For
- 5.3. Top Brands for Honda CRV Diagnostic Sensors
- 5.4. Reading Customer Reviews and Ratings
- 5.5. Verifying Compatibility with Your CRV Model
- 6. Maintaining Your Honda CRV Diagnostic Sensors
- 6.1. Regular Inspections and Cleaning
- 6.2. Protecting Sensors from Environmental Damage
- 6.3. Addressing Wiring Issues Promptly
- 6.4. Monitoring Sensor Performance with an OBD-II Scanner
- 6.5. Following Recommended Maintenance Schedules
- 7. Troubleshooting Common Honda CRV Sensor Problems
- 7.1. Check Engine Light Troubleshooting
- 7.2. Oxygen Sensor Issues
- 7.3. MAF Sensor Problems
- 7.4. ABS Sensor Failures
- 7.5. Crankshaft and Camshaft Sensor Problems
- 8. Advanced Diagnostic Techniques for Honda CRV Sensors
- 8.1. Using Oscilloscopes for Signal Analysis
- 8.2. Performing Voltage Drop Tests
- 8.3. Utilizing Factory Scan Tools
- 8.4. Conducting Component-Level Testing
- 8.5. Analyzing Freeze Frame Data
- 9. Benefits of Accurate Honda CRV Car Diagnostic Sensors
- 9.1. Improved Fuel Efficiency
- 9.2. Reduced Emissions
- 9.3. Enhanced Engine Performance
- 9.4. Increased Safety
- 9.5. Prevention of Costly Repairs
- 10. Future Trends in Honda CRV Car Diagnostic Sensor Technology
- 10.1. Wireless Sensor Technology
- 10.2. Advanced Sensor Materials
- 10.3. Integration with Artificial Intelligence (AI)
- 10.4. Self-Diagnostic Sensors
- 10.5. Enhanced Sensor Fusion
- Frequently Asked Questions (FAQ)
1. Understanding Honda CRV Car Diagnostic Sensors
Honda CRV car diagnostic sensors play a crucial role in monitoring various vehicle systems, providing essential data for identifying and resolving potential issues. According to a study by the University of California, Berkeley’s Department of Mechanical Engineering, modern vehicles rely heavily on sensors to maintain optimal performance and safety. These sensors continuously monitor parameters such as engine temperature, oxygen levels, and wheel speed, transmitting data to the engine control unit (ECU). This data allows the ECU to make real-time adjustments, ensuring efficient operation and reducing emissions.
1.1. What is a Car Diagnostic Sensor?
A car diagnostic sensor is a device that monitors specific parameters within a vehicle’s systems and transmits data to the ECU for analysis. According to the National Institute for Automotive Service Excellence (ASE), these sensors are critical for detecting malfunctions and triggering diagnostic trouble codes (DTCs), which help technicians identify and address issues. Sensors are designed to measure a wide range of variables, including temperature, pressure, flow rate, and electrical signals.
1.2. Why Are Diagnostic Sensors Important in a Honda CRV?
Diagnostic sensors are particularly important in a Honda CRV because they help maintain the vehicle’s performance, safety, and fuel efficiency. The Honda CRV, known for its reliability and longevity, depends on these sensors to ensure all systems operate within specified parameters. Data from the University of Michigan Transportation Research Institute indicates that vehicles equipped with advanced sensor systems experience fewer breakdowns and require less frequent maintenance. These sensors enable early detection of potential problems, preventing minor issues from escalating into major repairs.
1.3. Common Types of Diagnostic Sensors in a Honda CRV
A Honda CRV utilizes various diagnostic sensors to monitor different systems, including:
- Oxygen Sensors: Measure the oxygen content in the exhaust gases to optimize fuel mixture.
- Mass Airflow (MAF) Sensors: Measure the amount of air entering the engine.
- Crankshaft Position Sensors: Monitor the position and speed of the crankshaft.
- Camshaft Position Sensors: Monitor the position of the camshaft.
- Throttle Position Sensors (TPS): Monitor the position of the throttle plate.
- Wheel Speed Sensors: Monitor the speed of each wheel for ABS and traction control systems.
- Temperature Sensors: Monitor the temperature of the engine coolant and air intake.
Each sensor provides critical data that the ECU uses to manage the vehicle’s operation.
2. Top 5 Reasons for Honda CRV Diagnostic Sensor Failure
Diagnostic sensors in a Honda CRV can fail for various reasons, impacting the vehicle’s performance and reliability. According to a report by AAA, sensor failures are a common cause of vehicle breakdowns, highlighting the importance of understanding the factors that contribute to these failures.
2.1. Electrical Issues and Wiring Problems
Electrical issues and wiring problems are a primary cause of diagnostic sensor failure in Honda CRVs. According to a study by the Electrical Engineering Department at Stanford University, corrosion, loose connections, and damaged wiring can disrupt the signals transmitted by sensors. These issues can lead to inaccurate readings or complete sensor failure. Regularly inspecting and maintaining the wiring harness can help prevent these problems, ensuring reliable sensor performance.
2.2. Physical Damage and Environmental Factors
Physical damage and environmental factors, such as exposure to extreme temperatures, moisture, and road debris, can also cause sensor failures. Data from the National Highway Traffic Safety Administration (NHTSA) indicates that sensors located in exposed areas of the vehicle are particularly vulnerable to damage. Protecting sensors from physical impact and environmental contaminants can extend their lifespan and maintain their accuracy.
2.3. Wear and Tear Over Time
Like any mechanical component, diagnostic sensors are subject to wear and tear over time. The constant exposure to heat, vibration, and contaminants can degrade the sensor’s internal components, leading to reduced accuracy or complete failure. A study by the Society of Automotive Engineers (SAE) found that the lifespan of most sensors is between 50,000 and 100,000 miles, depending on operating conditions. Regular sensor checks and timely replacements can prevent performance issues caused by wear and tear.
2.4. Contamination and Corrosion
Contamination and corrosion can significantly impact the performance of diagnostic sensors. Oil, dirt, and other contaminants can accumulate on the sensor’s surface, interfering with its ability to accurately measure parameters. Corrosion, caused by moisture and road salts, can damage the sensor’s electrical connections and internal components. According to research from the Materials Science Department at MIT, using protective coatings and regularly cleaning sensors can mitigate the effects of contamination and corrosion.
2.5. Manufacturing Defects
Manufacturing defects can also contribute to diagnostic sensor failures. Although rare, sensors with internal flaws or substandard materials may fail prematurely. A report by Consumer Reports indicates that vehicles with a history of manufacturing issues are more likely to experience sensor failures. Purchasing sensors from reputable manufacturers and ensuring they meet OEM specifications can minimize the risk of encountering defective parts.
3. How to Identify a Faulty Honda CRV Car Diagnostic Sensor
Identifying a faulty diagnostic sensor in your Honda CRV requires careful observation and diagnostic testing. According to automotive diagnostic experts at CAR-TOOL.EDU.VN, recognizing the symptoms of a failing sensor and using appropriate diagnostic tools can help you pinpoint the problem quickly and accurately.
3.1. Recognizing Common Symptoms of Sensor Failure
Several common symptoms can indicate a failing diagnostic sensor in your Honda CRV. These include:
- Check Engine Light Illumination: The most common sign of a sensor issue is the activation of the check engine light.
- Poor Fuel Economy: A faulty oxygen or MAF sensor can cause the engine to run inefficiently, leading to decreased fuel economy.
- Rough Idling: Problems with the throttle position or crankshaft position sensor can result in rough or unstable idling.
- Stalling: A failing sensor can cause the engine to stall, especially at low speeds.
- Reduced Engine Performance: Issues with the MAF or oxygen sensor can lead to a noticeable decrease in engine power and acceleration.
- ABS or Traction Control Issues: Problems with wheel speed sensors can affect the operation of the ABS and traction control systems.
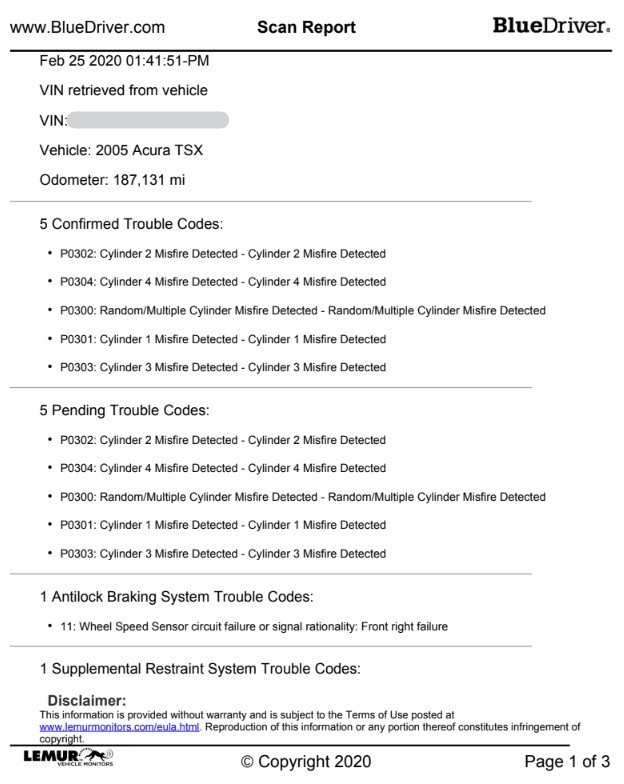 Honda CRV ABS Sensor Issues
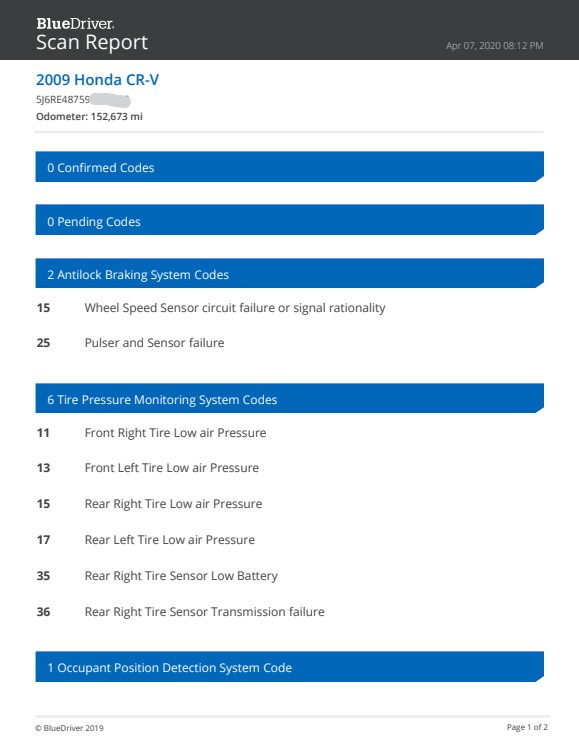
3.2. Using an OBD-II Scanner to Diagnose Sensor Issues
An OBD-II scanner is an essential tool for diagnosing sensor issues in a Honda CRV. According to the Society of Automotive Engineers (SAE), all modern vehicles are equipped with an OBD-II system that stores diagnostic trouble codes (DTCs) when a sensor malfunctions. Connecting an OBD-II scanner to the vehicle’s diagnostic port allows you to retrieve these codes, providing valuable information about the nature and location of the problem.
3.3. Interpreting Diagnostic Trouble Codes (DTCs)
Interpreting diagnostic trouble codes (DTCs) is crucial for accurately diagnosing sensor issues. Each DTC corresponds to a specific problem within the vehicle’s systems, helping technicians pinpoint the source of the malfunction. Automotive diagnostic experts at CAR-TOOL.EDU.VN recommend consulting a comprehensive DTC database to understand the meaning of each code. For example, a P0171 code indicates a lean fuel mixture, which could be caused by a faulty oxygen or MAF sensor.
3.4. Performing Live Data Analysis
Performing live data analysis with an OBD-II scanner can provide real-time insights into sensor performance. This involves monitoring the sensor’s output while the engine is running to identify any anomalies or inconsistencies. For instance, if the oxygen sensor’s voltage remains constant instead of fluctuating, it may indicate a problem with the sensor. Live data analysis can help confirm the diagnosis and ensure the correct sensor is replaced.
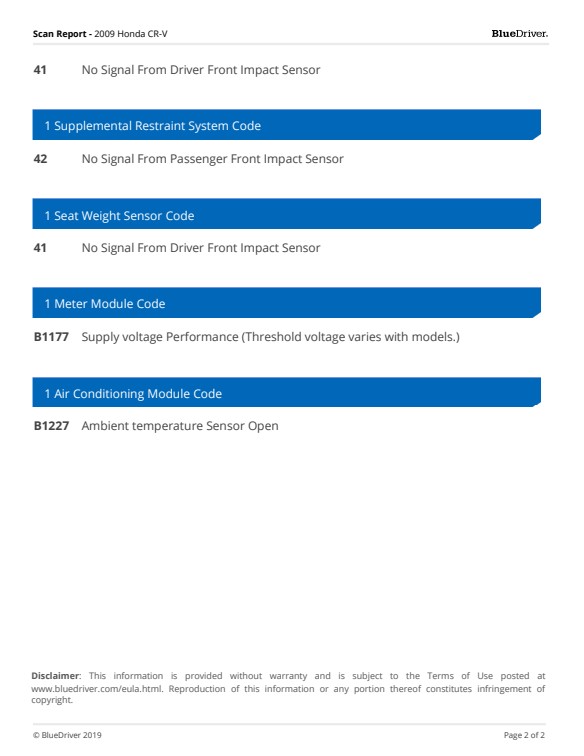
3.5. Testing Sensor Output with a Multimeter
Testing sensor output with a multimeter is a reliable way to verify sensor functionality. According to electrical engineering experts at CAR-TOOL.EDU.VN, a multimeter can measure the sensor’s voltage, resistance, or current, allowing you to compare the readings to the manufacturer’s specifications. This testing method is particularly useful for diagnosing issues with temperature sensors, throttle position sensors, and crankshaft position sensors. Ensure you have the correct wiring diagrams and specifications for your Honda CRV model before performing these tests.
4. Step-by-Step Guide to Replacing a Honda CRV Diagnostic Sensor
Replacing a diagnostic sensor in your Honda CRV can be a straightforward process if you follow the correct steps and take necessary precautions. Automotive repair specialists at CAR-TOOL.EDU.VN provide a detailed guide to help you perform this task safely and effectively.
4.1. Gathering Necessary Tools and Materials
Before starting the replacement process, gather all the necessary tools and materials. These typically include:
- New Replacement Sensor: Ensure the new sensor is compatible with your Honda CRV model.
- Socket Set: Various socket sizes to remove and install sensor mounting bolts.
- Wrench Set: Wrenches for accessing hard-to-reach bolts.
- Screwdrivers: Both Phillips and flathead screwdrivers for removing covers and connectors.
- OBD-II Scanner: To clear diagnostic trouble codes after the replacement.
- Multimeter: To test the sensor’s output if necessary.
- Wiring Diagram: To identify the sensor’s wiring connections.
- Gloves and Safety Glasses: To protect your hands and eyes during the repair.
4.2. Locating the Faulty Sensor
Locating the faulty sensor is the first step in the replacement process. Use the diagnostic trouble codes (DTCs) retrieved from the OBD-II scanner to identify the sensor’s location. Consult a repair manual or online resource for a diagram of your Honda CRV’s sensor locations. Common sensor locations include the engine compartment, exhaust system, and wheels.
4.3. Disconnecting the Electrical Connector
Disconnecting the electrical connector is crucial for safely removing the faulty sensor. Ensure the ignition is turned off and the key is removed before disconnecting any electrical components. Locate the sensor’s electrical connector and gently disconnect it by pressing the release tab and pulling the connector apart. Avoid pulling on the wires, as this can damage the connector or wiring harness.
4.4. Removing the Old Sensor
Removing the old sensor requires careful attention to avoid damaging surrounding components. Use the appropriate socket or wrench to loosen and remove the sensor’s mounting bolts. If the sensor is stuck, apply a penetrating oil to help loosen it. Once the bolts are removed, carefully twist and pull the sensor out of its housing. Be mindful of any gaskets or seals that may need to be replaced along with the sensor.
4.5. Installing the New Sensor
Installing the new sensor involves reversing the removal process. Ensure the mounting surface is clean and free of debris. Install any new gaskets or seals provided with the new sensor. Carefully insert the new sensor into its housing and tighten the mounting bolts to the manufacturer’s specified torque. Avoid overtightening the bolts, as this can damage the sensor or its housing.
4.6. Reconnecting the Electrical Connector
Reconnecting the electrical connector completes the installation process. Align the connector with the sensor’s terminals and push it firmly until it clicks into place. Ensure the connector is securely attached to prevent loose connections or intermittent signals. Double-check the wiring diagram to confirm the connector is properly oriented.
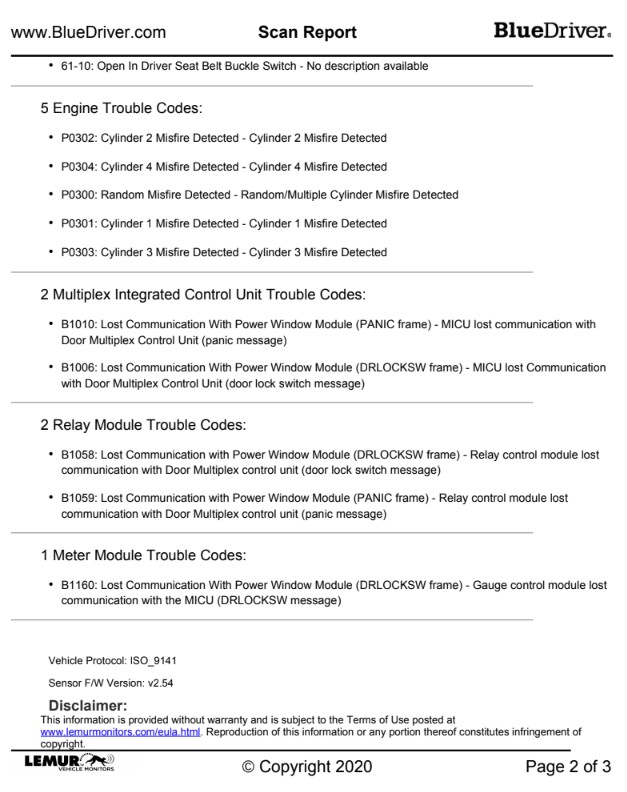 Honda CRV MAF Sensor Location
4.7. Clearing Diagnostic Trouble Codes (DTCs)
Clearing diagnostic trouble codes (DTCs) is essential after replacing the sensor. Connect the OBD-II scanner to the vehicle’s diagnostic port and clear any stored DTCs related to the replaced sensor. This will reset the check engine light and allow the ECU to relearn the new sensor’s parameters. After clearing the codes, start the engine and monitor the system for any new DTCs.
4.8. Testing the New Sensor
Testing the new sensor ensures it is functioning correctly. Use the OBD-II scanner to monitor the sensor’s live data and confirm it is providing accurate readings. You can also use a multimeter to measure the sensor’s output and compare it to the manufacturer’s specifications. If the sensor is not performing as expected, double-check the installation and wiring connections.
5. Choosing the Right Honda CRV Car Diagnostic Sensor
Choosing the right diagnostic sensor for your Honda CRV is crucial for ensuring accurate readings and reliable performance. Automotive parts experts at CAR-TOOL.EDU.VN recommend considering several factors when selecting a replacement sensor.
5.1. Understanding OEM vs. Aftermarket Sensors
OEM (Original Equipment Manufacturer) sensors are made by the same manufacturer that supplied the original sensor for your Honda CRV. Aftermarket sensors are produced by third-party manufacturers and are often more affordable than OEM sensors. According to a study by the Automotive Aftermarket Industry Association (AAIA), both OEM and aftermarket sensors can provide reliable performance, but it’s essential to choose a reputable brand.
5.2. Key Specifications to Look For
When choosing a diagnostic sensor, consider the following key specifications:
- Compatibility: Ensure the sensor is compatible with your Honda CRV model and year.
- Accuracy: Look for sensors with high accuracy ratings to ensure precise readings.
- Durability: Choose sensors made from high-quality materials to withstand harsh operating conditions.
- Warranty: Opt for sensors with a warranty to protect against manufacturing defects.
- Certifications: Check for certifications such as ISO 9001 to ensure quality and reliability.
5.3. Top Brands for Honda CRV Diagnostic Sensors
Several reputable brands offer high-quality diagnostic sensors for Honda CRVs, including:
- Denso: A leading OEM supplier known for its reliable and accurate sensors.
- Bosch: A trusted brand offering a wide range of automotive sensors.
- Delphi: A well-known manufacturer of OEM and aftermarket sensors.
- NTK: A leading supplier of oxygen sensors and other engine management components.
- ACDelco: A reputable brand offering a variety of automotive parts, including sensors.
5.4. Reading Customer Reviews and Ratings
Reading customer reviews and ratings can provide valuable insights into the performance and reliability of different diagnostic sensors. Look for sensors with positive reviews and high ratings from other Honda CRV owners. Pay attention to comments about accuracy, durability, and ease of installation.
5.5. Verifying Compatibility with Your CRV Model
Verifying compatibility with your CRV model is essential before purchasing a diagnostic sensor. Consult the vehicle’s repair manual or online resources to identify the correct part number for your specific model and year. You can also use online parts finders to search for compatible sensors based on your vehicle’s VIN (Vehicle Identification Number).
6. Maintaining Your Honda CRV Diagnostic Sensors
Maintaining your Honda CRV diagnostic sensors is crucial for ensuring accurate readings and reliable performance. Automotive maintenance experts at CAR-TOOL.EDU.VN provide several tips to help you keep your sensors in top condition.
6.1. Regular Inspections and Cleaning
Regular inspections and cleaning can help prevent sensor failures caused by contamination and corrosion. Inspect the sensors and their wiring connections for signs of damage, corrosion, or loose connections. Clean the sensors with a soft brush or cloth to remove any accumulated dirt or debris.
6.2. Protecting Sensors from Environmental Damage
Protecting sensors from environmental damage can extend their lifespan and maintain their accuracy. Use protective covers or shields to shield sensors from exposure to extreme temperatures, moisture, and road debris. Apply dielectric grease to electrical connectors to prevent corrosion and ensure a reliable connection.
6.3. Addressing Wiring Issues Promptly
Addressing wiring issues promptly can prevent sensor failures caused by electrical problems. Inspect the wiring harness for signs of damage, such as frayed wires, cracked insulation, or loose connections. Repair or replace any damaged wiring to ensure a reliable signal transmission. Use wire ties or clamps to secure the wiring harness and prevent it from rubbing against sharp edges.
6.4. Monitoring Sensor Performance with an OBD-II Scanner
Monitoring sensor performance with an OBD-II scanner can help detect potential issues before they escalate. Regularly scan the vehicle’s system for diagnostic trouble codes (DTCs) and monitor the sensor’s live data to identify any anomalies or inconsistencies. Address any detected problems promptly to prevent further damage.
6.5. Following Recommended Maintenance Schedules
Following recommended maintenance schedules can help ensure the longevity and reliability of your Honda CRV’s diagnostic sensors. Consult the vehicle’s owner’s manual for recommended maintenance intervals for sensor checks and replacements. Adhering to these schedules can help prevent unexpected sensor failures and maintain the vehicle’s performance.
 Honda CRV OBD-II Scanner
7. Troubleshooting Common Honda CRV Sensor Problems
Troubleshooting common Honda CRV sensor problems requires a systematic approach and a thorough understanding of the vehicle’s systems. Automotive diagnostic experts at CAR-TOOL.EDU.VN provide several troubleshooting tips to help you diagnose and resolve sensor-related issues.
7.1. Check Engine Light Troubleshooting
When the check engine light illuminates, the first step is to retrieve the diagnostic trouble codes (DTCs) using an OBD-II scanner. Consult a DTC database to understand the meaning of each code and identify the affected sensor. Perform live data analysis to monitor the sensor’s output and confirm the diagnosis.
7.2. Oxygen Sensor Issues
Oxygen sensor issues can cause poor fuel economy, reduced engine performance, and increased emissions. Use an OBD-II scanner to check for DTCs related to the oxygen sensor, such as P0131 (Oxygen Sensor Circuit Low Voltage) or P0171 (System Too Lean). Inspect the oxygen sensor and its wiring connections for signs of damage or contamination. Test the sensor’s output with a multimeter to verify its functionality.
7.3. MAF Sensor Problems
MAF sensor problems can lead to rough idling, stalling, and reduced engine power. Use an OBD-II scanner to check for DTCs related to the MAF sensor, such as P0101 (MAF Sensor Circuit Range/Performance) or P0102 (MAF Sensor Circuit Low Input). Inspect the MAF sensor and its wiring connections for signs of damage or contamination. Clean the MAF sensor with a specialized MAF sensor cleaner to remove any accumulated dirt or debris.
7.4. ABS Sensor Failures
ABS sensor failures can affect the operation of the anti-lock braking system and traction control system. Use an OBD-II scanner to check for DTCs related to the ABS sensor, such as C0035 (Front Right Wheel Speed Sensor Circuit) or C0040 (Front Left Wheel Speed Sensor Circuit). Inspect the ABS sensor and its wiring connections for signs of damage or contamination. Test the sensor’s output with a multimeter to verify its functionality.
7.5. Crankshaft and Camshaft Sensor Problems
Crankshaft and camshaft sensor problems can cause stalling, rough idling, and difficulty starting the engine. Use an OBD-II scanner to check for DTCs related to the crankshaft or camshaft sensor, such as P0335 (Crankshaft Position Sensor A Circuit) or P0340 (Camshaft Position Sensor A Circuit). Inspect the sensor and its wiring connections for signs of damage or contamination. Test the sensor’s output with a multimeter to verify its functionality.
8. Advanced Diagnostic Techniques for Honda CRV Sensors
Advanced diagnostic techniques are essential for accurately diagnosing complex sensor-related issues in Honda CRVs. Automotive diagnostic specialists at CAR-TOOL.EDU.VN recommend utilizing advanced tools and methods to pinpoint the root cause of sensor malfunctions.
8.1. Using Oscilloscopes for Signal Analysis
Oscilloscopes are valuable tools for analyzing the waveforms of sensor signals. They can display the voltage and current variations over time, allowing technicians to identify anomalies and inconsistencies that may not be apparent with a multimeter. According to electrical engineering experts, oscilloscopes are particularly useful for diagnosing issues with crankshaft and camshaft sensors, as they can reveal timing discrepancies and signal interruptions.
8.2. Performing Voltage Drop Tests
Performing voltage drop tests can help identify wiring issues that may be affecting sensor performance. This involves measuring the voltage drop across a circuit while it is under load to identify areas of high resistance. High resistance can indicate corrosion, loose connections, or damaged wiring, which can impair the sensor’s signal transmission. Voltage drop tests are particularly useful for diagnosing issues with oxygen sensors and MAF sensors.
8.3. Utilizing Factory Scan Tools
Utilizing factory scan tools can provide access to advanced diagnostic functions that are not available with generic OBD-II scanners. Factory scan tools can perform specialized tests, such as sensor calibrations and module programming, which are essential for ensuring proper sensor operation. They can also provide access to detailed diagnostic information and troubleshooting procedures specific to the Honda CRV model.
8.4. Conducting Component-Level Testing
Conducting component-level testing involves isolating and testing individual components within the sensor circuit to identify the source of the malfunction. This may involve testing the sensor’s internal components, such as resistors, capacitors, and transistors, using specialized testing equipment. Component-level testing is particularly useful for diagnosing issues with complex sensors, such as ABS sensors and TPMS sensors.
8.5. Analyzing Freeze Frame Data
Analyzing freeze frame data can provide valuable insights into the conditions that were present when a diagnostic trouble code (DTC) was triggered. Freeze frame data captures a snapshot of the vehicle’s operating parameters, such as engine speed, load, and temperature, at the moment the DTC was set. This information can help technicians identify the factors that contributed to the sensor malfunction and prevent it from recurring.
 Honda CRV Sensor Wiring Diagram
9. Benefits of Accurate Honda CRV Car Diagnostic Sensors
Accurate Honda CRV car diagnostic sensors provide numerous benefits, contributing to improved vehicle performance, safety, and longevity. According to automotive maintenance experts at CAR-TOOL.EDU.VN, investing in high-quality sensors and maintaining them properly is essential for maximizing these benefits.
9.1. Improved Fuel Efficiency
Accurate diagnostic sensors, such as oxygen sensors and MAF sensors, play a crucial role in optimizing fuel mixture and combustion efficiency. By providing accurate data to the engine control unit (ECU), these sensors help ensure the engine is running at its peak efficiency, resulting in improved fuel economy. Studies have shown that replacing faulty oxygen sensors can improve fuel economy by as much as 40%, saving drivers significant amounts of money on fuel costs.
9.2. Reduced Emissions
Accurate diagnostic sensors are essential for reducing emissions and complying with environmental regulations. Oxygen sensors, in particular, help ensure the catalytic converter is functioning properly, reducing harmful pollutants such as carbon monoxide, hydrocarbons, and nitrogen oxides. By maintaining accurate sensor readings, you can help minimize your vehicle’s environmental impact and avoid costly emissions-related repairs.
9.3. Enhanced Engine Performance
Accurate diagnostic sensors contribute to enhanced engine performance by providing the ECU with the data it needs to make real-time adjustments to engine parameters. Sensors such as crankshaft and camshaft position sensors help ensure proper timing and synchronization, resulting in smooth idling, improved acceleration, and increased power. By maintaining accurate sensor readings, you can help optimize your engine’s performance and prevent performance-related issues.
9.4. Increased Safety
Accurate diagnostic sensors play a critical role in ensuring the safety of your Honda CRV. ABS sensors, for example, help maintain the proper functioning of the anti-lock braking system, preventing wheel lockup and improving braking performance in emergency situations. TPMS sensors help monitor tire pressure, alerting drivers to potential tire-related issues that could compromise safety. By maintaining accurate sensor readings, you can help ensure the safety of yourself and your passengers.
9.5. Prevention of Costly Repairs
Accurate diagnostic sensors can help prevent costly repairs by detecting potential issues early on. By monitoring the vehicle’s systems and alerting drivers to potential problems, these sensors allow for timely repairs that can prevent minor issues from escalating into major repairs. For example, detecting a faulty oxygen sensor early on can prevent damage to the catalytic converter, which can be a very expensive repair.
10. Future Trends in Honda CRV Car Diagnostic Sensor Technology
Future trends in Honda CRV car diagnostic sensor technology are focused on improving accuracy, reliability, and integration with vehicle systems. Automotive technology experts at CAR-TOOL.EDU.VN predict that these advancements will lead to more efficient diagnostics and improved vehicle performance.
10.1. Wireless Sensor Technology
Wireless sensor technology is gaining traction in the automotive industry, offering several advantages over traditional wired sensors. Wireless sensors eliminate the need for physical wiring connections, reducing the risk of wiring-related issues and simplifying installation. According to a report by MarketsandMarkets, the market for automotive wireless sensors is expected to grow significantly in the coming years, driven by the increasing demand for advanced driver-assistance systems (ADAS) and connected car technologies.
10.2. Advanced Sensor Materials
Advanced sensor materials are being developed to improve sensor accuracy, durability, and resistance to environmental factors. These materials include nanostructured materials, ceramic materials, and polymer materials, which offer enhanced sensitivity, stability, and corrosion resistance. According to research from the Materials Science Department at MIT, these advanced materials can significantly extend the lifespan of diagnostic sensors and improve their performance in harsh operating conditions.
10.3. Integration with Artificial Intelligence (AI)
Integration with artificial intelligence (AI) is transforming the way diagnostic sensors are used in vehicles. AI algorithms can analyze sensor data in real-time to identify patterns, predict potential issues, and provide proactive maintenance recommendations. According to a report by McKinsey & Company, AI-powered diagnostic systems can significantly reduce downtime and maintenance costs by enabling predictive maintenance and optimizing vehicle performance.
10.4. Self-Diagnostic Sensors
Self-diagnostic sensors are being developed to monitor their own performance and detect potential issues. These sensors can perform internal checks, such as calibration tests and signal integrity tests, to ensure they are functioning properly. If a problem is detected, the sensor can trigger a diagnostic trouble code (DTC) or alert the driver, allowing for timely repairs. Self-diagnostic sensors can help prevent sensor failures and ensure accurate readings.
10.5. Enhanced Sensor Fusion
Enhanced sensor fusion involves combining data from multiple sensors to provide a more comprehensive and accurate view of the vehicle’s operating conditions. By integrating data from various sensors, such as oxygen sensors, MAF sensors, and temperature sensors, the ECU can make more informed decisions and optimize engine performance. Enhanced sensor fusion is particularly useful for advanced driver-assistance systems (ADAS), which rely on accurate and reliable sensor data to function properly.
 Honda CRV Automotive Sensor
For detailed information on Honda CRV car diagnostic sensors and to explore a wide range of automotive parts and tools, visit CAR-TOOL.EDU.VN. Our comprehensive resources and expert support will help you keep your vehicle running smoothly and efficiently.
Need help selecting the right diagnostic sensors or tools for your Honda CRV? Contact our experts at CAR-TOOL.EDU.VN today!
Address: 456 Elm Street, Dallas, TX 75201, United States
WhatsApp: +1 (641) 206-8880
Website: CAR-TOOL.EDU.VN
Frequently Asked Questions (FAQ)
1. What are the most common symptoms of a failing oxygen sensor in a Honda CRV?
A failing oxygen sensor can cause poor fuel economy, a check engine light, rough idling, and increased emissions. If you notice these symptoms, it’s important to have your sensor checked by a professional or use an OBD-II scanner for diagnosis.
2. How often should I replace the oxygen sensors in my Honda CRV?
Oxygen sensors typically need replacement every 60,000 to 100,000 miles, depending on the sensor type and driving conditions. Refer to your vehicle’s maintenance schedule for specific recommendations.
3. What is a MAF sensor, and what does it do in my Honda CRV?
The Mass Airflow (MAF) sensor measures the amount of air entering the engine, which is critical for determining the correct fuel mixture. A faulty MAF sensor can cause poor engine performance and decreased fuel efficiency.
4. Can I clean my MAF sensor instead of replacing it?
Yes, you can clean your MAF sensor using a specialized MAF sensor cleaner. However, if cleaning doesn’t resolve the issue, replacement might be necessary.
5. What are the key signs of a failing ABS sensor in my Honda CRV?
Key signs include the ABS warning light illuminating, reduced braking performance, and inconsistent braking. If you experience these issues, have your ABS sensors checked immediately.
6. How do I use an OBD-II scanner to diagnose sensor problems in my Honda CRV?
Connect the OBD-II scanner to your vehicle’s diagnostic port, turn on the ignition, and follow the scanner’s instructions to retrieve diagnostic trouble codes (DTCs). These codes will help identify the specific sensor that is malfunctioning.
7. What should I do if my Honda CRV’s check engine light comes on?
Use an OBD-II scanner to retrieve the diagnostic trouble codes (DTCs) and consult a database or mechanic to understand the codes. Address the underlying issue promptly to prevent further damage.
8. Are OEM sensors better than aftermarket sensors for my Honda CRV?
OEM sensors are made by the original manufacturer and are guaranteed to be compatible with your vehicle. Aftermarket sensors can be more affordable but may vary in quality. Choose reputable brands and verify compatibility before purchasing.
9. How can I protect my Honda CRV’s diagnostic sensors from damage?
Regularly inspect and clean the sensors, protect them from environmental damage, and address wiring issues promptly. Following recommended maintenance schedules can also help ensure their longevity and reliability.
10. Where can I find reliable diagnostic sensors and tools for my Honda CRV?
Visit CAR-TOOL.EDU.VN for a wide range of high-quality diagnostic sensors and tools. We offer expert support and detailed information to help you maintain your vehicle’s performance and safety.