Have you inspected the brake pedal assembly for any damage or loose connections is a crucial question during a brake system inspection, it can impact brake performance. At CAR-TOOL.EDU.VN, we’ll explore the brake pedal assembly, common issues, and inspection steps. Understanding these details will help ensure driving safety and prevent potential accidents involving braking components, master cylinder issues, and brake lines.
Contents
- 1. What Is the Brake Pedal Assembly?
- 2. Why Inspect the Brake Pedal Assembly?
- 3. What Are the Common Problems with the Brake Pedal Assembly?
- 4. How to Inspect the Brake Pedal Assembly: A Step-by-Step Guide
- 5. Tools You’ll Need to Inspect the Brake Pedal Assembly
- 6. Detailed Inspection Points for the Brake Pedal Assembly
- 7. Understanding Brake System Failure Indicator Lamps
- 8. What to Do If You Find Damage or Loose Connections
- 9. Maintaining Your Brake Pedal Assembly
- 10. Hydraulic Brake Systems: A Closer Look
- 11. Electric Brake Systems: An Overview
- 12. General Specifications for Hydraulic Brakes
- 13. Brake Drums and Discs: Key Inspection Points
- 14. Mechanical Linkage: Cables and Components
- 15. Vacuum System Operation and Inspection
- 16. Stopping Distance: What’s Acceptable?
- 17. Understanding Brake Linings and Disc Pads
- 18. The Role of the Master Cylinder in Brake Performance
- 19. ABS (Anti-lock Braking System) Inspection
- 20. How Often Should You Inspect Your Brakes?
- 21. DIY vs. Professional Brake Inspection: Which Is Right for You?
- 22. The Importance of Brake Fluid in the Hydraulic System
- 23. Brake System Warning Signs: What to Look For
- 24. Troubleshooting Common Brake Pedal Issues
- 25. Brake Pedal Height and Its Impact on Performance
- 26. Replacing the Brake Pedal Assembly: When and How
- 27. Torquing Lug Nuts: Why It Matters
- 28. Understanding Floating Axles and Brake Service
- 29. How to Test Drive a Vehicle for Brake Issues
- 30. Brake Inspection Checklist: A Comprehensive Guide
- 31. Safety Precautions When Working on Brake Systems
- 32. The Impact of Brake Condition on Vehicle Value
- 33. Resources for Further Learning About Brake Systems
- 34. Expert Opinions on Brake System Maintenance
- 35. FAQ: Common Questions About Brake Pedal Assemblies
Table of Contents
- What Is the Brake Pedal Assembly?
- Why Inspect the Brake Pedal Assembly?
- What Are the Common Problems with the Brake Pedal Assembly?
- How to Inspect the Brake Pedal Assembly: A Step-by-Step Guide
- Tools You’ll Need to Inspect the Brake Pedal Assembly
- Detailed Inspection Points for the Brake Pedal Assembly
- Understanding Brake System Failure Indicator Lamps
- What to Do If You Find Damage or Loose Connections
- Maintaining Your Brake Pedal Assembly
- Hydraulic Brake Systems: A Closer Look
- Electric Brake Systems: An Overview
- General Specifications for Hydraulic Brakes
- Brake Drums and Discs: Key Inspection Points
- Mechanical Linkage: Cables and Components
- Vacuum System Operation and Inspection
- Stopping Distance: What’s Acceptable?
- Understanding Brake Linings and Disc Pads
- The Role of the Master Cylinder in Brake Performance
- ABS (Anti-lock Braking System) Inspection
- How Often Should You Inspect Your Brakes?
- DIY vs. Professional Brake Inspection: Which Is Right for You?
- The Importance of Brake Fluid in the Hydraulic System
- Brake System Warning Signs: What to Look For
- Troubleshooting Common Brake Pedal Issues
- Brake Pedal Height and Its Impact on Performance
- Replacing the Brake Pedal Assembly: When and How
- Torquing Lug Nuts: Why It Matters
- Understanding Floating Axles and Brake Service
- How to Test Drive a Vehicle for Brake Issues
- Brake Inspection Checklist: A Comprehensive Guide
- Safety Precautions When Working on Brake Systems
- The Impact of Brake Condition on Vehicle Value
- Resources for Further Learning About Brake Systems
- Expert Opinions on Brake System Maintenance
- FAQ: Common Questions About Brake Pedal Assemblies
1. What Is the Brake Pedal Assembly?
The brake pedal assembly is a set of components that allows the driver to apply the brakes. According to a study by the National Highway Traffic Safety Administration (NHTSA), brake system failures contribute to a significant number of vehicle accidents annually. It typically includes the pedal itself, a pivot point, linkages, and connections to the master cylinder. The master cylinder, as noted by the Bureau of Automotive Repair, is responsible for converting the mechanical force from the pedal into hydraulic pressure that activates the brakes. The entire system must be in good working order to ensure reliable braking. The proper functioning and regular inspection of these parts are vital for road safety.
Alt: Close-up of a vehicle’s brake pedal assembly showing linkages and pivot points.
2. Why Inspect the Brake Pedal Assembly?
Inspecting the brake pedal assembly is critical for several reasons. First and foremost, it ensures the safety of the driver and passengers. A malfunctioning brake pedal can lead to reduced braking efficiency or complete brake failure, as highlighted by the National Transportation Safety Board (NTSB). Regular inspections can identify potential issues such as loose connections, worn components, or damage. According to the Virginia State Police Inspection Procedures, any brake system defect can lead to a vehicle failing inspection. Addressing these issues promptly can prevent accidents and costly repairs, promoting overall road safety.
3. What Are the Common Problems with the Brake Pedal Assembly?
Several common problems can affect the brake pedal assembly. These include:
- Loose Connections: Connections can loosen over time due to vibrations and wear, affecting brake responsiveness.
- Worn Pivot Points: The pivot points can wear out, causing the pedal to feel sloppy or unresponsive.
- Damaged Linkages: Linkages can bend or break, reducing the effectiveness of the braking system.
- Corrosion: Rust and corrosion can weaken the assembly, leading to potential failure.
- Master Cylinder Issues: Problems with the master cylinder, like leaks or internal damage, can affect pedal feel and brake performance.
According to a study by the AAA Foundation for Traffic Safety, maintaining your vehicle’s brake system is crucial. Routine checks and timely repairs can prevent many of these issues, ensuring the reliability of your braking system.
4. How to Inspect the Brake Pedal Assembly: A Step-by-Step Guide
Inspecting the brake pedal assembly can be done with a few simple steps:
- Visual Inspection: Check for any visible damage, rust, or corrosion on the pedal and its components.
- Check Connections: Ensure all connections are tight and secure. Look for any loose nuts or bolts.
- Test Pedal Feel: Press the brake pedal and note how it feels. It should be firm and responsive, not spongy or soft.
- Listen for Noises: Listen for any unusual noises when pressing the pedal, such as squeaks, clicks, or grinding sounds.
- Inspect the Master Cylinder: Check the master cylinder for leaks and ensure the fluid level is correct.
The Virginia Department of Motor Vehicles emphasizes that inspectors must check the brake hydraulic system by applying moderate pressure to the brake pedal for 10 seconds. The pedal height should be maintained, indicating no leaks or issues within the system.
5. Tools You’ll Need to Inspect the Brake Pedal Assembly
To properly inspect the brake pedal assembly, you’ll need a few basic tools:
- Wrench Set: For tightening loose connections.
- Screwdriver Set: For removing covers or adjusting components.
- Flashlight: To see into dark or hard-to-reach areas.
- Inspection Mirror: For checking components that are difficult to see directly.
- Brake Fluid: To top off the master cylinder if needed.
- Gloves: To protect your hands from dirt and chemicals.
Having these tools on hand will make the inspection process more efficient and thorough. CAR-TOOL.EDU.VN offers a wide range of tools suitable for brake system maintenance.
6. Detailed Inspection Points for the Brake Pedal Assembly
When inspecting the brake pedal assembly, pay close attention to these specific points:
- Pedal Pad: Check the pedal pad for wear or damage. A worn pad can be slippery and reduce braking effectiveness.
- Pivot Bushings: Inspect the pivot bushings for wear and play. Excessive play can cause the pedal to feel loose.
- Return Spring: Ensure the return spring is intact and functioning correctly. The pedal should return to its original position quickly after being released.
- Linkage Rods: Check the linkage rods for bends, cracks, or corrosion. Damaged rods can affect brake performance.
- Master Cylinder Connection: Verify the connection between the pedal linkage and the master cylinder is secure and free from leaks.
Regularly checking these points will help identify potential problems before they become major issues.
7. Understanding Brake System Failure Indicator Lamps
Brake system failure indicator lamps are crucial for alerting drivers to potential brake problems. According to the Virginia State Police Inspection Procedures, passenger vehicles manufactured after January 1, 1968, must be equipped with a red brake failure warning lamp. This lamp should light up when the parking brake is applied and the ignition key is turned to the start position.
- Red Brake Failure Warning Lamp: This indicates a serious brake system issue, such as a loss of hydraulic pressure.
- Amber ABS/Anti-lock Brake Lamp: This indicates a problem with the anti-lock braking system, but the regular brakes should still function.
If either of these lamps illuminates while driving, it’s important to have the brake system inspected immediately.
8. What to Do If You Find Damage or Loose Connections
If you find damage or loose connections during your inspection, it’s important to take action.
- Tighten Loose Connections: Use the appropriate wrench or screwdriver to tighten any loose nuts, bolts, or screws.
- Replace Worn Parts: If you find worn or damaged parts, such as bushings or linkages, replace them immediately. CAR-TOOL.EDU.VN provides a wide range of replacement parts for brake systems.
- Seek Professional Help: If you are not comfortable making repairs yourself, take your vehicle to a qualified mechanic.
Addressing these issues promptly can prevent further damage and ensure your braking system remains reliable.
9. Maintaining Your Brake Pedal Assembly
Maintaining your brake pedal assembly is crucial for its longevity and reliability. Here are some tips:
- Regular Inspections: Conduct regular inspections to catch potential problems early.
- Lubrication: Lubricate pivot points and linkages to prevent wear and corrosion.
- Cleaning: Keep the assembly clean and free from dirt and debris.
- Prompt Repairs: Address any issues promptly to prevent further damage.
Following these maintenance tips will help keep your brake pedal assembly in good working order.
10. Hydraulic Brake Systems: A Closer Look
Hydraulic brake systems use brake fluid to transmit pressure from the master cylinder to the wheel cylinders or calipers. These systems are common in most modern vehicles. Key components include:
- Master Cylinder: Converts mechanical force into hydraulic pressure.
- Brake Lines: Carry brake fluid to the wheels.
- Wheel Cylinders/Calipers: Apply pressure to the brake shoes or pads.
- Brake Fluid Reservoir: Holds the brake fluid supply.
Maintaining the hydraulic system is crucial for effective braking. The Virginia Department of Motor Vehicles notes the importance of checking for leaks in the master cylinder, wheel cylinders, and brake calipers.
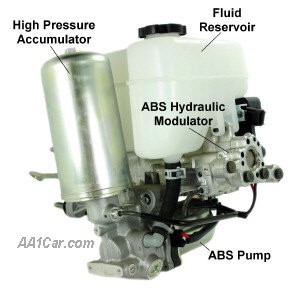 Hydraulic Brake System
11. Electric Brake Systems: An Overview
Electric brake systems are often used in trailers and some newer vehicles. These systems use electrical signals to activate the brakes. Key components include:
- Brake Controller: Sends electrical signals to the trailer brakes.
- Wiring Harness: Connects the brake controller to the trailer brakes.
- Electric Brakes: Use electromagnets to apply the brakes.
- Breakaway Switch: Activates the trailer brakes if the trailer becomes disconnected from the tow vehicle.
Ensuring all electrical connections are secure and the brake controller is functioning correctly is essential for safe towing.
12. General Specifications for Hydraulic Brakes
Several general specifications apply to hydraulic brakes to ensure proper function:
- Leakage: There should be no leakage in the master cylinder, wheel cylinders, or brake calipers.
- Fluid Level: The fluid level in the master cylinder should be at the proper level.
- Caliper Function: Calipers should not stick or bind.
- Hoses and Tubing: Hoses and tubing should be free from cracks, crimps, or restrictions.
- Brake Equalization: Brakes should be equalized to stop the vehicle in a straight line.
Adhering to these specifications ensures reliable and safe braking performance.
13. Brake Drums and Discs: Key Inspection Points
Brake drums and discs (rotors) are critical components of the braking system. Inspect them for:
- Wear: Check for excessive wear or scoring.
- Cracks: Look for any external cracks, especially those more than half the width of the friction surface.
- Contamination: Ensure there is no grease or other contamination on the braking surface.
The Virginia State Police Inspection Procedures specify that brake drums and discs should not be worn or scored to the extent that machining would fail to meet manufacturer’s specifications.
14. Mechanical Linkage: Cables and Components
Mechanical linkage components, such as cables, play a crucial role in the braking system. Inspect them for:
- Fraying: Cables should not be frayed or frozen.
- Missing Parts: Ensure no mechanical parts are missing, broken, or badly worn.
- Misalignment: Check for any misalignment of mechanical parts.
Properly functioning mechanical linkages are essential for effective braking.
15. Vacuum System Operation and Inspection
Some vehicles use a vacuum system to assist with braking. To inspect the vacuum system:
- Stop Engine: Stop the engine and depress the brake pedal several times to eliminate vacuum.
- Apply Pedal Force: Depress the pedal with light force (25 pounds).
- Start Engine: While maintaining force on the pedal, start the engine and observe if the pedal moves down slightly.
If the pedal does not move down slightly as the engine starts, there may be a problem with the vacuum system.
16. Stopping Distance: What’s Acceptable?
Stopping distance is a critical measure of brake performance. According to the Virginia State Police Inspection Procedures, when tested on a dry, hard, approximately level road at 20 miles per hour:
- Four-Wheel Brakes: Any motor vehicle with four-wheel brakes should stop within 25 feet.
- Two-Wheel Brakes: Any motor vehicle with two-wheel brakes should stop within 45 feet.
- Combinations of Vehicles: All combinations of vehicles should stop within 40 feet.
If a vehicle exceeds these stopping distances, the brake system should be inspected and repaired.
17. Understanding Brake Linings and Disc Pads
Brake linings and disc pads are essential for creating friction to stop the vehicle. Inspect them for:
- Thickness: Linings and pads should be at least 2/32 of an inch thick.
- Wear: Check for excessive wear or damage.
- Contamination: Ensure there is no grease or other contamination on the linings or pads.
Replacing worn brake linings and disc pads is crucial for maintaining braking performance.
Alt: Close-up of worn brake linings on a vehicle.
18. The Role of the Master Cylinder in Brake Performance
The master cylinder is a critical component of the hydraulic brake system, responsible for converting mechanical force from the brake pedal into hydraulic pressure. According to the Bureau of Automotive Repair, a properly functioning master cylinder is essential for effective braking. Issues such as leaks, internal damage, or insufficient fluid can significantly impact brake performance and safety. Regular inspection and maintenance of the master cylinder are vital for ensuring reliable brake function. CAR-TOOL.EDU.VN offers resources and tools to help maintain this essential part of your vehicle’s braking system.
19. ABS (Anti-lock Braking System) Inspection
The Anti-lock Braking System (ABS) is designed to prevent the wheels from locking up during hard braking, improving vehicle control. Inspect the ABS by:
- Checking the Warning Light: Ensure the ABS warning light illuminates briefly when the ignition is turned on and then turns off.
- Testing the System: Perform a test drive to ensure the ABS engages properly during hard braking.
If the ABS warning light stays on or the system does not engage properly, have it inspected by a qualified mechanic.
20. How Often Should You Inspect Your Brakes?
You should inspect your brakes at least once a year, or more frequently if you notice any signs of brake problems. Regular inspections can help catch potential issues early and prevent costly repairs. The AAA Foundation for Traffic Safety recommends that vehicle owners prioritize brake system maintenance for optimal safety. Factors such as driving conditions, vehicle type, and driving habits can also influence the frequency of brake inspections. For those who frequently drive in heavy traffic or hilly terrain, more frequent checks may be necessary.
21. DIY vs. Professional Brake Inspection: Which Is Right for You?
Deciding between a DIY brake inspection and a professional inspection depends on your skill level and comfort. A DIY inspection can be useful for identifying obvious issues like worn pads or loose connections. However, a professional inspection includes a more thorough assessment of all brake system components. The Virginia Department of Motor Vehicles requires certified inspectors to follow specific procedures to ensure brake systems meet safety standards. If you’re unsure about any aspect of brake inspection or maintenance, it’s always best to consult with a professional mechanic.
22. The Importance of Brake Fluid in the Hydraulic System
Brake fluid is a critical component of the hydraulic brake system. It transmits the pressure from the master cylinder to the wheel cylinders or calipers, activating the brakes. The fluid level should be checked regularly and maintained at the proper level. The Virginia State Police Inspection Procedures emphasize the importance of checking for leaks in the hydraulic system to prevent brake fluid loss. Additionally, brake fluid should be replaced every two to three years, as it can absorb moisture over time, reducing its effectiveness. Using the correct type of brake fluid, as specified by the vehicle manufacturer, is also crucial for maintaining optimal brake performance.
23. Brake System Warning Signs: What to Look For
Several warning signs can indicate potential brake system problems:
- Squealing or Grinding Noises: These noises often indicate worn brake pads or rotors.
- Spongy Brake Pedal: A spongy pedal can indicate air in the brake lines or a problem with the master cylinder.
- Pulling to One Side: The vehicle pulling to one side during braking can indicate uneven brake wear or a sticking caliper.
- Longer Stopping Distance: Increased stopping distance can indicate worn brake pads, rotors, or other brake system issues.
- Brake Fluid Leaks: Visible brake fluid leaks should be addressed immediately.
If you notice any of these warning signs, have your brake system inspected by a qualified mechanic.
24. Troubleshooting Common Brake Pedal Issues
Several issues can affect the brake pedal’s performance. Here’s how to troubleshoot some common problems:
- Spongy Pedal: Bleed the brake lines to remove air. Check the master cylinder for leaks or damage.
- Low Pedal: Adjust the brake pedal linkage. Check the brake pads for wear.
- Hard Pedal: Check the vacuum booster or hydraulic booster system. Inspect the brake lines for restrictions.
- Vibrating Pedal: Inspect the rotors for warping or damage. Check the wheel bearings for play.
Addressing these issues promptly can restore proper brake pedal function.
25. Brake Pedal Height and Its Impact on Performance
Brake pedal height is an important factor in overall brake performance. The pedal should be at the correct height to ensure full and effective braking. According to the Virginia Department of Motor Vehicles, the brake pedal height must be maintained when moderate pressure is applied, indicating no leaks or issues within the system. If the pedal is too low, it may not fully engage the master cylinder, reducing braking power. Conversely, if the pedal is too high, it may cause premature wear on brake components. Adjusting the pedal height to the manufacturer’s specifications can optimize braking performance and safety.
26. Replacing the Brake Pedal Assembly: When and How
Replacing the brake pedal assembly may be necessary if it is damaged beyond repair or if components are severely worn. Here’s when and how to replace it:
-
When to Replace: Replace the assembly if there are cracks, bends, or excessive wear in the pedal or its components.
-
How to Replace:
- Disconnect the brake light switch and any other electrical connections.
- Disconnect the linkage from the master cylinder.
- Remove the bolts holding the assembly in place.
- Install the new assembly, ensuring all connections are secure.
- Reconnect the electrical connections and linkage.
- Test the brake pedal to ensure it functions properly.
If you are not comfortable performing this task, it’s best to have it done by a professional mechanic.
27. Torquing Lug Nuts: Why It Matters
Torquing lug nuts to the manufacturer’s specifications is crucial when removing wheels to inspect brakes. The Virginia State Police Inspection Procedures warn that improper torquing can damage disc rotors. Using an impact wrench may exceed the manufacturer’s specifications and cause damage. Always use a torque wrench to ensure the lug nuts are tightened to the correct torque, preventing wheel damage and ensuring safety.
28. Understanding Floating Axles and Brake Service
Trucks with floating axles require special consideration when servicing brakes. The Virginia State Police Inspection Procedures note that some trucks with floating axles require seal replacement upon removal of rear wheels. Ensure you are aware of these requirements and follow the manufacturer’s recommendations when servicing brakes on these vehicles. Proper maintenance helps prevent leaks and ensures the braking system functions correctly.
29. How to Test Drive a Vehicle for Brake Issues
A test drive can help identify brake issues that may not be apparent during a visual inspection. During the test drive:
- Listen for Noises: Listen for any unusual noises, such as squealing, grinding, or clicking.
- Check Pedal Feel: Pay attention to the brake pedal feel. It should be firm and responsive.
- Test Stopping Power: Perform several stops to assess the stopping power and ensure the vehicle stops in a straight line.
- Engage ABS: If equipped, engage the ABS by braking hard on a safe surface.
If you notice any issues during the test drive, have the brake system inspected and repaired.
30. Brake Inspection Checklist: A Comprehensive Guide
Use this checklist to ensure a thorough brake inspection:
- [ ] Inspect brake pedal assembly for damage and loose connections.
- [ ] Check brake linings and disc pads for wear.
- [ ] Inspect brake drums and discs for wear, scoring, and cracks.
- [ ] Check brake lines and hoses for leaks, cracks, and restrictions.
- [ ] Inspect the master cylinder for leaks and proper fluid level.
- [ ] Check wheel cylinders and calipers for leaks and proper function.
- [ ] Inspect mechanical linkage for fraying, wear, and misalignment.
- [ ] Test the parking brake.
- [ ] Check brake system failure indicator lamps.
- [ ] Perform a test drive to assess brake performance.
Following this checklist will help you identify potential brake problems and ensure your braking system is in good working order.
31. Safety Precautions When Working on Brake Systems
When working on brake systems, it’s important to take safety precautions:
- Wear Gloves: Protect your hands from brake fluid and other chemicals.
- Eye Protection: Wear safety glasses to protect your eyes from debris.
- Proper Ventilation: Work in a well-ventilated area to avoid inhaling brake dust.
- Use Jack Stands: Always use jack stands to support the vehicle when working underneath.
- Dispose of Brake Fluid Properly: Brake fluid is hazardous waste and should be disposed of properly.
Following these safety precautions will help prevent injuries and ensure a safe working environment.
Alt: Mechanic wearing safety glasses and gloves while working on a vehicle’s brake system.
32. The Impact of Brake Condition on Vehicle Value
The condition of your vehicle’s brake system can significantly impact its value. Potential buyers often prioritize safety and reliability, making the brake system a key consideration. A well-maintained brake system can increase the vehicle’s appeal and resale value. Conversely, a poorly maintained brake system can deter buyers and lower the vehicle’s value. Ensuring your brakes are in good working order is not only important for safety but also for maintaining the value of your vehicle. Resources at CAR-TOOL.EDU.VN can help you keep your brake system in top condition, protecting your investment.
33. Resources for Further Learning About Brake Systems
There are many resources available for further learning about brake systems:
- Online Forums: Participate in online forums to ask questions and share experiences.
- Technical Manuals: Consult technical manuals for detailed information on brake system components and repair procedures.
- Training Courses: Take training courses to learn about brake system diagnostics and repair.
- Automotive Websites: Visit automotive websites for articles, videos, and other resources on brake systems.
34. Expert Opinions on Brake System Maintenance
Experts emphasize the importance of regular brake system maintenance. According to the AAA Foundation for Traffic Safety, neglecting brake maintenance can lead to increased accident risk. Mechanics often recommend inspecting brakes at least once a year and addressing any issues promptly. The Virginia Department of Motor Vehicles requires certified inspectors to follow specific procedures to ensure brake systems meet safety standards. Following expert advice and maintaining your brake system can help ensure your safety on the road.
35. FAQ: Common Questions About Brake Pedal Assemblies
Q: What are the signs of a failing brake pedal assembly?
A: Signs include a spongy or low pedal, unusual noises, and reduced braking power.
Q: How often should I inspect my brake pedal assembly?
A: Inspect it at least once a year, or more frequently if you notice any signs of problems.
Q: Can I replace the brake pedal assembly myself?
A: If you have mechanical experience, you can replace it yourself. Otherwise, it’s best to have it done by a professional.
Q: What tools do I need to inspect the brake pedal assembly?
A: You’ll need a wrench set, screwdriver set, flashlight, and inspection mirror.
Q: What is the importance of brake fluid in the hydraulic system?
A: Brake fluid transmits pressure from the master cylinder to the wheel cylinders or calipers, activating the brakes.
Q: How do I check the brake fluid level?
A: Check the master cylinder reservoir. The fluid level should be at the proper level, as indicated on the reservoir.
Q: What should I do if I find a leak in the brake system?
A: Have the leak repaired immediately by a qualified mechanic.
Q: What is the function of the ABS (Anti-lock Braking System)?
A: The ABS prevents the wheels from locking up during hard braking, improving vehicle control.
Q: How do I know if my brake pads need to be replaced?
A: Signs include squealing noises, reduced braking power, and worn brake pad indicators.
Q: What is the recommended stopping distance for a vehicle with four-wheel brakes?
A: The recommended stopping distance is 25 feet when tested at 20 miles per hour on a dry, level surface.
By following these guidelines and resources, you can ensure your brake pedal assembly and overall braking system are in top condition, promoting safety and reliability. For all your automotive tool and parts needs, visit CAR-TOOL.EDU.VN.
Do you need help finding the right brake parts or tools for your vehicle? Contact us today for expert advice and assistance. Our team at CAR-TOOL.EDU.VN is here to help you ensure your vehicle’s braking system is in top condition. Call us at +1 (641) 206-8880 or visit our website at CAR-TOOL.EDU.VN. You can also find us at 456 Elm Street, Dallas, TX 75201, United States. Reach out via WhatsApp for immediate support.