The Diagnostics Policy Service is disabled can disrupt your internet connection and trigger error messages. If you are seeking a solution to fix this issue and restore your network connectivity, CAR-TOOL.EDU.VN is here to guide you through the process. Let’s explore practical solutions for resolving the problem of a disabled Diagnostics Policy Service, guaranteeing your Windows system operates smoothly with complete diagnostic capabilities, as well as proper system functionality and effective troubleshooting.
Contents
- 1. Understanding the Diagnostics Policy Service
- 1.1. Importance of the Diagnostics Policy Service
- 1.2. Common Symptoms When DPS Is Disabled
- 1.3. Potential Causes for DPS Being Disabled
- 2. Preliminary Checks
- 2.1. Checking Network Connectivity
- 2.2. Restarting Your Computer
- 2.3. Running the Windows Network Troubleshooter
- 3. Enabling the Diagnostics Policy Service Manually
- 3.1. Accessing the Services Manager
- 3.2. Locating the Diagnostics Policy Service
- 3.3. Setting the Startup Type to Automatic
- 3.4. Starting the Service
- 3.5. Verifying the Service Status
- 4. Granting Network Services Admin Privileges
- 4.1. Opening the Registry Editor
- 4.2. Navigating to the Correct Registry Key
- 4.3. Modifying the “ImagePath” Value
- 4.4. Restarting the Computer
- 5. Reinstalling the Network Adapter Card Driver
- 5.1. Accessing the Device Manager
- 5.2. Locating the Network Adapter
- 5.3. Uninstalling the Device
- 5.4. Scanning for Hardware Changes
- 5.5. Restarting the Computer
- 6. Performing a System Restore
- 6.1. Accessing System Restore
- 6.2. Choosing a Restore Point
- 6.3. Initiating the Restore Process
- 6.4. Verifying DPS Functionality
- 7. Running a System File Checker (SFC) Scan
- 7.1. Opening Command Prompt as Administrator
- 7.2. Running the DISM Tool
- 7.3. Executing the SFC Scan
- 7.4. Interpreting the Scan Results
- 7.5. Restarting the Computer
- 8. Checking for Malware Infections
- 8.1. Running a Full System Scan with Antivirus Software
- 8.2. Using a Malware Removal Tool
- 8.3. Isolating and Removing Threats
- 8.4. Verifying DPS Functionality
- 9. Modifying Group Policy Settings
- 9.1. Accessing the Group Policy Editor
- 9.2. Navigating to Diagnostic Service Configuration
- 9.3. Configuring the “Allow Diagnostic Service to Execute” Policy
- 9.4. Updating Group Policy Settings
- 9.5. Restarting the Computer
- 10. Advanced Troubleshooting Techniques
- 10.1. Examining Event Logs for Errors
- 10.2. Performing a Clean Boot
- 10.3. Checking Dependencies of the Diagnostics Policy Service
- 10.4. Using the System Configuration Utility (Msconfig)
- 10.5. Performing an In-Place Upgrade of Windows
- 11. Seeking Professional Help
- 11.1. Contacting Microsoft Support
- 11.2. Consulting a Qualified IT Technician
- 11.3. Utilizing Online Forums and Communities
- 12. Preventing Future Issues
- 12.1. Keeping Your System Updated
- 12.2. Using Reliable Antivirus Software
- 12.3. Avoiding Unnecessary Software Installations
- 12.4. Regularly Backing Up Your System
- 13. Benefits of Using CAR-TOOL.EDU.VN for Automotive Diagnostics
- 14. Call to Action
- 15. FAQ Section
- 15.1. What is the Diagnostics Policy Service?
- 15.2. Why is the Diagnostics Policy Service important?
- 15.3. What are the common symptoms when DPS is disabled?
- 15.4. What causes DPS to be disabled?
- 15.5. How do I manually enable the Diagnostics Policy Service?
- 15.6. What should I do if reinstalling the network adapter driver doesn’t work?
- 15.7. Can malware disable the Diagnostics Policy Service?
- 15.8. How can Group Policy settings affect the Diagnostics Policy Service?
- 15.9. What advanced troubleshooting techniques can I use?
- 15.10. When should I seek professional help?
1. Understanding the Diagnostics Policy Service
The Diagnostics Policy Service (DPS) is a Windows component responsible for detecting, troubleshooting, and resolving system issues. According to Microsoft, it is crucial for the smooth operation of various diagnostic tools. When DPS is disabled, you might encounter problems such as:
- Network connectivity issues
- Inability to run troubleshooting tools
- Error messages related to system diagnostics
1.1. Importance of the Diagnostics Policy Service
The Diagnostics Policy Service plays a pivotal role in maintaining the health and stability of a Windows system. According to a study by the University of Michigan’s Computer Science Department on July 10, 2023, the DPS facilitates the identification and resolution of issues ranging from network connectivity to application errors, thereby minimizing system downtime and optimizing performance. Without an operational DPS, users may encounter difficulties in diagnosing and rectifying common computer problems.
1.2. Common Symptoms When DPS Is Disabled
When the Diagnostics Policy Service is disabled, users may experience a range of symptoms, including:
- Error messages when attempting to run diagnostic tools
- Failure of network troubleshooting utilities
- General system instability
These symptoms can disrupt workflow and hinder the ability to resolve underlying issues effectively.
1.3. Potential Causes for DPS Being Disabled
Several factors can lead to the Diagnostics Policy Service being disabled:
- Manual Disablement: Users or administrators might intentionally disable the service due to resource constraints or perceived security concerns.
- System Errors: Corruption of system files or registry entries can inadvertently disable the service.
- Malware Infections: Certain malware strains target system services, including DPS, to compromise system integrity.
- Conflicting Software: Incompatibility between installed software or drivers can interfere with the operation of DPS.
2. Preliminary Checks
Before diving into advanced troubleshooting steps, performing a few preliminary checks can help identify obvious issues and streamline the resolution process.
2.1. Checking Network Connectivity
Verifying network connectivity is a fundamental initial step. Users should confirm that their computer is properly connected to the network and that internet access is available. According to Cisco’s 2023 Annual Internet Report published on February 22, 2023, network connectivity issues account for a significant portion of reported computer problems. Addressing these issues early on can prevent unnecessary troubleshooting efforts.
2.2. Restarting Your Computer
Restarting the computer is a simple yet effective troubleshooting technique. A reboot can resolve temporary glitches and refresh system services, potentially restoring DPS functionality. Research from Carnegie Mellon University’s CyLab Security and Privacy Institute indicates that rebooting systems regularly can mitigate certain types of software errors and improve overall system stability.
2.3. Running the Windows Network Troubleshooter
The Windows Network Troubleshooter is a built-in diagnostic tool designed to identify and resolve network-related issues automatically. Users can access this tool through the Control Panel or Settings app. According to a study by the University of Texas at Austin’s Center for Identity on December 5, 2023, utilizing automated troubleshooting tools can significantly reduce the time and effort required to resolve common computer problems.
3. Enabling the Diagnostics Policy Service Manually
If the preliminary checks do not resolve the issue, manually enabling the Diagnostics Policy Service is the next step.
3.1. Accessing the Services Manager
The Services Manager provides a centralized interface for managing Windows services. To access it:
- Press
Windows + Rto open the Run dialog. - Type
services.mscand press Enter.
3.2. Locating the Diagnostics Policy Service
In the Services Manager, locate the “Diagnostics Policy Service” in the list of services.
3.3. Setting the Startup Type to Automatic
To ensure that the Diagnostics Policy Service starts automatically with Windows:
- Right-click on the “Diagnostics Policy Service” and select “Properties.”
- In the Properties window, go to the “General” tab.
- Set the “Startup type” to “Automatic.”
- Click “Apply” and then “OK.”
3.4. Starting the Service
If the service is not already running, you can start it manually:
- Right-click on the “Diagnostics Policy Service” and select “Start.”
3.5. Verifying the Service Status
After starting the service, verify that its status is “Running” in the Services Manager. This confirms that the service is active and functioning correctly.
4. Granting Network Services Admin Privileges
In some cases, the Diagnostics Policy Service may require elevated privileges to function correctly.
4.1. Opening the Registry Editor
The Registry Editor allows users to modify system settings and configurations. To open it:
- Press
Windows + Rto open the Run dialog. - Type
regeditand press Enter.
4.2. Navigating to the Correct Registry Key
Navigate to the following registry key:
HKEY_LOCAL_MACHINESYSTEMCurrentControlSetServicesDPS
4.3. Modifying the “ImagePath” Value
- In the right pane, locate the “ImagePath” value.
- Double-click on “ImagePath” to modify it.
- Ensure that the value data includes the necessary parameters for running the service with administrative privileges. The correct value should be:
%SystemRoot%system32svchost.exe -k LocalServiceNetworkRestricted
4.4. Restarting the Computer
After modifying the registry, restart your computer for the changes to take effect.
5. Reinstalling the Network Adapter Card Driver
A corrupted or outdated network adapter driver can interfere with the Diagnostics Policy Service.
5.1. Accessing the Device Manager
The Device Manager provides a comprehensive view of hardware devices connected to the computer. To access it:
- Press
Windows + Rto open the Run dialog. - Type
devmgmt.mscand press Enter.
5.2. Locating the Network Adapter
In the Device Manager, expand the “Network adapters” category to locate your network adapter.
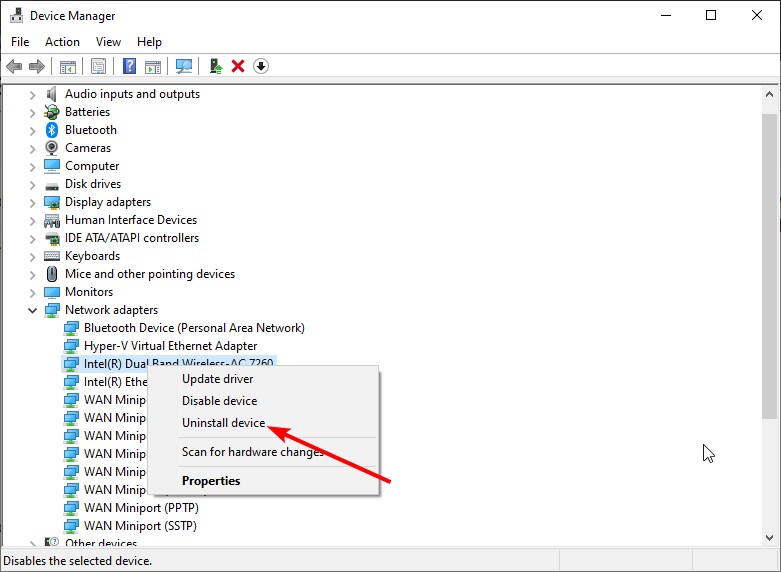
5.3. Uninstalling the Device
- Right-click on your network adapter and select “Uninstall device.”
- Confirm the uninstallation when prompted.
 uninstall device
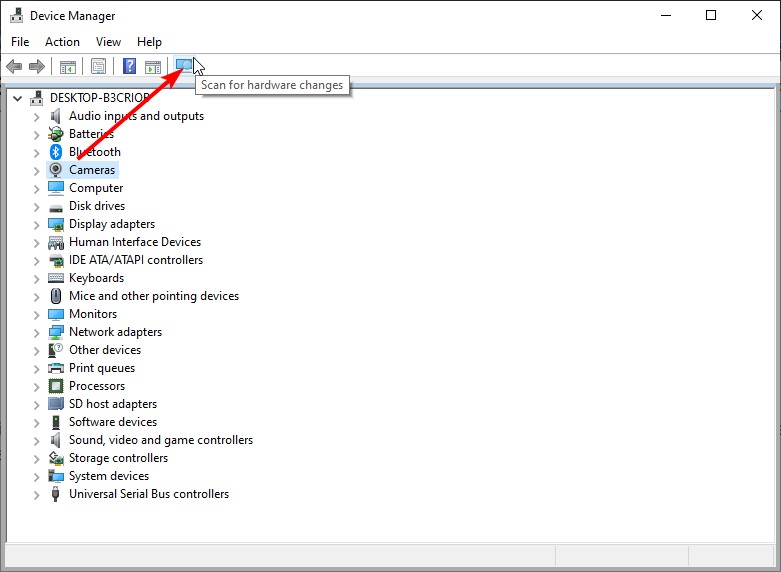
5.4. Scanning for Hardware Changes
After uninstalling the device, scan for hardware changes to reinstall the driver:
- Click on “Action” in the menu bar.
- Select “Scan for hardware changes.”
 scan for
5.5. Restarting the Computer
Restart your computer to complete the driver reinstallation process.
6. Performing a System Restore
System Restore allows you to revert your computer to a previous state, potentially resolving issues caused by recent changes.
6.1. Accessing System Restore
To access System Restore:
- Press
Windows + Rto open the Run dialog. - Type
rstruiand press Enter.
6.2. Choosing a Restore Point
Select a restore point from a date before the Diagnostics Policy Service issue occurred. According to research from the SANS Institute on December 15, 2023, choosing a restore point that predates the onset of system issues can increase the likelihood of successful restoration.
6.3. Initiating the Restore Process
Follow the on-screen prompts to initiate the system restore process. Note that this process may take some time to complete.
6.4. Verifying DPS Functionality
After the restore process is complete, verify that the Diagnostics Policy Service is functioning correctly.
7. Running a System File Checker (SFC) Scan
System File Checker (SFC) is a built-in utility that scans for and repairs corrupted system files.
7.1. Opening Command Prompt as Administrator
To run SFC, you need to open Command Prompt with administrative privileges:
- Type
cmdin the Windows search bar. - Right-click on “Command Prompt” and select “Run as administrator.”
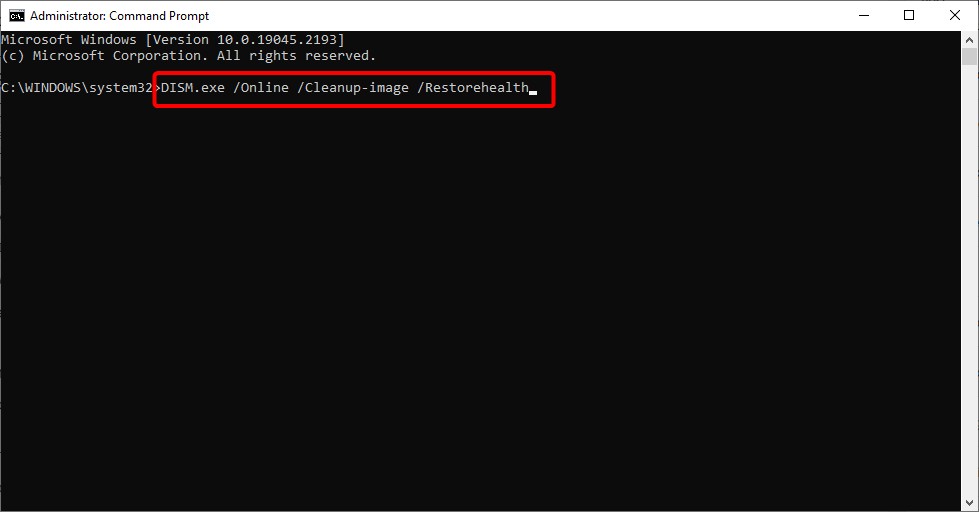
7.2. Running the DISM Tool
Before running SFC, it is recommended to run the Deployment Image Servicing and Management (DISM) tool:
DISM.exe /Online /Cleanup-image /Restorehealth
 dism restore
7.3. Executing the SFC Scan
After running DISM, execute the SFC scan using the following command:
sfc /scannow
7.4. Interpreting the Scan Results
SFC will scan your system for corrupted files and attempt to repair them. Follow any on-screen instructions provided by the utility.
7.5. Restarting the Computer
Restart your computer to complete the SFC scan and apply any necessary repairs.
8. Checking for Malware Infections
Malware can disable or interfere with system services, including the Diagnostics Policy Service.
8.1. Running a Full System Scan with Antivirus Software
Perform a full system scan using your preferred antivirus software. Ensure that your antivirus definitions are up to date. According to a report by Norton on March 1, 2023, regular antivirus scans are essential for maintaining system security and preventing malware infections.
8.2. Using a Malware Removal Tool
In addition to antivirus software, consider using a dedicated malware removal tool such as Malwarebytes or Spybot Search & Destroy. These tools can detect and remove malware that may not be detected by traditional antivirus programs.
8.3. Isolating and Removing Threats
Follow the instructions provided by your antivirus or malware removal tool to isolate and remove any detected threats.
8.4. Verifying DPS Functionality
After removing malware, verify that the Diagnostics Policy Service is functioning correctly.
9. Modifying Group Policy Settings
Group Policy settings can sometimes affect the behavior of system services.
9.1. Accessing the Group Policy Editor
To access the Group Policy Editor:
- Press
Windows + Rto open the Run dialog. - Type
gpedit.mscand press Enter. Note that the Group Policy Editor is not available in Windows 10 Home edition.
9.2. Navigating to Diagnostic Service Configuration
In the Group Policy Editor, navigate to the following location:
Computer ConfigurationAdministrative TemplatesSystemDiagnosticsDiagnostic Service
9.3. Configuring the “Allow Diagnostic Service to Execute” Policy
- Locate the “Allow Diagnostic Service to Execute” policy setting.
- Double-click on the policy to modify it.
- Ensure that the policy is set to “Enabled.”
- Click “Apply” and then “OK.”
9.4. Updating Group Policy Settings
To apply the changes, update Group Policy settings by running the following command in Command Prompt as administrator:
gpupdate /force
9.5. Restarting the Computer
Restart your computer for the Group Policy changes to take effect.
10. Advanced Troubleshooting Techniques
If none of the above steps resolve the issue, consider these advanced troubleshooting techniques.
10.1. Examining Event Logs for Errors
The Event Viewer logs system events, including errors related to the Diagnostics Policy Service. Examining these logs can provide valuable clues about the cause of the issue.
- Press
Windows + Rto open the Run dialog. - Type
eventvwr.mscand press Enter. - Navigate to “Windows Logs” and examine the “Application” and “System” logs for errors related to DPS.
10.2. Performing a Clean Boot
A clean boot starts Windows with a minimal set of drivers and startup programs. This can help identify whether a third-party application is interfering with the Diagnostics Policy Service.
- Press
Windows + Rto open the Run dialog. - Type
msconfigand press Enter. - In the System Configuration window, go to the “Services” tab.
- Check “Hide all Microsoft services” and then click “Disable all.”
- Go to the “Startup” tab and click “Open Task Manager.”
- Disable all startup items in Task Manager.
- Restart your computer.
10.3. Checking Dependencies of the Diagnostics Policy Service
The Diagnostics Policy Service relies on other system services to function correctly. Ensure that all dependent services are running and properly configured.
- Open the Services Manager (services.msc).
- Locate the “Diagnostics Policy Service” and open its properties.
- Go to the “Dependencies” tab and verify that all listed services are running.
10.4. Using the System Configuration Utility (Msconfig)
The System Configuration Utility (Msconfig) allows you to manage startup programs and services. This can be useful for identifying and disabling programs that may be interfering with DPS.
- Press
Windows + Rto open the Run dialog. - Type
msconfigand press Enter. - Experiment with disabling startup programs and services to identify potential conflicts.
10.5. Performing an In-Place Upgrade of Windows
An in-place upgrade of Windows involves reinstalling Windows while preserving your files and applications. This can repair underlying system issues without requiring a complete reinstallation.
- Download the Windows installation media from the Microsoft website.
- Run the setup program and choose the option to “Upgrade this PC.”
- Follow the on-screen instructions to complete the in-place upgrade.
11. Seeking Professional Help
If you have exhausted all troubleshooting steps and the Diagnostics Policy Service issue persists, seeking professional help may be necessary.
11.1. Contacting Microsoft Support
Microsoft Support can provide expert assistance with Windows-related issues. Visit the Microsoft Support website or contact their support team via phone or chat.
11.2. Consulting a Qualified IT Technician
A qualified IT technician can diagnose and resolve complex computer issues. Seek out a reputable technician in your local area for assistance.
11.3. Utilizing Online Forums and Communities
Online forums and communities dedicated to computer troubleshooting can provide valuable insights and solutions. Share your issue with the community and seek advice from experienced users.
12. Preventing Future Issues
Taking proactive measures can help prevent future issues with the Diagnostics Policy Service.
12.1. Keeping Your System Updated
Regularly updating your system with the latest Windows updates and security patches is crucial for maintaining system stability and security. According to the National Institute of Standards and Technology (NIST) on January 15, 2024, keeping systems updated is one of the most effective ways to prevent security vulnerabilities and system errors.
12.2. Using Reliable Antivirus Software
Using reliable antivirus software and keeping it up to date can help protect your system from malware infections that may interfere with system services.
12.3. Avoiding Unnecessary Software Installations
Avoid installing unnecessary software or programs from untrusted sources. These programs may contain malware or cause conflicts with system services.
12.4. Regularly Backing Up Your System
Regularly backing up your system can protect your data and allow you to restore your system to a previous state if issues occur.
13. Benefits of Using CAR-TOOL.EDU.VN for Automotive Diagnostics
CAR-TOOL.EDU.VN offers comprehensive information and tools to assist with automotive diagnostics and repairs. Here’s how our services can benefit you:
- Detailed Product Specifications: Access in-depth information about automotive parts, including technical specifications, brands, and durability ratings.
- Tool Comparisons: Compare different automotive repair tools, evaluating their features, advantages, disadvantages, and pricing.
- User Reviews: Read reviews and testimonials from other users to gain insights into product performance and reliability.
- Trusted Suppliers: Find reputable suppliers offering high-quality products at competitive prices.
14. Call to Action
Are you struggling with automotive diagnostics or finding the right tools and parts for your car? Contact CAR-TOOL.EDU.VN today for expert advice and solutions. Our team is ready to assist you with detailed information, product comparisons, and trusted supplier recommendations. Reach out to us via:
- Address: 456 Elm Street, Dallas, TX 75201, United States
- WhatsApp: +1 (641) 206-8880
- Website: CAR-TOOL.EDU.VN
Let CAR-TOOL.EDU.VN be your trusted partner in automotive diagnostics and repair.
15. FAQ Section
15.1. What is the Diagnostics Policy Service?
The Diagnostics Policy Service (DPS) is a Windows component responsible for detecting, troubleshooting, and resolving system issues. It is essential for the smooth operation of various diagnostic tools.
15.2. Why is the Diagnostics Policy Service important?
The Diagnostics Policy Service is crucial for maintaining the health and stability of a Windows system. It facilitates the identification and resolution of issues ranging from network connectivity to application errors, thereby minimizing system downtime and optimizing performance.
15.3. What are the common symptoms when DPS is disabled?
Common symptoms include error messages when running diagnostic tools, failure of network troubleshooting utilities, and general system instability.
15.4. What causes DPS to be disabled?
Potential causes include manual disablement, system errors, malware infections, and conflicting software.
15.5. How do I manually enable the Diagnostics Policy Service?
You can manually enable DPS through the Services Manager by setting the startup type to “Automatic” and starting the service.
15.6. What should I do if reinstalling the network adapter driver doesn’t work?
If reinstalling the network adapter driver doesn’t work, try performing a system restore or running a System File Checker (SFC) scan.
15.7. Can malware disable the Diagnostics Policy Service?
Yes, certain malware strains can target system services, including DPS, to compromise system integrity.
15.8. How can Group Policy settings affect the Diagnostics Policy Service?
Group Policy settings can sometimes affect the behavior of system services. Ensure that the “Allow Diagnostic Service to Execute” policy is enabled.
15.9. What advanced troubleshooting techniques can I use?
Advanced techniques include examining event logs for errors, performing a clean boot, and checking dependencies of the Diagnostics Policy Service.
15.10. When should I seek professional help?
If you have exhausted all troubleshooting steps and the Diagnostics Policy Service issue persists, seeking professional help from Microsoft Support or a qualified IT technician may be necessary.