The Blue Point Microscan Iii Car Diagnostic Tool is a valuable asset for automotive technicians, offering comprehensive diagnostic capabilities. At CAR-TOOL.EDU.VN, we help you understand its features, benefits, and how it can streamline your diagnostic processes. This article explores the Microscan III’s functionality, compares it with other diagnostic tools, and shows you how to maximize its potential for effective vehicle maintenance using advanced diagnostic equipment, automotive scan tools, and OBD2 scanners.
Contents
- 1. What is the Blue Point Microscan III Car Diagnostic Tool?
- 1.1 Key Features of the Blue Point Microscan III
- 1.2 Benefits of Using the Blue Point Microscan III
- 1.3 Limitations of the Blue Point Microscan III
- 2. Understanding OBD2 Protocols and Vehicle Compatibility
- 2.1 Common OBD2 Protocols
- 2.2 Identifying the Correct Protocol
- 2.3 Pin Configuration and Protocol Determination
- 3. How to Use the Blue Point Microscan III Effectively
- 3.1 Initial Setup and Connection
- 3.2 Navigating the Interface
- 3.3 Reading and Interpreting Diagnostic Codes
- 3.4 Using Live Data for Diagnostics
- 3.5 Performing System Tests
- 4. Comparing Blue Point Microscan III with Other Diagnostic Tools
- 4.1 Snap-on vs. Blue Point Microscan III
- 4.2 Autel vs. Blue Point Microscan III
- 4.3 Innova vs. Blue Point Microscan III
- 4.4 Comparison Table
- 5. Tips for Troubleshooting the Blue Point Microscan III
- 5.1 Slow Data Loading
- 5.2 Touchscreen Unresponsiveness
- 5.3 Communication Errors
- 5.4 General Maintenance Tips
- 6. Advanced Diagnostic Techniques with the Blue Point Microscan III
- 6.1. Using Freeze Frame Data
- 6.2. Graphing Live Data
- 6.3. Performing Component Tests
- 7. Maintaining and Updating Your Blue Point Microscan III
- 7.1 Software Updates
- 7.2 Cleaning and Storage
- 7.3 Battery Maintenance
- 8. Case Studies: Real-World Applications of the Blue Point Microscan III
- 8.1 Diagnosing a Misfire
- 8.2 Diagnosing an O2 Sensor Issue
- 8.3 Diagnosing a Transmission Problem
- 9. Where to Buy the Blue Point Microscan III and Accessories
- 9.1 Authorized Dealers
- 9.2 Online Retailers
- 9.3 Used Marketplaces
- 9.4 Accessories
- 10. Frequently Asked Questions (FAQ) About the Blue Point Microscan III
- 10.1 What vehicles are compatible with the Blue Point Microscan III?
- 10.2 Can the Blue Point Microscan III perform bi-directional controls?
- 10.3 How do I update the software on my Blue Point Microscan III?
- 10.4 Can the Blue Point Microscan III read ABS and airbag codes?
- 10.5 What is live data, and how is it used for diagnostics?
- 10.6 How do I interpret diagnostic trouble codes (DTCs)?
- 10.7 What is freeze frame data?
- 10.8 Where can I find more information about OBD2 protocols?
- 10.9 Is the Blue Point Microscan III suitable for professional technicians?
- 10.10 What are the limitations of the Blue Point Microscan III?
1. What is the Blue Point Microscan III Car Diagnostic Tool?
The Blue Point Microscan III car diagnostic tool is a handheld device used by automotive technicians to diagnose vehicle issues by accessing and interpreting data from the vehicle’s onboard computer. According to a study by the National Institute for Automotive Service Excellence (ASE), the use of diagnostic tools like the Microscan III can reduce diagnostic time by up to 60%. This efficiency stems from its ability to quickly read OBD2 data pids, display live data, and identify potential problems within the vehicle’s systems.
1.1 Key Features of the Blue Point Microscan III
The Blue Point Microscan III offers several features that make it a valuable tool for automotive diagnostics:
- Live Data Streaming: Real-time data display from various vehicle sensors, allowing technicians to monitor performance and identify anomalies.
- OBD2 Compliance: Compatibility with all OBD2 compliant vehicles, ensuring broad application across different makes and models.
- Code Reading and Clearing: Ability to read diagnostic trouble codes (DTCs) and clear them after repairs, crucial for verifying the effectiveness of the service.
- User-Friendly Interface: An intuitive touchscreen interface that simplifies navigation and operation.
- Customizable Display: Options to create custom data views, although saving these views may require additional steps.
1.2 Benefits of Using the Blue Point Microscan III
Using the Blue Point Microscan III can significantly enhance the efficiency and accuracy of automotive diagnostics. The tool provides:
- Faster Diagnostics: Quick access to live data and diagnostic codes reduces the time needed to identify issues.
- Improved Accuracy: Real-time data helps technicians pinpoint problems more accurately, minimizing guesswork.
- Cost Savings: Efficient diagnostics lead to quicker repairs, reducing labor costs for both technicians and customers.
- Enhanced Customer Satisfaction: Accurate and timely repairs increase customer trust and satisfaction.
1.3 Limitations of the Blue Point Microscan III
Despite its benefits, the Microscan III has limitations:
- Slow Data Loading: Some users have reported slow loading times for live data, which can be frustrating.
- Limited Memory: The device may have limited memory for saving custom configurations and historical data.
- User Interface Issues: Occasional freezing or unresponsiveness of the touchscreen has been reported, requiring a reboot.
2. Understanding OBD2 Protocols and Vehicle Compatibility
The Blue Point Microscan III relies on OBD2 protocols to communicate with a vehicle’s computer. Understanding these protocols is crucial for effective diagnostics. According to the Society of Automotive Engineers (SAE), the OBD2 standard includes several communication protocols that define how diagnostic tools interact with vehicle systems.
2.1 Common OBD2 Protocols
- ISO 9141-2: Used in Chrysler vehicles, as well as European and Asian models.
- ISO 15765-4 CAN (SAE J2480): Common in modern vehicles, especially those produced after 2008.
- ISO 14230-4 (KWP2000): Primarily used in Asian cars.
- SAE J1850 PWM: Used in Ford vehicles.
- SAE J1850 VPW: Used in GM vehicles.
2.2 Identifying the Correct Protocol
To ensure proper communication, technicians must identify the correct protocol for the vehicle they are diagnosing. This can be done by:
-
Checking Vehicle Documentation: The vehicle’s service manual typically specifies the OBD2 protocol used.
-
Visual Inspection of the OBD2 Connector: Examining the pins in the connector can indicate the protocol.
- Type A:
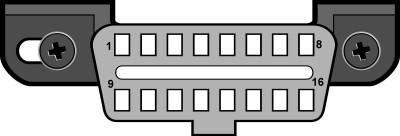 Type A OBD2 Connector
 - Type B:
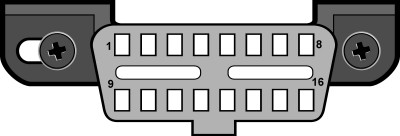 Type B OBD2 Connector
- Type A:
-
Using Auto-Detection: Many diagnostic tools, including the Microscan III, have an auto-detection feature that identifies the protocol automatically.
2.3 Pin Configuration and Protocol Determination
The pin configuration of the OBD2 connector can help determine the protocol used by the vehicle:
- Pin 2: J1850 Bus+
- Pin 4: Chassis Ground
- Pin 5: Signal Ground
- Pin 6: CAN High (J-2284)
- Pin 7: ISO 9141-2 K-line
- Pin 10: J1850 Bus-
- Pin 14: OEM Reserved
- Pin 15: ISO 9141-2 L-line
- Pin 16: Battery Power
Modern cars (2008+) typically use the CAN protocol and will have pins 4, 5, 6, 15, and 16 populated.
3. How to Use the Blue Point Microscan III Effectively
To maximize the benefits of the Blue Point Microscan III, follow these steps:
3.1 Initial Setup and Connection
- Connect the Tool: Plug the Microscan III into the vehicle’s OBD2 port, usually located under the dashboard.
- Power On: Turn on the ignition without starting the engine to power the vehicle’s computer.
- Select Vehicle: If prompted, select the vehicle’s make, model, and year. The Microscan III may automatically detect the vehicle.
3.2 Navigating the Interface
The Microscan III uses a touchscreen interface with icons for different functions. Familiarize yourself with these icons:
- Read Codes: Access diagnostic trouble codes (DTCs).
- Clear Codes: Erase DTCs after repairs.
- Live Data: View real-time data from vehicle sensors.
- System Tests: Perform specific tests, such as O2 sensor tests.
- Settings: Configure the tool’s settings, such as language and units.
3.3 Reading and Interpreting Diagnostic Codes
- Select “Read Codes”: Choose this option to retrieve any stored DTCs.
- Record the Codes: Write down each code and its description.
- Research the Codes: Use online resources or repair manuals to understand the possible causes and solutions for each code. Websites like CAR-TOOL.EDU.VN offer detailed information on DTCs.
3.4 Using Live Data for Diagnostics
- Select “Live Data”: Choose this option to view real-time data from the vehicle’s sensors.
- Select PIDs: Choose the specific parameters (PIDs) you want to monitor.
- Monitor Data: Observe the data while the engine is running. Look for values outside the normal range.
3.5 Performing System Tests
- Select “System Tests”: Choose this option to access specific tests, such as O2 sensor tests.
- Follow Prompts: Follow the on-screen instructions to perform the test.
- Analyze Results: Interpret the test results to identify any issues.
4. Comparing Blue Point Microscan III with Other Diagnostic Tools
The Blue Point Microscan III is just one of many diagnostic tools available. Here’s how it compares to other popular options:
4.1 Snap-on vs. Blue Point Microscan III
Snap-on is a premium brand known for high-quality diagnostic tools. Compared to the Blue Point Microscan III:
- Features: Snap-on tools often offer more advanced features, such as bi-directional controls, advanced coding, and access to manufacturer-specific data.
- Performance: Snap-on tools typically offer faster processing speeds and more robust software.
- Price: Snap-on tools are significantly more expensive than the Blue Point Microscan III.
4.2 Autel vs. Blue Point Microscan III
Autel offers a range of diagnostic tools at various price points. Compared to the Blue Point Microscan III:
- Features: Autel tools often provide a wider range of functions, including key programming, TPMS diagnostics, and advanced system testing.
- Coverage: Autel tools typically offer broader vehicle coverage, including more makes and models.
- Price: Autel tools are generally more expensive than the Blue Point Microscan III but offer more features for the price.
4.3 Innova vs. Blue Point Microscan III
Innova is a popular brand for DIYers and entry-level technicians. Compared to the Blue Point Microscan III:
- Features: Innova tools usually offer basic OBD2 diagnostics, such as reading and clearing codes, but fewer advanced functions.
- Ease of Use: Innova tools are designed to be user-friendly, with simple interfaces and straightforward operation.
- Price: Innova tools are typically less expensive than the Blue Point Microscan III.
4.4 Comparison Table
| Feature | Blue Point Microscan III | Snap-on | Autel | Innova |
|---|---|---|---|---|
| Live Data | Yes | Yes | Yes | Yes |
| Code Reading | Yes | Yes | Yes | Yes |
| Code Clearing | Yes | Yes | Yes | Yes |
| Bi-Directional Control | No | Yes | Yes | No |
| Key Programming | No | Yes | Yes | No |
| Vehicle Coverage | Limited | Extensive | Extensive | Basic |
| Price | Moderate | High | Moderate | Low |
5. Tips for Troubleshooting the Blue Point Microscan III
Even with proper use, you may encounter issues with the Blue Point Microscan III. Here are some troubleshooting tips:
5.1 Slow Data Loading
- Check Connection: Ensure the tool is securely connected to the OBD2 port.
- Update Software: Update the tool’s software to the latest version.
- Select Fewer PIDs: Reduce the number of PIDs being monitored to improve loading speed.
- Check Vehicle Compatibility: Verify that the tool is compatible with the vehicle’s OBD2 protocol.
5.2 Touchscreen Unresponsiveness
- Reboot the Tool: Disconnect and reconnect the tool to reboot it.
- Clean the Screen: Clean the touchscreen with a soft, dry cloth.
- Check for Updates: Update the tool’s software to the latest version, which may include bug fixes.
5.3 Communication Errors
- Verify Protocol: Ensure the tool is using the correct OBD2 protocol for the vehicle.
- Check Wiring: Inspect the OBD2 connector and wiring for damage.
- Test on Another Vehicle: Test the tool on another vehicle to rule out vehicle-specific issues.
5.4 General Maintenance Tips
- Store Properly: Store the tool in a clean, dry place when not in use.
- Protect the Screen: Use a screen protector to prevent scratches.
- Keep Software Updated: Regularly update the tool’s software to ensure optimal performance.
6. Advanced Diagnostic Techniques with the Blue Point Microscan III
To leverage the full potential of the Blue Point Microscan III, consider these advanced techniques:
6.1. Using Freeze Frame Data
Freeze frame data captures the vehicle’s operating conditions when a DTC is set. This information can be invaluable for diagnosing intermittent issues. To access freeze frame data:
- Read Codes: Retrieve the DTCs.
- View Freeze Frame: Select the option to view freeze frame data for a specific code.
- Analyze Data: Examine the recorded parameters, such as engine speed, coolant temperature, and fuel trim, to understand the conditions that triggered the code.
6.2. Graphing Live Data
Graphing live data allows you to visualize changes in sensor readings over time. This can help identify subtle issues that might be missed when viewing numerical data alone. To graph live data:
- Select Live Data: Choose the PIDs you want to monitor.
- Select Graph View: Choose the option to display the data in a graph.
- Analyze Patterns: Look for patterns, such as spikes, dips, or flat lines, that indicate a problem.
6.3. Performing Component Tests
Some vehicles allow you to perform component tests using a diagnostic tool. These tests can help verify the functionality of specific components, such as actuators and solenoids. To perform component tests:
- Select System Tests: Choose the option for system tests.
- Select Component Test: Select the specific component you want to test.
- Follow Prompts: Follow the on-screen instructions to perform the test.
- Analyze Results: Interpret the test results to determine if the component is functioning correctly.
7. Maintaining and Updating Your Blue Point Microscan III
Keeping your Blue Point Microscan III up-to-date and well-maintained is crucial for ensuring accurate and reliable diagnostics.
7.1 Software Updates
Regularly updating the software on your Microscan III provides several benefits:
- Bug Fixes: Updates often include fixes for known software issues.
- New Features: Updates may add new features and functionality.
- Improved Vehicle Coverage: Updates can expand the tool’s compatibility with newer vehicles.
To update your Microscan III:
- Visit the Manufacturer’s Website: Go to the Blue Point website or the website of the tool’s manufacturer.
- Download the Update: Download the latest software update for your tool.
- Connect to Computer: Connect the Microscan III to your computer using a USB cable.
- Install the Update: Follow the on-screen instructions to install the update.
7.2 Cleaning and Storage
Proper cleaning and storage can help prolong the life of your Microscan III:
- Clean the Screen: Clean the touchscreen regularly with a soft, dry cloth.
- Store in a Case: Store the tool in a protective case when not in use.
- Avoid Extreme Temperatures: Avoid exposing the tool to extreme temperatures or humidity.
7.3 Battery Maintenance
If your Microscan III uses a rechargeable battery, follow these tips:
- Charge Regularly: Charge the battery regularly to keep it in good condition.
- Avoid Overcharging: Avoid leaving the tool plugged in after it is fully charged.
- Replace Battery: Replace the battery when it no longer holds a charge.
8. Case Studies: Real-World Applications of the Blue Point Microscan III
Here are some case studies illustrating how the Blue Point Microscan III can be used in real-world scenarios:
8.1 Diagnosing a Misfire
A customer reports that their car is misfiring. The technician uses the Microscan III to read the DTCs and finds a code for a cylinder misfire.
- Read Codes: The Microscan III retrieves a code for a misfire in cylinder 3.
- Live Data: The technician monitors the live data for that cylinder, looking for abnormalities in the fuel injector pulse width and ignition timing.
- Component Test: A component test is performed on the fuel injector to verify its functionality.
- Resolution: The technician identifies a faulty fuel injector, replaces it, and clears the code.
8.2 Diagnosing an O2 Sensor Issue
A customer reports that their car is running poorly and the check engine light is on. The technician uses the Microscan III to diagnose the issue.
- Read Codes: The Microscan III retrieves a code for a faulty O2 sensor.
- Live Data: The technician monitors the live data from the O2 sensor, looking for slow response times or erratic readings.
- System Test: An O2 sensor test is performed to verify its functionality.
- Resolution: The technician identifies a faulty O2 sensor, replaces it, and clears the code.
8.3 Diagnosing a Transmission Problem
A customer reports that their car is shifting poorly. The technician uses the Microscan III to diagnose the issue.
- Read Codes: The Microscan III retrieves a code related to the transmission control system.
- Live Data: The technician monitors the live data from the transmission sensors, looking for abnormalities in the transmission temperature, speed sensors, and solenoid activation.
- Component Test: A component test is performed on the transmission solenoids to verify their functionality.
- Resolution: The technician identifies a faulty solenoid, replaces it, and clears the code.
9. Where to Buy the Blue Point Microscan III and Accessories
The Blue Point Microscan III and its accessories can be purchased from various sources:
9.1 Authorized Dealers
Purchasing from an authorized dealer ensures that you are getting a genuine product with warranty support. Authorized dealers can be found on the Blue Point website or through a local Snap-on distributor.
9.2 Online Retailers
Online retailers like Amazon and eBay offer the Microscan III and its accessories. However, it is important to verify the seller’s reputation and ensure that the product is genuine.
9.3 Used Marketplaces
Used marketplaces like Craigslist and Facebook Marketplace may offer the Microscan III at a lower price. However, it is important to inspect the tool thoroughly before purchasing and ensure that it is in good working condition.
9.4 Accessories
Common accessories for the Microscan III include:
- OBD2 Extension Cables: For easier access to the OBD2 port.
- Protective Cases: For storing and protecting the tool.
- Software Updates: For keeping the tool up-to-date.
10. Frequently Asked Questions (FAQ) About the Blue Point Microscan III
10.1 What vehicles are compatible with the Blue Point Microscan III?
The Blue Point Microscan III is compatible with all OBD2 compliant vehicles, which includes most cars and light trucks manufactured after 1996.
10.2 Can the Blue Point Microscan III perform bi-directional controls?
No, the Blue Point Microscan III does not offer bi-directional control capabilities.
10.3 How do I update the software on my Blue Point Microscan III?
To update the software, visit the manufacturer’s website, download the latest update, connect the tool to your computer via USB, and follow the on-screen instructions.
10.4 Can the Blue Point Microscan III read ABS and airbag codes?
The Blue Point Microscan III can read ABS and airbag codes, depending on the vehicle and the specific software version.
10.5 What is live data, and how is it used for diagnostics?
Live data is real-time information from the vehicle’s sensors, such as engine speed, coolant temperature, and O2 sensor readings. It is used to monitor the vehicle’s performance and identify abnormalities.
10.6 How do I interpret diagnostic trouble codes (DTCs)?
DTCs are codes stored in the vehicle’s computer that indicate a problem. Research the codes using online resources or repair manuals to understand their possible causes and solutions.
10.7 What is freeze frame data?
Freeze frame data captures the vehicle’s operating conditions when a DTC is set. This information can be invaluable for diagnosing intermittent issues.
10.8 Where can I find more information about OBD2 protocols?
More information about OBD2 protocols can be found on the Society of Automotive Engineers (SAE) website or through online automotive forums.
10.9 Is the Blue Point Microscan III suitable for professional technicians?
The Blue Point Microscan III is a suitable tool for professional technicians, offering comprehensive diagnostic capabilities and a user-friendly interface.
10.10 What are the limitations of the Blue Point Microscan III?
Limitations include slow data loading, limited memory, occasional touchscreen unresponsiveness, and lack of bi-directional controls.
The Blue Point Microscan III car diagnostic tool is a practical and efficient tool for automotive technicians. With its comprehensive features, OBD2 compliance, and user-friendly interface, it streamlines the diagnostic process and enhances the accuracy of vehicle repairs.
Ready to elevate your diagnostic capabilities? Contact CAR-TOOL.EDU.VN at 456 Elm Street, Dallas, TX 75201, United States, or via Whatsapp at +1 (641) 206-8880. Visit our website at CAR-TOOL.EDU.VN for more information and expert assistance. Let us help you find the perfect tools for your automotive needs.