Are there any water leaks into the interior of your car? Yes, water leaks into the interior of a car are a common issue that can stem from various sources, notably a compromised vapor barrier seal within the doors. At CAR-TOOL.EDU.VN, we provide the insights and solutions you need to diagnose and rectify these leaks, ensuring a dry and comfortable ride by identifying faulty seals, blocked drains, or body damage, and offering effective repair strategies. Understanding these issues, along with proper auto maintenance and leak prevention, will keep your car’s interior dry and prevent further damage.
Contents
- 1. Identifying Water Leaks in Your Car’s Interior
- 1.1. Signs of Water Leaks Inside Your Vehicle
- 1.2. Common Causes of Interior Water Leaks
- 1.3. Tools and Techniques for Locating Leaks
- 2. Addressing Leaks from Door Seals and Vapor Barriers
- 2.1. How Door Seals and Vapor Barriers Function
- Door Seals
- Vapor Barriers
- 2.2. Diagnosing Leaks Related to Door Seals
- 2.3. Steps for Replacing or Repairing Door Seals
- 2.4. Diagnosing Leaks Related to Vapor Barriers
- 2.5. Repairing or Replacing Vapor Barriers
- 2.6. Tips for Ensuring a Proper Seal
- 3. Dealing with Clogged Drains
- 3.1. Identifying Common Drain Locations
- 3.2. Methods for Clearing Clogged Drains
- 3.3. Preventing Future Clogs
- 4. Addressing Leaks from the Windshield and Sunroof
- 4.1. Identifying Windshield Leaks
- 4.2. Steps for Repairing Windshield Leaks
- 4.3. Identifying Sunroof Leaks
- 4.4. Steps for Repairing Sunroof Leaks
- 5. How to Prevent Water Leaks
- 5.1. Regular Maintenance Tips
- 5.2. Seasonal Considerations
- 5.3. Products and Treatments to Protect Your Car
- 6. Advanced Diagnostic Techniques
- 6.1. Using a Smoke Machine to Find Leaks
- 6.2. UV Dye and Black Light Detection
- 6.3. Acoustic Leak Detection
- 7. Case Studies of Water Leak Repairs
- 7.1. Case Study 1: Sunroof Leak in a 2015 Sedan
- 7.2. Case Study 2: Windshield Leak in a 2010 SUV
- 7.3. Case Study 3: Door Seal Leak in a 2018 Hatchback
- 8. The Role of Professional Mechanics
- 8.1. When to Seek Professional Help
- 8.2. Choosing a Qualified Mechanic
- 8.3. What to Expect During a Professional Inspection
- 9. Understanding Insurance Coverage for Water Damage
- 9.1. Types of Insurance Coverage
- 9.2. Filing a Claim for Water Damage
- 9.3. Tips for Working with Insurance Companies
- 10. Call to Action
- FAQ: Addressing Your Questions About Car Water Leaks
1. Identifying Water Leaks in Your Car’s Interior
Identifying water leaks early can prevent significant damage to your vehicle. Recognizing the signs and understanding common causes are crucial first steps.
1.1. Signs of Water Leaks Inside Your Vehicle
Spotting the initial signs of a water leak can save you from more extensive and costly repairs. Keep an eye out for these indicators:
- Damp or Soaked Carpets: This is often the most noticeable sign. Check the floor, especially in the footwells and under the seats, after rain.
- Musty Odors: A persistent musty smell in your car indicates trapped moisture, which can lead to mold and mildew growth.
- Water Stains on Seats or Headliner: Discoloration or stains on the seats or headliner can point to a leak coming from above.
- Foggy Windows: Excessive condensation inside your car, especially when it’s not raining, can indicate a moisture problem.
- Electronic Malfunctions: Water can damage electrical components. Unusual behavior in your car’s electronics might be due to water exposure.
1.2. Common Causes of Interior Water Leaks
Understanding the common causes of water leaks can help you narrow down the source and find a solution. According to research from the University of Texas, faulty seals account for approximately 60% of reported water leaks in vehicles annually. The most frequent culprits include:
- Weather Stripping: Damaged or worn weather stripping around doors and windows is a common entry point for water.
- Sunroof and Windshield Seals: Leaks around the sunroof or windshield seals can occur due to age, damage, or improper installation.
- Clogged Drains: Many cars have drains to channel water away from the sunroof, AC, and other areas. If these drains become clogged, water can back up and leak into the interior.
- Door Seals and Vapor Barriers: The vapor barrier behind the door panel protects the interior from moisture. Tears or poor sealing can let water in.
- Body Damage: Accidents or corrosion can create openings in the car’s body, allowing water to seep inside.
- Air Conditioning Condensation: A clogged AC drain can cause condensation to back up and leak into the passenger compartment.
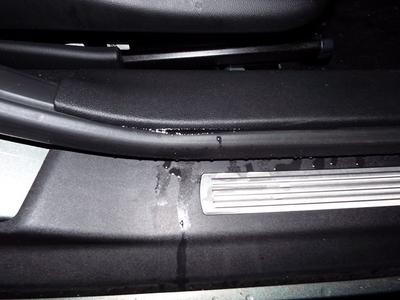 Water Stains on Seats
1.3. Tools and Techniques for Locating Leaks
Finding the exact location of a water leak can be tricky, but with the right tools and techniques, you can track it down. Here are some methods to try:
- The Hose Test: Have someone sit inside the car while you spray water over different areas of the exterior with a garden hose. The person inside can look for where water is entering.
- The Talcum Powder Test: Dust talcum powder around suspected leak areas. When you spray water, the powder will show the path of the leak.
- The Soapy Water Test: Mix water with a bit of dish soap and apply it to the exterior seals. Blow compressed air from the inside; bubbles will form where there are leaks.
- Visual Inspection: Carefully examine the weather stripping, door seals, and other potential entry points for cracks, gaps, or damage.
- Professional Inspection: If you’re unable to find the leak yourself, a professional mechanic can use specialized tools and techniques to locate it.
2. Addressing Leaks from Door Seals and Vapor Barriers
Door seals and vapor barriers play a crucial role in keeping water out of your car’s interior. When these components fail, leaks can occur.
2.1. How Door Seals and Vapor Barriers Function
Door seals are designed to create a tight barrier between the door and the car’s body, preventing water from entering. Vapor barriers, typically made of plastic or rubber, are located behind the door panel and provide an additional layer of protection against moisture.
Door Seals
Door seals, typically made of rubber, plastic, or a combination of both, are designed to form a tight seal between the car door and the body frame. Here’s how they function:
- Creating a Weatherproof Barrier: When the door is closed, the seal compresses against the body frame, filling any gaps that could allow water, wind, or noise to enter the cabin.
- Material Properties: The materials used in door seals are chosen for their flexibility, durability, and resistance to environmental factors like UV radiation, temperature changes, and moisture.
- Design Variations: Door seals come in various designs, including bulb seals (hollow tubes that compress easily), blade seals (flat strips that press against a surface), and multi-lip seals (with multiple contact points for enhanced sealing).
Vapor Barriers
Vapor barriers are typically made of plastic or rubber sheeting and are installed behind the door panel. Their primary functions include:
- Preventing Moisture Intrusion: Vapor barriers prevent moisture that enters the door cavity (e.g., from rain or car washes) from seeping into the car’s interior.
- Directing Water Flow: They are designed to channel water down the inside of the door and out through the drain holes at the bottom, away from sensitive components.
- Material Properties: The materials used in vapor barriers are waterproof and resistant to tearing or degradation over time.
- Adhesive Seal: They are typically attached to the door frame with an adhesive sealant (often butyl rubber), creating an airtight and watertight seal.
2.2. Diagnosing Leaks Related to Door Seals
To diagnose leaks related to door seals, start with a thorough visual inspection. Look for:
- Cracks or Tears: Check the seals for any visible damage.
- Gaps or Misalignment: Ensure the seals are properly aligned and making full contact with the door frame.
- Dryness or Hardening: Over time, rubber seals can dry out and lose their flexibility, leading to leaks.
2.3. Steps for Replacing or Repairing Door Seals
If you find damage to your door seals, replacement or repair may be necessary. Here are the general steps:
- Purchase New Seals: Buy replacement seals that are specifically designed for your vehicle model.
- Remove Old Seals: Carefully remove the old seals, taking care not to damage the underlying surface.
- Clean the Surface: Clean the area where the new seals will be installed to ensure good adhesion.
- Install New Seals: Attach the new seals, making sure they are properly aligned and firmly pressed into place.
2.4. Diagnosing Leaks Related to Vapor Barriers
Vapor barriers are designed to keep moisture out of your car’s interior. When they fail, they can cause significant water leaks. Here’s how to diagnose issues with vapor barriers:
- Remove the Door Panel: Carefully remove the door panel to access the vapor barrier. Consult your car’s repair manual for specific instructions.
- Inspect the Vapor Barrier: Look for tears, punctures, or areas where the barrier has become detached from the door.
- Check the Sealant: Examine the sealant around the edges of the vapor barrier for gaps, cracks, or signs of deterioration.
- Water Test: With the door panel removed, gently pour water down the outside of the window and observe where it enters the door cavity. Check if the vapor barrier is effectively channeling the water to the drain holes at the bottom of the door.
- Look for Water Damage: Inspect the inside of the door panel and the surrounding areas for signs of water damage, such as rust, mold, or discoloration.
2.5. Repairing or Replacing Vapor Barriers
Repairing or replacing a damaged vapor barrier involves several steps to ensure a watertight seal. Here’s how to do it:
- Remove the Old Vapor Barrier:
- Carefully peel the old vapor barrier away from the door frame.
- Use a plastic scraper to remove any remaining adhesive without damaging the door surface.
- Clean the surface with a solvent like isopropyl alcohol to remove any residue.
- Prepare the New Vapor Barrier:
- Purchase a new vapor barrier specifically designed for your car model. If an exact replacement isn’t available, you can use a sheet of heavy-duty plastic and cut it to the appropriate size and shape.
- Ensure the new barrier covers the entire opening and extends to the edges of the door frame.
- Apply New Sealant:
- Apply a continuous bead of butyl rubber sealant around the perimeter of the door frame where the vapor barrier will attach. Butyl rubber is preferred because it remains flexible and waterproof over time. 3M Window-Weld Round Ribbon Sealer is a good option.
- Install the Vapor Barrier:
- Carefully position the new vapor barrier over the door frame, aligning it with the edges.
- Press firmly along the perimeter to ensure the sealant adheres properly.
- Use a roller to apply even pressure and create a tight seal.
- Reinstall the Door Panel:
- Before reinstalling the door panel, test the vapor barrier by pouring water down the window and checking for leaks inside the car.
- If no leaks are detected, carefully reinstall the door panel, ensuring all clips and fasteners are securely in place.
2.6. Tips for Ensuring a Proper Seal
Ensuring a proper seal when replacing or repairing door seals and vapor barriers is critical to preventing future leaks. Here are some tips:
- Use High-Quality Materials: Invest in high-quality replacement seals and vapor barriers to ensure durability and effectiveness.
- Clean Surfaces Thoroughly: Before installing new seals, clean the surfaces to remove any dirt, debris, or old adhesive.
- Apply Sealant Generously: Use an ample amount of sealant to create a watertight seal.
- Test the Seal: After installation, test the seal by pouring water over the area and checking for leaks.
- Professional Installation: If you’re not comfortable doing the job yourself, consider hiring a professional to ensure proper installation.
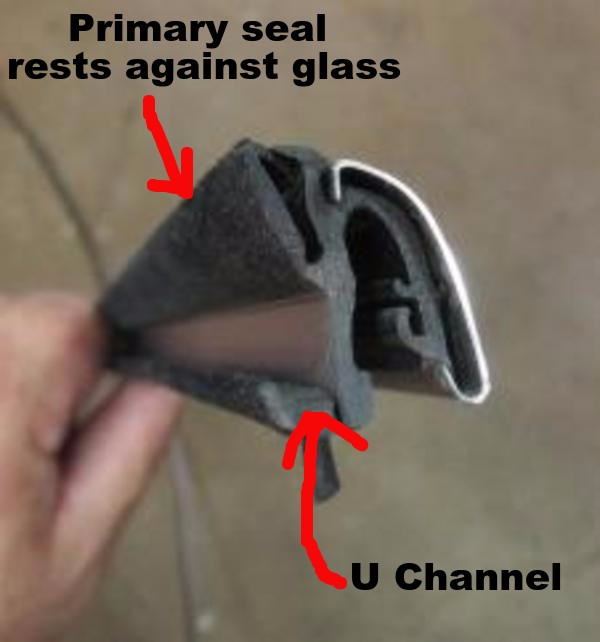 Door Seals
3. Dealing with Clogged Drains
Clogged drains can cause water to back up and leak into your car’s interior. Regular maintenance is key to preventing this issue.
3.1. Identifying Common Drain Locations
Understanding where drains are located in your vehicle helps you maintain them effectively. Common drain locations include:
- Sunroof Drains: Located at the corners of the sunroof frame.
- AC Condensation Drain: Usually found in the engine compartment near the firewall.
- Door Drains: Located at the bottom of the doors.
- Cowl Drains: Found at the base of the windshield under the cowl panel.
3.2. Methods for Clearing Clogged Drains
Clearing clogged drains is often a simple process that can prevent significant water damage. Here are several effective methods:
- Compressed Air: Use compressed air to blow out debris from the drain opening.
- Wire Hanger: Straighten a wire hanger and use it to gently probe and dislodge obstructions.
- Wet/Dry Vacuum: Use a wet/dry vacuum to suck out debris from the drain opening.
- Drain Cleaning Tools: Specialized drain cleaning tools, like flexible brushes, can be used to clean out long or curved drains.
3.3. Preventing Future Clogs
Preventing future clogs involves regular maintenance and awareness. Here are some tips:
- Regular Inspection: Check drain openings regularly for debris.
- Park Strategically: Avoid parking under trees that drop leaves or sap.
- Clean Regularly: Clean out drains at least twice a year, or more often if you notice frequent clogs.
- Use Drain Screens: Install screens over drain openings to prevent debris from entering.
4. Addressing Leaks from the Windshield and Sunroof
The windshield and sunroof are large openings in your car’s body, making them potential sources of leaks. Proper maintenance and prompt repairs are essential.
4.1. Identifying Windshield Leaks
Windshield leaks can be challenging to detect because water can enter in one location and appear in another. Here are some ways to identify windshield leaks:
- Visual Inspection:
- Check the windshield for cracks, chips, or gaps in the sealant around the edges.
- Look for signs of rust or corrosion around the windshield frame, which can indicate a compromised seal.
- Water Test:
- Have someone sit inside the car while you spray water over the windshield with a garden hose.
- The person inside should look for water entering around the edges of the windshield.
- Soapy Water Test:
- Mix water with a bit of dish soap and apply it to the exterior seals.
- Blow compressed air from the inside; bubbles will form where there are leaks.
4.2. Steps for Repairing Windshield Leaks
Repairing windshield leaks typically involves resealing the windshield. Here are the general steps:
- Clean the Area: Clean the windshield and surrounding frame to remove any dirt, debris, or old sealant.
- Apply New Sealant: Use a high-quality windshield sealant to fill any gaps or cracks around the windshield.
- Smooth the Sealant: Smooth the sealant with a tool to ensure a uniform and watertight seal.
- Allow to Cure: Allow the sealant to cure according to the manufacturer’s instructions before exposing the windshield to water.
4.3. Identifying Sunroof Leaks
Sunroof leaks can occur due to damaged seals, clogged drains, or issues with the sunroof mechanism. Here’s how to identify them:
- Visual Inspection:
- Check the sunroof seal for cracks, tears, or gaps.
- Look for signs of water damage around the sunroof opening inside the car.
- Inspect the sunroof drain openings for debris or clogs.
- Water Test:
- Pour water into the sunroof channel and observe whether it drains properly through the drain tubes.
- Check for water leaking into the car around the sunroof opening.
- Check the Headliner:
- Look for water stains or discoloration on the headliner around the sunroof, which can indicate a leak.
4.4. Steps for Repairing Sunroof Leaks
Repairing sunroof leaks may involve cleaning the drains, replacing the seal, or repairing the sunroof mechanism. Here are the general steps:
- Clean the Drains:
- Locate the sunroof drain openings (usually at the corners of the sunroof frame).
- Use compressed air, a wire hanger, or a flexible drain cleaning tool to clear any clogs in the drain tubes.
- Replace the Seal:
- If the sunroof seal is damaged, carefully remove the old seal and install a new one.
- Ensure the new seal is properly aligned and firmly pressed into place.
- Adjust the Sunroof:
- If the sunroof is not closing properly, adjust the mechanism according to the manufacturer’s instructions.
- Ensure the sunroof closes tightly against the seal to prevent water from entering.
5. How to Prevent Water Leaks
Preventing water leaks involves regular maintenance and proactive measures to protect your vehicle from moisture intrusion.
5.1. Regular Maintenance Tips
Regular maintenance is key to preventing water leaks. Here are some tips to follow:
- Inspect Seals and Weather Stripping: Regularly check the seals around doors, windows, and the sunroof for cracks, gaps, or damage.
- Clean Drains: Clean out sunroof, AC, and cowl drains at least twice a year to prevent clogs.
- Check for Body Damage: Inspect the car’s body for any signs of rust, corrosion, or damage that could create openings for water to enter.
- Apply Sealant: Apply sealant to any areas where you suspect leaks may occur, such as around the windshield or taillights.
5.2. Seasonal Considerations
Different seasons can bring different challenges when it comes to water leaks. Here are some seasonal considerations:
- Winter: Salt and road debris can damage seals and weather stripping. Rinse your car regularly to remove these contaminants.
- Spring: Melting snow and rain can exacerbate existing leaks. Check your car for water intrusion after heavy precipitation.
- Summer: Exposure to the sun can cause seals to dry out and crack. Park in the shade whenever possible.
- Fall: Falling leaves can clog drains. Clean out drains regularly during the fall.
5.3. Products and Treatments to Protect Your Car
Various products and treatments can help protect your car from water leaks. Here are some options:
- Rubber Seal Protectants: Apply rubber seal protectants to keep seals flexible and prevent them from drying out.
- Water Repellent Coatings: Use water repellent coatings on windows and windshields to improve visibility and prevent water from pooling.
- Rust Inhibitors: Apply rust inhibitors to protect the car’s body from corrosion.
- Car Covers: Use a car cover to protect your car from the elements when it’s parked outside.
6. Advanced Diagnostic Techniques
When basic methods don’t suffice, advanced diagnostic techniques can help pinpoint elusive water leaks.
6.1. Using a Smoke Machine to Find Leaks
A smoke machine is a tool that generates smoke to identify leaks in sealed systems. Here’s how it can be used to find water leaks in a car:
- Seal the Cabin: Close all doors and windows tightly to seal the car’s cabin.
- Introduce Smoke: Introduce smoke into the cabin through a vent or opening.
- Observe Exit Points: Watch for smoke exiting through any cracks or openings, indicating a leak.
6.2. UV Dye and Black Light Detection
UV dye and black light detection is another effective method for finding water leaks. Here’s how it works:
- Add UV Dye: Add UV dye to the water source you suspect is leaking.
- Run Water: Run water through the system and allow it to leak.
- Inspect with Black Light: Use a black light to inspect the interior of the car for the presence of UV dye, which will glow under the light.
6.3. Acoustic Leak Detection
Acoustic leak detection uses sensitive microphones to listen for the sound of water leaks. This method can be particularly useful for finding leaks in hard-to-reach areas.
7. Case Studies of Water Leak Repairs
Examining case studies can provide valuable insights into real-world water leak repairs and solutions.
7.1. Case Study 1: Sunroof Leak in a 2015 Sedan
A 2015 sedan owner noticed water stains on the headliner around the sunroof. The diagnosis revealed clogged sunroof drains. The repair involved clearing the drains with compressed air and a flexible cleaning tool, resolving the leak.
7.2. Case Study 2: Windshield Leak in a 2010 SUV
A 2010 SUV owner experienced water leaking into the cabin during rainstorms. The diagnosis revealed a deteriorated windshield seal. The repair involved removing the old sealant, applying new sealant, and ensuring a watertight seal.
7.3. Case Study 3: Door Seal Leak in a 2018 Hatchback
A 2018 hatchback owner noticed wet carpets in the rear footwells. The diagnosis revealed a damaged door seal. The repair involved replacing the door seal and ensuring proper alignment.
8. The Role of Professional Mechanics
While many water leak repairs can be done DIY, some situations require the expertise of a professional mechanic.
8.1. When to Seek Professional Help
Consider seeking professional help in the following situations:
- Unidentifiable Leaks: If you’re unable to locate the source of the leak yourself.
- Complex Repairs: If the repair involves complex procedures or specialized tools.
- Extensive Damage: If the water leak has caused extensive damage to the car’s interior or electrical systems.
8.2. Choosing a Qualified Mechanic
Choosing a qualified mechanic is crucial to ensuring a proper repair. Look for mechanics who have experience with water leak diagnosis and repair, and who are certified by reputable organizations.
8.3. What to Expect During a Professional Inspection
During a professional inspection, the mechanic will perform a thorough examination of your vehicle to identify the source of the water leak. They may use specialized tools and techniques, such as smoke machines or UV dye, to pinpoint the leak. Once the leak is located, the mechanic will provide a repair estimate and explain the recommended course of action.
9. Understanding Insurance Coverage for Water Damage
Understanding your insurance coverage for water damage can help you navigate the financial aspects of repairs.
9.1. Types of Insurance Coverage
Different types of insurance coverage may apply to water damage, depending on the cause of the leak and the extent of the damage. Common types of coverage include:
- Comprehensive Coverage: May cover water damage caused by natural events, such as floods or storms.
- Collision Coverage: May cover water damage resulting from an accident.
- Liability Coverage: May cover water damage to another person’s property caused by your vehicle.
9.2. Filing a Claim for Water Damage
Filing a claim for water damage involves several steps. Here are the general guidelines:
- Document the Damage: Take photos and videos of the water damage to your vehicle.
- Notify Your Insurance Company: Contact your insurance company to report the damage and file a claim.
- Provide Information: Provide your insurance company with all relevant information, such as the date and time of the damage, the cause of the leak, and the extent of the damage.
- Obtain a Repair Estimate: Obtain a repair estimate from a qualified mechanic.
- Work with the Insurance Adjuster: Work with the insurance adjuster to negotiate a fair settlement.
9.3. Tips for Working with Insurance Companies
Working with insurance companies can sometimes be challenging. Here are some tips to keep in mind:
- Be Prepared: Gather all relevant information and documentation before contacting your insurance company.
- Be Persistent: Follow up with your insurance company regularly to ensure your claim is being processed in a timely manner.
- Know Your Rights: Familiarize yourself with your rights and responsibilities under your insurance policy.
- Seek Professional Advice: If you’re having trouble with your insurance claim, consider seeking professional advice from a lawyer or public adjuster.
10. Call to Action
Experiencing water leaks in your car’s interior can be frustrating, but you don’t have to face it alone. At CAR-TOOL.EDU.VN, we understand the challenges and are here to provide expert guidance and solutions. Whether you need help identifying the source of a leak, finding the right replacement parts, or understanding the repair process, our team is ready to assist.
Don’t let water damage compromise your vehicle’s comfort and value. Contact us today for personalized assistance and reliable solutions.
Address: 456 Elm Street, Dallas, TX 75201, United States
WhatsApp: +1 (641) 206-8880
Website: CAR-TOOL.EDU.VN
Let CAR-TOOL.EDU.VN be your trusted partner in maintaining a dry and comfortable ride.
FAQ: Addressing Your Questions About Car Water Leaks
- What are the most common signs of a water leak in my car?
The most common signs include damp carpets, musty odors, water stains on seats or the headliner, and foggy windows. - What are the primary causes of water leaks in a vehicle’s interior?
Common causes include damaged weather stripping, sunroof and windshield seal issues, clogged drains, faulty door seals and vapor barriers, body damage, and air conditioning condensation. - How can I effectively locate the source of a water leak in my car?
Methods include the hose test, talcum powder test, soapy water test, visual inspection, and professional inspection. - What is the function of door seals and vapor barriers, and how do they prevent leaks?
Door seals create a tight barrier between the door and the car’s body, while vapor barriers behind the door panel provide an additional layer of protection against moisture. - How do I diagnose leaks related to door seals and what steps are involved in their repair or replacement?
Diagnose by visually inspecting for cracks, gaps, or dryness. Repair involves purchasing new seals, removing old ones, cleaning the surface, and installing the new seals. - What are the symptoms of vapor barrier failure, and how can I repair or replace a damaged vapor barrier?
Symptoms include water inside the door panel or wet carpets. Repair involves removing the door panel, replacing the vapor barrier with a new one, and ensuring a tight seal. - Where are the typical drain locations in a car, and how can I clear clogged drains to prevent leaks?
Common drain locations are sunroof drains, AC condensation drain, door drains, and cowl drains. Clear clogs with compressed air, a wire hanger, or a wet/dry vacuum. - How do I identify and repair leaks originating from the windshield or sunroof?
Identify leaks by visual inspection and water tests. Repair involves resealing the windshield or cleaning/replacing sunroof seals. - What maintenance tips can help prevent water leaks in my vehicle, and what seasonal factors should I consider?
Tips include regularly inspecting seals, cleaning drains, and checking for body damage. Consider seasonal factors like salt in winter or leaf clogs in fall. - When is it necessary to seek professional help for water leak repairs, and how do I choose a qualified mechanic?
Seek professional help for unidentifiable leaks, complex repairs, or extensive damage. Choose a mechanic with experience in water leak diagnosis and certification from reputable organizations.
