What Does An Obd1 Port Look Like? It varies greatly by manufacturer and year, unlike the standardized OBD2 port. CAR-TOOL.EDU.VN provides a detailed look at the various OBD1 port styles, locations, and adapter cables necessary for diagnosing older vehicles, ensuring you get the right tools and information for your specific needs. This guide will equip you with the knowledge to identify your OBD1 port and choose the correct diagnostic equipment, saving you time and money while ensuring accurate vehicle diagnostics.
Contents
- 1. Understanding OBD1: The Predecessor to OBD2
- 1.1 What is OBD1?
- 1.2 Why Was OBD1 Replaced by OBD2?
- 1.3 Key Differences Between OBD1 and OBD2
- 2. Identifying the OBD1 Port: A Visual Guide
- 2.1 General Characteristics of OBD1 Ports
- 2.2 Common Locations of OBD1 Ports
- 2.3 Specific Examples of OBD1 Port Types by Manufacturer
- 2.3.1 GM (General Motors) OBD1 Port
- 2.3.2 Ford OBD1 Port
- 2.3.3 Toyota OBD1 Port
- 2.3.4 Nissan OBD1 Port
- 3. Identifying Your Vehicle’s OBD Protocol
- 3.1 Check the Vehicle’s Manufacturing Date
- 3.2 Locate the Diagnostic Port
- 3.3 Consult Your Vehicle’s Service Manual
- 3.4 Use an OBD Compatibility Checker
- 4. Adapters for OBD1 Ports: Bridging the Gap
- 4.1 Why Are Adapters Necessary for OBD1 Ports?
- 4.2 Common Types of OBD1 Adapters
- 4.3 Selecting the Right Adapter for Your Vehicle
- 5. OBD1 Scan Tools: What You Need to Know
- 5.1 Key Features of OBD1 Scan Tools
- 5.2 Top OBD1 Scan Tool Brands
- 5.3 Tips for Choosing the Right OBD1 Scan Tool
- 6. Step-by-Step Guide to Using an OBD1 Scan Tool
- 6.1 Preparation
- 6.2 Connecting the Scan Tool
- 6.3 Retrieving Diagnostic Trouble Codes (DTCs)
- 6.4 Analyzing Live Data
- 6.5 Performing Bi-Directional Tests
- 6.6 Clearing Diagnostic Trouble Codes (DTCs)
- 6.7 Final Steps
- 7. Common Issues and Troubleshooting Tips
- 7.1 Communication Errors
- 7.2 Incorrect Diagnostic Trouble Codes (DTCs)
- 7.3 Inaccurate Live Data
- 7.4 Scan Tool Malfunctions
- 7.5 Adapter Issues
- 8. Maintaining Your OBD1 Vehicle: Tips and Best Practices
- 8.1 Regular Inspections
- 8.2 Fluid Checks and Changes
- 8.3 Component Replacements
- 8.4 Tire Maintenance
- 8.5 Battery Care
- 8.6 Diagnostic Scans
- 8.7 Addressing Issues Promptly
- 9. Benefits of Using CAR-TOOL.EDU.VN for Your OBD1 Needs
- 9.1 Extensive Product Selection
- 9.2 Detailed Product Information
- 9.3 Expert Advice and Support
- 9.4 Competitive Pricing
- 9.5 Secure Online Shopping
- 9.6 Fast Shipping
- 10. Frequently Asked Questions (FAQs) About OBD1 Ports
- 10.1 What is the main difference between OBD1 and OBD2?
- 10.2 How can I tell if my car is OBD1 or OBD2?
- 10.3 Where is the OBD1 port located in my car?
- 10.4 Do I need an adapter to use an OBD1 scan tool?
- 10.5 Can I use an OBD2 scan tool on an OBD1 car with an adapter?
- 10.6 What are some common issues when using an OBD1 scan tool?
- 10.7 How do I choose the right OBD1 scan tool?
- 10.8 What should I do if my OBD1 scan tool is not communicating with my car?
- 10.9 Where can I find the correct adapter for my OBD1 port?
- 10.10 How often should I perform a diagnostic scan on my OBD1 vehicle?
1. Understanding OBD1: The Predecessor to OBD2
OBD1 (On-Board Diagnostics 1) was the early generation of automotive diagnostic systems, preceding the now-standard OBD2. It’s essential to understand its context to properly identify its ports.
1.1 What is OBD1?
OBD1 refers to the on-board diagnostic systems used in vehicles manufactured before the mid-1990s. Unlike the standardized OBD2, OBD1 systems were manufacturer-specific, meaning each automaker had its own diagnostic protocols, connectors, and trouble codes. This lack of standardization made diagnosing issues on older vehicles more challenging. According to a study by the Society of Automotive Engineers (SAE), the introduction of OBD2 in 1996 aimed to create a uniform diagnostic standard across all vehicles sold in the United States, simplifying emission testing and repairs.
1.2 Why Was OBD1 Replaced by OBD2?
The primary reason for the transition from OBD1 to OBD2 was the need for standardization. OBD1 systems varied significantly between manufacturers, making it difficult for mechanics and technicians to diagnose and repair vehicles from different brands. OBD2 provided a common set of diagnostic trouble codes (DTCs) and a standardized connector, simplifying the diagnostic process. According to the Environmental Protection Agency (EPA), OBD2 was mandated to improve emission control and monitoring, ensuring that all vehicles met the same environmental standards.
1.3 Key Differences Between OBD1 and OBD2
Here’s a comparison table highlighting the key differences between OBD1 and OBD2:
| Feature | OBD1 | OBD2 |
|---|---|---|
| Standardization | Manufacturer-specific | Standardized across all vehicles |
| Diagnostic Codes | Proprietary, manufacturer-specific codes | Standardized DTCs (Diagnostic Trouble Codes) |
| Connector Type | Varies by manufacturer | Standardized 16-pin Data Link Connector (DLC) |
| Data Parameters | Limited data parameters | Enhanced data parameters for comprehensive diagnostics |
| Emission Monitoring | Limited emission monitoring | Comprehensive emission monitoring as mandated by the EPA |
| Vehicle Coverage | Pre-mid-1990s vehicles | Vehicles manufactured from 1996 onwards in the United States |
| Adapter Cables | Often required | Generally not required, but may be needed for some older OBD2 vehicles |
2. Identifying the OBD1 Port: A Visual Guide
Identifying an OBD1 port can be tricky due to the lack of standardization. Here’s what to look for:
2.1 General Characteristics of OBD1 Ports
OBD1 ports come in various shapes and sizes, often with a different number of pins depending on the vehicle’s manufacturer. Unlike the OBD2 port, which is a standard 16-pin connector, OBD1 ports can have anywhere from a few pins to over a dozen. The port is typically located under the dashboard, in the engine bay, or near the center console. Given the variability, a visual inspection is often the best way to determine the type of OBD1 port in your vehicle.
2.2 Common Locations of OBD1 Ports
- Under the Dashboard: Most commonly found on the driver’s side, near the steering column.
- Engine Bay: Some manufacturers placed the OBD1 port in the engine bay, often near the fuse box.
- Center Console: Less common, but some vehicles have the port located in the center console area.
2.3 Specific Examples of OBD1 Port Types by Manufacturer
2.3.1 GM (General Motors) OBD1 Port
GM OBD1 ports often feature a 12-pin ALDL (Assembly Line Diagnostic Link) connector. These ports are typically trapezoidal in shape and can be found under the dashboard on the driver’s side. The ALDL connector communicates using GM’s proprietary diagnostic protocol, requiring a specialized scan tool or adapter for data retrieval. According to a GM service manual from 1993, the ALDL connector provides access to engine and transmission control module data, essential for diagnosing performance issues.
2.3.2 Ford OBD1 Port
Ford OBD1 ports vary, but a common type is the EEC-IV (Electronic Engine Control IV) connector. This connector can be found in various locations, including under the dashboard or in the engine bay. Ford’s EEC-IV system uses a different communication protocol compared to GM, necessitating a Ford-specific scan tool or adapter. According to a Ford technical service bulletin, the EEC-IV system monitors various engine parameters such as fuel injection, ignition timing, and emissions control.
2.3.3 Toyota OBD1 Port
Toyota OBD1 ports often feature a 22-pin connector located in the engine bay. This connector is typically rectangular and requires a Toyota-specific adapter cable to interface with a scan tool. Toyota’s OBD1 system provides access to engine and transmission diagnostic data, aiding in troubleshooting performance and emission-related issues. A Toyota service manual from 1994 specifies that the 22-pin connector is used for diagnostic functions, including retrieving trouble codes and monitoring sensor data.
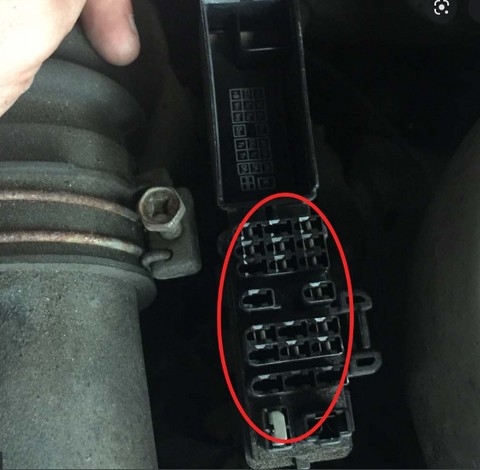 Toyota 22 pin OBD port
2.3.4 Nissan OBD1 Port
Nissan OBD1 ports frequently use a 14-pin connector, often found behind the fuse panel cover. These connectors require a Nissan-specific adapter cable to connect to a standard OBD1 scan tool. Nissan’s diagnostic system allows technicians to access engine and transmission control data, facilitating the diagnosis of various vehicle issues. A Nissan technical guide from 1992 highlights the use of the 14-pin connector for accessing diagnostic information and performing system tests.
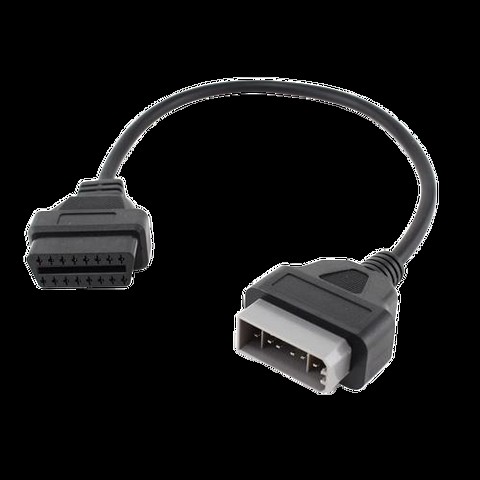 nissan 14 pin adapter
3. Identifying Your Vehicle’s OBD Protocol
Determining whether your vehicle uses OBD1 or OBD2 is crucial for selecting the correct diagnostic tools. Here’s how to figure it out:
3.1 Check the Vehicle’s Manufacturing Date
Vehicles manufactured in or after 1996 are generally OBD2 compliant in the United States. However, some vehicles produced before 1996 may also be OBD2 compliant, so it’s essential to verify.
3.2 Locate the Diagnostic Port
Look for the diagnostic port, typically located under the dashboard. If it’s a 16-pin connector, it’s likely OBD2. If it’s a different shape and has a varying number of pins, it’s probably OBD1.
3.3 Consult Your Vehicle’s Service Manual
The service manual should specify the OBD protocol used by your vehicle. This is the most reliable method for determining whether your vehicle is OBD1 or OBD2.
3.4 Use an OBD Compatibility Checker
CAR-TOOL.EDU.VN provides a compatibility checker tool that can help you determine your vehicle’s OBD protocol based on its make, model, and year. This tool simplifies the process and ensures you get the right information.
4. Adapters for OBD1 Ports: Bridging the Gap
Because OBD1 ports vary, adapters are often needed to connect them to standard scan tools.
4.1 Why Are Adapters Necessary for OBD1 Ports?
Adapters are essential for OBD1 ports due to the lack of standardization. Each manufacturer had its own diagnostic protocol and connector type, making it impossible to use a universal scan tool without an adapter. These adapters bridge the gap between the vehicle’s OBD1 port and the standard OBD2 scan tool, allowing technicians to access diagnostic data. According to automotive diagnostic experts, using the correct adapter ensures proper communication and accurate data retrieval from the vehicle’s computer.
4.2 Common Types of OBD1 Adapters
- GM 12-Pin to OBD2 Adapter: Converts the 12-pin ALDL connector to a standard OBD2 connector.
- Ford EEC-IV to OBD2 Adapter: Adapts the Ford EEC-IV connector to the OBD2 standard.
- Toyota 22-Pin to OBD2 Adapter: Converts the Toyota 22-pin connector to OBD2.
- Nissan 14-Pin to OBD2 Adapter: Adapts the Nissan 14-pin connector to OBD2.
4.3 Selecting the Right Adapter for Your Vehicle
To select the correct adapter, you need to identify the specific OBD1 port type in your vehicle. Consult your vehicle’s service manual or use an OBD compatibility checker on CAR-TOOL.EDU.VN to determine the correct adapter. Ensure that the adapter is compatible with your scan tool to avoid communication issues. Automotive diagnostic forums recommend verifying the adapter’s compatibility with your vehicle’s make, model, and year before purchasing.
5. OBD1 Scan Tools: What You Need to Know
Not all scan tools are created equal. To work with OBD1 vehicles, you need a compatible scan tool.
5.1 Key Features of OBD1 Scan Tools
OBD1 scan tools are designed to communicate with the proprietary diagnostic systems of older vehicles. Key features include:
- Compatibility with OBD1 Protocols: Supports various OBD1 protocols used by different manufacturers.
- Adapter Cables: Includes a set of adapter cables for connecting to different OBD1 port types.
- Diagnostic Trouble Code (DTC) Reading: Retrieves and displays DTCs from the vehicle’s computer.
- Live Data Monitoring: Provides real-time data from sensors and components.
- Bi-Directional Control: Allows technicians to perform tests and activate components for diagnostic purposes.
5.2 Top OBD1 Scan Tool Brands
- Actron: Known for its affordable and reliable OBD1 and OBD2 scan tools.
- Innova: Offers a range of scan tools with advanced features for both OBD1 and OBD2 vehicles.
- Snap-on: Provides professional-grade scan tools with comprehensive diagnostic capabilities.
- OTC: Specializes in diagnostic tools and equipment for automotive technicians.
5.3 Tips for Choosing the Right OBD1 Scan Tool
- Check Compatibility: Ensure the scan tool supports the OBD1 protocols used by your vehicle.
- Read Reviews: Look for customer reviews to gauge the tool’s performance and reliability.
- Consider Features: Determine which features are essential for your diagnostic needs, such as live data monitoring or bi-directional control.
- Budget: Set a budget and compare prices from different brands and models.
- Warranty and Support: Choose a scan tool with a good warranty and reliable customer support.
6. Step-by-Step Guide to Using an OBD1 Scan Tool
Using an OBD1 scan tool requires a slightly different approach compared to OBD2, mainly due to the need for adapters and manufacturer-specific protocols. Here’s a step-by-step guide:
6.1 Preparation
- Gather Your Tools: You’ll need an OBD1 scan tool, the appropriate adapter for your vehicle, and your vehicle’s service manual.
- Locate the OBD1 Port: Find the OBD1 port in your vehicle. Refer to your vehicle’s service manual or the information provided earlier in this article for common locations.
- Connect the Adapter: Attach the correct adapter to the OBD1 port. Ensure it is securely connected.
6.2 Connecting the Scan Tool
- Plug in the Scan Tool: Connect the OBD1 scan tool to the adapter.
- Turn On the Vehicle: Turn the ignition to the “on” position without starting the engine. This provides power to the vehicle’s diagnostic system.
- Power On the Scan Tool: Turn on the OBD1 scan tool and wait for it to initialize.
6.3 Retrieving Diagnostic Trouble Codes (DTCs)
- Select the Vehicle: Use the scan tool’s menu to select your vehicle’s make, model, and year.
- Initiate Diagnostic Scan: Follow the scan tool’s prompts to initiate a diagnostic scan. This may involve selecting specific systems or modules to test.
- Read DTCs: Once the scan is complete, the scan tool will display any stored DTCs. Record these codes for further diagnosis.
- Interpret DTCs: Use your vehicle’s service manual or online resources to interpret the meaning of the DTCs. OBD1 codes are often manufacturer-specific, so accurate interpretation is crucial.
6.4 Analyzing Live Data
- Select Live Data: Navigate to the live data section of the scan tool.
- Choose Parameters: Select the specific parameters you want to monitor, such as engine RPM, coolant temperature, or sensor readings.
- Monitor Data: Observe the live data readings while the engine is running. Look for any abnormal values or fluctuations that could indicate a problem.
- Compare to Specifications: Compare the live data readings to the specifications in your vehicle’s service manual to identify any discrepancies.
6.5 Performing Bi-Directional Tests
- Select Bi-Directional Tests: Navigate to the bi-directional tests section of the scan tool.
- Choose Test: Select the specific test you want to perform, such as activating a fuel injector or cycling a solenoid.
- Follow Prompts: Follow the scan tool’s prompts to initiate and monitor the test.
- Observe Results: Observe the results of the test and compare them to the expected outcome. This can help you determine if a component is functioning correctly.
6.6 Clearing Diagnostic Trouble Codes (DTCs)
- Select Clear Codes: Navigate to the clear codes section of the scan tool.
- Confirm Clear: Confirm that you want to clear the DTCs.
- Verify Clear: After clearing the codes, perform another scan to ensure the codes have been successfully cleared and do not reappear.
6.7 Final Steps
- Turn Off the Vehicle: Turn off the vehicle’s ignition and remove the scan tool and adapter.
- Store Tools: Store your OBD1 scan tool and adapter in a safe and dry place.
- Document Results: Document your diagnostic findings, including the DTCs, live data readings, and test results. This information will be helpful for future reference.
7. Common Issues and Troubleshooting Tips
Working with OBD1 systems can present unique challenges. Here are some common issues and troubleshooting tips:
7.1 Communication Errors
- Issue: The scan tool fails to communicate with the vehicle’s computer.
- Troubleshooting:
- Verify Adapter: Ensure you are using the correct adapter for your vehicle’s OBD1 port.
- Check Connections: Make sure all connections between the scan tool, adapter, and vehicle are secure.
- Inspect Wiring: Check the wiring for any damage or corrosion.
- Power Supply: Ensure the vehicle’s battery has sufficient voltage.
- Scan Tool Compatibility: Confirm that the scan tool is compatible with your vehicle’s OBD1 protocol.
7.2 Incorrect Diagnostic Trouble Codes (DTCs)
- Issue: The scan tool displays DTCs that don’t match the symptoms or are inaccurate.
- Troubleshooting:
- Verify DTCs: Use your vehicle’s service manual to verify the accuracy of the DTCs.
- Check for Updates: Ensure your scan tool has the latest software updates.
- Consult Forums: Consult online automotive forums or technical resources for additional information on specific DTCs.
- Component Testing: Perform additional component testing to confirm the DTCs.
7.3 Inaccurate Live Data
- Issue: The live data readings from the scan tool appear to be inaccurate or inconsistent.
- Troubleshooting:
- Sensor Calibration: Check and calibrate the sensors if necessary.
- Wiring Issues: Inspect the wiring and connectors for any damage or corrosion.
- Grounding Problems: Ensure proper grounding for the sensors and scan tool.
- Compare to Specifications: Compare the live data readings to the specifications in your vehicle’s service manual.
7.4 Scan Tool Malfunctions
- Issue: The scan tool itself is malfunctioning or not working correctly.
- Troubleshooting:
- Power Source: Ensure the scan tool has a reliable power source.
- Software Updates: Check for and install any available software updates.
- Reset Scan Tool: Try resetting the scan tool to its default settings.
- Contact Support: Contact the scan tool manufacturer for technical support or repairs.
7.5 Adapter Issues
- Issue: The adapter is not functioning correctly or is damaged.
- Troubleshooting:
- Inspect Adapter: Check the adapter for any physical damage or corrosion.
- Test Continuity: Use a multimeter to test the continuity of the adapter’s wiring.
- Replace Adapter: If the adapter is damaged or not functioning correctly, replace it with a new one.
8. Maintaining Your OBD1 Vehicle: Tips and Best Practices
Proper maintenance is crucial for keeping your OBD1 vehicle running smoothly. Here are some tips and best practices:
8.1 Regular Inspections
Perform regular inspections of your vehicle’s engine, fluids, and components. Check for any signs of wear, leaks, or damage. Regular inspections can help you identify potential issues before they become major problems. According to automotive maintenance experts, inspecting your vehicle every three months can significantly extend its lifespan and prevent costly repairs.
8.2 Fluid Checks and Changes
Check and change your vehicle’s fluids according to the manufacturer’s recommendations. This includes engine oil, coolant, brake fluid, power steering fluid, and transmission fluid. Fresh fluids ensure proper lubrication, cooling, and performance of your vehicle’s components. Automotive maintenance guides recommend changing your engine oil every 3,000 to 5,000 miles, depending on your driving conditions.
8.3 Component Replacements
Replace worn or damaged components promptly. This includes spark plugs, air filters, fuel filters, belts, hoses, and brake pads. Replacing these components at the recommended intervals can prevent performance issues and extend the life of your vehicle. Automotive repair manuals specify the replacement intervals for various components based on mileage and usage.
8.4 Tire Maintenance
Maintain proper tire pressure, rotation, and alignment. Proper tire maintenance ensures even wear, optimal handling, and fuel efficiency. Tire manufacturers recommend checking your tire pressure monthly and rotating your tires every 6,000 to 8,000 miles.
8.5 Battery Care
Keep your vehicle’s battery clean and properly charged. Clean the battery terminals to remove any corrosion and ensure a good connection. If your battery is more than three years old, have it tested to ensure it can still hold a charge. Automotive battery experts recommend replacing your vehicle’s battery every three to five years, depending on the climate and usage.
8.6 Diagnostic Scans
Perform regular diagnostic scans using an OBD1 scan tool. This can help you identify any potential issues early on, even if there are no visible symptoms. Regular diagnostic scans can also help you monitor the performance of your vehicle’s engine and components. Automotive diagnostic technicians recommend performing a diagnostic scan at least once a year, or more frequently if you notice any performance issues.
8.7 Addressing Issues Promptly
Address any issues or concerns promptly. Ignoring minor problems can lead to more significant and costly repairs down the road. If you notice any unusual noises, vibrations, or performance issues, have your vehicle inspected by a qualified mechanic. Automotive repair experts emphasize the importance of addressing issues promptly to prevent further damage and ensure your vehicle’s safety and reliability.
9. Benefits of Using CAR-TOOL.EDU.VN for Your OBD1 Needs
CAR-TOOL.EDU.VN is your go-to resource for all things OBD1.
9.1 Extensive Product Selection
CAR-TOOL.EDU.VN offers a wide range of OBD1 scan tools, adapters, and accessories. Whether you’re a professional mechanic or a DIY enthusiast, you’ll find the tools you need to diagnose and repair your OBD1 vehicle.
9.2 Detailed Product Information
Each product listing includes detailed specifications, compatibility information, and customer reviews. This helps you make informed purchasing decisions and ensures you get the right tools for your vehicle.
9.3 Expert Advice and Support
CAR-TOOL.EDU.VN provides expert advice and support to help you with your OBD1 diagnostic needs. Our team of experienced technicians can answer your questions and guide you through the diagnostic process.
9.4 Competitive Pricing
CAR-TOOL.EDU.VN offers competitive pricing on all OBD1 tools and accessories. We also provide special deals and promotions to help you save money on your purchases.
9.5 Secure Online Shopping
CAR-TOOL.EDU.VN provides a secure online shopping experience. Your personal and financial information is protected by advanced encryption technology.
9.6 Fast Shipping
CAR-TOOL.EDU.VN offers fast shipping on all orders. Your tools will be delivered to your doorstep quickly and efficiently.
10. Frequently Asked Questions (FAQs) About OBD1 Ports
10.1 What is the main difference between OBD1 and OBD2?
OBD1 is manufacturer-specific with varied connectors and diagnostic codes, whereas OBD2 is a standardized system with a 16-pin connector and universal diagnostic codes.
10.2 How can I tell if my car is OBD1 or OBD2?
Check the manufacturing date (vehicles from 1996 onwards are generally OBD2), locate the diagnostic port (a 16-pin port is likely OBD2), or consult your vehicle’s service manual.
10.3 Where is the OBD1 port located in my car?
OBD1 ports are commonly found under the dashboard on the driver’s side, in the engine bay, or near the center console.
10.4 Do I need an adapter to use an OBD1 scan tool?
Yes, adapters are often necessary because OBD1 ports vary by manufacturer. The adapter bridges the connection between the vehicle’s OBD1 port and the scan tool.
10.5 Can I use an OBD2 scan tool on an OBD1 car with an adapter?
No, you need a scan tool that is specifically designed to read OBD1 protocols. Adapters only help with the physical connection, not the communication protocol.
10.6 What are some common issues when using an OBD1 scan tool?
Communication errors, incorrect diagnostic trouble codes, and inaccurate live data are common issues. Troubleshooting involves verifying the adapter, checking connections, and ensuring scan tool compatibility.
10.7 How do I choose the right OBD1 scan tool?
Check compatibility with your vehicle’s OBD1 protocols, read reviews, consider essential features, set a budget, and choose a tool with a good warranty and support.
10.8 What should I do if my OBD1 scan tool is not communicating with my car?
Verify the adapter, check connections, inspect wiring, ensure sufficient battery voltage, and confirm scan tool compatibility.
10.9 Where can I find the correct adapter for my OBD1 port?
Consult your vehicle’s service manual or use an OBD compatibility checker on CAR-TOOL.EDU.VN to determine the correct adapter.
10.10 How often should I perform a diagnostic scan on my OBD1 vehicle?
Perform a diagnostic scan at least once a year, or more frequently if you notice any performance issues.
Need help finding the right OBD1 scan tool or adapter for your vehicle? Contact CAR-TOOL.EDU.VN today for expert advice and support. Our team is ready to assist you with all your diagnostic needs. Visit us at 456 Elm Street, Dallas, TX 75201, United States, call us on Whatsapp at +1 (641) 206-8880, or visit our website at CAR-TOOL.EDU.VN for more information.