OBD2 scanner usage is key to diagnosing car problems and saving money on repairs, and with CAR-TOOL.EDU.VN, understanding fault codes and live data becomes straightforward. This guide helps you master the use of automotive diagnostic tools and learn about vehicle computer diagnostics, ensuring efficient troubleshooting and maintenance. Explore our site for the latest information on automotive tools and resources for vehicle maintenance.
Contents
- 1. What is an OBD2 Scanner and What Does It Do?
- 2. Understanding Different Types of OBD2 Scanners
- 3. Step-by-Step Guide: How to Use an OBD2 Scanner
- Step 1: Locate the OBD2 Port
- Step 2: Connect the OBD2 Scanner
- Step 3: Turn On the Ignition
- Step 4: Power On the Scanner
- Step 5: Select Vehicle Information
- Step 6: Read Diagnostic Trouble Codes (DTCs)
- Step 7: Record and Research the Codes
- Step 8: View Live Data (Optional)
- Step 9: Clear the Codes (Optional)
- Step 10: Verify the Repair
- 4. Interpreting OBD2 Fault Codes: A Comprehensive Guide
- Understanding OBD2 Code Structure
- Common OBD2 Codes and Their Meanings
- Using Freeze Frame Data
- Consulting Repair Manuals and Online Resources
- When to Seek Professional Help
- 5. Reading Live Data: Maximizing Your OBD2 Scanner’s Potential
- Accessing Live Data
- Interpreting Live Data Parameters
- Common Live Data Parameters and Their Significance
- Diagnosing Problems with Live Data
- 6. Clearing OBD2 Fault Codes: When and How
- When to Clear OBD2 Fault Codes
- How to Clear OBD2 Fault Codes
- Potential Consequences of Clearing Codes Improperly
- Alternatives to Clearing Codes
- 7. Advanced OBD2 Scanner Functions for In-Depth Diagnostics
- 8. OBD2 Scanner Safety Precautions: What You Need to Know
- 9. OBD2 Scanner Maintenance and Storage: Keeping Your Tool in Top Condition
- 10. OBD2 Scanner and Used Car Inspections: What to Look For
1. What is an OBD2 Scanner and What Does It Do?
An OBD2 scanner is a diagnostic tool that connects to your car’s OBD2 port to read data from the vehicle’s computer, helping diagnose issues. According to a study by the Society of Automotive Engineers (SAE), the implementation of OBD2 systems has led to a significant reduction in automotive emissions, demonstrating its importance in modern vehicle diagnostics.
- Accessing Vehicle Data: The OBD2 scanner accesses crucial data, including diagnostic trouble codes (DTCs), live sensor data, and vehicle information. This data helps identify problems and monitor the vehicle’s performance.
- Identifying Fault Codes: An OBD2 scanner reads fault codes generated by the car’s computer. These codes indicate specific issues, from engine problems to transmission malfunctions, allowing for targeted repairs.
- Monitoring Live Data: The tool displays real-time data from various sensors. This data is valuable for diagnosing intermittent issues and assessing overall vehicle health. For example, monitoring the engine’s coolant temperature or oxygen sensor readings can provide insights into potential problems before they escalate.
- Performing Diagnostic Tests: Some advanced scanners can perform specific tests on components like the oxygen sensor, fuel injectors, and EGR valve. These tests help verify the functionality of these components and pinpoint any issues.
- Resetting Trouble Codes: After resolving the underlying problem, an OBD2 scanner can clear the diagnostic trouble codes (DTCs) and turn off the check engine light.
- Enhancing Vehicle Maintenance: By providing detailed insights into the vehicle’s condition, OBD2 scanners can assist in preventative maintenance. Regular scans can help identify potential issues early on, preventing costly repairs down the line.
- Improving Fuel Efficiency: By identifying issues that affect the engine’s performance, such as a faulty oxygen sensor or a clogged catalytic converter, an OBD2 scanner can help improve fuel efficiency.
- Saving Time and Money: Using an OBD2 scanner can save time and money by quickly identifying the source of a problem, allowing for targeted repairs instead of costly guesswork.
- Supporting DIY Repairs: For car enthusiasts and DIY mechanics, an OBD2 scanner is an essential tool for diagnosing and repairing their vehicles. It provides the information needed to make informed decisions and perform repairs with confidence.
- Facilitating Vehicle Inspections: An OBD2 scanner can be used to perform pre-purchase inspections of used vehicles, helping buyers identify any potential problems before making a purchase.
2. Understanding Different Types of OBD2 Scanners
The market offers various OBD2 scanners, from basic code readers to advanced diagnostic tools, each with unique features and capabilities. According to research from the National Institute for Automotive Service Excellence (ASE), technicians who utilize advanced diagnostic tools experience increased efficiency and accuracy in their work.
- Basic OBD2 Code Readers:
- Functionality: These are the simplest and most affordable scanners, designed primarily to read and clear diagnostic trouble codes (DTCs).
- Features: They typically display the fault code and a brief description of the problem. Some models may also provide freeze frame data, which shows the sensor values at the time the code was triggered.
- Target User: Ideal for car owners who want a basic tool for diagnosing common issues and clearing the check engine light.
- Mid-Range OBD2 Scanners:
- Functionality: These scanners offer more advanced features compared to basic code readers, including live data streaming, graphing capabilities, and the ability to perform some basic tests.
- Features: They can display real-time sensor data, such as engine RPM, coolant temperature, and oxygen sensor readings. Graphing capabilities allow users to visualize the data and identify trends. Some models also offer bidirectional control, allowing users to command certain functions, such as turning on and off the cooling fan.
- Target User: Suitable for DIY mechanics and car enthusiasts who want more in-depth diagnostic capabilities.
- Professional-Grade OBD2 Scanners:
- Functionality: These are the most advanced and expensive scanners, designed for professional technicians and auto repair shops.
- Features: They offer comprehensive diagnostic capabilities, including advanced coding and programming, bidirectional control, and access to vehicle-specific data and repair information. They can also perform advanced tests, such as cylinder compression tests and fuel injector balance tests.
- Target User: Intended for professional technicians who need a powerful and versatile tool for diagnosing and repairing a wide range of vehicle issues.
- Smartphone-Based OBD2 Adapters:
- Functionality: These adapters plug into the OBD2 port and connect to a smartphone or tablet via Bluetooth or Wi-Fi.
- Features: They rely on mobile apps for data display and functionality. The features available depend on the app used, but many offer code reading, live data streaming, and basic diagnostic tests.
- Target User: A convenient and affordable option for car owners who prefer to use their smartphones for diagnostics.
- Key Considerations When Choosing a Scanner:
- Compatibility: Ensure the scanner is compatible with your vehicle’s make and model.
- Features: Consider the features you need based on your diagnostic needs.
- Ease of Use: Choose a scanner with a user-friendly interface and clear instructions.
- Update Availability: Check if the scanner can be updated with the latest vehicle information and software updates.
- Price: Set a budget and compare prices from different brands and retailers.
3. Step-by-Step Guide: How to Use an OBD2 Scanner
Using an OBD2 scanner is straightforward, but understanding each step is crucial for accurate diagnostics. According to a report by AutoMD, approximately 70% of check engine light issues can be diagnosed with a simple OBD2 scan, highlighting the tool’s effectiveness.
Step 1: Locate the OBD2 Port
- The OBD2 port is usually found under the dashboard on the driver’s side.
- Check the owner’s manual if you can’t find it easily.
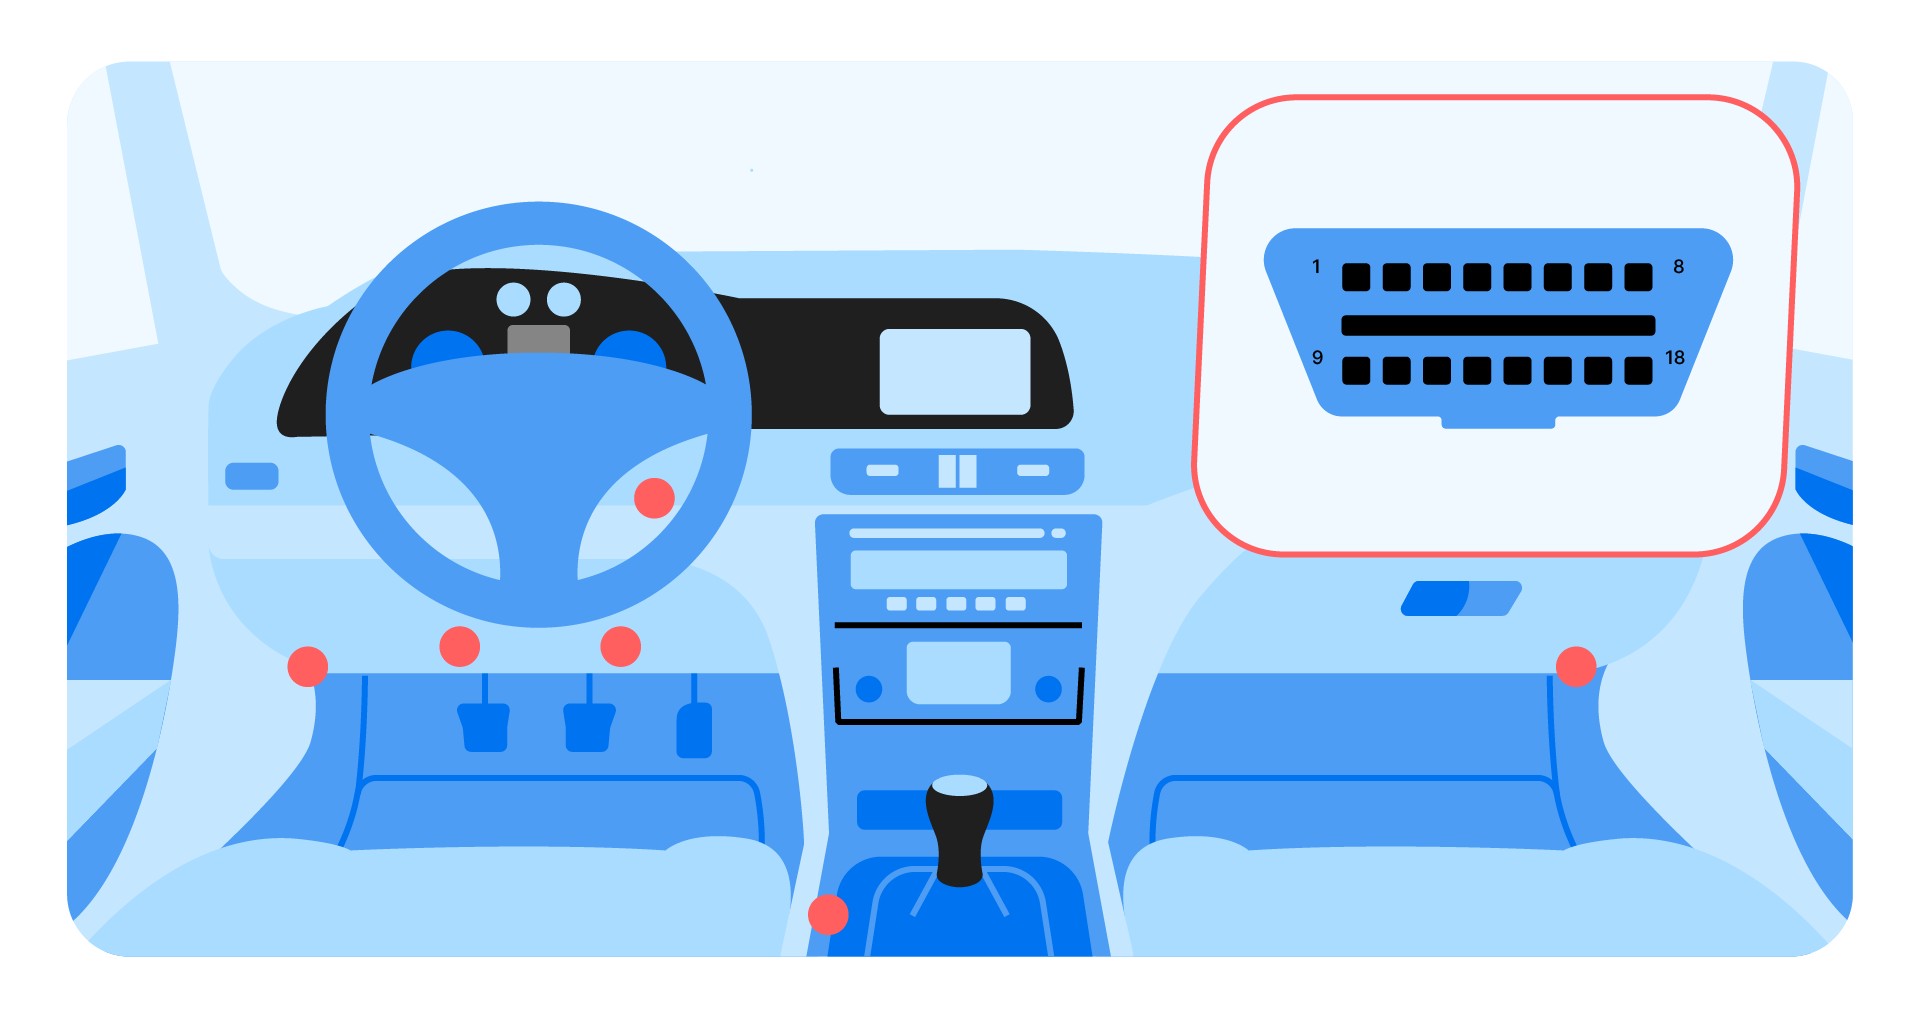 OBD2 scanner port location
Step 2: Connect the OBD2 Scanner
- Plug the scanner into the OBD2 port.
- Ensure it’s securely connected.
Step 3: Turn On the Ignition
- Turn the ignition to the “ON” position without starting the engine.
- This provides power to the car’s computer.
Step 4: Power On the Scanner
- The scanner will typically power on automatically once connected.
- If not, press the power button.
Step 5: Select Vehicle Information
- Enter the vehicle’s make, model, and year if prompted.
- Some scanners can automatically detect the VIN (Vehicle Identification Number).
Step 6: Read Diagnostic Trouble Codes (DTCs)
- Select the “Read Codes” or “Diagnostic Codes” option on the scanner’s menu.
- The scanner will display any stored DTCs.
Step 7: Record and Research the Codes
- Write down each code and its description.
- Use online resources or a repair manual to understand what each code means.
Step 8: View Live Data (Optional)
- Select the “Live Data” or “Data Stream” option to view real-time sensor readings.
- This can help diagnose intermittent issues or confirm the diagnosis based on the DTCs.
Step 9: Clear the Codes (Optional)
- After repairing the issue, select the “Clear Codes” option to reset the check engine light.
- Note that clearing codes without fixing the underlying problem will only result in the light coming back on.
Step 10: Verify the Repair
- After clearing the codes, drive the vehicle to see if the check engine light comes back on.
- If the light stays off, the repair was successful.
4. Interpreting OBD2 Fault Codes: A Comprehensive Guide
Interpreting OBD2 fault codes is essential for diagnosing vehicle issues accurately. According to a study by the American Automobile Association (AAA), understanding fault codes can reduce unnecessary repairs by up to 30%.
Understanding OBD2 Code Structure
OBD2 codes are structured in a specific format, typically consisting of five characters: one letter followed by four numbers.
- First Character (Letter):
- P: Powertrain (Engine, Transmission)
- B: Body (Airbags, Power Windows)
- C: Chassis (ABS, Suspension)
- U: Network (Communication Systems)
- Second Character (Number):
- 0: Generic (SAE) Code
- 1: Manufacturer-Specific Code
- Third Character (Number):
- Indicates the specific system or subsystem:
- 1: Fuel and Air Metering
- 2: Fuel and Air Metering (Injector Circuit)
- 3: Ignition System or Misfire
- 4: Auxiliary Emission Controls
- 5: Vehicle Speed Controls and Idle Control System
- 6: Computer Output Circuit
- 7: Transmission
- 8: Transmission
- Indicates the specific system or subsystem:
- Fourth and Fifth Characters (Numbers):
- Specify the particular fault within the identified system.
Common OBD2 Codes and Their Meanings
| Code | Description | Possible Causes |
|---|---|---|
| P0171 | System Too Lean (Bank 1) | Vacuum leak, faulty MAF sensor, fuel pump failure |
| P0300 | Random/Multiple Cylinder Misfire Detected | Faulty spark plugs, ignition coils, fuel injectors |
| P0420 | Catalyst System Efficiency Below Threshold (Bank 1) | Faulty catalytic converter, oxygen sensors |
| P0442 | Evaporative Emission Control System Leak Detected (Small Leak) | Loose or damaged fuel cap, cracked EVAP hoses |
| P0101 | Mass Air Flow (MAF) Sensor Circuit Range/Performance Problem | Dirty or faulty MAF sensor, intake air leaks |
| P0301 | Cylinder 1 Misfire Detected | Faulty spark plug, ignition coil, fuel injector |
| P0011 | “A” Camshaft Position – Timing Over-Advanced or System Performance | Faulty camshaft position sensor, oil control valve, timing chain issues |
| P0113 | Intake Air Temperature (IAT) Sensor Circuit High Input | Faulty IAT sensor, wiring issues |
| P0340 | Camshaft Position Sensor “A” Circuit (Bank 1 or Single Sensor) | Faulty camshaft position sensor, wiring issues, timing chain issues |
| P0401 | Exhaust Gas Recirculation (EGR) Flow Insufficient Detected | Clogged EGR valve, EGR passages, faulty EGR solenoid |
| P0135 | O2 Sensor Heater Circuit Malfunction (Bank 1, Sensor 1) | Faulty oxygen sensor, wiring issues |
| P0455 | Evaporative Emission Control System Leak Detected (Gross Leak) | Loose or damaged fuel cap, cracked EVAP hoses, faulty purge valve |
| P0505 | Idle Air Control System Malfunction | Faulty IAC valve, vacuum leaks, throttle body issues |
| P0118 | Engine Coolant Temperature Circuit High Input | Faulty coolant temperature sensor, wiring issues |
| P0304 | Cylinder 4 Misfire Detected | Faulty spark plug, ignition coil, fuel injector |
| P0430 | Catalyst System Efficiency Below Threshold (Bank 2) | Faulty catalytic converter, oxygen sensors |
| P0014 | “B” Camshaft Position – Timing Over-Advanced or System Performance | Faulty camshaft position sensor, oil control valve, timing chain issues |
| P0128 | Coolant Thermostat (Coolant Temperature Below Thermostat Regulating Temperature) | Faulty thermostat, coolant temperature sensor |
| P0446 | Evaporative Emission Control System Vent Control Circuit Malfunction | Faulty vent valve, wiring issues |
| P0325 | Knock Sensor 1 Circuit Malfunction (Bank 1 or Single Sensor) | Faulty knock sensor, wiring issues |
Using Freeze Frame Data
Freeze frame data captures the sensor values at the moment a fault code was triggered. This data can provide valuable insights into the conditions that caused the fault and help pinpoint the source of the problem.
Consulting Repair Manuals and Online Resources
Repair manuals, online forums, and technical databases can provide detailed information about specific fault codes, including possible causes, diagnostic procedures, and repair instructions.
When to Seek Professional Help
While OBD2 scanners can help identify many common vehicle issues, some problems require professional expertise and specialized equipment. It’s best to seek professional help if:
- You are unsure about the meaning of a fault code or how to diagnose the problem.
- You lack the necessary tools or skills to perform the repair.
- The problem is complex or involves critical systems such as the engine or transmission.
- You are concerned about safety or causing further damage to the vehicle.
5. Reading Live Data: Maximizing Your OBD2 Scanner’s Potential
Reading live data allows you to monitor your vehicle’s performance in real time, providing valuable insights for diagnosis and maintenance. According to a report by the National Automotive Service Task Force (NASTF), technicians who utilize live data analysis experience a 25% reduction in diagnostic time.
Accessing Live Data
- Connect the OBD2 scanner to the vehicle’s OBD2 port.
- Turn the ignition to the “ON” position without starting the engine.
- Navigate to the “Live Data” or “Data Stream” option on the scanner’s menu.
Interpreting Live Data Parameters
- Engine RPM (Revolutions Per Minute): Indicates the speed at which the engine’s crankshaft is rotating.
- Engine Load: Represents the percentage of the engine’s maximum potential output being used.
- Coolant Temperature: Indicates the temperature of the engine coolant.
- Intake Air Temperature (IAT): Indicates the temperature of the air entering the engine.
- Mass Air Flow (MAF): Measures the amount of air entering the engine.
- Oxygen Sensor Readings: Indicate the oxygen content in the exhaust gas.
- Fuel Trim: Represents the adjustments made by the engine control unit (ECU) to the fuel mixture.
- Ignition Timing Advance: Indicates the timing of the spark in relation to the piston’s position.
Common Live Data Parameters and Their Significance
| Parameter | Normal Range | Possible Issues |
|---|---|---|
| Engine RPM | Idle: 600-1000 RPM, Cruising: 1500-3000 RPM | High RPM at idle: Vacuum leak, faulty idle air control valve, Low RPM: Engine misfire, low compression |
| Engine Load | Idle: 20-30%, Cruising: 40-60% | High load at idle: Engine misfire, restricted exhaust, Low load: Vacuum leak, faulty sensor |
| Coolant Temperature | 195-220°F (90-104°C) | Overheating: Faulty thermostat, radiator issues, Low temperature: Faulty thermostat, coolant temperature sensor |
| Intake Air Temperature | Varies with ambient temperature | High IAT: Restricted airflow, faulty IAT sensor, Low IAT: Faulty IAT sensor |
| Mass Air Flow | Varies with engine size and RPM | Low MAF: Vacuum leak, restricted airflow, faulty MAF sensor, High MAF: Faulty MAF sensor |
| Oxygen Sensor Readings | Varies with engine operating conditions | Lean condition: Vacuum leak, faulty fuel injector, Rich condition: Faulty oxygen sensor, fuel pressure issues |
| Short-Term Fuel Trim (STFT) | -10% to +10% | High positive STFT: Vacuum leak, faulty fuel injector, High negative STFT: Fuel pressure issues, faulty O2 sensor |
| Long-Term Fuel Trim (LTFT) | -10% to +10% | High positive LTFT: Vacuum leak, faulty fuel injector, High negative LTFT: Fuel pressure issues, faulty O2 sensor |
| Ignition Timing Advance | Varies with engine operating conditions | Retarded timing: Engine knock, faulty knock sensor, Advanced timing: Overheating, engine damage |
Diagnosing Problems with Live Data
- Vacuum Leaks: Monitor fuel trim values. A high positive fuel trim indicates a lean condition caused by a vacuum leak.
- Misfires: Monitor engine RPM and misfire counters. A sudden drop in RPM or a high misfire count indicates a misfiring cylinder.
- Oxygen Sensor Issues: Monitor oxygen sensor readings. Slow or erratic readings indicate a faulty oxygen sensor.
- Catalytic Converter Problems: Monitor oxygen sensor readings before and after the catalytic converter. A significant difference in readings indicates a faulty catalytic converter.
6. Clearing OBD2 Fault Codes: When and How
Clearing OBD2 fault codes is a simple process, but it’s important to understand when and how to do it properly. According to a survey by Consumer Reports, approximately 20% of car owners mistakenly clear fault codes without addressing the underlying problem, leading to recurring issues.
When to Clear OBD2 Fault Codes
- After Repairing the Underlying Issue: Only clear the codes after you have diagnosed and repaired the problem that triggered the code.
- During Diagnostic Testing: Clearing codes can be useful during diagnostic testing to see if the code returns after performing a specific repair or test.
- When Replacing Parts: When replacing a faulty component, such as an oxygen sensor or a mass air flow sensor, it’s a good practice to clear the codes after the replacement.
How to Clear OBD2 Fault Codes
- Connect the OBD2 Scanner: Plug the scanner into the vehicle’s OBD2 port.
- Turn On the Ignition: Turn the ignition to the “ON” position without starting the engine.
- Navigate to the “Clear Codes” Option: Select the “Clear Codes” or “Erase Codes” option on the scanner’s menu.
- Confirm the Action: The scanner will typically ask you to confirm that you want to clear the codes. Select “Yes” or “OK”.
- Wait for Confirmation: The scanner will clear the codes and display a confirmation message.
- Verify the Codes are Cleared: After clearing the codes, you can re-scan the vehicle to verify that the codes have been cleared.
Potential Consequences of Clearing Codes Improperly
- Check Engine Light Returns: If you clear the codes without fixing the underlying problem, the check engine light will likely come back on.
- Loss of Diagnostic Information: Clearing the codes erases valuable diagnostic information that can help identify the problem.
- Emission Test Failure: Clearing the codes can reset the vehicle’s emission monitors, which may prevent the vehicle from passing an emission test until the monitors are reset.
Alternatives to Clearing Codes
- Allow the Code to Clear Automatically: Some codes will clear automatically after a certain number of drive cycles if the problem is resolved.
- Use a High-Quality Scanner: Invest in a high-quality scanner that provides accurate and reliable code clearing functionality.
7. Advanced OBD2 Scanner Functions for In-Depth Diagnostics
Advanced OBD2 scanners offer capabilities beyond basic code reading and live data, allowing for more thorough diagnostics. According to a study by the Automotive Management Institute (AMI), technicians who utilize advanced diagnostic functions can improve their diagnostic accuracy by up to 40%.
- Bi-Directional Control:
- Function: Allows the user to send commands to the vehicle’s computer to activate or deactivate certain components.
- Examples: Activating fuel injectors, turning on and off the cooling fan, cycling the ABS pump.
- Benefits: Helps verify the functionality of components and diagnose electrical issues.
- Coding and Programming:
- Function: Allows the user to reprogram the vehicle’s computer to adjust settings, update software, or install new components.
- Examples: Programming new keys, calibrating sensors, updating engine control unit (ECU) software.
- Benefits: Essential for replacing certain components and ensuring proper operation.
- Component Testing:
- Function: Allows the user to perform specific tests on individual components.
- Examples: Testing fuel injectors, oxygen sensors, EGR valves.
- Benefits: Helps verify the functionality of components and identify problems.
- Freeze Frame Data:
- Function: Captures the sensor values at the moment a fault code was triggered.
- Benefits: Provides valuable insights into the conditions that caused the fault.
- On-Board Monitoring:
- Function: Monitors the performance of various systems and components.
- Examples: Monitoring the oxygen sensor heater circuit, the catalytic converter efficiency, and the evaporative emission control system.
- Benefits: Helps identify potential problems before they trigger a fault code.
- OBD2 Scanner with Oscilloscope:
- Function: An oscilloscope is an electronic instrument that displays electrical signals as waveforms. When integrated into an OBD2 scanner, it allows technicians to visualize and analyze the signals from various sensors and components in the vehicle.
- Benefits: With an oscilloscope-equipped OBD2 scanner, technicians can diagnose issues with greater precision, leading to more accurate and effective repairs.
- OBD2 Scanner with Multimeter:
- Function: A multimeter is a versatile tool used to measure voltage, current, and resistance in electrical circuits. When combined with an OBD2 scanner, it enhances the diagnostic capabilities by providing a means to directly measure electrical parameters.
- Benefits: By integrating a multimeter into an OBD2 scanner, technicians gain a more comprehensive diagnostic tool that allows for both digital data analysis and direct electrical measurements.
- OBD2 Scanner with Smoke Machine:
- Function: A smoke machine is a device that generates smoke to detect leaks in sealed systems, such as the intake manifold, exhaust system, and evaporative emission control system. When used in conjunction with an OBD2 scanner, it can help pinpoint the location of leaks that may be causing engine performance issues or triggering diagnostic trouble codes.
- Benefits: By combining a smoke machine with an OBD2 scanner, technicians can efficiently diagnose and repair leaks in various vehicle systems, leading to improved engine performance and reduced emissions.
8. OBD2 Scanner Safety Precautions: What You Need to Know
Using an OBD2 scanner is generally safe, but it’s essential to follow certain precautions to avoid potential problems. According to a report by the National Highway Traffic Safety Administration (NHTSA), improper use of diagnostic tools can lead to vehicle damage or personal injury.
- Read the Manual: Always read and understand the scanner’s user manual before using it.
- Use the Correct Voltage: Ensure the scanner is compatible with the vehicle’s voltage.
- Avoid Using While Driving: Do not use the scanner while driving.
- Disconnect the Scanner When Not in Use: Disconnect the scanner when not in use to prevent battery drain.
- Protect the Scanner from Damage: Store the scanner in a safe place to prevent damage.
- Keep Away from Water: Keep the scanner away from water and other liquids.
- Do Not Modify the Scanner: Do not attempt to modify the scanner in any way.
- Use in a Well-Ventilated Area: Use the scanner in a well-ventilated area to avoid exposure to harmful fumes.
- Wear Safety Glasses: Wear safety glasses to protect your eyes from debris.
- Work on a Level Surface: Work on a level surface to prevent the vehicle from rolling.
- Use Wheel Chocks: Use wheel chocks to prevent the vehicle from rolling.
- Disconnect the Battery: Disconnect the battery before performing any electrical work.
- Follow Repair Manuals: Follow repair manuals and technical bulletins for specific repair procedures.
- Seek Professional Help: Seek professional help if you are unsure about any aspect of the repair.
9. OBD2 Scanner Maintenance and Storage: Keeping Your Tool in Top Condition
Proper maintenance and storage are essential for keeping your OBD2 scanner in top condition and ensuring its longevity. According to a survey by the Equipment Service Association (ESA), regular maintenance can extend the lifespan of diagnostic tools by up to 25%.
- Cleaning:
- Clean the scanner regularly with a soft, dry cloth.
- Avoid using harsh chemicals or solvents.
- Clean the OBD2 connector pins with a contact cleaner.
- Storage:
- Store the scanner in a clean, dry place.
- Protect the scanner from extreme temperatures and humidity.
- Store the scanner in its original case or a padded bag.
- Keep the scanner away from direct sunlight.
- Software Updates:
- Check for software updates regularly.
- Install the updates to ensure the scanner has the latest features and vehicle coverage.
- Battery Maintenance:
- If the scanner has a rechargeable battery, charge it regularly.
- Replace the battery when it no longer holds a charge.
- Cable Maintenance:
- Inspect the cable for damage regularly.
- Replace the cable if it is frayed or damaged.
- Avoid kinking or bending the cable excessively.
- Connector Maintenance:
- Inspect the OBD2 connector pins for damage regularly.
- Clean the connector pins with a contact cleaner.
- Calibration:
- Calibrate the scanner periodically to ensure accurate readings.
- Follow the manufacturer’s instructions for calibration.
10. OBD2 Scanner and Used Car Inspections: What to Look For
Using an OBD2 scanner is an essential step in inspecting a used car before making a purchase. According to a report by CARFAX, approximately 40% of used cars have hidden problems that can be detected with an OBD2 scan.
- Check for Diagnostic Trouble Codes (DTCs):
- Connect the OBD2 scanner to the vehicle’s OBD2 port.
- Turn the ignition to the “ON” position without starting the engine.
- Read the diagnostic trouble codes (DTCs) to identify any stored faults.
- Record the codes and research their meanings.
- Evaluate the Severity of the Codes:
- Determine the severity of the codes. Some codes may be minor and easily repairable, while others may indicate serious problems.
- Consider the cost of repairing the issues indicated by the codes.
- Check for Cleared Codes:
- Check if the codes have been recently cleared.
- A recently cleared code may indicate that the seller is trying to hide a problem.
- Verify the VIN (Vehicle Identification Number):
- Use the OBD2 scanner to verify the vehicle’s VIN.
- Compare the VIN to the VIN on the vehicle’s title and registration.
- Check for Mismatched Mileage:
- Use the OBD2 scanner to check the vehicle’s mileage.
- Compare the mileage to the mileage on the vehicle’s odometer.
- Inspect the Vehicle’s Condition:
- Inspect the vehicle’s exterior and interior for any signs of damage.
- Check the tires for wear and tear.
- Inspect the engine compartment for any leaks or damage.
- Test Drive the Vehicle:
- Test drive the vehicle to check for any unusual noises or vibrations.
- Pay attention to the engine’s performance and the transmission’s shifting.
- Get a Pre-Purchase Inspection:
- Consider getting a pre-purchase inspection from a qualified mechanic.
- The mechanic can perform a more thorough inspection of the vehicle and identify any potential problems.
For all your automotive tool and diagnostic needs, trust CAR-TOOL.EDU.VN. We offer a wide range of high-quality OBD2 scanners and diagnostic tools to help you keep your vehicle running smoothly.
Don’t let vehicle issues slow you down. Contact us today via Whatsapp at +1 (641) 206-8880 or visit our location at 456 Elm Street, Dallas, TX 75201, United States. Let CAR-TOOL.EDU.VN be your partner in automotive maintenance and repair.