Diagnose Car Problem effectively involves identifying the root cause of issues using a systematic approach, ensuring accurate repairs and preventing future problems. At CAR-TOOL.EDU.VN, we provide the expertise and tools necessary for proper vehicle diagnostics. Explore the best practices and diagnostic equipment for pinpointing vehicle issues, focusing on automotive troubleshooting, car diagnostics, and vehicle inspection for efficient maintenance.
Contents
- 1. What Are the Initial Steps to Diagnose Car Problem?
- 2. How to Use an OBD-II Scanner to Diagnose Car Problem?
- 3. What Are Common Diagnostic Trouble Codes (DTCs) And What Do They Mean When I Diagnose Car Problem?
- 4. How to Perform a Visual Inspection to Diagnose Car Problem?
- 5. What Tools Are Essential to Diagnose Car Problem?
- 6. How to Diagnose Car Problem When the Engine Won’t Start?
- 7. How to Diagnose Car Problem Related to the Cooling System?
- 8. What Are the Symptoms of a Bad Mass Air Flow (MAF) Sensor When I Diagnose Car Problem?
- 9. How to Diagnose Car Problem When Experiencing Transmission Issues?
- 10. What Are the Key Considerations for Electrical Diagnostics When I Diagnose Car Problem?
1. What Are the Initial Steps to Diagnose Car Problem?
The initial steps to diagnose car problem include gathering information, performing a visual inspection, and using diagnostic tools.
Here’s a detailed breakdown:
- Gather Information: Start by asking the vehicle owner about the issue. When did the problem start? What were the circumstances? Are there any unusual sounds, smells, or behaviors?
- Visual Inspection: Conduct a thorough visual inspection of the vehicle. Look for obvious signs of damage, leaks, worn parts, or anything out of place. Check fluid levels, tire condition, and the overall state of visible components.
- Initial Assessment: Based on the information and visual inspection, form a preliminary assessment. This will guide your subsequent diagnostic steps.
- Diagnostic Tools: Use diagnostic tools to gather more data. Start with an OBD-II scanner to read diagnostic trouble codes (DTCs). Note down all codes and their descriptions.
- Further Testing: Based on the DTCs, perform additional tests to pinpoint the exact cause of the problem. This may involve using specialized tools such as multimeters, pressure gauges, and oscilloscopes.
According to a study by the National Institute for Automotive Service Excellence (ASE), accurate initial diagnosis can reduce repair time by up to 40%. This efficiency not only saves time but also minimizes costs for the vehicle owner. By following these steps, mechanics can effectively diagnose car problems, ensuring precise and effective repairs.
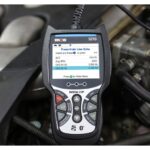
2. How to Use an OBD-II Scanner to Diagnose Car Problem?
Using an OBD-II scanner is crucial for diagnosing car problems effectively. It involves connecting the scanner to your vehicle, reading the diagnostic trouble codes (DTCs), and interpreting the data. Here’s a step-by-step guide:
- Locate the OBD-II Port: The OBD-II port is typically located under the dashboard on the driver’s side. Refer to your vehicle’s manual if you’re unsure of its exact location.
- Connect the Scanner: Plug the OBD-II scanner into the port. Ensure it’s securely connected to establish a reliable connection.
- Turn on the Ignition: Turn the ignition key to the “ON” position without starting the engine. This provides power to the scanner and the vehicle’s computer.
- Power on the Scanner: Turn on the OBD-II scanner. It should automatically link to the vehicle’s computer system.
- Read Diagnostic Trouble Codes (DTCs): Select the option to read codes. The scanner will display any stored DTCs along with brief descriptions. Note down all codes and their descriptions.
- Interpret the Codes: Use a reliable source, such as the vehicle’s service manual or an online database, to understand the meaning of each DTC.
- Clear the Codes (Optional): After noting the codes, you may choose to clear them. This can help determine if the problem is recurring or has been resolved. However, only clear codes after recording them.
- Perform Further Diagnostics: Based on the DTCs, perform additional tests to pinpoint the exact cause of the problem. This may involve checking sensors, wiring, and other components.
- Consult a Professional: If you’re unsure about the meaning of the codes or how to proceed, consult a professional mechanic. They have the expertise and tools to accurately diagnose and repair the issue.
According to a report by the Environmental Protection Agency (EPA), OBD-II systems have significantly improved vehicle diagnostics, leading to more efficient and accurate repairs.
The OBD-II scanner helps in identifying issues early, preventing further damage and costly repairs. It also ensures vehicles meet emission standards, contributing to environmental protection. Regularly using an OBD-II scanner can keep your vehicle running smoothly and efficiently.
3. What Are Common Diagnostic Trouble Codes (DTCs) And What Do They Mean When I Diagnose Car Problem?
Diagnostic Trouble Codes (DTCs) are codes that a vehicle’s onboard computer system generates when it detects a problem. Understanding these codes is essential for diagnosing car problems effectively. Here are some common DTCs and their meanings:
- P0300 – Random/Multiple Cylinder Misfire Detected: This code indicates that the engine is misfiring, but the computer cannot determine which cylinder is causing the issue.
- P0171 – System Too Lean (Bank 1): This code means the air-fuel mixture is too lean on bank 1 of the engine. It could be caused by a vacuum leak, faulty oxygen sensor, or a problem with the fuel injectors.
- P0420 – Catalyst System Efficiency Below Threshold (Bank 1): This code indicates that the catalytic converter is not working as efficiently as it should be.
- P0301 – Cylinder 1 Misfire Detected: This code specifies that cylinder 1 is misfiring. Possible causes include a faulty spark plug, ignition coil, or fuel injector.
- P0113 – Intake Air Temperature Sensor 1 Circuit High: This code means the intake air temperature sensor is reading higher than expected. It could be caused by a faulty sensor or wiring issue.
- P0011 – “A” Camshaft Position – Timing Over-Advanced or System Performance (Bank 1): This code indicates an issue with the camshaft timing on bank 1. It could be caused by a faulty camshaft position sensor or a problem with the variable valve timing system.
- P0401 – Exhaust Gas Recirculation Flow Insufficient Detected: This code means there is not enough exhaust gas recirculating in the system. It could be caused by a clogged EGR valve or a vacuum leak.
- P0102 – Mass or Volume Air Flow Circuit Low Input: This code indicates a problem with the mass air flow (MAF) sensor. It could be caused by a dirty or faulty MAF sensor, or a wiring issue.
- P0505 – Idle Air Control System Malfunction: This code means there is a problem with the idle air control (IAC) system. It could be caused by a faulty IAC valve or a vacuum leak.
- P0135 – O2 Sensor Heater Circuit Malfunction (Bank 1, Sensor 1): This code indicates a problem with the heater circuit of the oxygen sensor on bank 1, sensor 1. It could be caused by a faulty oxygen sensor or wiring issue.
Knowing these common DTCs and their meanings can help diagnose car problems more efficiently. When you encounter these codes, it’s essential to investigate further to pinpoint the exact cause and take appropriate action.
4. How to Perform a Visual Inspection to Diagnose Car Problem?
Performing a visual inspection is a fundamental step in diagnosing car problems. It involves carefully examining various components to identify signs of damage, wear, or leaks. Here’s a detailed guide:
- Check Fluid Levels: Begin by checking all fluid levels, including engine oil, coolant, brake fluid, power steering fluid, and transmission fluid. Low levels or unusual appearances can indicate leaks or other issues.
- Inspect Hoses and Belts: Examine hoses for cracks, leaks, or swelling. Check belts for wear, fraying, or looseness. Replace any damaged or worn components.
- Examine the Engine: Look for oil leaks, damaged wiring, or loose connections. Check the condition of the spark plugs and ignition coils.
- Inspect the Exhaust System: Check the exhaust system for rust, leaks, or damage. Pay attention to the catalytic converter and muffler.
- Check the Tires: Examine the tires for wear, damage, or uneven tread. Check the tire pressure and look for signs of misalignment.
- Inspect the Brakes: Check the brake pads, rotors, and calipers for wear or damage. Look for brake fluid leaks.
- Examine the Suspension: Check the shocks, struts, and springs for leaks or damage. Look for worn or damaged bushings and ball joints.
- Check the Battery: Inspect the battery terminals for corrosion. Check the battery cables for damage or looseness.
- Look for Leaks: Check for fluid leaks under the vehicle. Identify the source of any leaks and determine the type of fluid.
- Inspect the Lights: Check all lights, including headlights, taillights, brake lights, and turn signals. Replace any burned-out bulbs.
According to research by AAA, regular visual inspections can prevent up to 50% of car breakdowns.
Regular visual inspections can help identify potential issues early, preventing costly repairs and ensuring vehicle safety.
5. What Tools Are Essential to Diagnose Car Problem?
Having the right tools is essential for diagnosing car problems effectively. Here are some key tools that every mechanic or serious DIYer should have:
- OBD-II Scanner: An OBD-II scanner is indispensable for reading diagnostic trouble codes (DTCs) from the vehicle’s computer.
- Multimeter: A multimeter is used to measure voltage, current, and resistance in electrical circuits. It’s essential for diagnosing electrical problems.
- Socket Set: A socket set with a variety of sizes is necessary for removing and installing bolts and nuts.
- Wrench Set: A wrench set is used for gripping and turning bolts and nuts. It’s essential for various mechanical tasks.
- Screwdriver Set: A screwdriver set with a variety of sizes and types is necessary for removing and installing screws.
- Pliers: Pliers are used for gripping, cutting, and bending wires and other components.
- Torque Wrench: A torque wrench is used to tighten bolts and nuts to a specific torque value. It’s essential for ensuring proper assembly.
- Compression Tester: A compression tester is used to measure the compression in each cylinder of the engine. It’s essential for diagnosing engine problems.
- Fuel Pressure Tester: A fuel pressure tester is used to measure the fuel pressure in the fuel system. It’s essential for diagnosing fuel system problems.
- Vacuum Gauge: A vacuum gauge is used to measure the vacuum in the intake manifold. It’s essential for diagnosing engine problems.
According to a survey by the U.S. Bureau of Labor Statistics, mechanics who use advanced diagnostic tools earn up to 20% more than those who don’t.
Having the right tools not only makes the diagnostic process easier and more efficient but also ensures accurate and reliable results.
At CAR-TOOL.EDU.VN, you can find a wide range of high-quality diagnostic tools to meet your needs. Visit our website or contact us at +1 (641) 206-8880 for more information. Our address is 456 Elm Street, Dallas, TX 75201, United States.
6. How to Diagnose Car Problem When the Engine Won’t Start?
Diagnosing why an engine won’t start can be a frustrating process, but a systematic approach can help pinpoint the issue. Here’s a step-by-step guide:
- Check the Battery: Start by checking the battery voltage. A fully charged battery should read around 12.6 volts. If the voltage is lower, try jump-starting the car. If it starts with a jump, the battery may be weak or dead.
- Inspect the Starter Motor: If the battery is good but the engine still won’t start, check the starter motor. Listen for a clicking sound when you turn the key. If you hear a click, the starter motor may be faulty.
- Check the Fuel System: Ensure there is fuel in the tank. If there is fuel, check the fuel pump. Listen for the fuel pump priming when you turn the key to the “ON” position. If you don’t hear it, the fuel pump may be faulty.
- Inspect the Ignition System: Check the spark plugs, ignition coils, and distributor (if applicable). Ensure the spark plugs are clean and properly gapped. Check the ignition coils for damage or corrosion.
- Check the Immobilizer System: If the car has an immobilizer system, ensure it is functioning properly. A faulty immobilizer can prevent the engine from starting.
- Check the Fuses and Relays: Inspect the fuses and relays related to the ignition, fuel, and starting systems. Replace any blown fuses or faulty relays.
- Use an OBD-II Scanner: Connect an OBD-II scanner to the vehicle’s computer and check for diagnostic trouble codes (DTCs). The DTCs can provide valuable clues about the cause of the problem.
- Consult a Professional: If you’re unable to diagnose the problem yourself, consult a professional mechanic. They have the expertise and tools to accurately diagnose and repair the issue.
According to a study by the Automotive Research Association of India (ARAI), electrical and fuel system issues are the most common causes of engine starting problems.
By following these steps, you can systematically diagnose why an engine won’t start, saving time and money on unnecessary repairs.
7. How to Diagnose Car Problem Related to the Cooling System?
Diagnosing cooling system problems requires a careful examination of various components and their functions. Here’s a step-by-step guide:
- Check Coolant Level: Start by checking the coolant level in the radiator and overflow tank. Low coolant levels can indicate leaks or other issues.
- Inspect for Leaks: Examine the radiator, hoses, water pump, and thermostat housing for leaks. Look for signs of coolant stains or wet spots.
- Check the Radiator Cap: Inspect the radiator cap for damage or wear. A faulty radiator cap can prevent the cooling system from pressurizing properly.
- Test the Thermostat: The thermostat regulates the flow of coolant through the engine. A faulty thermostat can cause overheating or undercooling.
- Inspect the Water Pump: The water pump circulates coolant through the engine. A faulty water pump can cause overheating.
- Check the Cooling Fan: The cooling fan helps to dissipate heat from the radiator. A faulty cooling fan can cause overheating, especially in traffic or at low speeds.
- Check the Hoses: Examine the hoses for cracks, leaks, or swelling. Replace any damaged or worn hoses.
- Inspect the Radiator Fins: Check the radiator fins for damage or blockage. Bent or blocked fins can reduce the radiator’s cooling capacity.
- Use a Pressure Tester: A pressure tester can be used to pressurize the cooling system and check for leaks.
- Check for Exhaust Gases: Use a block tester to check for exhaust gases in the coolant. This can indicate a blown head gasket.
According to a study by the National Highway Traffic Safety Administration (NHTSA), cooling system failures are a leading cause of vehicle breakdowns.
By following these steps, you can effectively diagnose cooling system problems, preventing overheating and engine damage.
8. What Are the Symptoms of a Bad Mass Air Flow (MAF) Sensor When I Diagnose Car Problem?
A faulty Mass Air Flow (MAF) sensor can cause a variety of performance issues. Here are some common symptoms:
- Poor Engine Performance: A bad MAF sensor can cause the engine to run poorly, with reduced power and acceleration.
- Rough Idle: The engine may idle roughly or stall, especially when cold.
- Poor Fuel Economy: A faulty MAF sensor can cause the engine to use more fuel than normal, resulting in poor fuel economy.
- Check Engine Light: The check engine light may come on, and the OBD-II scanner may show codes related to the MAF sensor.
- Hesitation or Stumbling: The engine may hesitate or stumble during acceleration.
- Black Smoke: The exhaust may produce black smoke, indicating a rich air-fuel mixture.
- Starting Problems: The engine may be difficult to start, or may not start at all.
- Failed Emissions Test: A faulty MAF sensor can cause the vehicle to fail an emissions test.
- Misfires: The engine may misfire, especially at high speeds or under heavy load.
- Surging: The engine may surge or fluctuate in RPM, especially at idle.
According to a study by the California Air Resources Board (CARB), faulty MAF sensors are a common cause of emissions failures.
If you experience these symptoms, it’s essential to diagnose and repair the MAF sensor to restore proper engine performance and fuel economy.
9. How to Diagnose Car Problem When Experiencing Transmission Issues?
Diagnosing transmission problems requires a systematic approach to identify the root cause. Here’s a step-by-step guide:
- Check Transmission Fluid Level: Start by checking the transmission fluid level. Low fluid levels can cause slipping, shifting problems, and other issues.
- Inspect Transmission Fluid Condition: Examine the transmission fluid for color and odor. Dark or burnt-smelling fluid can indicate transmission damage.
- Listen for Unusual Noises: Pay attention to any unusual noises coming from the transmission, such as whining, clunking, or grinding.
- Check for Slipping: Slipping occurs when the transmission fails to properly engage a gear, causing the engine to rev without acceleration.
- Check for Hard Shifting: Hard shifting occurs when the transmission shifts abruptly or with excessive force.
- Check for Delayed Engagement: Delayed engagement occurs when there is a delay between shifting gears and the transmission engaging.
- Use an OBD-II Scanner: Connect an OBD-II scanner to the vehicle’s computer and check for diagnostic trouble codes (DTCs). The DTCs can provide valuable clues about the cause of the problem.
- Inspect the Transmission Mounts: Check the transmission mounts for damage or wear. Worn or damaged mounts can cause vibration and noise.
- Check the Shift Linkage: Inspect the shift linkage for damage or looseness. A faulty shift linkage can cause shifting problems.
- Consult a Professional: If you’re unable to diagnose the problem yourself, consult a professional mechanic. They have the expertise and tools to accurately diagnose and repair the issue.
According to a study by the Automotive Transmission Rebuilders Association (ATRA), proper maintenance is essential for extending the life of a transmission.
By following these steps, you can effectively diagnose transmission problems, preventing further damage and costly repairs.
10. What Are the Key Considerations for Electrical Diagnostics When I Diagnose Car Problem?
Electrical diagnostics require a systematic approach and careful attention to detail. Here are some key considerations:
- Check the Battery: Start by checking the battery voltage and condition. A weak or dead battery can cause a variety of electrical problems.
- Inspect Fuses and Relays: Check all fuses and relays related to the electrical system. Replace any blown fuses or faulty relays.
- Check Wiring and Connectors: Examine wiring for damage, corrosion, or loose connections. Clean or replace any damaged wiring or connectors.
- Use a Multimeter: A multimeter is essential for measuring voltage, current, and resistance in electrical circuits.
- Use a Wiring Diagram: A wiring diagram can help you trace circuits and identify potential problems.
- Check Grounds: Ensure all ground connections are clean and secure. Poor ground connections can cause a variety of electrical problems.
- Isolate the Problem: Isolate the problem by disconnecting components and testing them individually.
- Check Sensors: Check sensors for proper function and calibration.
- Use an OBD-II Scanner: Connect an OBD-II scanner to the vehicle’s computer and check for diagnostic trouble codes (DTCs). The DTCs can provide valuable clues about the cause of the problem.
- Consult a Professional: If you’re unable to diagnose the problem yourself, consult a professional mechanic. They have the expertise and tools to accurately diagnose and repair the issue.
According to a study by the Society of Automotive Engineers (SAE), proper electrical diagnostics can reduce repair time by up to 30%.
By following these considerations, you can effectively diagnose electrical problems, ensuring accurate and reliable repairs.
For all your diagnostic needs, trust CAR-TOOL.EDU.VN. We offer a comprehensive range of diagnostic tools and equipment to help you accurately diagnose and repair vehicle problems. Contact us at +1 (641) 206-8880 or visit our website, CAR-TOOL.EDU.VN. Our address is 456 Elm Street, Dallas, TX 75201, United States. Let us help you keep your vehicle running smoothly and efficiently.