Where Do You Plug In A Car Diagnostic Tool? The On-Board Diagnostics II (OBD2) port is where you connect a car diagnostic tool, and this port is generally located under the driver’s side dashboard. With CAR-TOOL.EDU.VN, understanding the purpose, location, and proper usage of the OBD2 port and diagnostic tools will help you interpret diagnostic trouble codes (DTCs), monitor live data, and perform necessary repairs efficiently using code readers and scan tools.
Contents
- 1. Understanding the OBD2 Port and Its Significance
- 1.1. Historical Context of OBD Systems
- 1.2. Functions of the OBD2 Port
- 1.3. Benefits of Using an OBD2 Scanner
- 2. Locating the OBD2 Port in Your Vehicle
- 2.1. Common Locations
- 2.2. Identifying the OBD2 Port
- 2.3. Using Your Vehicle’s Manual
- 3. Types of Car Diagnostic Tools
- 3.1. Basic Code Readers
- 3.2. Advanced Scan Tools
- 3.3. Smartphone-Based OBD2 Scanners
- 3.4. Professional-Grade Diagnostic Equipment
- 4. Step-by-Step Guide to Connecting a Car Diagnostic Tool
- 4.1. Preparation
- 4.2. Connecting the Scanner
- 4.3. Navigating the Scanner Menu
- 5. Interpreting Diagnostic Trouble Codes (DTCs)
- 5.1. Understanding the DTC Structure
- 5.2. Common DTC Examples
- 5.3. Using Online Resources
- 6. Monitoring Live Data
- 6.1. Accessing Live Data
- 6.2. Interpreting Live Data
- 6.3. Identifying Abnormal Readings
- 7. Performing System Tests
- 7.1. Available System Tests
- 7.2. Conducting System Tests
- 7.3. Interpreting Test Results
- 8. Clearing Diagnostic Trouble Codes (DTCs)
- 8.1. Clearing Codes Procedure
- 8.2. When to Clear Codes
- 8.3. Potential Issues with Clearing Codes
- 9. Common Mistakes to Avoid When Using a Car Diagnostic Tool
- 9.1. Ignoring the Vehicle’s Manual
- 9.2. Misinterpreting DTCs
- 9.3. Replacing Parts Without Proper Diagnosis
- 9.4. Neglecting Basic Maintenance
- 9.5. Using Incompatible Tools
- 10. The Future of Car Diagnostic Tools
- 10.1. Wireless Connectivity
- 10.2. Cloud-Based Diagnostics
- 10.3. Artificial Intelligence (AI)
- 10.4. Integration with Telematics
- 11. Choosing the Right Car Diagnostic Tool
- 11.1. Assess Your Needs
- 11.2. Consider Your Budget
- 11.3. Read Reviews and Compare Features
- 11.4. Check Compatibility
- 11.5. Evaluate Ease of Use
- 12. Where to Purchase Car Diagnostic Tools
- 12.1. Online Retailers
- 12.2. Physical Stores
- 13. Maintenance and Care of Your Car Diagnostic Tool
- 13.1. Keep the Tool Clean
- 13.2. Store the Tool Properly
- 13.3. Protect the Connector
- 13.4. Update the Software
- 13.5. Replace Batteries as Needed
- 14. Legal and Ethical Considerations
- 14.1. Privacy
- 14.2. Security
- 14.3. Compliance
- 14.4. Transparency
- 14.5. Professionalism
- 15. Advanced Diagnostic Techniques
- 15.1. Waveform Analysis
- 15.2. Circuit Testing
- 15.3. Module Programming
- 15.4. Network Diagnostics
- 15.5. Custom Parameter Identification (PID)
- 16. Frequently Asked Questions (FAQs)
- 16.1. What is an OBD2 port?
- 16.2. Where is the OBD2 port located?
- 16.3. Can I use any OBD2 scanner on my car?
- 16.4. Do I need to turn on the engine to use an OBD2 scanner?
- 16.5. What do I do if the OBD2 scanner doesn’t power on?
- 16.6. How do I interpret diagnostic trouble codes (DTCs)?
- 16.7. Can I clear DTCs with an OBD2 scanner?
- 16.8. Will clearing DTCs fix the problem?
- 16.9. What is live data?
- 16.10. Can I perform system tests with a basic code reader?
1. Understanding the OBD2 Port and Its Significance
The OBD2 port, standardized in the mid-1990s, serves as a universal interface for accessing a vehicle’s computer system. This port allows mechanics and vehicle owners to retrieve diagnostic information, monitor performance data, and troubleshoot issues. According to the Environmental Protection Agency (EPA), all cars and light trucks manufactured since 1996 in the United States are required to have an OBD2 system.
1.1. Historical Context of OBD Systems
Before the OBD2 standardization, manufacturers used various proprietary diagnostic systems, making it difficult to diagnose and repair vehicles across different brands. The introduction of OBD2 provided a standardized interface, leading to more efficient and accurate diagnostics.
1.2. Functions of the OBD2 Port
The OBD2 port enables several critical functions:
- Reading Diagnostic Trouble Codes (DTCs): These codes indicate specific problems within the vehicle’s systems.
- Monitoring Live Data: Real-time data from sensors can be observed to assess engine performance and identify anomalies.
- Performing System Tests: Some advanced scan tools can perform specific tests on components like oxygen sensors or fuel injectors.
- Clearing Diagnostic Codes: After repairs, codes can be cleared to reset the vehicle’s computer.
1.3. Benefits of Using an OBD2 Scanner
Using an OBD2 scanner offers numerous benefits:
- Cost Savings: Identifying issues early can prevent costly repairs.
- Informed Maintenance: Understanding your vehicle’s condition allows for proactive maintenance.
- DIY Repairs: Simple repairs can be performed at home, saving on labor costs.
- Emissions Readiness: Verify if your vehicle is ready for emissions testing.
2. Locating the OBD2 Port in Your Vehicle
The OBD2 port is typically located under the driver’s side dashboard. However, its exact position can vary depending on the vehicle’s make and model.
2.1. Common Locations
- Under the Dashboard: This is the most common location, usually near the steering column.
- Near the Center Console: Some vehicles may have the port located in the center console area.
- Behind a Panel: In rare cases, the port may be hidden behind a small panel that needs to be removed.
2.2. Identifying the OBD2 Port
The OBD2 port is a 16-pin, trapezoid-shaped connector. It’s usually black or grey and clearly stands out from other connectors.
2.3. Using Your Vehicle’s Manual
If you’re having trouble locating the OBD2 port, consult your vehicle’s owner’s manual. The manual should provide a diagram or description of its exact location.
3. Types of Car Diagnostic Tools
There are several types of car diagnostic tools available, each with different capabilities and price points.
3.1. Basic Code Readers
- Functionality: These tools can read and clear basic diagnostic trouble codes (DTCs).
- Pros: Affordable, easy to use, and suitable for basic diagnostics.
- Cons: Limited functionality compared to advanced scan tools.
3.2. Advanced Scan Tools
- Functionality: In addition to reading and clearing codes, these tools can monitor live data, perform system tests, and offer more detailed diagnostics.
- Pros: Comprehensive diagnostics, real-time data monitoring, and advanced testing capabilities.
- Cons: More expensive and may require some technical knowledge to use effectively.
3.3. Smartphone-Based OBD2 Scanners
- Functionality: These scanners connect to your smartphone via Bluetooth or Wi-Fi and use a mobile app to provide diagnostic information.
- Pros: Convenient, portable, and often come with user-friendly interfaces.
- Cons: May require a subscription for full functionality and rely on the smartphone’s processing power.
3.4. Professional-Grade Diagnostic Equipment
- Functionality: Used by professional mechanics, these tools offer the most comprehensive diagnostic capabilities, including advanced programming and module reprogramming.
- Pros: Extensive functionality, accurate diagnostics, and essential for complex repairs.
- Cons: Very expensive and require specialized training to use.
4. Step-by-Step Guide to Connecting a Car Diagnostic Tool
Connecting a car diagnostic tool is a straightforward process. Follow these steps to ensure a successful connection:
4.1. Preparation
- Turn Off the Ignition: Ensure the vehicle’s ignition is turned off before connecting the scanner.
- Locate the OBD2 Port: Find the OBD2 port under the dashboard on the driver’s side.
- Prepare the Scanner: Ensure your scanner is powered on or has fresh batteries.
4.2. Connecting the Scanner
- Align the Connector: Align the connector of the scan tool with the OBD2 port. The connector is trapezoid-shaped and only fits one way.
- Insert the Connector: Gently but firmly push the connector into the OBD2 port. You may feel a slight click when it’s fully seated.
- Power On the Scanner: If the scanner doesn’t power on automatically, turn the ignition to the “ON” position without starting the engine. This provides power to the OBD2 port.
4.3. Navigating the Scanner Menu
- Wait for Initialization: Allow the scanner to initialize and connect to the vehicle’s computer. This may take a few seconds.
- Select the Appropriate Function: Use the scanner’s menu to select the desired function, such as “Read Codes,” “Live Data,” or “System Tests.”
- Follow On-Screen Instructions: Follow the on-screen instructions to perform the selected function.
5. Interpreting Diagnostic Trouble Codes (DTCs)
Diagnostic Trouble Codes (DTCs) are codes stored by the vehicle’s computer to indicate specific problems. Understanding these codes is essential for diagnosing and repairing issues.
5.1. Understanding the DTC Structure
DTCs are five-character codes consisting of a letter followed by four numbers. Each character provides specific information about the fault.
-
First Character (Letter): Indicates the system where the fault occurred.
- P: Powertrain (engine, transmission, fuel system)
- B: Body (airbags, interior systems)
- C: Chassis (brakes, suspension)
- U: Network (communication systems)
-
Second Character (Number): Indicates whether the code is generic or manufacturer-specific.
- 0: Generic (applies to all manufacturers)
- 1: Manufacturer-specific
-
Third Character (Number): Indicates the specific subsystem.
-
Fourth and Fifth Characters (Numbers): Provide further details about the fault.
5.2. Common DTC Examples
- P0300: Random/Multiple Cylinder Misfire Detected. This code indicates that the engine is misfiring in multiple cylinders.
- P0171: System Too Lean (Bank 1). This code indicates that the air-fuel mixture in bank 1 is too lean.
- P0420: Catalyst System Efficiency Below Threshold (Bank 1). This code indicates that the catalytic converter in bank 1 is not functioning efficiently.
5.3. Using Online Resources
Numerous online resources can help you interpret DTCs. Websites like OBD-Codes.com and the AutoZone Repair Guide provide detailed information about specific codes and their potential causes.
6. Monitoring Live Data
Monitoring live data allows you to observe real-time sensor readings, helping you diagnose intermittent issues and assess overall engine performance.
6.1. Accessing Live Data
- Connect the Scanner: Connect the scan tool to the OBD2 port.
- Select “Live Data”: Navigate to the “Live Data” option in the scanner menu.
- Choose Parameters: Select the parameters you want to monitor, such as engine RPM, coolant temperature, oxygen sensor voltage, and fuel trim.
6.2. Interpreting Live Data
- Engine RPM: Should be stable at idle and increase smoothly with acceleration.
- Coolant Temperature: Should rise to the normal operating range after the engine warms up.
- Oxygen Sensor Voltage: Should fluctuate between 0.1 and 0.9 volts, indicating proper oxygen sensor function.
- Fuel Trim: Should be close to 0%, indicating a balanced air-fuel mixture.
6.3. Identifying Abnormal Readings
Abnormal readings can indicate specific problems. For example, a consistently high coolant temperature may indicate a cooling system issue, while a stuck oxygen sensor voltage may indicate a faulty sensor.
7. Performing System Tests
Advanced scan tools can perform system tests to evaluate the functionality of specific components.
7.1. Available System Tests
- Oxygen Sensor Test: Evaluates the response time and voltage range of oxygen sensors.
- Fuel Injector Test: Checks the performance and flow rate of fuel injectors.
- EGR Valve Test: Verifies the functionality of the Exhaust Gas Recirculation (EGR) valve.
- EVAP System Test: Checks for leaks in the Evaporative Emission Control (EVAP) system.
7.2. Conducting System Tests
- Connect the Scanner: Connect the scan tool to the OBD2 port.
- Select “System Tests”: Navigate to the “System Tests” option in the scanner menu.
- Choose the Test: Select the specific test you want to perform.
- Follow On-Screen Instructions: Follow the on-screen instructions to conduct the test.
7.3. Interpreting Test Results
The scanner will provide test results, indicating whether the component passed or failed the test. Use these results to guide your diagnostic and repair efforts.
8. Clearing Diagnostic Trouble Codes (DTCs)
After performing repairs, it’s essential to clear the DTCs to reset the vehicle’s computer.
8.1. Clearing Codes Procedure
- Connect the Scanner: Connect the scan tool to the OBD2 port.
- Select “Erase Codes”: Navigate to the “Erase Codes” option in the scanner menu.
- Confirm the Action: Confirm that you want to erase the codes.
- Verify Completion: Verify that the codes have been successfully cleared.
8.2. When to Clear Codes
- After Repairs: Always clear codes after completing repairs to ensure the check engine light is off.
- After Inspections: Clear codes after performing diagnostic inspections to reset the system.
8.3. Potential Issues with Clearing Codes
- Recurring Codes: If a code reappears shortly after being cleared, it indicates that the underlying issue has not been resolved.
- Readiness Monitors: Clearing codes can reset readiness monitors, which may prevent your vehicle from passing an emissions test until the monitors are reset.
9. Common Mistakes to Avoid When Using a Car Diagnostic Tool
Using a car diagnostic tool correctly is crucial to prevent misdiagnosis and potential damage. Here are some common mistakes to avoid:
9.1. Ignoring the Vehicle’s Manual
Always consult the vehicle’s owner’s manual for specific instructions and recommendations.
9.2. Misinterpreting DTCs
Ensure you thoroughly research and understand the meaning of each DTC before attempting repairs.
9.3. Replacing Parts Without Proper Diagnosis
Avoid replacing parts based solely on a DTC. Perform additional tests to confirm the diagnosis.
9.4. Neglecting Basic Maintenance
Ensure your vehicle is properly maintained, as many issues can be prevented with regular servicing.
9.5. Using Incompatible Tools
Use diagnostic tools that are compatible with your vehicle’s make and model to ensure accurate results.
10. The Future of Car Diagnostic Tools
The future of car diagnostic tools is evolving rapidly with advancements in technology.
10.1. Wireless Connectivity
More tools are incorporating wireless connectivity via Bluetooth or Wi-Fi, allowing for easier data transfer and remote diagnostics.
10.2. Cloud-Based Diagnostics
Cloud-based platforms are emerging, providing access to vast databases of diagnostic information and repair procedures.
10.3. Artificial Intelligence (AI)
AI is being integrated into diagnostic tools to provide more accurate diagnoses and predictive maintenance recommendations.
10.4. Integration with Telematics
Diagnostic data is being integrated with vehicle telematics systems, providing real-time monitoring and alerts.
11. Choosing the Right Car Diagnostic Tool
Selecting the right car diagnostic tool depends on your needs, budget, and technical expertise.
11.1. Assess Your Needs
Determine what you want to achieve with the tool. Do you need basic code reading, live data monitoring, or advanced system tests?
11.2. Consider Your Budget
Diagnostic tools range in price from affordable code readers to expensive professional-grade equipment. Set a budget before you start shopping.
11.3. Read Reviews and Compare Features
Read reviews from other users and compare the features of different tools to find the best option for your needs.
11.4. Check Compatibility
Ensure the tool is compatible with your vehicle’s make and model.
11.5. Evaluate Ease of Use
Choose a tool that is easy to use and has a user-friendly interface.
12. Where to Purchase Car Diagnostic Tools
Car diagnostic tools can be purchased from various retailers, both online and in physical stores.
12.1. Online Retailers
- Amazon: Offers a wide selection of diagnostic tools from various brands.
- eBay: Provides access to both new and used tools at competitive prices.
- Specialty Automotive Websites: Sites like CAR-TOOL.EDU.VN offer a curated selection of high-quality diagnostic tools.
12.2. Physical Stores
- Auto Parts Stores: Stores like AutoZone, Advance Auto Parts, and O’Reilly Auto Parts sell a variety of diagnostic tools.
- Tool Retailers: Retailers like Harbor Freight Tools offer affordable options for DIY mechanics.
- Professional Tool Suppliers: Suppliers like Snap-on and Mac Tools cater to professional mechanics with high-end diagnostic equipment.
13. Maintenance and Care of Your Car Diagnostic Tool
Proper maintenance and care can extend the lifespan of your car diagnostic tool and ensure accurate results.
13.1. Keep the Tool Clean
Clean the tool regularly with a soft, dry cloth to remove dirt and grime.
13.2. Store the Tool Properly
Store the tool in a clean, dry place when not in use.
13.3. Protect the Connector
Protect the connector from damage by using a protective cover or case.
13.4. Update the Software
Keep the tool’s software updated to ensure compatibility with the latest vehicle models and diagnostic protocols.
13.5. Replace Batteries as Needed
Replace batteries as needed to ensure the tool has sufficient power for accurate readings.
14. Legal and Ethical Considerations
When using a car diagnostic tool, it’s important to be aware of legal and ethical considerations.
14.1. Privacy
Be mindful of the data you are accessing and avoid sharing sensitive information without proper authorization.
14.2. Security
Protect your diagnostic tool from unauthorized access to prevent tampering or misuse.
14.3. Compliance
Comply with all applicable laws and regulations regarding vehicle diagnostics and repairs.
14.4. Transparency
Be transparent with customers about the diagnostic process and the results obtained.
14.5. Professionalism
Maintain a high level of professionalism and ethical conduct when using diagnostic tools.
15. Advanced Diagnostic Techniques
For experienced users, advanced diagnostic techniques can provide deeper insights into vehicle issues.
15.1. Waveform Analysis
Using an oscilloscope to analyze sensor waveforms can reveal subtle issues that may not be apparent from DTCs or live data.
15.2. Circuit Testing
Performing circuit tests with a multimeter can help identify electrical faults such as shorts, opens, and high resistance.
15.3. Module Programming
Advanced diagnostic tools can be used to reprogram vehicle modules, addressing software issues and improving performance.
15.4. Network Diagnostics
Analyzing vehicle network communication can help identify issues with data transmission and module connectivity.
15.5. Custom Parameter Identification (PID)
Accessing custom PIDs can provide additional diagnostic information specific to certain vehicle models.
16. Frequently Asked Questions (FAQs)
16.1. What is an OBD2 port?
An OBD2 (On-Board Diagnostics II) port is a standardized interface in vehicles that allows access to the vehicle’s computer system for diagnostics and monitoring.
16.2. Where is the OBD2 port located?
The OBD2 port is typically located under the driver’s side dashboard, near the steering column.
16.3. Can I use any OBD2 scanner on my car?
Most OBD2 scanners are compatible with all vehicles manufactured since 1996 in the United States. However, it’s always a good idea to check the scanner’s compatibility with your specific make and model.
16.4. Do I need to turn on the engine to use an OBD2 scanner?
No, you usually only need to turn the ignition to the “ON” position without starting the engine to power the OBD2 port.
16.5. What do I do if the OBD2 scanner doesn’t power on?
Check the scanner’s power source, such as batteries or the connection to the OBD2 port. Ensure the ignition is in the “ON” position.
16.6. How do I interpret diagnostic trouble codes (DTCs)?
DTCs are five-character codes that indicate specific problems. Use online resources or the scanner’s manual to interpret the codes.
16.7. Can I clear DTCs with an OBD2 scanner?
Yes, most OBD2 scanners have the ability to clear DTCs after repairs have been performed.
16.8. Will clearing DTCs fix the problem?
Clearing DTCs only resets the vehicle’s computer. It does not fix the underlying issue. The problem must be addressed before clearing the codes.
16.9. What is live data?
Live data refers to real-time sensor readings that can be monitored to assess engine performance and identify anomalies.
16.10. Can I perform system tests with a basic code reader?
Basic code readers typically do not have the ability to perform system tests. Advanced scan tools are required for this functionality.
Navigating the complexities of vehicle diagnostics becomes streamlined with the right tools and knowledge. At CAR-TOOL.EDU.VN, we provide comprehensive resources to help you understand and utilize car diagnostic tools effectively. Our platform offers detailed guides, product comparisons, and expert advice to empower both novice and experienced users.
For personalized assistance and expert guidance in selecting the perfect diagnostic tools and auto parts, contact us today. Our knowledgeable team is ready to address your questions and provide tailored recommendations. Reach out via Whatsapp at +1 (641) 206-8880 or visit our website at CAR-TOOL.EDU.VN. Our physical location is at 456 Elm Street, Dallas, TX 75201, United States. Let CAR-TOOL.EDU.VN be your trusted partner in automotive diagnostics, ensuring you have the tools and insights needed for optimal vehicle performance and maintenance.
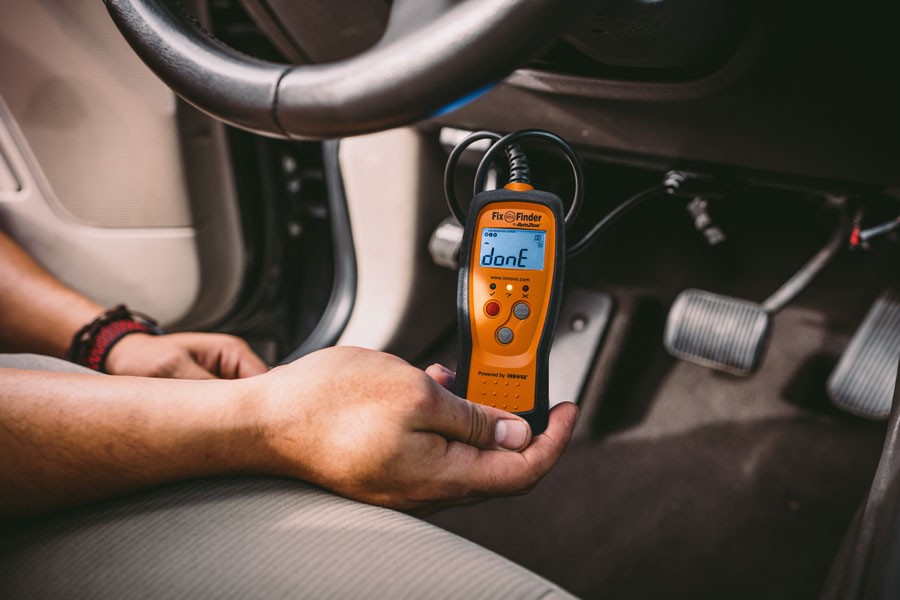 OBD-II scanner done reading trouble codes