Impala Car Diagnostic for the evaporative emission (EVAP) system involves checking the fuel tank pressure sensor, vent solenoid, and purge solenoid, often requiring a systematic approach to pinpoint the issue. CAR-TOOL.EDU.VN provides detailed guides and resources to help diagnose and repair EVAP system problems, ensuring your vehicle meets emission standards and runs efficiently. By understanding the system’s components and their functions, you can effectively address EVAP-related issues.
Contents
- 1. Understanding the Impala Car Diagnostic Process for EVAP Systems
- 1.1. Initial Scan and Code Retrieval
- 1.2. Inspecting the Fuel Tank Pressure Sensor
- 1.3. Checking the Vent Solenoid
- 1.4. Evaluating the Purge Solenoid
- 1.5. Smoke Testing the EVAP System
- 1.6. Visual Inspection of Hoses and Connections
- 1.7. Charcoal Canister Evaluation
- 2. Identifying Common Impala EVAP System Problems
- 2.1. Faulty Gas Cap
- 2.2. Leaking Hoses and Connections
- 2.3. Malfunctioning Purge Valve
- 2.4. Defective Vent Valve
- 2.5. Damaged Charcoal Canister
- 2.6. Faulty Fuel Tank Pressure Sensor
- 2.7. EVAP System Leaks
- 3. Utilizing Diagnostic Tools for Impala EVAP Issues
- 3.1. OBD-II Scanner
- 3.2. Multimeter
- 3.3. Smoke Machine
- 3.4. Vacuum Pump
- 3.5. Scan Tool with EVAP Testing Capabilities
- 3.6. Fuel Pressure Tester
- 4. Step-by-Step Guide to Diagnosing a P0446 Code on an Impala
- 4.1. Verify the Code
- 4.2. Inspect the Vent Valve
- 4.3. Test the Vent Valve Operation
- 4.4. Check the Vent Valve Wiring
- 4.5. Test the Fuel Tank Pressure Sensor
- 4.6. Perform a Smoke Test
- 4.7. Inspect the Charcoal Canister
- 4.8. Check the Purge Valve
- 4.9. Consult a Professional
- 5. Maintaining Your Impala’s EVAP System for Optimal Performance
- 5.1. Regularly Inspect the Gas Cap
- 5.2. Inspect Hoses and Connections
- 5.3. Replace the Fuel Filter
- 5.4. Monitor for EVAP System Codes
- 5.5. Perform Smoke Tests Periodically
- 5.6. Keep the Fuel Tank Relatively Full
- 5.7. Inspect the Charcoal Canister
- 5.8. Use Quality Fuel
- 6. Understanding the Role of Each Component in the Impala EVAP System
- 6.1. Fuel Tank
- 6.2. Gas Cap
- 6.3. Fuel Tank Pressure Sensor (FTP)
- 6.4. Charcoal Canister
- 6.5. Purge Valve (Purge Solenoid)
- 6.6. Vent Valve (Vent Solenoid)
- 6.7. EVAP Hoses and Lines
- 6.8. Fuel Cap Sensor (If Equipped)
- 6.9. Canister Vent Filter
- 7. How to Choose the Right Replacement Parts for Your Impala EVAP System
- 7.1. Use the Vehicle’s VIN
- 7.2. Choose OEM or Reputable Aftermarket Brands
- 7.3. Read Reviews and Ratings
- 7.4. Verify Compatibility
- 7.5. Check Warranty Information
- 7.6. Consider the Cost vs. Quality
- 7.7. Consult a Professional
- 7.8. Buy from Reputable Suppliers
- 8. Advanced Diagnostic Techniques for Complex Impala EVAP Problems
- 8.1. Using a Bi-Directional Scan Tool
- 8.2. Performing a Leak Down Test
- 8.3. Analyzing Fuel Trim Data
- 8.4. Testing the EVAP System with a Lab Scope
- 8.5. Using a Gas Analyzer
- 8.6. Performing a Vacuum Decay Test
- 8.7. Checking for Blocked or Restricted Lines
- 9. The Impact of a Faulty EVAP System on Your Impala’s Performance
- 9.1. Reduced Fuel Efficiency
- 9.2. Increased Emissions
- 9.3. Poor Engine Performance
- 9.4. Check Engine Light Illumination
- 9.5. Failed Emission Tests
- 9.6. Fuel Odor
- 9.7. Reduced Resale Value
- 10. Impala Car Diagnostic: FAQ on EVAP System Issues
1. Understanding the Impala Car Diagnostic Process for EVAP Systems
The diagnostic process for the evaporative emission (EVAP) system in an Impala involves several key steps to identify the root cause of any issues. Begin with a thorough inspection of the system’s components, including the fuel tank pressure sensor, vent solenoid, and purge solenoid. According to the Environmental Protection Agency (EPA), a malfunctioning EVAP system can lead to increased emissions and reduced fuel efficiency.
1.1. Initial Scan and Code Retrieval
Start by connecting a diagnostic scanner to the vehicle’s OBD-II port to retrieve any stored trouble codes. Common codes related to the EVAP system include P0440, P0442, P0446, and P0455. Note that these codes are just starting points; a comprehensive diagnosis is necessary to confirm the problem, as emphasized by the National Institute for Automotive Service Excellence (ASE).
1.2. Inspecting the Fuel Tank Pressure Sensor
The fuel tank pressure sensor (FTP) monitors the pressure inside the fuel tank. A faulty FTP sensor can provide incorrect readings, leading to EVAP system errors. To test the FTP sensor:
- Locate the sensor, typically near the fuel tank.
- Use a multimeter to check the sensor’s voltage output.
- Compare the reading to the vehicle’s specifications. A reading significantly outside the specified range indicates a faulty sensor.
1.3. Checking the Vent Solenoid
The vent solenoid controls the flow of air into the EVAP system. A malfunctioning vent solenoid can prevent the system from properly venting, leading to pressure imbalances. To check the vent solenoid:
- Locate the vent solenoid, usually near the charcoal canister.
- Apply 12V power to the solenoid to see if it opens and closes.
- Use a vacuum pump to check for leaks.
- Replace the solenoid if it fails to operate correctly or leaks.
1.4. Evaluating the Purge Solenoid
The purge solenoid controls the flow of fuel vapors from the charcoal canister to the engine. A faulty purge solenoid can cause the engine to run poorly or trigger EVAP system codes. To evaluate the purge solenoid:
- Locate the purge solenoid, typically near the engine.
- Use a diagnostic scanner to activate the solenoid and check its operation.
- Inspect the solenoid for any signs of damage or leaks.
- Replace the solenoid if it does not operate correctly or is damaged.
1.5. Smoke Testing the EVAP System
A smoke test is an effective method for detecting leaks in the EVAP system. This involves using a smoke machine to introduce smoke into the system and observing where the smoke escapes. According to a study by the University of California, Davis, smoke testing can significantly improve the accuracy of EVAP system diagnostics.
- Seal the EVAP system.
- Introduce smoke into the system using a smoke machine.
- Visually inspect all EVAP components and lines for escaping smoke.
- Repair or replace any leaking components.
1.6. Visual Inspection of Hoses and Connections
Carefully inspect all hoses and connections in the EVAP system for cracks, leaks, or damage. Even small leaks can cause significant issues. Replace any damaged or worn hoses and ensure all connections are secure.
1.7. Charcoal Canister Evaluation
The charcoal canister stores fuel vapors until they can be purged into the engine. A saturated or damaged charcoal canister can cause EVAP system problems. Inspect the canister for any signs of damage or saturation. If necessary, replace the charcoal canister.
By following these steps, you can effectively diagnose and address EVAP system issues in your Impala, ensuring optimal performance and compliance with emission standards. For more detailed guides and resources, visit CAR-TOOL.EDU.VN.
2. Identifying Common Impala EVAP System Problems
Several common issues can affect the evaporative emission (EVAP) system in an Impala. Recognizing these problems can streamline the diagnostic process and help you address them efficiently. Here are some of the most frequent issues:
2.1. Faulty Gas Cap
A loose or damaged gas cap is one of the most common causes of EVAP system failures. The gas cap seals the fuel tank, preventing fuel vapors from escaping. If the gas cap is not sealing properly, it can trigger EVAP system codes, such as P0455. According to the Car Care Council, regularly checking and replacing a worn gas cap can prevent many EVAP system issues.
- Inspect the gas cap for cracks or damage.
- Ensure the gas cap seals tightly when installed.
- Replace the gas cap if it is damaged or does not seal properly.
2.2. Leaking Hoses and Connections
Cracked or disconnected hoses are another common source of EVAP system leaks. These leaks can occur in any of the hoses connecting the fuel tank, charcoal canister, purge valve, and vent valve. Regularly inspecting these hoses can help identify and resolve leaks early.
- Visually inspect all EVAP hoses for cracks, wear, or damage.
- Check hose connections to ensure they are secure.
- Replace any damaged or worn hoses.
2.3. Malfunctioning Purge Valve
The purge valve controls the flow of fuel vapors from the charcoal canister to the engine. A faulty purge valve can either remain open, causing a vacuum leak, or remain closed, preventing proper vapor flow. Both conditions can trigger EVAP system codes.
- Use a diagnostic scanner to test the purge valve’s operation.
- Check the valve for vacuum leaks.
- Ensure the valve opens and closes properly when activated.
- Replace the purge valve if it is faulty.
2.4. Defective Vent Valve
The vent valve allows fresh air to enter the EVAP system, facilitating the purging of fuel vapors. A malfunctioning vent valve can prevent the system from venting properly, leading to pressure imbalances and EVAP codes.
- Inspect the vent valve for proper operation.
- Check for any obstructions preventing the valve from opening or closing.
- Test the valve’s electrical connections.
- Replace the vent valve if it is defective.
2.5. Damaged Charcoal Canister
The charcoal canister stores fuel vapors until they can be purged into the engine. Over time, the canister can become saturated or damaged, reducing its ability to store vapors effectively. This can lead to EVAP system leaks and codes.
- Inspect the charcoal canister for physical damage.
- Check for signs of saturation, such as a strong fuel odor.
- Replace the charcoal canister if it is damaged or saturated.
2.6. Faulty Fuel Tank Pressure Sensor
The fuel tank pressure sensor (FTP) monitors the pressure inside the fuel tank. A failing FTP sensor can provide inaccurate readings, leading to EVAP system codes. Proper diagnosis requires verifying the sensor’s accuracy.
- Use a diagnostic scanner to read the FTP sensor data.
- Compare the sensor reading to the actual fuel tank pressure.
- Check the sensor’s wiring and connections.
- Replace the FTP sensor if it is faulty.
2.7. EVAP System Leaks
Leaks in the EVAP system can occur at various points, including hoses, connections, and components. These leaks allow fuel vapors to escape, triggering EVAP system codes.
- Perform a smoke test to locate leaks in the EVAP system.
- Inspect all components and connections for signs of leaks.
- Repair or replace any leaking components.
By addressing these common EVAP system problems, you can keep your Impala running efficiently and reduce emissions. For more in-depth diagnostic tips and repair solutions, visit CAR-TOOL.EDU.VN.
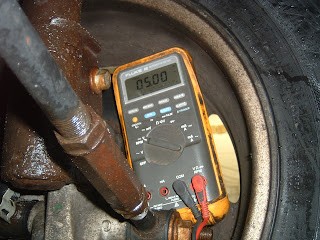 Fuel Tank Pressure Sensor
3. Utilizing Diagnostic Tools for Impala EVAP Issues
Effective diagnosis of EVAP system issues in an Impala requires the use of specialized diagnostic tools. These tools help pinpoint the source of problems, ensuring accurate and efficient repairs. Here are some essential tools and how to use them:
3.1. OBD-II Scanner
An OBD-II scanner is crucial for retrieving diagnostic trouble codes (DTCs) from the vehicle’s computer. These codes provide a starting point for diagnosing EVAP system issues. Modern scanners can also display live data, allowing you to monitor the performance of various EVAP system components.
- Connect the scanner to the vehicle’s OBD-II port.
- Retrieve and record any stored DTCs.
- Use the scanner to monitor live data from EVAP system components, such as the fuel tank pressure sensor and purge valve.
3.2. Multimeter
A multimeter is essential for testing the electrical components of the EVAP system, such as sensors and solenoids. It can be used to measure voltage, resistance, and current, helping you identify wiring issues or faulty components.
- Use the multimeter to check the voltage at the fuel tank pressure sensor.
- Measure the resistance of the purge and vent solenoids to check for continuity.
- Test the wiring for shorts or open circuits.
3.3. Smoke Machine
A smoke machine is used to introduce smoke into the EVAP system to detect leaks. This is one of the most effective ways to find small leaks that might not be visible otherwise.
- Connect the smoke machine to the EVAP system.
- Introduce smoke into the system and look for escaping smoke, indicating a leak.
- Inspect hoses, connections, and components for leaks.
3.4. Vacuum Pump
A vacuum pump can be used to test the operation of the purge and vent valves. By applying vacuum to these valves, you can check if they open and close properly.
- Connect the vacuum pump to the purge or vent valve.
- Apply vacuum and observe if the valve holds vacuum or leaks.
- Check the valve’s operation according to the vehicle’s specifications.
3.5. Scan Tool with EVAP Testing Capabilities
Some advanced scan tools have built-in EVAP system testing capabilities. These tools can perform automated tests, such as leak tests and purge valve tests, simplifying the diagnostic process.
- Connect the scan tool to the vehicle’s OBD-II port.
- Select the EVAP system test function.
- Follow the scan tool’s prompts to perform the test and interpret the results.
3.6. Fuel Pressure Tester
While not directly related to the EVAP system, a fuel pressure tester can help diagnose related issues, such as a malfunctioning fuel pump or pressure regulator, which can indirectly affect the EVAP system.
- Connect the fuel pressure tester to the fuel rail.
- Measure the fuel pressure and compare it to the vehicle’s specifications.
- Identify any issues with the fuel supply system.
By utilizing these diagnostic tools effectively, you can accurately diagnose and repair EVAP system issues in your Impala. For a comprehensive selection of automotive diagnostic tools, visit CAR-TOOL.EDU.VN.
4. Step-by-Step Guide to Diagnosing a P0446 Code on an Impala
The P0446 code indicates a problem with the evaporative emission (EVAP) control system vent control circuit. This code suggests that the vehicle’s computer has detected an issue with the vent valve not opening or closing properly. Here’s a step-by-step guide to diagnosing and resolving this issue on an Impala:
4.1. Verify the Code
First, use an OBD-II scanner to confirm the presence of the P0446 code. Clear the code and perform a test drive to see if it returns. This ensures that the code is not a one-time occurrence.
- Connect the OBD-II scanner to the vehicle’s diagnostic port.
- Read and record the stored codes.
- Clear the codes and perform a test drive.
- Recheck for the P0446 code.
4.2. Inspect the Vent Valve
The vent valve is responsible for allowing fresh air into the EVAP system. Inspect the vent valve for any signs of damage, corrosion, or blockage.
- Locate the vent valve, typically near the charcoal canister.
- Visually inspect the valve for damage or corrosion.
- Check for any obstructions that may prevent the valve from opening or closing.
4.3. Test the Vent Valve Operation
Use a multimeter to test the vent valve’s electrical connections and operation. Ensure that the valve is receiving power and ground signals.
- Disconnect the vent valve connector.
- Use a multimeter to check for voltage at the connector.
- Test the ground circuit for continuity.
- Apply 12V power to the valve to see if it opens and closes.
4.4. Check the Vent Valve Wiring
Inspect the wiring harness and connectors leading to the vent valve for any signs of damage, such as frayed wires or corroded connectors.
- Visually inspect the wiring harness for damage.
- Check the connectors for corrosion or loose connections.
- Repair or replace any damaged wiring or connectors.
4.5. Test the Fuel Tank Pressure Sensor
A faulty fuel tank pressure sensor (FTP) can sometimes trigger the P0446 code. Use a diagnostic scanner to monitor the FTP sensor readings.
- Connect the diagnostic scanner to the vehicle.
- Monitor the FTP sensor readings.
- Compare the readings to the vehicle’s specifications.
- Replace the FTP sensor if it is faulty.
4.6. Perform a Smoke Test
A smoke test can help identify any leaks in the EVAP system, which can cause the P0446 code.
- Connect the smoke machine to the EVAP system.
- Introduce smoke into the system and look for escaping smoke.
- Inspect hoses, connections, and components for leaks.
- Repair or replace any leaking components.
4.7. Inspect the Charcoal Canister
The charcoal canister stores fuel vapors and can become saturated or damaged over time. Inspect the canister for any signs of damage or saturation.
- Locate the charcoal canister.
- Visually inspect the canister for damage.
- Check for signs of saturation, such as a strong fuel odor.
- Replace the charcoal canister if it is damaged or saturated.
4.8. Check the Purge Valve
Although the P0446 code specifically relates to the vent valve, a malfunctioning purge valve can sometimes cause similar symptoms. Test the purge valve to ensure it is functioning correctly.
- Use a diagnostic scanner to test the purge valve’s operation.
- Check the valve for vacuum leaks.
- Ensure the valve opens and closes properly when activated.
- Replace the purge valve if it is faulty.
4.9. Consult a Professional
If you have followed these steps and are still unable to resolve the P0446 code, it may be necessary to consult a professional mechanic. They will have the expertise and specialized tools to diagnose and repair complex EVAP system issues.
By following this step-by-step guide, you can effectively diagnose and resolve the P0446 code on your Impala. For more detailed information and resources, visit CAR-TOOL.EDU.VN.
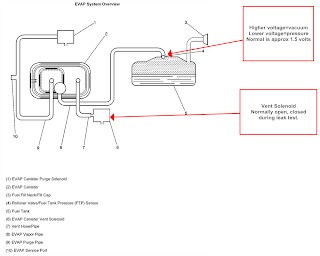 EVAP Vent System
5. Maintaining Your Impala’s EVAP System for Optimal Performance
Proper maintenance of your Impala’s evaporative emission (EVAP) system is crucial for ensuring optimal performance, reducing emissions, and preventing costly repairs. Regular maintenance can help identify and address potential issues before they escalate into major problems. Here are some essential maintenance tips:
5.1. Regularly Inspect the Gas Cap
The gas cap is a critical component of the EVAP system, sealing the fuel tank and preventing fuel vapors from escaping. Regularly inspect the gas cap for any signs of damage, such as cracks or a worn sealing ring. Ensure that the gas cap is properly tightened after each refueling.
- Check the gas cap for cracks or damage.
- Ensure the sealing ring is intact and not worn.
- Tighten the gas cap until it clicks.
- Replace the gas cap if it is damaged or does not seal properly.
5.2. Inspect Hoses and Connections
Regularly inspect all hoses and connections in the EVAP system for cracks, leaks, or damage. These hoses carry fuel vapors and can deteriorate over time due to exposure to heat and chemicals.
- Visually inspect all EVAP hoses for cracks, wear, or damage.
- Check hose connections to ensure they are secure.
- Replace any damaged or worn hoses.
5.3. Replace the Fuel Filter
A clogged fuel filter can put additional strain on the EVAP system, leading to performance issues. Replace the fuel filter according to the manufacturer’s recommended service interval.
- Consult your vehicle’s owner’s manual for the recommended fuel filter replacement interval.
- Replace the fuel filter as needed.
5.4. Monitor for EVAP System Codes
Regularly scan your vehicle for EVAP system codes using an OBD-II scanner. Addressing these codes early can prevent minor issues from becoming major problems.
- Connect the OBD-II scanner to the vehicle’s diagnostic port.
- Read and record any stored codes.
- Research the codes and address the underlying issues promptly.
5.5. Perform Smoke Tests Periodically
Consider performing a smoke test on the EVAP system periodically to detect any small leaks that may not be immediately apparent.
- Connect the smoke machine to the EVAP system.
- Introduce smoke into the system and look for escaping smoke.
- Inspect hoses, connections, and components for leaks.
- Repair or replace any leaking components.
5.6. Keep the Fuel Tank Relatively Full
Keeping the fuel tank relatively full can help reduce the amount of air space inside the tank, which can minimize the evaporation of fuel vapors.
- Avoid running the fuel tank down to empty frequently.
- Try to keep the fuel tank at least one-quarter full.
5.7. Inspect the Charcoal Canister
The charcoal canister stores fuel vapors and can become saturated or damaged over time. Inspect the canister for any signs of damage or saturation.
- Locate the charcoal canister.
- Visually inspect the canister for damage.
- Check for signs of saturation, such as a strong fuel odor.
- Replace the charcoal canister if it is damaged or saturated.
5.8. Use Quality Fuel
Using high-quality fuel can help prevent deposits from forming in the EVAP system, which can lead to performance issues.
- Use fuel from reputable gas stations.
- Consider using fuel with added detergents to help keep the fuel system clean.
By following these maintenance tips, you can help ensure the long-term health and performance of your Impala’s EVAP system. For more detailed maintenance guides and product recommendations, visit CAR-TOOL.EDU.VN.
6. Understanding the Role of Each Component in the Impala EVAP System
To effectively diagnose and repair EVAP system issues in an Impala, it’s essential to understand the function of each component. Here’s a detailed overview of the key components and their roles:
6.1. Fuel Tank
The fuel tank stores the vehicle’s fuel supply. It is a sealed container designed to prevent fuel vapors from escaping into the atmosphere.
- Function: Stores fuel and prevents vapor leaks.
- Maintenance: Check for leaks or damage.
6.2. Gas Cap
The gas cap seals the fuel tank, preventing fuel vapors from escaping. A properly sealed gas cap is crucial for maintaining the integrity of the EVAP system.
- Function: Seals the fuel tank to prevent vapor leaks.
- Maintenance: Inspect for damage and ensure a tight seal.
6.3. Fuel Tank Pressure Sensor (FTP)
The fuel tank pressure sensor monitors the pressure inside the fuel tank. This sensor provides data to the vehicle’s computer, which uses it to regulate the EVAP system.
- Function: Measures fuel tank pressure.
- Maintenance: Check for accurate readings and replace if faulty.
6.4. Charcoal Canister
The charcoal canister stores fuel vapors collected from the fuel tank. It contains activated charcoal that absorbs and traps the vapors until they can be purged into the engine.
- Function: Stores and absorbs fuel vapors.
- Maintenance: Inspect for damage and saturation.
6.5. Purge Valve (Purge Solenoid)
The purge valve controls the flow of fuel vapors from the charcoal canister to the engine. When the engine is running, the purge valve opens, allowing the engine to draw the stored vapors from the canister and burn them.
- Function: Regulates vapor flow from the canister to the engine.
- Maintenance: Test for proper operation and leaks.
6.6. Vent Valve (Vent Solenoid)
The vent valve allows fresh air to enter the EVAP system. When the purge valve is open, the vent valve opens to allow air to flow into the canister, facilitating the purging of fuel vapors.
- Function: Allows fresh air into the EVAP system.
- Maintenance: Check for proper opening and closing.
6.7. EVAP Hoses and Lines
EVAP hoses and lines connect the various components of the EVAP system. These hoses carry fuel vapors between the fuel tank, charcoal canister, purge valve, and vent valve.
- Function: Transports fuel vapors between components.
- Maintenance: Inspect for cracks, leaks, and damage.
6.8. Fuel Cap Sensor (If Equipped)
Some Impala models are equipped with a fuel cap sensor that detects whether the gas cap is properly installed. If the gas cap is loose or missing, the sensor will trigger a warning light on the dashboard.
- Function: Detects if the gas cap is properly installed.
- Maintenance: Ensure proper function and address any warning lights.
6.9. Canister Vent Filter
The canister vent filter prevents dirt and debris from entering the EVAP system through the vent valve. A clogged or dirty filter can restrict airflow and cause EVAP system problems.
- Function: Filters air entering the EVAP system.
- Maintenance: Inspect and replace as needed.
Understanding the function of each component in the EVAP system is essential for effective diagnosis and repair. For detailed guides and resources, visit CAR-TOOL.EDU.VN.
7. How to Choose the Right Replacement Parts for Your Impala EVAP System
When repairing your Impala’s evaporative emission (EVAP) system, selecting the right replacement parts is crucial for ensuring proper function and longevity. Here are some tips on how to choose the right parts:
7.1. Use the Vehicle’s VIN
Always use your vehicle’s Vehicle Identification Number (VIN) to identify the correct parts. The VIN provides specific information about your vehicle, including the year, make, model, and engine type. This information is essential for ensuring that the replacement parts are compatible with your vehicle.
- Locate the VIN on your vehicle (usually on the dashboard or doorframe).
- Use the VIN to search for compatible parts on reputable online stores or at your local auto parts store.
7.2. Choose OEM or Reputable Aftermarket Brands
OEM (Original Equipment Manufacturer) parts are made by the same manufacturer that produced the original parts for your vehicle. These parts are designed to fit perfectly and function correctly. Reputable aftermarket brands also offer high-quality parts that meet or exceed OEM specifications.
- Consider OEM parts for guaranteed fit and performance.
- Research reputable aftermarket brands known for quality and reliability.
7.3. Read Reviews and Ratings
Before purchasing replacement parts, read reviews and ratings from other customers. This can provide valuable insights into the quality and reliability of the parts.
- Check online reviews on reputable automotive websites.
- Look for feedback on fitment, performance, and longevity.
7.4. Verify Compatibility
Even if a part is listed as compatible with your vehicle, it’s always a good idea to double-check the specifications and dimensions to ensure it will fit properly.
- Compare the part number with the original part.
- Check the dimensions and specifications to ensure compatibility.
7.5. Check Warranty Information
Choose replacement parts that come with a warranty. A warranty provides protection against defects and ensures that you can get a replacement or refund if the part fails prematurely.
- Review the warranty terms and conditions.
- Choose parts with a reasonable warranty period.
7.6. Consider the Cost vs. Quality
While it may be tempting to save money by purchasing the cheapest parts, it’s important to consider the long-term cost of quality. Lower-quality parts may fail sooner, leading to additional repairs and expenses.
- Balance the cost with the quality and reliability of the parts.
- Invest in higher-quality parts for better long-term performance.
7.7. Consult a Professional
If you’re unsure about which replacement parts to choose, consult a professional mechanic. They can provide expert advice and recommendations based on their experience.
- Seek advice from a trusted mechanic.
- Get recommendations on the best parts for your specific needs.
7.8. Buy from Reputable Suppliers
Purchase replacement parts from reputable suppliers to ensure that you are getting genuine, high-quality products.
- Choose well-known auto parts stores or online retailers.
- Avoid buying from unverified sources.
By following these tips, you can choose the right replacement parts for your Impala EVAP system, ensuring proper function and longevity. For a wide selection of high-quality automotive parts, visit CAR-TOOL.EDU.VN.
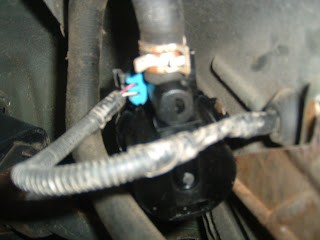 EVAP Purge Solenoid
8. Advanced Diagnostic Techniques for Complex Impala EVAP Problems
When dealing with complex evaporative emission (EVAP) system problems in an Impala, advanced diagnostic techniques may be necessary to pinpoint the root cause. These techniques go beyond basic code reading and visual inspection, requiring specialized tools and expertise. Here are some advanced diagnostic methods:
8.1. Using a Bi-Directional Scan Tool
A bi-directional scan tool allows you to control and monitor various EVAP system components, such as the purge valve and vent valve. This enables you to perform active tests and verify the functionality of these components in real-time.
- Connect the bi-directional scan tool to the vehicle’s OBD-II port.
- Use the scan tool to command the purge valve and vent valve to open and close.
- Monitor the system’s response and check for any discrepancies.
8.2. Performing a Leak Down Test
A leak down test involves sealing the EVAP system and monitoring the pressure over time. This test can help identify small leaks that may not be detectable with a smoke test.
- Seal the EVAP system using appropriate plugs and adapters.
- Introduce a small amount of pressure into the system.
- Monitor the pressure gauge for any drop in pressure over time.
- A significant drop in pressure indicates a leak.
8.3. Analyzing Fuel Trim Data
Fuel trim data provides insights into how the engine control unit (ECU) is adjusting the fuel mixture to compensate for lean or rich conditions. Analyzing fuel trim data can help identify EVAP system leaks or other issues that are affecting the engine’s air-fuel ratio.
- Use a diagnostic scanner to access the fuel trim data.
- Monitor the short-term and long-term fuel trim values.
- Positive fuel trim values indicate a lean condition, while negative values indicate a rich condition.
- Investigate any abnormal fuel trim values.
8.4. Testing the EVAP System with a Lab Scope
A lab scope, also known as an oscilloscope, can be used to analyze the electrical signals of EVAP system components, such as sensors and solenoids. This can help identify intermittent electrical issues that may not be detectable with a multimeter.
- Connect the lab scope to the electrical circuits of the EVAP system components.
- Monitor the waveforms and look for any abnormalities, such as voltage drops or signal noise.
8.5. Using a Gas Analyzer
A gas analyzer can be used to measure the concentration of hydrocarbons (HC), carbon monoxide (CO), and other gases in the exhaust. This can help identify EVAP system issues that are causing increased emissions.
- Insert the gas analyzer probe into the vehicle’s tailpipe.
- Measure the concentration of various gases in the exhaust.
- Compare the readings to the vehicle’s specifications.
- Investigate any abnormal readings.
8.6. Performing a Vacuum Decay Test
A vacuum decay test involves applying a vacuum to the EVAP system and monitoring how quickly the vacuum dissipates. This can help identify leaks or restrictions in the system.
- Connect a vacuum pump to the EVAP system.
- Apply a vacuum and then close off the system.
- Monitor the vacuum gauge for any decay over time.
- A rapid decay indicates a leak or restriction.
8.7. Checking for Blocked or Restricted Lines
Sometimes, EVAP system problems can be caused by blocked or restricted lines. Use compressed air or a vacuum pump to check for proper airflow through the lines.
- Disconnect the lines and use compressed air to blow through them.
- Check for any obstructions or restrictions.
- Use a vacuum pump to check for proper airflow.
By utilizing these advanced diagnostic techniques, you can effectively troubleshoot and repair complex EVAP system problems in your Impala. For more detailed information and resources, visit CAR-TOOL.EDU.VN.
9. The Impact of a Faulty EVAP System on Your Impala’s Performance
A malfunctioning evaporative emission (EVAP) system can significantly impact your Impala’s performance in several ways. Understanding these effects can help you recognize the importance of maintaining a properly functioning EVAP system.
9.1. Reduced Fuel Efficiency
A faulty EVAP system can lead to reduced fuel efficiency. If the system is leaking fuel vapors, the engine may not be receiving the correct air-fuel mixture, causing it to run less efficiently.
- Fuel vapors escaping from the system are not burned in the engine, wasting fuel.
- An improper air-fuel mixture can cause the engine to work harder, reducing fuel economy.
9.2. Increased Emissions
The primary purpose of the EVAP system is to reduce emissions. When the system is not functioning correctly, harmful fuel vapors can escape into the atmosphere, contributing to air pollution.
- Increased levels of hydrocarbons (HC) and other pollutants in the exhaust.
- Failure to meet emission standards during vehicle inspections.
9.3. Poor Engine Performance
A malfunctioning EVAP system can cause various engine performance issues, such as rough idling, stalling, and hesitation during acceleration.
- Vacuum leaks in the system can disrupt the engine’s air-fuel ratio, leading to poor performance.
- A faulty purge valve can cause the engine to run lean or rich, affecting its performance.
9.4. Check Engine Light Illumination
One of the most common symptoms of a faulty EVAP system is the illumination of the check engine light. This indicates that the vehicle’s computer has detected a problem with the system.
- The check engine light may illuminate due to various EVAP system codes, such as P0440, P0442, P0446, and P0455.
- Ignoring the check engine light can lead to more severe problems and costly repairs.
9.5. Failed Emission Tests
If your Impala’s EVAP system is not functioning correctly, it may fail emission tests. This can prevent you from renewing your vehicle’s registration and may result in fines.
- Emission tests measure the levels of pollutants in the exhaust.
- A faulty EVAP system can cause the vehicle to exceed the allowable emission limits.
9.6. Fuel Odor
A leaking EVAP system can cause a noticeable fuel odor, especially near the fuel tank or charcoal canister. This is a clear indication that fuel vapors are escaping from the system.
- Fuel odor may be more noticeable after refueling or on hot days.
- A persistent fuel odor should be investigated and addressed promptly.
9.7. Reduced Resale Value
A vehicle with a history of EVAP system problems may have a reduced resale value. Potential buyers may be hesitant to purchase a vehicle with known issues.
- A well-maintained vehicle with a properly functioning EVAP system is more attractive to buyers.
- Addressing EVAP system issues can help maintain your vehicle’s value.
By understanding the impact of a faulty EVAP system on your Impala’s performance, you can appreciate the importance of regular maintenance and prompt repairs. For expert advice and high-quality parts, visit CAR-TOOL.EDU.VN.
10. Impala Car Diagnostic: FAQ on EVAP System Issues
Here are some frequently asked questions about evaporative emission (EVAP) system issues in Impala cars, along with detailed answers to help you understand and address these problems effectively:
Q1: What is the EVAP system, and why is it important?
The EVAP system captures fuel vapors from the fuel tank and prevents them from being released into the atmosphere, reducing emissions and improving air quality. It’s crucial for environmental protection and meeting emission standards.
Q2: What are the common symptoms of a faulty EVAP system in an Impala?
Common symptoms include a check engine light, reduced fuel efficiency, poor engine performance, fuel odor, and failed emission tests.
Q3: What does the P0446 code mean on an Impala?
The P0446 code indicates a problem with the evaporative emission (EVAP) control system vent control circuit, suggesting an issue with the vent valve not opening or closing properly.
Q4: How can I diagnose a P0446 code on my Impala?
To diagnose a P0446 code, inspect the vent valve, test its operation, check the wiring, test the fuel tank pressure sensor, perform a smoke test, and inspect the charcoal canister and purge valve.
Q5: What tools are needed to diagnose EVAP system issues on an Impala?
Essential tools include an OBD-II scanner, multimeter, smoke machine, vacuum pump, scan tool with EVAP testing capabilities, and a fuel pressure tester.
Q6: How often should I inspect my Impala’s EVAP system?
You should inspect the EVAP system at least once a year or whenever you notice symptoms of a problem, such as a check engine light or fuel odor.
Q7: Can a loose gas cap cause EVAP system problems on an Impala?
Yes, a loose or damaged gas cap is a common cause of EVAP system failures, as it can allow fuel vapors to escape.
**Q8: What is the role of the