Check engine fault on your Volvo can be a cause for concern, but CAR-TOOL.EDU.VN offers resources to help you understand and address the issue efficiently. Whether it’s a minor sensor glitch or a more significant engine issue, understanding the fault is the first step towards resolution, potentially preventing costly repairs. By exploring our diagnostic tips, maintenance guides, and recommended repair strategies, you gain access to practical knowledge that keeps your car running smoothly and extends its lifespan. Volvo owners can discover how to diagnose, troubleshoot, and maintain their vehicles effectively.
Contents
- 1. Decoding the Check Engine Light: What Volvo Owners Need to Know
- 1.1. Understanding the Basics of the Check Engine Light
- 1.2. Common Reasons for the Check Engine Light to Illuminate
- 1.3. How to Respond When the Check Engine Light Comes On
- 1.4. Tools and Resources for Diagnosing Check Engine Light Issues
- 1.5. Preventive Measures to Avoid Check Engine Light Problems
- 1.6. How to Locate the OBD-II Port in Your Volvo
- 2. Top 5 Reasons Your Volvo’s Check Engine Light Is On
- 2.1. The Common Culprit: Loose or Faulty Gas Cap
- 2.2. Oxygen Sensor Issues: Maintaining Optimal Fuel Efficiency
- 2.3. Catalytic Converter Failure: Protecting the Environment
- 2.4. Spark Plug or Ignition Coil Problems: Ensuring Smooth Engine Operation
- 2.5. Mass Airflow Sensor (MAF) Issues: Regulating Air Intake
- 2.6. Addressing Additional Potential Causes
- 3. Volvo Check Engine Light Codes: A Comprehensive Guide
- 3.1. What Are Check Engine Light Codes?
- 3.2. Common Volvo Check Engine Light Codes and Their Meanings
- 3.3. How to Retrieve Volvo Check Engine Light Codes
- 3.4. Interpreting and Addressing the Codes
- 3.5. Clearing the Check Engine Light
- 3.6. When to Seek Professional Help
- 4. Troubleshooting a Flashing Check Engine Light on Your Volvo
- 4.1. Understanding the Severity of a Flashing Check Engine Light
- 4.2. Immediate Steps to Take When the Light Starts Flashing
- 4.3. Common Causes of a Flashing Check Engine Light
- 4.4. Using an OBD-II Scanner to Diagnose the Issue
- 4.5. Interpreting the Codes and Planning Your Next Steps
- 4.6. Why Professional Diagnosis Is Crucial
- 4.7. Common Repairs for a Flashing Check Engine Light
- 5. Decoding Volvo Warning Lights: Beyond the Check Engine Indicator
- 5.1. Understanding the Color Codes of Volvo Warning Lights
- 5.2. Common Red Warning Lights and Their Meanings
- 5.3. Common Yellow/Amber Warning Lights and Their Meanings
- 5.4. Other Important Volvo Warning Lights
- 5.5. Responding to Volvo Warning Lights
- 5.6. The Importance of Regular Maintenance
- FAQ: Addressing Your Questions About the Volvo Check Engine Light
- What does it mean when my Volvo check engine light comes on?
- Is it safe to drive my Volvo with the check engine light on?
- How can I find out why my check engine light is on?
- Can a loose gas cap cause the check engine light to come on?
- How do I reset the check engine light on my Volvo?
- What are some common repairs for a Volvo check engine light?
- How much does it cost to diagnose a check engine light issue?
- Can I fix a check engine light issue myself?
- When should I take my Volvo to a mechanic for a check engine light issue?
- What are the long-term consequences of ignoring the check engine light?
1. Decoding the Check Engine Light: What Volvo Owners Need to Know
Is your Volvo’s check engine light illuminated? It indicates that the vehicle’s onboard diagnostic system has detected an issue that requires attention.
The check engine light in your Volvo is more than just a warning; it’s a communication tool from your vehicle’s onboard computer, signaling that something needs attention. According to the Society of Automotive Engineers (SAE), modern vehicles are equipped with sophisticated diagnostic systems that monitor a wide range of functions, from engine performance to emissions control. When this light appears, it’s crucial to understand what it means and how to respond to prevent potential damage and maintain your Volvo’s optimal performance.
1.1. Understanding the Basics of the Check Engine Light
The check engine light, often represented by an engine icon or the words “Check Engine,” is a key component of your Volvo’s On-Board Diagnostics (OBD) system. This system monitors various aspects of your vehicle’s performance, including:
- Engine Performance: Detecting misfires, irregular idling, and other performance issues.
- Emissions Control: Monitoring components like the catalytic converter and oxygen sensors to ensure your vehicle meets emissions standards.
- Fuel System: Checking for issues with fuel delivery and efficiency.
The light can appear in several states, each indicating a different level of urgency:
- Steady Light: Indicates a problem has been detected but is not immediately critical.
- Flashing Light: Signifies a severe issue, such as an engine misfire, that can cause immediate damage if not addressed promptly.
1.2. Common Reasons for the Check Engine Light to Illuminate
Several factors can trigger the check engine light in your Volvo. Here are some of the most common:
- Loose or Damaged Gas Cap: This is one of the simplest issues, but it can cause fuel vapors to leak, affecting emissions and triggering the light.
- Oxygen Sensor Issues: Faulty oxygen sensors can disrupt the air-fuel mixture, leading to decreased fuel efficiency and potential damage to the catalytic converter.
- Catalytic Converter Failure: A failing catalytic converter can cause your Volvo to fail emissions tests and reduce engine performance.
- Spark Plug or Ignition Coil Problems: Worn or damaged spark plugs and ignition coils can lead to engine misfires and reduced power.
- Mass Airflow Sensor (MAF) Issues: A malfunctioning MAF sensor can cause the engine to run inefficiently, affecting fuel economy and performance.
- Vacuum Leaks: Leaks in the vacuum system can disrupt the engine’s air-fuel mixture, leading to rough idling and other performance issues.
1.3. How to Respond When the Check Engine Light Comes On
When the check engine light illuminates, follow these steps:
- Check the Gas Cap: Ensure that the gas cap is properly tightened. If it was loose, tighten it and see if the light turns off after a few drives.
- Assess Vehicle Performance: Notice any changes in how your Volvo drives. Rough idling, decreased power, or unusual noises can indicate a more serious problem.
- Use an OBD-II Scanner: If you have access to an OBD-II scanner, use it to read the diagnostic trouble codes (DTCs) stored in the vehicle’s computer. This can provide valuable information about the issue.
- Consult a Professional: If you are unsure about the cause of the check engine light or how to address it, take your Volvo to a certified mechanic. They can accurately diagnose the problem and perform the necessary repairs.
1.4. Tools and Resources for Diagnosing Check Engine Light Issues
Diagnosing check engine light issues can be simplified with the right tools and resources. Here are some options:
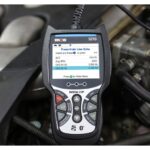
- OBD-II Scanners: These devices plug into your vehicle’s OBD-II port and read the diagnostic trouble codes (DTCs) stored in the computer. Basic scanners are affordable and easy to use, while more advanced models offer additional features like live data monitoring.
- Smartphone Apps: Several apps, such as Torque Pro and OBD Fusion, can connect to your vehicle via a Bluetooth OBD-II adapter and provide diagnostic information.
- Online Forums and Databases: Websites like CAR-TOOL.EDU.VN and Volvo owner forums offer valuable information and discussions about common check engine light issues.
1.5. Preventive Measures to Avoid Check Engine Light Problems
Preventing check engine light issues involves regular maintenance and care. Consider these measures:
- Follow the Recommended Maintenance Schedule: Adhere to Volvo’s recommended maintenance schedule, including oil changes, spark plug replacements, and filter replacements.
- Regularly Inspect and Replace Wear Items: Check and replace components like spark plugs, air filters, and fuel filters as needed.
- Address Minor Issues Promptly: Don’t ignore minor issues like a loose gas cap or rough idling. Addressing these problems early can prevent them from escalating and triggering the check engine light.
1.6. How to Locate the OBD-II Port in Your Volvo
The OBD-II (On-Board Diagnostics II) port is a standardized connector used to access your Volvo’s diagnostic information. Locating this port is the first step in diagnosing check engine light issues with an OBD-II scanner. The OBD-II port is typically found under the dashboard on the driver’s side. Here are common locations depending on the Volvo model:
- Under the Dashboard: In many Volvo models, the OBD-II port is located beneath the dashboard, usually near the steering column. You may need to crouch down and look for it.
- Near the Center Console: Some models have the port located in the center console area, often near the gear shifter or under a small cover.
- Inside the Glove Compartment: Although less common, a few Volvo models might have the OBD-II port inside the glove compartment.
Consult your Volvo’s owner’s manual for the exact location of the OBD-II port if you are having trouble finding it.
2. Top 5 Reasons Your Volvo’s Check Engine Light Is On
Why is that check engine light glaring at you from your Volvo’s dashboard? Let’s dive into the top 5 reasons behind this automotive mystery, complete with insights from the experts at CAR-TOOL.EDU.VN.
When the check engine light illuminates in your Volvo, it’s crucial to identify the cause to prevent potential damage and maintain your vehicle’s optimal performance. According to the Environmental Protection Agency (EPA), addressing check engine light issues promptly can improve fuel economy by up to 40% and reduce emissions. Here are the top five reasons why your Volvo’s check engine light might be on, along with guidance from CAR-TOOL.EDU.VN.
2.1. The Common Culprit: Loose or Faulty Gas Cap
It might sound simple, but a loose or faulty gas cap is a frequent trigger for the check engine light. The gas cap seals the fuel system, maintaining pressure and preventing fuel vapors from escaping. When the cap is loose, damaged, or missing, the system detects a pressure drop, which triggers the light.
Symptoms:
- Check engine light illuminated
- Fuel odor around the vehicle
- Decreased fuel efficiency
Solution:
- Check the Cap: Ensure the gas cap is tightened properly. Remove and reinstall the cap to make sure it seals correctly.
- Inspect the Cap: Look for cracks or damage to the gas cap. If it appears worn, replace it with a new one from CAR-TOOL.EDU.VN.
2.2. Oxygen Sensor Issues: Maintaining Optimal Fuel Efficiency
Oxygen sensors measure the amount of oxygen in the exhaust gases. They send this information to the engine control unit (ECU), which adjusts the air-fuel mixture for optimal combustion. Faulty oxygen sensors can disrupt this process, leading to decreased fuel efficiency and potential damage to the catalytic converter.
Symptoms:
- Check engine light illuminated
- Decreased fuel economy
- Rough idling
- Failed emissions test
Solution:
- Diagnose the Sensor: Use an OBD-II scanner to identify which oxygen sensor is faulty (e.g., upstream or downstream).
- Replace the Sensor: Purchase a new, high-quality oxygen sensor from CAR-TOOL.EDU.VN and replace the faulty one.
2.3. Catalytic Converter Failure: Protecting the Environment
The catalytic converter reduces harmful emissions by converting carbon monoxide, hydrocarbons, and nitrogen oxides into less harmful substances. A failing catalytic converter can cause your Volvo to fail emissions tests and reduce engine performance.
Symptoms:
- Check engine light illuminated
- Decreased engine performance
- Rattling noises from under the vehicle
- Failed emissions test
Solution:
- Inspect the Converter: Have a professional inspect the catalytic converter for damage or clogs.
- Replace the Converter: If the catalytic converter is faulty, replace it with a new one from CAR-TOOL.EDU.VN.
2.4. Spark Plug or Ignition Coil Problems: Ensuring Smooth Engine Operation
Worn or damaged spark plugs and ignition coils can lead to engine misfires, reduced power, and poor fuel economy. These components are essential for igniting the air-fuel mixture in the engine cylinders.
Symptoms:
- Check engine light illuminated
- Engine misfires
- Rough idling
- Decreased power
- Poor fuel economy
Solution:
- Inspect the Components: Check the spark plugs for wear, damage, or fouling. Inspect the ignition coils for cracks or other signs of damage.
- Replace the Components: Replace worn or damaged spark plugs and ignition coils with new ones from CAR-TOOL.EDU.VN.
2.5. Mass Airflow Sensor (MAF) Issues: Regulating Air Intake
The mass airflow sensor measures the amount of air entering the engine. The ECU uses this information to adjust the fuel mixture for optimal combustion. A malfunctioning MAF sensor can cause the engine to run inefficiently, affecting fuel economy and performance.
Symptoms:
- Check engine light illuminated
- Rough idling
- Poor acceleration
- Decreased fuel economy
Solution:
- Clean the Sensor: Try cleaning the MAF sensor with a specialized MAF sensor cleaner.
- Replace the Sensor: If cleaning doesn’t resolve the issue, replace the MAF sensor with a new one from CAR-TOOL.EDU.VN.
2.6. Addressing Additional Potential Causes
While the top five reasons cover many common check engine light triggers, other issues can also be responsible. These include:
- Vacuum Leaks: Leaks in the vacuum system can disrupt the engine’s air-fuel mixture, leading to rough idling and other performance issues.
- EGR Valve Problems: The EGR (Exhaust Gas Recirculation) valve helps reduce emissions by recirculating exhaust gases back into the engine. A malfunctioning EGR valve can cause performance issues and trigger the check engine light.
- Fuel Injector Issues: Dirty or faulty fuel injectors can disrupt the fuel delivery, leading to poor performance and decreased fuel economy.
3. Volvo Check Engine Light Codes: A Comprehensive Guide
Decoding your Volvo’s check engine light codes can feel like deciphering a secret language. But fear not, CAR-TOOL.EDU.VN is here to guide you through the process. Let’s explore the world of Volvo check engine light codes and empower you to understand what your car is trying to tell you.
Understanding Volvo check engine light codes is essential for diagnosing and resolving issues with your vehicle. According to the National Institute for Automotive Service Excellence (ASE), knowing the meaning of these codes can help you make informed decisions about repairs and maintenance. This comprehensive guide from CAR-TOOL.EDU.VN will help you understand the common Volvo check engine light codes and how to address them.
3.1. What Are Check Engine Light Codes?
Check engine light codes, also known as Diagnostic Trouble Codes (DTCs), are alphanumeric codes stored by your Volvo’s onboard computer when it detects a problem. These codes provide valuable information about the nature and location of the issue.
- Structure: DTCs typically consist of one letter followed by four numbers (e.g., P0171).
- Categories: The letter indicates the system affected:
- P: Powertrain (engine, transmission)
- B: Body (airbags, power windows)
- C: Chassis (ABS, suspension)
- U: Network (communication systems)
3.2. Common Volvo Check Engine Light Codes and Their Meanings
Here are some of the most common Volvo check engine light codes and their potential causes:
| Code | Description | Possible Causes |
|---|---|---|
| P0171 | System Too Lean (Bank 1) | Vacuum leak, faulty oxygen sensor, dirty mass airflow sensor, fuel injector issues, low fuel pressure |
| P0172 | System Too Rich (Bank 1) | Faulty oxygen sensor, leaking fuel injector, high fuel pressure, faulty mass airflow sensor |
| P0300 | Random/Multiple Cylinder Misfire Detected | Worn spark plugs, faulty ignition coils, vacuum leak, low compression, fuel injector issues |
| P0420 | Catalyst System Efficiency Below Threshold (Bank 1) | Faulty catalytic converter, faulty oxygen sensors, exhaust leaks, engine misfires |
| P0442 | Evaporative Emission Control System Leak Detected (Small Leak) | Loose or damaged gas cap, faulty purge valve, cracked charcoal canister, leaking fuel lines |
| P0455 | Evaporative Emission Control System Leak Detected (Gross Leak) | Missing or damaged gas cap, faulty purge valve, cracked charcoal canister, leaking fuel lines |
| P0101 | Mass Air Flow Circuit Range/Performance Problem | Dirty or faulty mass airflow sensor, vacuum leak, restricted air intake |
| P0130 | O2 Sensor Circuit Malfunction (Bank 1, Sensor 1) | Faulty oxygen sensor, wiring issues, exhaust leaks |
| P0301 | Cylinder 1 Misfire Detected | Worn spark plug, faulty ignition coil, fuel injector issues, low compression |
| P0302 | Cylinder 2 Misfire Detected | Worn spark plug, faulty ignition coil, fuel injector issues, low compression |
3.3. How to Retrieve Volvo Check Engine Light Codes
To retrieve the check engine light codes from your Volvo, you will need an OBD-II scanner. Here are the steps:
- Locate the OBD-II Port: The OBD-II port is typically located under the dashboard on the driver’s side.
- Connect the Scanner: Plug the OBD-II scanner into the port.
- Turn on the Ignition: Turn the ignition key to the “ON” position, but do not start the engine.
- Read the Codes: Follow the scanner’s instructions to read the stored diagnostic trouble codes (DTCs).
- Record the Codes: Write down all the codes that appear.
3.4. Interpreting and Addressing the Codes
Once you have retrieved the codes, you can use online resources like CAR-TOOL.EDU.VN to look up their meanings and potential causes. Here are some general tips for interpreting and addressing the codes:
- Prioritize Codes: Some codes are more critical than others. Focus on addressing the most severe codes first.
- Research Symptoms: Pay attention to any symptoms you have noticed while driving, such as rough idling, decreased power, or poor fuel economy. These symptoms can provide valuable clues about the underlying issue.
- Perform Basic Checks: Before replacing any parts, perform basic checks such as inspecting the gas cap, checking for vacuum leaks, and examining spark plugs and ignition coils.
- Consult a Professional: If you are unsure about how to interpret the codes or address the issue, consult a certified mechanic.
3.5. Clearing the Check Engine Light
After addressing the underlying issue, you can clear the check engine light using the OBD-II scanner. Here are the steps:
- Connect the Scanner: Plug the OBD-II scanner into the OBD-II port.
- Turn on the Ignition: Turn the ignition key to the “ON” position, but do not start the engine.
- Clear the Codes: Follow the scanner’s instructions to clear the stored diagnostic trouble codes (DTCs).
- Verify the Repair: Start the engine and drive the vehicle to ensure the check engine light does not reappear.
3.6. When to Seek Professional Help
While some check engine light issues can be resolved with simple DIY repairs, others require professional attention. Here are some situations where you should seek help from a certified mechanic:
- Unfamiliar Codes: If you are unable to interpret the codes or determine the cause of the issue.
- Complex Repairs: If the repair involves complex procedures or specialized tools.
- Persistent Issues: If the check engine light reappears after you have attempted to resolve the issue.
- Safety Concerns: If the issue affects the safety or drivability of the vehicle.
4. Troubleshooting a Flashing Check Engine Light on Your Volvo
A flashing check engine light on your Volvo is not something to ignore. It signals a severe problem that needs immediate attention. Let’s explore the steps you should take to troubleshoot a flashing check engine light and prevent potential damage to your vehicle.
A flashing check engine light in your Volvo indicates a serious issue that requires immediate attention. According to AAA, ignoring a flashing check engine light can lead to significant engine damage and costly repairs. This guide from CAR-TOOL.EDU.VN will help you understand what to do when your check engine light is flashing and how to troubleshoot the problem.
4.1. Understanding the Severity of a Flashing Check Engine Light
A flashing check engine light is a critical warning that indicates a severe issue that can cause immediate damage to your Volvo. Unlike a steady check engine light, which might indicate a less urgent problem, a flashing light signifies that the engine is experiencing a major malfunction that needs prompt attention.
- Engine Misfires: One of the most common causes of a flashing check engine light is an engine misfire. A misfire occurs when one or more cylinders in the engine fail to ignite the air-fuel mixture properly.
- Catalytic Converter Damage: Continuous misfires can send unburned fuel into the exhaust system, causing the catalytic converter to overheat and potentially fail.
- Severe Engine Damage: Ignoring a flashing check engine light can lead to severe engine damage, requiring costly repairs or even engine replacement.
4.2. Immediate Steps to Take When the Light Starts Flashing
When the check engine light starts flashing in your Volvo, take the following immediate steps:
- Pull Over Safely: If it is safe to do so, pull over to the side of the road as soon as possible.
- Turn Off the Engine: Turn off the engine to prevent further damage.
- Assess the Situation: Check for any obvious issues, such as unusual noises, smells, or smoke.
- Do Not Drive: Do not continue driving the vehicle, as this can cause further damage.
- Call for Assistance: Contact a certified mechanic or roadside assistance for help.
4.3. Common Causes of a Flashing Check Engine Light
Here are some of the most common causes of a flashing check engine light in your Volvo:
- Engine Misfires: Misfires can be caused by worn spark plugs, faulty ignition coils, fuel injector issues, or low compression.
- Ignition System Problems: Issues with the ignition system, such as a faulty ignition coil or distributor, can cause misfires and trigger the flashing light.
- Fuel System Problems: Problems with the fuel system, such as a faulty fuel pump or clogged fuel filter, can disrupt the fuel delivery and cause misfires.
- Sensor Malfunctions: Malfunctioning sensors, such as the crankshaft position sensor or camshaft position sensor, can disrupt the engine’s timing and cause misfires.
4.4. Using an OBD-II Scanner to Diagnose the Issue
If you have access to an OBD-II scanner, you can use it to read the diagnostic trouble codes (DTCs) stored in the vehicle’s computer. This can provide valuable information about the cause of the flashing check engine light.
- Connect the Scanner: Plug the OBD-II scanner into the OBD-II port.
- Turn on the Ignition: Turn the ignition key to the “ON” position, but do not start the engine.
- Read the Codes: Follow the scanner’s instructions to read the stored diagnostic trouble codes (DTCs).
- Record the Codes: Write down all the codes that appear.
4.5. Interpreting the Codes and Planning Your Next Steps
Once you have retrieved the codes, you can use online resources like CAR-TOOL.EDU.VN to look up their meanings and potential causes. Here are some general tips for interpreting the codes and planning your next steps:
- Prioritize Misfire Codes: If you see any codes related to engine misfires (e.g., P0300, P0301, P0302), focus on addressing these issues first.
- Check for Related Symptoms: Pay attention to any related symptoms, such as rough idling, decreased power, or unusual noises. These symptoms can provide valuable clues about the underlying issue.
- Consult a Professional: Due to the severity of a flashing check engine light, it is always recommended to consult a certified mechanic for diagnosis and repair.
4.6. Why Professional Diagnosis Is Crucial
While an OBD-II scanner can provide valuable information, it is not a substitute for a professional diagnosis. A certified mechanic has the expertise, experience, and specialized tools to accurately diagnose the cause of a flashing check engine light and perform the necessary repairs.
- Accurate Diagnosis: A mechanic can perform a thorough inspection of the engine and related systems to identify the root cause of the problem.
- Proper Repairs: A mechanic can perform the necessary repairs using the correct tools and procedures.
- Prevent Further Damage: Addressing the issue promptly can prevent further damage to the engine and related systems.
4.7. Common Repairs for a Flashing Check Engine Light
Depending on the cause of the flashing check engine light, common repairs may include:
- Replacing Spark Plugs: Worn or damaged spark plugs can cause engine misfires and trigger the flashing light.
- Replacing Ignition Coils: Faulty ignition coils can disrupt the engine’s timing and cause misfires.
- Replacing Fuel Injectors: Clogged or faulty fuel injectors can disrupt the fuel delivery and cause misfires.
- Repairing Vacuum Leaks: Vacuum leaks can disrupt the engine’s air-fuel mixture and cause performance issues.
- Replacing Sensors: Malfunctioning sensors, such as the crankshaft position sensor or camshaft position sensor, can disrupt the engine’s timing and cause misfires.
5. Decoding Volvo Warning Lights: Beyond the Check Engine Indicator
Volvo’s dashboard lights are designed to keep you informed about your vehicle’s condition. But beyond the check engine light, what do those other symbols mean? Let’s demystify the world of Volvo warning lights and help you understand what your car is trying to tell you.
Understanding the various warning lights on your Volvo’s dashboard is crucial for maintaining your vehicle and ensuring your safety. According to Volvo Cars, each warning light is designed to alert you to a specific issue that needs attention. This guide from CAR-TOOL.EDU.VN will help you decode the meaning of these warning lights and understand how to respond.
5.1. Understanding the Color Codes of Volvo Warning Lights
Volvo’s warning lights use a color-coded system to indicate the severity of the issue:
- Red: Indicates a critical issue that requires immediate attention.
- Yellow/Amber: Indicates a less urgent issue that needs to be addressed soon.
- Green: Indicates that a system is active or functioning normally.
5.2. Common Red Warning Lights and Their Meanings
Red warning lights indicate critical issues that require immediate attention. Here are some of the most common red warning lights in Volvo vehicles:
- Brake System Warning Light: Indicates a problem with the braking system, such as low brake fluid, worn brake pads, or a malfunctioning ABS system.
- Oil Pressure Warning Light: Indicates low oil pressure, which can cause severe engine damage.
- Coolant Temperature Warning Light: Indicates that the engine is overheating, which can cause significant damage.
- Battery Warning Light: Indicates a problem with the charging system, such as a faulty alternator or a discharged battery.
- Airbag Warning Light: Indicates a problem with the airbag system, which can compromise your safety in the event of a collision.
5.3. Common Yellow/Amber Warning Lights and Their Meanings
Yellow/amber warning lights indicate less urgent issues that need to be addressed soon. Here are some of the most common yellow/amber warning lights in Volvo vehicles:
- Check Engine Light: Indicates a problem with the engine or related systems, such as the emissions control system.
- Tire Pressure Monitoring System (TPMS) Warning Light: Indicates that one or more tires have low pressure.
- Anti-Skid System (ESC/Traction Control) Warning Light: Indicates that the anti-skid system is malfunctioning or has been temporarily disabled.
- Bulb Failure Warning Light: Indicates that one or more of the vehicle’s lights are not working properly.
5.4. Other Important Volvo Warning Lights
In addition to the red and yellow/amber warning lights, there are other important warning lights in Volvo vehicles that you should be aware of:
- Seat Belt Reminder Light: Reminds you to buckle your seat belt.
- High Beam Indicator Light: Indicates that the high beams are activated.
- Fog Light Indicator Light: Indicates that the fog lights are activated.
- Cruise Control Indicator Light: Indicates that the cruise control system is activated.
5.5. Responding to Volvo Warning Lights
When a warning light illuminates on your Volvo’s dashboard, it’s important to respond appropriately. Here are some general guidelines:
- Check Your Owner’s Manual: Consult your owner’s manual for specific information about the warning light and recommended actions.
- Assess the Situation: Pay attention to any related symptoms, such as unusual noises, smells, or changes in vehicle performance.
- Take Immediate Action: If a red warning light illuminates, take immediate action to address the issue, such as pulling over to the side of the road or calling for assistance.
- Schedule a Service Appointment: If a yellow/amber warning light illuminates, schedule a service appointment with a certified mechanic to diagnose and repair the issue.
5.6. The Importance of Regular Maintenance
Regular maintenance is essential for preventing warning light issues and keeping your Volvo in top condition. By following the recommended maintenance schedule and addressing minor issues promptly, you can avoid more serious problems down the road.
- Oil Changes: Regular oil changes help keep the engine lubricated and prevent damage.
- Fluid Checks: Regularly check and top off fluids such as coolant, brake fluid, and power steering fluid.
- Tire Maintenance: Maintain proper tire pressure and regularly inspect tires for wear and damage.
- Brake Inspections: Regularly inspect the brake system for worn pads, rotors, and other components.
Do you need expert advice and assistance? Contact CAR-TOOL.EDU.VN today. Our address is 456 Elm Street, Dallas, TX 75201, United States. Call us on Whatsapp at +1 (641) 206-8880. Or visit our website CAR-TOOL.EDU.VN
FAQ: Addressing Your Questions About the Volvo Check Engine Light
Navigating the complexities of your Volvo’s check engine light can bring up a lot of questions. Let’s address some of the most frequently asked questions to provide clarity and guidance.
What does it mean when my Volvo check engine light comes on?
A check engine light means that your Volvo’s onboard diagnostic system has detected an issue. It could range from a minor problem like a loose gas cap to a more serious issue like a faulty oxygen sensor or catalytic converter.
Is it safe to drive my Volvo with the check engine light on?
It depends. If the light is steady, it might be safe to drive for a short period, but it’s best to get it checked as soon as possible. If the light is flashing, it indicates a severe problem, and you should avoid driving the car to prevent further damage.
How can I find out why my check engine light is on?
You can use an OBD-II scanner to read the diagnostic trouble codes (DTCs) stored in the vehicle’s computer. Alternatively, you can take your Volvo to a certified mechanic for a professional diagnosis.
Can a loose gas cap cause the check engine light to come on?
Yes, a loose or damaged gas cap is a common cause of the check engine light. The gas cap seals the fuel system, and if it’s not properly tightened, fuel vapors can leak, triggering the light.
How do I reset the check engine light on my Volvo?
You can reset the check engine light using an OBD-II scanner after addressing the underlying issue. Follow the scanner’s instructions to clear the stored diagnostic trouble codes (DTCs). However, if the problem persists, the light will come back on.
What are some common repairs for a Volvo check engine light?
Common repairs include replacing a loose gas cap, replacing oxygen sensors, replacing the catalytic converter, replacing spark plugs or ignition coils, and cleaning or replacing the mass airflow sensor.
How much does it cost to diagnose a check engine light issue?
The cost to diagnose a check engine light issue can range from $75 to $150, depending on the mechanic and the complexity of the issue. Some auto repair shops offer free initial diagnostics.
Can I fix a check engine light issue myself?
Some minor issues, like a loose gas cap, can be easily fixed yourself. However, more complex issues require specialized knowledge and tools, and it’s best to consult a professional.
When should I take my Volvo to a mechanic for a check engine light issue?
You should take your Volvo to a mechanic if the check engine light is flashing, if you notice any significant changes in vehicle performance, or if you are unable to diagnose and resolve the issue yourself.
What are the long-term consequences of ignoring the check engine light?
Ignoring the check engine light can lead to more serious engine damage, decreased fuel efficiency, failed emissions tests, and costly repairs down the road. It’s always best to address the issue promptly to prevent further damage.
Do you need expert advice and assistance? Contact CAR-TOOL.EDU.VN today. Our address is 456 Elm Street, Dallas, TX 75201, United States. Call us on Whatsapp at +1 (641) 206-8880. Or visit our website CAR-TOOL.EDU.VN