Car Ac Diagnostic involves identifying the root cause of air conditioning problems in your vehicle, and CAR-TOOL.EDU.VN offers comprehensive guidance to ensure effective troubleshooting and repair. Addressing issues like refrigerant leaks, compressor malfunctions, or electrical faults is crucial for restoring optimal cooling performance, improving your driving comfort. Leverage our resources for expert insights into automotive AC diagnostics, ac system check and maintenance.
1. Is Your AC Cool but Not Cold?
If your car’s AC is blowing moderately cool air instead of cold, several factors could be responsible. Start by verifying that the cooling fans on the condenser or radiator are operational when the AC is on. Look for any obstructions such as leaves, bugs, or dirt that may be hindering airflow over the condenser. Additionally, inspect the cabin air filter to ensure it is not clogged. If these components are functioning correctly, the next step involves checking the pressures in the system using a manifold gauge set.
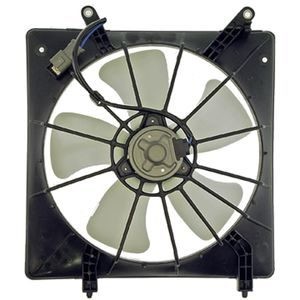 Cooling Fans
The recommended high-side and low-side pressures can be found in your vehicle’s repair manual or online resources such as CAR-TOOL.EDU.VN. Once the gauges are connected, observe the AC compressor’s performance to identify any abnormalities. Remember to check the radiator for optimal performance.
2. How Do You Start With The AC Compressor?
When diagnosing an air conditioning issue, it’s often easiest to begin with the compressor. Start the engine and turn the AC to max cool with the fans on high. Ensure that the clutch is engaging on the compressor; this refers to the center piece that engages the pulley to the compressor shaft, not just the pulley itself. If the clutch is engaging and disengaging frequently (every few seconds), it could indicate low refrigerant levels. In this scenario, you’ll likely observe the low-side pressure on your gauge dropping rapidly when the clutch engages, reaching a point of excessively low pressure, and then disengaging, causing the pressure to rise again.
As you introduce more refrigerant, the gauge should stabilize, with the compressor running consistently and holding at the recommended pressure. If the clutch isn’t engaging despite the system having refrigerant, use a voltmeter to check for voltage reaching the compressor. No voltage could point to a faulty cycling switch, a blown fuse, or insufficient refrigerant pressure preventing the low-pressure cutoff switch from activating the compressor.
3. Why Are Most AC Problems Caused By Leaks?
Leaks are the most common culprit behind air conditioning system malfunctions. If the pressure within the system is low, it often indicates the presence of a leak. To effectively locate these leaks, using a UV A/C leak detection kit can prove invaluable. These kits typically include UV dye that you introduce into the system, along with a UV light to help identify the source of the leak.
 UV Leak Detection Kit
Examine all fittings to ensure they are secure and properly tightened. Inspect hose manifolds on the compressor, as well as the front seal and O-rings sealing the pressure switches on the compressor’s back. Additionally, check where the hoses are crimped onto the fittings and inspect the Schrader valves for any signs of leakage. Finally, scan the condenser for pinholes.
4. What Are The Most Common AC Compressor and Clutch Problems?
The AC compressor is a pivotal component responsible for circulating refrigerant (such as Freon) throughout the air conditioning system. Leaks in the seals or within the compressor itself can frequently occur, leading to system inefficiencies. Additionally, particle contamination from worn internal parts can compromise the compressor’s functionality. The engagement clutch, often referred to as the AC clutch, is also susceptible to failure, rendering the compressor inoperative.
When diagnosing AC compressor and clutch issues, it’s crucial to check for several indicators. If the refrigerant level is low, inspect for visible system leaks characterized by a green, oily residue. Moreover, assess the condition of internal components, considering wear or low AC oil levels. A malfunctioning AC clutch can prevent the compressor from engaging, while a failed power supply to the AC clutch, possibly due to a blown fuse, faulty pressure control switch, damaged dash control module, or a broken circuit wire, can impede its operation. It’s imperative to conduct thorough inspections and tests before considering replacement.
5. What Are Accumulator / Drier Common Problems?
The accumulator or drier plays a crucial role in collecting and absorbing moisture within the air conditioning system. Moisture is detrimental to internal components and can cause damage to the AC compressor. Whether your vehicle utilizes an accumulator or a receiver/drier depends on its specific design.
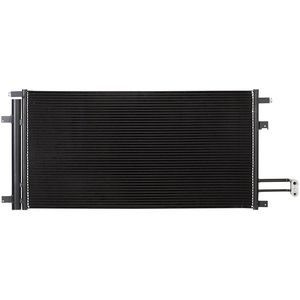 Condenser
Common problems associated with accumulators/driers include internal failure leading to the introduction of desiccant material into the AC system. This can cause significant issues if it contaminates other components. Additionally, leaks can result in the over-saturation of the desiccant material, potentially leading to compressor damage.
6. What Are AC Orifice Tube / Expansion Valve Common Problems?
The AC orifice tube or expansion valve is essential for filtering and regulating the flow of refrigerant throughout the air conditioning system. Similar to accumulators/driers, the specific component used depends on your vehicle’s design.
Contamination is the primary cause of failure in AC orifice tubes/expansion valves. If the system pressures are excessively high or low, the expansion device may be the culprit. However, before assuming a faulty expansion device, verify that the refrigerant levels are correct and that the radiator/AC condenser fan(s) are functioning properly. It’s crucial to conduct thorough inspections and tests before replacing the orifice tube or expansion valve.
7. What Are AC Condenser Common Problems?
The AC condenser, resembling a radiator in appearance, works in conjunction with the radiator fan(s) to cool the refrigerant. Air flowing across the condenser tubes dissipates heat from the hot refrigerant, which has absorbed heat from inside the vehicle. This process returns the refrigerant to a liquid state, enabling it to re-enter the evaporator core and absorb more heat from the interior.
Common problems associated with AC condensers include refrigerant leaks. Furthermore, contaminant particles originating from the AC compressor or accumulator/drier can obstruct the flow of refrigerant, leading to poor cooling performance. While inspecting the AC condenser, it’s also advisable to assess the condition of the radiator/AC cooling fan motor(s).
8. What Are AC Evaporator Core Common Problems?
The AC evaporator core functions as a cooling element within the air conditioning system. It facilitates the rapid cooling of hot cabin air as it flows through the core, subsequently blowing the chilled air back into the cabin. The cool air emanating from the dash vents is delivered by the AC heater blower motor assembly.
The primary cause of failure in AC evaporator cores is leaks resulting from age and wear. Employing an electronic leak detector is the most effective method for identifying leaks. Special attention should be given to the AC evaporator box water drain tube, using the detector to pinpoint any leaks. The presence of a green and oily substance in the drain tube may indicate larger leaks.
9. What Are The Symptoms Of A Bad Car AC Compressor?
A malfunctioning AC compressor can manifest in various ways, including weak airflow, unusual noises, overheating, leaks, and the AC clutch failing to engage.
- Weak Airflow: A failing compressor may struggle to circulate refrigerant effectively, leading to weak or inconsistent airflow from the AC vents.
- Unusual Noises: Strange noises such as rattling, grinding, or squealing coming from the compressor area could indicate internal damage or wear.
- Overheating: A malfunctioning compressor may overheat due to increased friction or internal issues, potentially causing damage to other components.
- Leaks: Refrigerant leaks around the compressor are a common symptom of a failing unit, often accompanied by a noticeable decrease in cooling performance.
- AC Clutch Not Engaging: The AC clutch is responsible for engaging the compressor when the AC is turned on. If the clutch fails to engage, the compressor won’t operate, resulting in a lack of cooling.
10. What Does CAR-TOOL.EDU.VN Suggest To Do If The Car AC Is Still Not Working?
If your car AC is still not working after performing initial diagnostic steps, CAR-TOOL.EDU.VN recommends several advanced troubleshooting measures.
First, check the refrigerant pressure using a manifold gauge set to ensure it’s within the specified range. Next, inspect the AC compressor clutch for proper engagement and voltage supply. Additionally, examine the expansion valve or orifice tube for any signs of blockage or damage. Finally, consider using a professional-grade leak detector to identify any elusive refrigerant leaks that may be present.
In-Depth Car AC Diagnostic Guide
Diagnosing car AC problems can seem daunting, but with a systematic approach, you can pinpoint the issue and restore your vehicle’s cooling system to optimal performance. This comprehensive guide, enhanced by expert insights and resources from CAR-TOOL.EDU.VN, will walk you through the essential steps of car AC diagnostic, from identifying common symptoms to using specialized tools for accurate assessment.
1. Identifying Common AC Problems
Before diving into the diagnostic process, it’s crucial to recognize the common symptoms that indicate AC problems. According to a study by the National Institute for Automotive Service Excellence (ASE), refrigerant leaks are responsible for up to 60% of AC system failures. Other common issues include compressor failure, condenser blockage, and electrical faults.
Common Symptoms of AC Problems:
- Weak Airflow: Air coming from the vents is weak or inconsistent.
- Warm Air: The AC blows warm air instead of cold.
- Unusual Noises: Rattling, grinding, or hissing sounds from the AC system.
- Foul Odors: Musty or moldy smells emanating from the vents.
- AC Clutch Issues: The AC clutch fails to engage or disengage properly.
2. Gathering Essential Tools and Equipment
To perform an effective car AC diagnostic, you’ll need a variety of specialized tools and equipment. According to CAR-TOOL.EDU.VN, having the right tools not only ensures accuracy but also saves time and effort during the diagnostic process.
Essential Tools for Car AC Diagnostic:
| Tool | Description | Use |
|---|---|---|
| Manifold Gauge Set | Measures refrigerant pressure on both the high and low sides of the AC system. | Diagnosing refrigerant leaks, overcharging, and compressor performance. |
| UV Leak Detection Kit | Uses ultraviolet dye and light to locate refrigerant leaks in the AC system. | Identifying hard-to-find leaks in hoses, fittings, and components. |
| Electronic Leak Detector | Detects refrigerant leaks using electronic sensors. | Pinpointing small leaks that may not be visible with UV dye. |
| Thermometer | Measures the temperature of the air coming from the AC vents. | Assessing cooling performance and identifying potential issues with airflow or refrigerant. |
| Multimeter | Tests electrical circuits and components, such as fuses, relays, and switches. | Diagnosing electrical faults in the AC system. |
| Vacuum Pump | Removes air and moisture from the AC system before recharging with refrigerant. | Ensuring proper AC system operation and preventing damage from contaminants. |
| Refrigerant Identifier | Verifies the type of refrigerant in the AC system to prevent contamination during recharging. | Avoiding cross-contamination of refrigerants, which can damage the AC system. |
| AC Compressor Clutch Tool | Used to remove and install the AC compressor clutch. | Replacing or repairing the AC compressor clutch. |
| Fin Comb | Straightens bent or damaged fins on the condenser and evaporator. | Improving airflow and cooling efficiency. |
| Service Manual | Provides detailed information about the AC system, including specifications, procedures, and diagrams. | Guiding the diagnostic and repair process with accurate information. |
3. Performing a Visual Inspection
Before using any tools, start with a thorough visual inspection of the AC system. This can help identify obvious issues such as damaged components, leaks, or obstructions.
Steps for Visual Inspection:
- Check the AC Compressor: Look for signs of damage, leaks, or corrosion on the compressor body. Inspect the clutch for proper engagement and disengagement.
- Inspect the Condenser: Check the condenser fins for damage or blockage. Remove any debris such as leaves, bugs, or dirt that may be obstructing airflow.
- Examine the Evaporator: Inspect the evaporator core for leaks or corrosion. Check the evaporator drain for clogs.
- Inspect Hoses and Fittings: Look for cracks, leaks, or damage on the AC hoses and fittings. Tighten any loose connections.
- Check the Belt: Inspect the AC compressor belt for wear, cracks, or damage. Ensure the belt is properly tensioned.
4. Testing Refrigerant Pressure
One of the most critical steps in car AC diagnostic is testing the refrigerant pressure. According to a study by the Society of Automotive Engineers (SAE), improper refrigerant pressure can significantly affect AC system performance and efficiency.
Steps for Testing Refrigerant Pressure:
- Connect the Manifold Gauge Set: Connect the high-side and low-side gauges to the corresponding service ports on the AC system.
- Start the Engine: Start the engine and turn on the AC to the maximum setting.
- Observe the Gauge Readings: Monitor the high-side and low-side pressure readings on the gauges.
- Compare to Specifications: Compare the readings to the specifications in the vehicle’s service manual.
Interpreting Refrigerant Pressure Readings:
| Condition | Low-Side Pressure | High-Side Pressure | Possible Cause |
|---|---|---|---|
| Normal | Within Specs | Within Specs | AC system is functioning properly. |
| Low Refrigerant | Low | Low | Refrigerant leak or undercharge. |
| Overcharged Refrigerant | High | High | Overcharging during previous service. |
| Blockage in System | Low | High | Blockage in the expansion valve, orifice tube, or refrigerant line. |
| Compressor Failure | Low | Low | Faulty compressor not generating sufficient pressure. |
| Moisture in System | Erratic | Erratic | Moisture contamination causing erratic pressure fluctuations. |
| Restricted Airflow | High | High | Blocked condenser fins or radiator causing restricted airflow over the condenser. |
| Expansion Valve Failure | High | Low | Faulty expansion valve not regulating refrigerant flow properly. |
| Clogged Orifice Tube | Low | High | Blockage in the orifice tube restricting refrigerant flow. |
| Internal Compressor Leak | Low | Low | Internal leak in the compressor reducing its ability to generate pressure. |
5. Locating Refrigerant Leaks
Refrigerant leaks are a common cause of AC problems. According to the Environmental Protection Agency (EPA), refrigerant leaks not only reduce AC performance but also contribute to environmental damage.
Methods for Locating Refrigerant Leaks:
- UV Leak Detection Kit: Add UV dye to the AC system and use a UV light to locate leaks.
- Electronic Leak Detector: Use an electronic leak detector to pinpoint small leaks that may not be visible with UV dye.
- Soap and Water Solution: Apply a soap and water solution to suspected leak areas and look for bubbles.
6. Testing Electrical Components
Electrical faults can also cause AC problems. According to the National Highway Traffic Safety Administration (NHTSA), electrical issues account for a significant percentage of vehicle AC system failures.
Steps for Testing Electrical Components:
- Check Fuses: Use a multimeter to check the AC fuse in the fuse box. Replace any blown fuses.
- Test Relays: Test the AC relay using a multimeter. Replace any faulty relays.
- Check Switches: Test the AC switch and other control switches using a multimeter. Replace any faulty switches.
- Inspect Wiring: Look for damaged or corroded wiring. Repair or replace any damaged wiring.
7. Evaluating AC Compressor Performance
The AC compressor is a crucial component of the AC system. According to a study by the American Society of Mechanical Engineers (ASME), compressor failure is a common cause of AC problems, especially in older vehicles.
Methods for Evaluating AC Compressor Performance:
- Check Compressor Clutch: Inspect the compressor clutch for proper engagement and disengagement.
- Measure Compressor Discharge Pressure: Use a manifold gauge set to measure the compressor discharge pressure.
- Listen for Unusual Noises: Listen for rattling, grinding, or hissing sounds coming from the compressor.
8. Inspecting the Condenser and Evaporator
The condenser and evaporator are essential for heat exchange in the AC system. According to a study by the Air Conditioning Contractors of America (ACCA), proper maintenance of these components is crucial for optimal AC performance.
Steps for Inspecting the Condenser and Evaporator:
- Check for Blockage: Inspect the condenser and evaporator fins for blockage. Remove any debris such as leaves, bugs, or dirt.
- Look for Damage: Inspect the condenser and evaporator for damage or corrosion.
- Check for Leaks: Inspect the condenser and evaporator for leaks.
9. Cleaning and Maintenance
Regular cleaning and maintenance can help prevent AC problems and prolong the life of the system. According to CAR-TOOL.EDU.VN, proper maintenance can improve AC efficiency by up to 20%.
Tips for Cleaning and Maintenance:
- Clean the Condenser and Evaporator: Use a fin comb and a soft brush to clean the condenser and evaporator fins.
- Replace the Cabin Air Filter: Replace the cabin air filter regularly to improve airflow and air quality.
- Flush the AC System: Flush the AC system every few years to remove contaminants and debris.
- Recharge the Refrigerant: Recharge the refrigerant every few years to maintain optimal cooling performance.
10. Seeking Professional Assistance
While many AC problems can be diagnosed and repaired at home, some issues may require professional assistance. According to the Mobile Air Conditioning Society (MACS), complex AC repairs should be performed by qualified technicians with specialized training and equipment.
When to Seek Professional Assistance:
- Complex AC Repairs: Repairs that require specialized tools or expertise.
- Refrigerant Handling: Handling and disposal of refrigerant require certification and specialized equipment.
- Uncertainty: If you are unsure about the diagnostic or repair process, seek professional assistance.
By following this comprehensive guide and utilizing the resources provided by CAR-TOOL.EDU.VN, you can effectively diagnose and address common car AC problems, ensuring optimal cooling performance and driving comfort.
Are you struggling to find reliable auto parts or repair tools? Do you spend too much time comparing prices and features? Are you unsure about the durability and effectiveness of new tools? Contact CAR-TOOL.EDU.VN at 456 Elm Street, Dallas, TX 75201, United States or via Whatsapp at +1 (641) 206-8880. Visit our website at CAR-TOOL.EDU.VN for detailed information on auto parts, tool comparisons, user reviews, and trusted suppliers. Let us help you find the perfect solutions for your auto repair needs. Contact us today for expert advice and immediate assistance. Our team is ready to answer your questions and provide personalized recommendations to make your repair process smoother and more efficient.
FAQ: Car AC Diagnostic
1. What is car AC diagnostic?
Car AC diagnostic is the process of identifying the cause of air conditioning problems in a vehicle, and is crucial for restoring optimal cooling performance.
2. What are the common symptoms of AC problems?
Common symptoms include weak airflow, warm air, unusual noises, and foul odors. A faulty AC clutch can also indicate issues.
3. What tools are needed for AC diagnostics?
Essential tools include a manifold gauge set, UV leak detection kit, electronic leak detector, thermometer, and multimeter.
4. How do I check refrigerant pressure?
Connect a manifold gauge set to the service ports, start the engine, turn on the AC, and compare the gauge readings to the vehicle’s specifications.
5. How do I locate refrigerant leaks?
Use a UV leak detection kit, electronic leak detector, or apply a soap and water solution to suspected leak areas.
6. How do I test electrical components?
Use a multimeter to check fuses, relays, and switches for continuity and proper function.
7. What are the most common AC compressor issues?
Common problems include leaks, worn internal parts, and a faulty AC clutch. Inspect and test before replacing.
8. How often should I clean my car’s AC system?
Regular cleaning and maintenance, including replacing the cabin air filter, can improve AC efficiency and prolong the system’s life. Aim to clean the system annually.
9. When should I seek professional AC service?
Seek professional assistance for complex repairs, refrigerant handling, or if you are unsure about the diagnostic or repair process.
10. Can CAR-TOOL.EDU.VN help with AC diagnostics?
Yes, CAR-TOOL.EDU.VN offers comprehensive guides, expert insights, and resources to assist with car AC diagnostics and repairs.