Connecting your OBDLink OBD car diagnostic tool to a computer allows you to unlock a wealth of vehicle data, diagnose issues, and optimize performance. CAR-TOOL.EDU.VN provides expert guidance and top-quality tools to make this process seamless and effective. Explore advanced diagnostics, real-time data, and comprehensive vehicle analysis with our resources and expertise. Enhance your automotive diagnostic capabilities and gain deeper insights into your vehicle’s health.
Contents
- 1. Understanding the Basics: What is OBD and Why Connect to a Computer?
- 1.1. What is OBD?
- 1.2. Why Connect Your OBD Tool to a Computer?
- 1.3. Benefits of Using OBD Diagnostic Tools
- 1.4. Types of OBD Connectors
- 2. Key Components: OBDLink Adapter and Diagnostic Software
- 2.1. OBDLink Adapters: Bluetooth, Wi-Fi, and USB
- 2.2. Diagnostic Software: Features and Compatibility
- 2.3. Choosing the Right OBDLink Adapter and Software Combination
- 2.4. Software Updates and Their Importance
- 3. Step-by-Step Guide: Connecting OBDLink to Your Computer
- 3.1. Preparing Your Computer and Vehicle
- 3.2. Installing the OBDLink Driver (if necessary)
- 3.3. Connecting the OBDLink Adapter to Your Vehicle
- 3.4. Pairing Bluetooth or Wi-Fi OBDLink Adapters
- 3.5. Launching and Configuring the Diagnostic Software
- 3.6. Troubleshooting Connection Issues
- 4. Using Diagnostic Software: Reading Codes and Monitoring Data
- 4.1. Reading Diagnostic Trouble Codes (DTCs)
- 4.2. Understanding DTC Severity and Categories
- 4.3. Monitoring Real-Time Data
- 4.4. Interpreting Data and Identifying Issues
- 4.5. Data Logging and Analysis Techniques
- 5. Advanced Diagnostics: Going Beyond Basic Code Reading
- 5.1. Performing Advanced System Tests
- 5.2. Accessing Manufacturer-Specific Data
- 5.3. Flashing and Reprogramming ECUs
- 5.4. Using Bi-Directional Control Features
- 5.5. Safety Precautions for Advanced Diagnostics
- 6. Tips and Tricks for Effective OBD Diagnostics
- 6.1. Keeping Your Software and Firmware Up-to-Date
- 6.2. Understanding Vehicle-Specific Diagnostic Procedures
- 6.3. Creating Custom Dashboards for Monitoring Key Parameters
- 6.4. Using Freeze Frame Data to Diagnose Intermittent Issues
- 6.5. Common Mistakes to Avoid When Using OBD Tools
- 7. Real-World Applications: Case Studies and Examples
- 7.1. Diagnosing a Misfire Issue with OBD Data
- 7.2. Identifying a Faulty Oxygen Sensor Using Live Data
- 7.3. Tracking Down a Fuel Efficiency Problem with Data Logging
- 7.4. Solving an ABS Issue with Advanced Diagnostics
- 8. Maintaining and Troubleshooting Your OBDLink Setup
- 8.1. Cleaning and Storing Your OBDLink Adapter
- 8.2. Common Issues and Their Solutions
- 8.3. When to Seek Professional Help
- 9. Future Trends in OBD Diagnostics
- 9.1. Integration with Mobile Devices and Cloud Services
- 9.2. Advanced Driver-Assistance Systems (ADAS) Diagnostics
- 9.3. Predictive Maintenance and Vehicle Health Monitoring
- 10. Conclusion: Empowering Your Vehicle Diagnostics
- Frequently Asked Questions (FAQs)
- 1. What is an OBDLink adapter?
- 2. Why should I connect my OBDLink adapter to a computer?
- 3. What types of OBDLink adapters are available?
- 4. What diagnostic software should I use with my OBDLink adapter?
- 5. How do I connect a Bluetooth OBDLink adapter to my computer?
- 6. How do I read diagnostic trouble codes (DTCs) with my OBDLink adapter and software?
- 7. What is real-time data monitoring?
- 8. How can data logging help with diagnostics?
- 9. What are some common issues when using OBD tools and how can I resolve them?
- 10. When should I seek professional help with OBD diagnostics?
1. Understanding the Basics: What is OBD and Why Connect to a Computer?
Connecting your OBD (On-Board Diagnostics) tool to a computer offers significant advantages for vehicle diagnostics and maintenance. The OBD system is a standardized system used in modern vehicles to monitor and control various engine and vehicle parameters.
1.1. What is OBD?
OBD, or On-Board Diagnostics, is an electronic system that monitors the performance of a vehicle’s engine, emissions control system, and other components. It was standardized in the United States in the 1990s to ensure vehicles meet emissions regulations. Modern OBD systems, known as OBD-II, provide real-time data and diagnostic trouble codes (DTCs) to help technicians identify and resolve issues.
According to the EPA (United States Environmental Protection Agency), OBD-II systems are designed to monitor nearly all components that can affect emissions, ensuring vehicles comply with environmental standards.
1.2. Why Connect Your OBD Tool to a Computer?
Connecting an OBD tool to a computer enhances diagnostic capabilities by:
- Larger Display and Easier Navigation: Computers offer larger screens and user-friendly interfaces compared to handheld OBD scanners.
- Advanced Data Logging and Analysis: Software on computers can log and analyze data over time, providing insights into intermittent issues.
- Software Updates and Expanded Features: Computer-based systems often receive software updates that add features and support for newer vehicles.
- Comprehensive Reporting: Generate detailed diagnostic reports for analysis and record-keeping.
- Access to Extensive Databases: Software can access online databases for troubleshooting guides, repair information, and technical service bulletins.
1.3. Benefits of Using OBD Diagnostic Tools
Utilizing OBD diagnostic tools offers several key benefits:
- Early Problem Detection: Identify potential issues before they escalate into major repairs.
- Cost Savings: By diagnosing and addressing problems early, you can prevent costly repairs and maintenance.
- Improved Vehicle Performance: Monitoring and optimizing vehicle parameters can improve fuel efficiency and performance.
- Emission Compliance: Ensure your vehicle meets emissions standards, avoiding fines and penalties.
- Informed Decision Making: Make informed decisions about vehicle repairs and maintenance based on accurate diagnostic data.
1.4. Types of OBD Connectors
There are several types of OBD connectors, but the most common is the OBD-II connector, which is standardized across most vehicles manufactured after 1996. Other types include:
- OBD-I: Used in vehicles before 1996, it lacks standardization and varies between manufacturers.
- EOBD (European On-Board Diagnostics): Similar to OBD-II, used in European vehicles.
- JOBD (Japanese On-Board Diagnostics): Used in Japanese vehicles and also similar to OBD-II.
The OBD-II connector is a 16-pin connector, typically located under the dashboard on the driver’s side.
2. Key Components: OBDLink Adapter and Diagnostic Software
To successfully connect your OBD system to a computer, you need two essential components: an OBDLink adapter and diagnostic software.
2.1. OBDLink Adapters: Bluetooth, Wi-Fi, and USB
OBDLink adapters serve as the interface between your vehicle’s OBD-II port and your computer. There are three main types:
- Bluetooth OBDLink Adapters:
- Pros: Wireless connectivity, convenient for mobile use, and compatible with smartphones and tablets.
- Cons: Can be susceptible to interference, may require pairing, and potential security concerns.
- Example: OBDLink MX+ is a popular Bluetooth adapter known for its speed and compatibility.
- Wi-Fi OBDLink Adapters:
- Pros: Wireless connectivity, can support multiple devices, and often provides a more stable connection.
- Cons: May require network setup, potential security concerns, and can be more expensive.
- Example: OBDLink LX is a Wi-Fi adapter offering robust connectivity and features.
- USB OBDLink Adapters:
- Pros: Direct connection, stable and reliable, and generally faster data transfer.
- Cons: Requires a physical connection, less convenient for mobile use, and limited by cable length.
- Example: OBDLink EX is a USB adapter designed for professional diagnostics.
The choice of adapter depends on your specific needs, such as portability, stability, and compatibility with your devices.
2.2. Diagnostic Software: Features and Compatibility
Diagnostic software is essential for interpreting the data received from the OBDLink adapter. Key features to look for include:
- Compatibility: Ensure the software supports your vehicle’s make and model, as well as the operating system of your computer (Windows, macOS, Linux).
- Diagnostic Trouble Code (DTC) Reading and Clearing: Ability to read and clear DTCs to diagnose and resolve issues.
- Real-Time Data Monitoring: View live data streams from various sensors in your vehicle.
- Data Logging and Analysis: Record and analyze data over time to identify intermittent problems.
- Customizable Dashboards: Create custom dashboards to monitor specific parameters of interest.
- Reporting: Generate detailed diagnostic reports for analysis and record-keeping.
Popular diagnostic software options include:
- OBDWiz: A comprehensive software package designed to work seamlessly with OBDLink adapters.
- FORScan: Specializes in Ford, Lincoln, and Mercury vehicles, offering advanced diagnostic capabilities.
- Torque Pro: A popular Android app that can be used with Bluetooth OBD adapters.
- ScanXL: Offers advanced diagnostics and customizable features for various vehicle makes.
2.3. Choosing the Right OBDLink Adapter and Software Combination
Selecting the right combination of OBDLink adapter and diagnostic software depends on your specific needs and technical expertise. For example:
- For Professional Technicians: A USB adapter like OBDLink EX paired with professional diagnostic software like ScanXL provides a stable connection and advanced features.
- For DIY Enthusiasts: A Bluetooth adapter like OBDLink MX+ paired with OBDWiz or Torque Pro offers convenience and ease of use for basic diagnostics.
- For Specific Vehicle Makes: FORScan is ideal for Ford, Lincoln, and Mercury owners due to its specialized features.
Consider factors such as compatibility, features, ease of use, and cost when making your decision.
2.4. Software Updates and Their Importance
Regular software updates are crucial for maintaining the accuracy and reliability of your diagnostic system. Updates often include:
- Support for New Vehicle Models: Updates ensure compatibility with the latest vehicle makes and models.
- Bug Fixes: Resolve known issues and improve the stability of the software.
- New Features: Add new diagnostic capabilities and enhance existing features.
- Improved Data Accuracy: Updates can improve the accuracy of diagnostic data and interpretations.
Ensure your diagnostic software is always up to date to take advantage of the latest features and improvements.
3. Step-by-Step Guide: Connecting OBDLink to Your Computer
Connecting your OBDLink adapter to your computer involves a series of steps to ensure a stable and reliable connection.
3.1. Preparing Your Computer and Vehicle
Before you begin, ensure your computer meets the minimum system requirements for the diagnostic software you plan to use. Also, make sure your vehicle is parked in a well-ventilated area and the ignition is turned off.
- Check System Requirements: Verify that your computer meets the minimum system requirements for the diagnostic software.
- Prepare Vehicle: Park the vehicle in a well-ventilated area and turn off the ignition.
- Locate OBD-II Port: Find the OBD-II port, typically located under the dashboard on the driver’s side.
3.2. Installing the OBDLink Driver (if necessary)
For USB OBDLink adapters, you may need to install a driver on your computer. The driver allows your computer to communicate with the adapter.
- Download Driver: Download the latest driver from the OBDLink website or the included installation disc.
- Install Driver: Run the installer and follow the on-screen instructions.
- Verify Installation: Check the Device Manager to ensure the OBDLink adapter is recognized without any errors.
3.3. Connecting the OBDLink Adapter to Your Vehicle
- Locate OBD-II Port: Find the OBD-II port, typically located under the dashboard on the driver’s side.
- Plug in Adapter: Plug the OBDLink adapter into the OBD-II port, ensuring a secure connection.
- Turn Ignition On: Turn the ignition key to the “ON” position without starting the engine. This provides power to the OBD system.
3.4. Pairing Bluetooth or Wi-Fi OBDLink Adapters
For Bluetooth or Wi-Fi adapters, you need to pair the adapter with your computer.
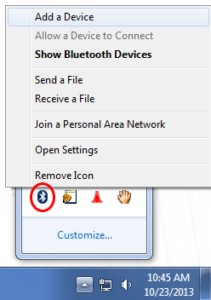
Bluetooth Pairing:
- Enable Bluetooth: Turn on Bluetooth on your computer.
- Make OBDLink Discoverable: Press the “Connect” button on the OBDLink adapter to make it discoverable.
- Search for Devices: On your computer, search for Bluetooth devices.
- Select OBDLink: Select the OBDLink adapter from the list of available devices.
- Enter PIN (if required): If prompted, enter the PIN “1234” or “0000.”
- Confirm Pairing: Confirm that the OBDLink adapter is successfully paired with your computer.
Wi-Fi Pairing:
- Enable Wi-Fi: Turn on Wi-Fi on your computer.
- Find OBDLink Network: Search for available Wi-Fi networks.
- Connect to OBDLink: Select the OBDLink network from the list of available networks.
- Enter Password (if required): Enter the password for the OBDLink network (usually found in the adapter’s documentation).
- Confirm Connection: Confirm that your computer is successfully connected to the OBDLink network.
 bluetooth-connection
3.5. Launching and Configuring the Diagnostic Software
- Install Software: If you haven’t already, install the diagnostic software on your computer.
- Launch Software: Launch the diagnostic software.
- Configure Connection: In the software settings, select the OBDLink adapter as the communication interface. For Bluetooth or Wi-Fi connections, select the appropriate COM port or network connection.
- Test Connection: Use the software’s connection test to verify that it can communicate with the OBDLink adapter and your vehicle’s OBD system.
3.6. Troubleshooting Connection Issues
If you encounter connection issues, try the following troubleshooting steps:
- Check Adapter Connection: Ensure the OBDLink adapter is securely plugged into the OBD-II port.
- Verify Power: Make sure the ignition is turned to the “ON” position to provide power to the OBD system.
- Restart Devices: Restart your computer and the OBDLink adapter.
- Update Drivers: Ensure you have the latest drivers installed for the OBDLink adapter.
- Check Software Settings: Verify that the software settings are configured correctly for the OBDLink adapter and connection type.
- Disable Other Bluetooth Devices: Disable other Bluetooth devices that may be interfering with the connection.
4. Using Diagnostic Software: Reading Codes and Monitoring Data
Once you’ve successfully connected your OBDLink adapter to your computer and launched the diagnostic software, you can begin reading diagnostic codes and monitoring real-time data.
4.1. Reading Diagnostic Trouble Codes (DTCs)
Diagnostic Trouble Codes (DTCs) are codes stored in the vehicle’s computer that indicate a problem with a specific system or component.
- Select “Read Codes”: In the diagnostic software, select the option to read diagnostic codes.
- View DTCs: The software will display any stored DTCs, along with descriptions of the problem.
- Record DTCs: Record the DTCs for further analysis and troubleshooting.
- Clear DTCs (if appropriate): If you’ve resolved the issue, you can clear the DTCs. Be cautious when clearing codes, as it can erase important diagnostic information.
4.2. Understanding DTC Severity and Categories
DTCs are categorized by severity and system. Common categories include:
- P (Powertrain): Relates to the engine, transmission, and related components.
- B (Body): Relates to body systems such as airbags, power windows, and door locks.
- C (Chassis): Relates to chassis systems such as ABS, traction control, and suspension.
- U (Network): Relates to the vehicle’s communication network.
DTCs also have a severity level, such as:
- Permanent Codes: Cannot be cleared until the issue is resolved.
- Confirmed Codes: Indicate a problem that has been detected multiple times.
- Pending Codes: Indicate a potential problem that needs further verification.
4.3. Monitoring Real-Time Data
Real-time data monitoring allows you to view live data streams from various sensors and components in your vehicle.
- Select “Live Data”: In the diagnostic software, select the option to view live data.
- Choose Parameters: Select the parameters you want to monitor, such as engine RPM, coolant temperature, and fuel pressure.
- View Data: The software will display the data in real-time, often in graphical or tabular format.
- Record Data: You can record the data for later analysis.
4.4. Interpreting Data and Identifying Issues
Interpreting real-time data requires some knowledge of vehicle systems and sensor behavior. Look for values that are outside the normal range or that fluctuate erratically. For example:
- High Coolant Temperature: May indicate a problem with the cooling system.
- Erratic Fuel Pressure: May indicate a problem with the fuel pump or fuel pressure regulator.
- Abnormal Oxygen Sensor Readings: May indicate a problem with the oxygen sensors or catalytic converter.
4.5. Data Logging and Analysis Techniques
Data logging allows you to record real-time data over time for later analysis. This can be useful for identifying intermittent problems or tracking vehicle performance.
- Start Logging: In the diagnostic software, start the data logging function.
- Drive Vehicle: Drive the vehicle under the conditions where the problem occurs.
- Stop Logging: Stop the data logging function when you’ve collected enough data.
- Analyze Data: Use the software’s analysis tools to review the data and identify any abnormalities or patterns.
5. Advanced Diagnostics: Going Beyond Basic Code Reading
Advanced diagnostics involve using the OBDLink adapter and diagnostic software to perform more in-depth analysis and troubleshooting.
5.1. Performing Advanced System Tests
Many diagnostic software packages offer advanced system tests that can help you diagnose specific problems. Examples include:
- Injector Balance Test: Checks the performance of each fuel injector.
- Compression Test: Measures the compression in each cylinder.
- EGR System Test: Tests the operation of the EGR (Exhaust Gas Recirculation) system.
- ABS System Test: Tests the operation of the ABS (Anti-lock Braking System).
5.2. Accessing Manufacturer-Specific Data
Some diagnostic software packages provide access to manufacturer-specific data and diagnostic routines. This can be useful for diagnosing problems that are not covered by the standard OBD-II protocol.
- Select Manufacturer: In the software, select the manufacturer of your vehicle.
- Access Manufacturer Data: Navigate to the manufacturer-specific data and diagnostic routines.
- Perform Tests: Follow the instructions provided by the software to perform the tests.
5.3. Flashing and Reprogramming ECUs
Flashing and reprogramming ECUs (Engine Control Units) involves updating the software in the vehicle’s computer. This can be used to fix bugs, improve performance, or add new features.
Caution: Flashing and reprogramming ECUs is an advanced procedure that should only be performed by experienced technicians. Incorrectly flashing an ECU can cause serious damage to the vehicle.
- Obtain Software: Obtain the correct software update from the vehicle manufacturer or a reputable source.
- Connect to ECU: Connect the OBDLink adapter to the vehicle and establish a connection with the ECU.
- Follow Instructions: Follow the instructions provided by the software to flash the ECU.
- Verify Installation: After flashing, verify that the new software is installed correctly.
5.4. Using Bi-Directional Control Features
Bi-directional control features allow you to send commands to the vehicle’s computer to control specific components. This can be useful for testing and troubleshooting. Examples include:
- Activating Fuel Pump: Turns on the fuel pump to check its operation.
- Cycling Solenoids: Cycles solenoids to check their function.
- Adjusting Idle Speed: Adjusts the idle speed of the engine.
5.5. Safety Precautions for Advanced Diagnostics
When performing advanced diagnostics, always follow these safety precautions:
- Wear Safety Glasses: Protect your eyes from debris and chemicals.
- Disconnect Battery: Disconnect the negative battery cable before working on electrical systems.
- Use Proper Tools: Use the correct tools for the job and follow the manufacturer’s instructions.
- Work in a Well-Ventilated Area: Avoid breathing harmful fumes.
- Consult Service Manuals: Refer to the vehicle’s service manual for detailed instructions and specifications.
6. Tips and Tricks for Effective OBD Diagnostics
Effective OBD diagnostics requires a combination of knowledge, skill, and the right tools. Here are some tips and tricks to help you get the most out of your OBDLink adapter and diagnostic software.
6.1. Keeping Your Software and Firmware Up-to-Date
Regularly update your diagnostic software and OBDLink adapter firmware to ensure you have the latest features, bug fixes, and vehicle support.
- Check for Updates: Check for updates regularly on the software and adapter manufacturer’s website.
- Download Updates: Download the latest updates.
- Install Updates: Follow the instructions provided to install the updates.
6.2. Understanding Vehicle-Specific Diagnostic Procedures
Different vehicles may have different diagnostic procedures and requirements. Consult the vehicle’s service manual or online resources for specific information.
- Consult Service Manual: Refer to the vehicle’s service manual for detailed diagnostic procedures.
- Use Online Resources: Utilize online forums, databases, and technical service bulletins for vehicle-specific information.
- Seek Expert Advice: Consult with experienced technicians or mechanics for assistance.
6.3. Creating Custom Dashboards for Monitoring Key Parameters
Most diagnostic software allows you to create custom dashboards to monitor specific parameters of interest. This can be useful for tracking vehicle performance and identifying potential problems.
- Select Parameters: Choose the parameters you want to monitor.
- Arrange Dashboard: Arrange the parameters on the dashboard in a logical and easy-to-read format.
- Customize Display: Customize the display settings, such as colors, fonts, and graph types.
6.4. Using Freeze Frame Data to Diagnose Intermittent Issues
Freeze frame data is a snapshot of the vehicle’s sensor readings at the moment a DTC was triggered. This can be useful for diagnosing intermittent issues that are difficult to reproduce.
- View Freeze Frame Data: In the diagnostic software, view the freeze frame data associated with a DTC.
- Analyze Data: Analyze the data to identify any abnormal readings or conditions that may have triggered the code.
- Reproduce Conditions: Try to reproduce the conditions that were present when the code was triggered to further diagnose the problem.
6.5. Common Mistakes to Avoid When Using OBD Tools
Avoid these common mistakes when using OBD tools:
- Incorrectly Identifying the OBD-II Port: Ensure you are using the correct port.
- Using Incompatible Software: Verify that the software is compatible with your vehicle and OBDLink adapter.
- Ignoring Safety Precautions: Always follow safety precautions to avoid injury and damage.
- Clearing Codes Without Diagnosing the Problem: Always diagnose and resolve the underlying issue before clearing DTCs.
- Misinterpreting Data: Ensure you understand the meaning of the data and DTCs before making any repairs.
7. Real-World Applications: Case Studies and Examples
Understanding how OBD diagnostics are applied in real-world scenarios can enhance your diagnostic skills.
7.1. Diagnosing a Misfire Issue with OBD Data
A misfire occurs when one or more cylinders in the engine fail to fire properly. OBD data can help you diagnose the cause of the misfire.
- Read DTCs: Read the DTCs to identify the misfiring cylinder (e.g., P0301 for misfire in cylinder 1).
- Monitor Real-Time Data: Monitor real-time data such as engine RPM, fuel trims, and oxygen sensor readings.
- Perform Cylinder Balance Test: Perform a cylinder balance test to identify the cylinder that is not contributing to engine power.
- Check Ignition System: Check the spark plugs, ignition coils, and wiring for the misfiring cylinder.
- Check Fuel System: Check the fuel injector for the misfiring cylinder.
- Analyze Data: Analyze the data to determine the cause of the misfire and make the necessary repairs.
7.2. Identifying a Faulty Oxygen Sensor Using Live Data
Faulty oxygen sensors can cause a variety of problems, including poor fuel economy and emissions issues. Live data can help you identify a faulty oxygen sensor.
- Monitor Oxygen Sensor Readings: Monitor the oxygen sensor readings using live data.
- Check for Proper Switching: The oxygen sensor readings should switch rapidly between high and low voltages.
- Look for Sticking or Slow Response: If the readings are sticking or responding slowly, the oxygen sensor may be faulty.
- Compare to Other Sensors: Compare the readings to other oxygen sensors in the vehicle to identify any discrepancies.
- Replace Sensor: Replace the faulty oxygen sensor and verify that the readings are now within the normal range.
7.3. Tracking Down a Fuel Efficiency Problem with Data Logging
Data logging can be used to track down the cause of a fuel efficiency problem.
- Start Data Logging: Start data logging and record parameters such as engine RPM, vehicle speed, fuel consumption, and oxygen sensor readings.
- Drive Under Various Conditions: Drive the vehicle under various conditions, such as city driving, highway driving, and idling.
- Analyze Data: Analyze the data to identify any factors that may be contributing to the fuel efficiency problem.
- Check for Vacuum Leaks: Check for vacuum leaks, which can cause poor fuel economy.
- Check for Clogged Air Filter: Check the air filter and replace it if it is clogged.
- Check for Other Issues: Check for other issues such as worn spark plugs, faulty oxygen sensors, and dragging brakes.
7.4. Solving an ABS Issue with Advanced Diagnostics
Advanced diagnostics can help you solve ABS (Anti-lock Braking System) issues.
- Read DTCs: Read the DTCs to identify the ABS issue.
- Perform ABS System Test: Perform an ABS system test to check the operation of the ABS components.
- Check Wheel Speed Sensors: Check the wheel speed sensors for proper operation.
- Check ABS Module: Check the ABS module for any faults or damage.
- Test Hydraulic System: Test the hydraulic system for leaks or blockages.
- Replace Faulty Components: Replace any faulty components and verify that the ABS system is now functioning properly.
8. Maintaining and Troubleshooting Your OBDLink Setup
Proper maintenance and troubleshooting can ensure your OBDLink setup remains reliable and effective.
8.1. Cleaning and Storing Your OBDLink Adapter
- Clean Adapter: Clean the OBDLink adapter with a soft, dry cloth.
- Store in a Safe Place: Store the adapter in a safe place, away from moisture and extreme temperatures.
- Protect from Damage: Protect the adapter from physical damage.
8.2. Common Issues and Their Solutions
- Connection Problems:
- Issue: Cannot establish a connection between the OBDLink adapter and the vehicle.
- Solution: Check the adapter connection, verify power, restart devices, and update drivers.
- Software Errors:
- Issue: The diagnostic software is crashing or displaying errors.
- Solution: Update the software, reinstall the software, and check for compatibility issues.
- Incorrect Data:
- Issue: The diagnostic data is inaccurate or unreliable.
- Solution: Verify that the software is compatible with your vehicle, check for sensor issues, and update the adapter firmware.
- Bluetooth Pairing Problems:
- Issue: Cannot pair the Bluetooth OBDLink adapter with your computer.
- Solution: Ensure Bluetooth is enabled, make the adapter discoverable, and enter the correct PIN.
8.3. When to Seek Professional Help
If you are unable to resolve the issue yourself, seek professional help from a qualified technician.
- Complex Issues: If you are dealing with complex diagnostic issues that require specialized knowledge or equipment.
- Safety Concerns: If you are concerned about your safety or the safety of your vehicle.
- Lack of Experience: If you lack the experience or expertise to perform the necessary repairs.
9. Future Trends in OBD Diagnostics
The field of OBD diagnostics is constantly evolving, with new technologies and features being introduced all the time.
9.1. Integration with Mobile Devices and Cloud Services
More OBD diagnostic tools are integrating with mobile devices and cloud services, allowing you to access and analyze your vehicle data from anywhere.
- Mobile Apps: Use mobile apps to connect to your OBDLink adapter and view real-time data.
- Cloud Storage: Store your diagnostic data in the cloud for easy access and sharing.
- Remote Diagnostics: Perform remote diagnostics and troubleshooting.
9.2. Advanced Driver-Assistance Systems (ADAS) Diagnostics
ADAS (Advanced Driver-Assistance Systems) are becoming increasingly common in modern vehicles. OBD diagnostic tools are now capable of diagnosing and calibrating these systems.
- ADAS Calibration: Calibrate ADAS systems such as lane departure warning and adaptive cruise control.
- Sensor Testing: Test ADAS sensors to ensure they are functioning properly.
- System Diagnostics: Diagnose and troubleshoot ADAS system issues.
9.3. Predictive Maintenance and Vehicle Health Monitoring
Predictive maintenance and vehicle health monitoring use OBD data to predict when maintenance will be required and identify potential problems before they occur.
- Predictive Algorithms: Use predictive algorithms to analyze OBD data and forecast maintenance needs.
- Vehicle Health Reports: Generate vehicle health reports that provide insights into the condition of your vehicle.
- Automated Alerts: Receive automated alerts when maintenance is required or potential problems are detected.
10. Conclusion: Empowering Your Vehicle Diagnostics
Connecting your OBDLink OBD car diagnostic tool to a computer empowers you with the ability to diagnose issues, monitor performance, and optimize your vehicle. With the right tools, knowledge, and resources from CAR-TOOL.EDU.VN, you can take control of your vehicle’s health and ensure it runs smoothly for years to come. Whether you’re a professional technician or a DIY enthusiast, the power of OBD diagnostics is now at your fingertips. Explore the benefits of enhanced diagnostics and proactive vehicle maintenance.
Are you ready to take the next step in vehicle diagnostics? Contact CAR-TOOL.EDU.VN today at 456 Elm Street, Dallas, TX 75201, United States, or call us on Whatsapp at +1 (641) 206-8880 for expert advice on choosing the right OBDLink adapter and diagnostic software for your needs. Unlock the full potential of your vehicle with CAR-TOOL.EDU.VN.
Frequently Asked Questions (FAQs)
1. What is an OBDLink adapter?
An OBDLink adapter is a device that connects to your vehicle’s OBD-II port and allows you to communicate with the vehicle’s computer using diagnostic software on a computer or mobile device.
2. Why should I connect my OBDLink adapter to a computer?
Connecting to a computer offers a larger display, advanced data logging, software updates, and comprehensive reporting, enhancing diagnostic capabilities.
3. What types of OBDLink adapters are available?
Bluetooth, Wi-Fi, and USB adapters are available, each offering different connectivity options and benefits.
4. What diagnostic software should I use with my OBDLink adapter?
Popular options include OBDWiz, FORScan, Torque Pro, and ScanXL, depending on your vehicle and diagnostic needs.
5. How do I connect a Bluetooth OBDLink adapter to my computer?
Enable Bluetooth on your computer, make the OBDLink discoverable, search for devices, select the OBDLink adapter, and enter the PIN if required.
6. How do I read diagnostic trouble codes (DTCs) with my OBDLink adapter and software?
Select the “Read Codes” option in the software, view the DTCs, record them, and clear them if appropriate.
7. What is real-time data monitoring?
Real-time data monitoring allows you to view live data streams from various sensors and components in your vehicle, providing insights into its performance.
8. How can data logging help with diagnostics?
Data logging allows you to record real-time data over time for later analysis, which can be useful for identifying intermittent problems or tracking vehicle performance.
9. What are some common issues when using OBD tools and how can I resolve them?
Common issues include connection problems, software errors, and incorrect data. Solutions include checking connections, updating software, and verifying compatibility.
10. When should I seek professional help with OBD diagnostics?
Seek professional help if you encounter complex diagnostic issues, have safety concerns, or lack the experience to perform the necessary repairs.