Where does diagnostic tool attach to on a car? The OBD2 port is where a diagnostic tool connects to your vehicle, and CAR-TOOL.EDU.VN ensures you pinpoint its location swiftly and accurately for efficient vehicle diagnostics. With the right information and tools, you can efficiently perform vehicle maintenance and troubleshooting. Explore our detailed guides and resources on automotive diagnostic equipment and onboard diagnostics.
Contents
- 1. Understanding the OBD2 Port
- 1.1. Location of the OBD2 Port
- 1.2. Identifying the OBD2 Port
- 2. Connecting a Diagnostic Tool to the OBD2 Port
- 2.1. Step-by-Step Connection Guide
- 2.2. Common Connection Issues and Solutions
- 3. Types of Diagnostic Tools
- 3.1. Basic Code Readers
- 3.2. Advanced Scan Tools
- 3.3. Smartphone-Based OBD2 Scanners
- 4. Interpreting Diagnostic Trouble Codes (DTCs)
- 4.1. DTC Structure
- 4.2. Common DTC Examples and Meanings
- 4.3. Resources for Decoding DTCs
- 5. Advanced Diagnostic Procedures
- 5.1. Live Data Monitoring
- 5.2. Freeze Frame Data
- 5.3. Bi-Directional Control
- 6. Common Diagnostic Scenarios and Solutions
- 6.1. Check Engine Light (CEL) On
- 6.2. Poor Fuel Economy
- 6.3. Engine Misfire
- 7. Choosing the Right Diagnostic Tool
- 7.1. Budget
- 7.2. Functionality
- 7.3. Compatibility
- 7.4. Ease of Use
- 7.5. Updates and Support
- 8. Maintaining Your Diagnostic Tool
- 8.1. Keep It Clean
- 8.2. Store It Properly
- 8.3. Update Software Regularly
- 8.4. Check Cables and Connectors
- 8.5. Replace Batteries as Needed
- 9. Benefits of Using a Diagnostic Tool
- 9.1. Early Problem Detection
- 9.2. Accurate Diagnostics
- 9.3. Cost Savings
- 9.4. Improved Vehicle Performance
- 9.5. Increased Vehicle Lifespan
- 10. Staying Updated with Automotive Diagnostic Technology
- 10.1. Industry Publications
- 10.2. Training Courses
- 10.3. Online Forums and Communities
- 10.4. Trade Shows and Conferences
- 11. Frequently Asked Questions (FAQs)
- 12. Conclusion
1. Understanding the OBD2 Port
The On-Board Diagnostics, second generation (OBD2) port is a standardized interface used to access a vehicle’s computer system for diagnostics and monitoring. According to the Environmental Protection Agency (EPA), all cars and light trucks manufactured for sale in the United States since 1996 are required to have an OBD2 port. This standardization simplifies vehicle diagnostics, as any compliant scan tool can interface with any compliant vehicle.
1.1. Location of the OBD2 Port
The OBD2 port is typically located inside the vehicle’s cabin.
- Standard Location: In most passenger vehicles, the OBD2 port is found under the driver’s side dashboard. It is often near the steering column.
- Alternative Locations: In some vehicles, the OBD2 port might be located in the center console or under the passenger side of the dashboard. Some manufacturers may place it inside the glove compartment.
1.2. Identifying the OBD2 Port
The OBD2 port is a female 16-pin connector shaped like a trapezoid. This unique shape ensures that the diagnostic tool can only be plugged in one way, preventing damage to the connector or the vehicle’s computer system.
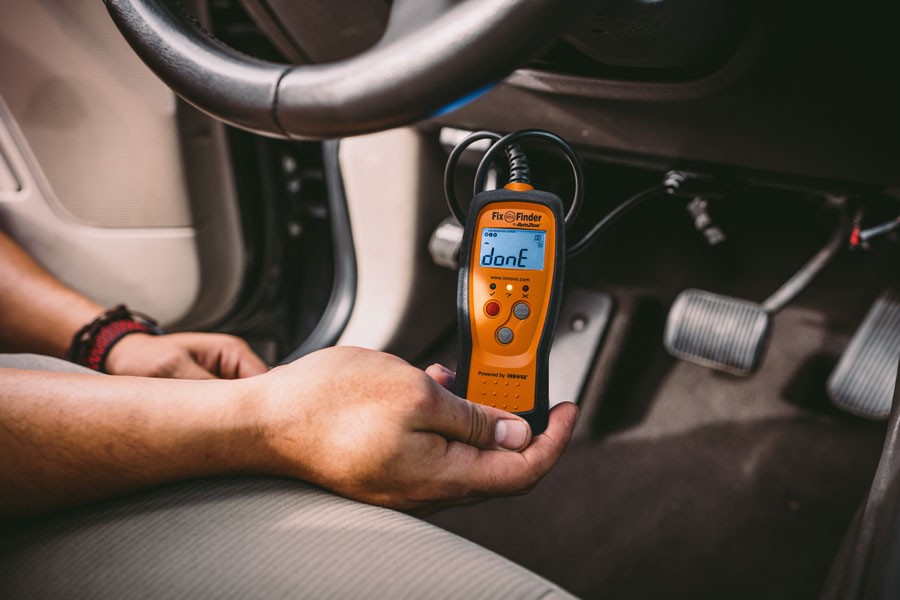 OBD2 Port Location
2. Connecting a Diagnostic Tool to the OBD2 Port
Connecting a diagnostic tool to the OBD2 port is a straightforward process. However, following the correct steps is essential to ensure a successful connection and accurate data retrieval.
2.1. Step-by-Step Connection Guide
- Turn Off the Ignition: Ensure the vehicle’s ignition is turned off before connecting the diagnostic tool. This prevents any electrical interference during the connection process.
- Locate the OBD2 Port: Find the OBD2 port in your vehicle, referring to the typical and alternative locations mentioned earlier.
- Align the Connector: Match the trapezoidal shape of the diagnostic tool’s connector with the OBD2 port.
- Connect the Tool: Gently but firmly push the connector into the OBD2 port. A slight wiggle might be necessary to fully seat the connectors together.
- Turn On the Ignition: Cycle the ignition to the “on” position without starting the engine. This provides power to the OBD2 port and the diagnostic tool.
- Wait for Boot-Up: Allow the diagnostic tool to complete its boot sequence. Most OBD2 ports will power up the scan tool automatically.
- Follow On-Screen Prompts: The diagnostic tool will guide you through any additional information required, such as engine size, VIN number, or instructions to start the engine.
2.2. Common Connection Issues and Solutions
- Connector Not Fitting: Ensure the connector is correctly aligned. Do not force the connection, as this could damage the pins in the OBD2 port.
- Tool Not Powering On: Check that the ignition is in the “on” position. If the tool still does not power on, check the vehicle’s fuses related to the OBD2 port.
- Communication Errors: Ensure the connector is fully seated in the OBD2 port. If errors persist, try a different diagnostic tool to rule out a faulty device.
3. Types of Diagnostic Tools
Several types of diagnostic tools are available, each with its features and capabilities. Selecting the right tool depends on your specific diagnostic needs and budget.
3.1. Basic Code Readers
- Functionality: Basic code readers are designed to read and clear diagnostic trouble codes (DTCs). They provide a brief description of the fault but typically do not offer advanced features.
- Use Case: Suitable for simple diagnostics, such as identifying the cause of a check engine light.
- Pros: Affordable, easy to use.
- Cons: Limited functionality, may not provide detailed information.
3.2. Advanced Scan Tools
- Functionality: Advanced scan tools offer a wide range of features, including reading and clearing DTCs, live data monitoring, freeze frame data, and bi-directional control.
- Use Case: Ideal for comprehensive diagnostics, including identifying intermittent issues, monitoring sensor data, and performing component testing.
- Pros: Extensive functionality, detailed information, supports advanced diagnostics.
- Cons: More expensive, may require training to use effectively.
3.3. Smartphone-Based OBD2 Scanners
- Functionality: These scanners connect to your smartphone via Bluetooth or Wi-Fi and use a mobile app to display diagnostic information. They often offer similar features to advanced scan tools, such as reading and clearing DTCs, live data monitoring, and custom dashboards.
- Use Case: Convenient for on-the-go diagnostics, monitoring vehicle performance, and tracking fuel economy.
- Pros: Portable, user-friendly interface, often more affordable than dedicated scan tools.
- Cons: Requires a smartphone or tablet, may have limited functionality compared to professional scan tools.
4. Interpreting Diagnostic Trouble Codes (DTCs)
Diagnostic Trouble Codes (DTCs) are alphanumeric codes that indicate a specific fault in the vehicle’s system. Understanding how to interpret these codes is essential for accurate diagnostics and effective repairs.
4.1. DTC Structure
A DTC typically consists of one letter followed by four numbers (e.g., P0301). Each character provides specific information about the fault.
- First Character (Letter): Indicates the system where the fault occurred.
- P: Powertrain (engine, transmission, fuel system)
- B: Body (airbags, interior electronics)
- C: Chassis (ABS, suspension)
- U: Network (communication issues)
- Second Character (Number): Indicates whether the code is generic or manufacturer-specific.
- 0: Generic code (applies to all manufacturers)
- 1: Manufacturer-specific code
- Third Character (Number): Indicates the subsystem.
- 1: Fuel and air metering
- 2: Fuel and air metering (injector circuit)
- 3: Ignition system or misfire
- 4: Auxiliary emission controls
- 5: Vehicle speed control or idle system
- 7, 8, 9: Transmission-related codes
- A, B, C: Hybrid-specific codes
- Fourth and Fifth Characters (Numbers): Further identify the specific fault.
4.2. Common DTC Examples and Meanings
- P0301: Cylinder 1 Misfire Detected
- P0171: System Too Lean (Bank 1)
- P0420: Catalyst System Efficiency Below Threshold (Bank 1)
- P0138: O2 Sensor Circuit High Voltage (Bank 1, Sensor 2)
- P0505: Idle Air Control System Malfunction
4.3. Resources for Decoding DTCs
- Diagnostic Tool Manual: Your diagnostic tool’s manual should provide a list of common DTCs and their meanings.
- Online Databases: Websites like OBD-Codes.com and AutoCodes.com offer extensive databases of DTCs and troubleshooting information.
- Repair Manuals: Vehicle-specific repair manuals (e.g., Haynes, Chilton) provide detailed information on DTCs and repair procedures.
5. Advanced Diagnostic Procedures
While reading and clearing DTCs is a fundamental diagnostic procedure, advanced diagnostics often require more in-depth analysis and testing.
5.1. Live Data Monitoring
- Functionality: Live data monitoring allows you to view real-time sensor data from the vehicle’s computer system. This can help identify intermittent issues and monitor component performance.
- Use Case: Monitoring engine parameters (e.g., RPM, coolant temperature, fuel trim) to diagnose performance problems.
- Example: Monitoring oxygen sensor voltage to detect a faulty sensor or fuel mixture issue.
5.2. Freeze Frame Data
- Functionality: Freeze frame data captures a snapshot of sensor values at the moment a DTC was set. This can provide valuable clues about the conditions that led to the fault.
- Use Case: Analyzing engine load, RPM, and fuel trim values at the time a misfire code was set to identify the root cause.
- Example: Reviewing freeze frame data to determine if a lean condition occurred under high load, indicating a potential fuel delivery problem.
5.3. Bi-Directional Control
- Functionality: Bi-directional control allows you to send commands to the vehicle’s computer system to activate or deactivate specific components. This can help isolate faults and verify component functionality.
- Use Case: Activating the fuel pump to check for proper operation or cycling the ABS pump to bleed the brake system.
- Example: Using bi-directional control to command the EGR valve to open and close, verifying that it is functioning correctly.
6. Common Diagnostic Scenarios and Solutions
To provide practical guidance, here are some common diagnostic scenarios and step-by-step solutions.
6.1. Check Engine Light (CEL) On
- Connect Diagnostic Tool: Connect your diagnostic tool to the OBD2 port and turn on the ignition.
- Read DTCs: Select “Read Codes” to retrieve any stored DTCs.
- Research DTCs: Use online resources or a repair manual to research the meaning of the DTCs.
- Inspect Related Components: Visually inspect the components related to the DTC. Check for damaged wiring, loose connections, or obvious signs of failure.
- Perform Further Testing: Use live data monitoring or bi-directional control to further test the components.
- Repair or Replace: Repair or replace any faulty components as needed.
- Clear DTCs: After completing the repairs, clear the DTCs using the diagnostic tool.
- Verify Repair: Drive the vehicle to verify that the check engine light does not return.
6.2. Poor Fuel Economy
- Connect Diagnostic Tool: Connect your diagnostic tool to the OBD2 port and turn on the ignition.
- Read DTCs: Select “Read Codes” to check for any DTCs related to fuel economy.
- Monitor Live Data: Monitor live data, including oxygen sensor readings, fuel trim values, and mass airflow (MAF) sensor readings.
- Inspect Components: Inspect the air filter, fuel injectors, and spark plugs for signs of wear or damage.
- Check for Vacuum Leaks: Use a smoke machine or carburetor cleaner to check for vacuum leaks, which can cause a lean fuel mixture and poor fuel economy.
- Repair or Replace: Repair any vacuum leaks, clean or replace fuel injectors, and replace worn spark plugs or air filters.
- Clear DTCs: After completing the repairs, clear any DTCs using the diagnostic tool.
- Verify Improvement: Drive the vehicle to verify that fuel economy has improved.
6.3. Engine Misfire
- Connect Diagnostic Tool: Connect your diagnostic tool to the OBD2 port and turn on the ignition.
- Read DTCs: Select “Read Codes” to identify which cylinder is misfiring.
- Inspect Spark Plugs: Remove and inspect the spark plug from the affected cylinder. Look for signs of wear, fouling, or damage.
- Check Ignition Coil: Test the ignition coil for the affected cylinder using a multimeter.
- Inspect Fuel Injector: Check the fuel injector for the affected cylinder using a multimeter or by listening for the injector to click while the engine is running.
- Perform Compression Test: Perform a compression test on the affected cylinder to check for mechanical issues.
- Repair or Replace: Replace any faulty spark plugs, ignition coils, or fuel injectors. Repair any mechanical issues as needed.
- Clear DTCs: After completing the repairs, clear the DTCs using the diagnostic tool.
- Verify Repair: Drive the vehicle to verify that the misfire has been resolved.
7. Choosing the Right Diagnostic Tool
Selecting the right diagnostic tool for your needs is crucial for effective vehicle maintenance. Here are some key factors to consider.
7.1. Budget
Diagnostic tools range from affordable basic code readers to expensive professional scan tools. Determine your budget before starting your search.
Basic code readers are typically priced under $100, while advanced scan tools can cost several hundred dollars or more.
Smartphone-based OBD2 scanners offer a good balance of features and affordability, typically priced between $50 and $200.
7.2. Functionality
Consider the types of diagnostic procedures you need to perform. If you only need to read and clear DTCs, a basic code reader may suffice.
If you need to monitor live data, perform bi-directional control, or access advanced features, an advanced scan tool or smartphone-based scanner is necessary.
7.3. Compatibility
Ensure the diagnostic tool is compatible with your vehicle’s make and model. Some tools may only support specific vehicle brands or model years.
Check the tool’s specifications or consult with the manufacturer to verify compatibility.
7.4. Ease of Use
Choose a diagnostic tool with a user-friendly interface and clear instructions. Some tools may require training or technical knowledge to use effectively.
Smartphone-based scanners often have intuitive mobile apps that make them easy to use.
7.5. Updates and Support
Consider whether the diagnostic tool offers software updates and technical support. Regular updates ensure the tool remains compatible with newer vehicles and diagnostic procedures.
Check the manufacturer’s website or reviews to assess the quality of their technical support.
8. Maintaining Your Diagnostic Tool
Proper maintenance of your diagnostic tool ensures its longevity and accuracy. Here are some essential maintenance tips.
8.1. Keep It Clean
Keep the diagnostic tool clean and free of dirt and debris. Use a soft cloth to wipe down the tool after each use.
8.2. Store It Properly
Store the diagnostic tool in a safe and dry place when not in use. Avoid exposing the tool to extreme temperatures or humidity.
8.3. Update Software Regularly
If your diagnostic tool offers software updates, install them regularly to ensure compatibility with newer vehicles and diagnostic procedures.
8.4. Check Cables and Connectors
Periodically check the cables and connectors for damage or wear. Replace any damaged cables or connectors to ensure a reliable connection.
8.5. Replace Batteries as Needed
If your diagnostic tool is battery-powered, replace the batteries as needed to ensure proper operation.
9. Benefits of Using a Diagnostic Tool
Using a diagnostic tool offers numerous benefits for vehicle owners and technicians.
9.1. Early Problem Detection
Diagnostic tools can detect potential problems early, allowing you to address them before they become more severe and costly.
9.2. Accurate Diagnostics
Diagnostic tools provide accurate and detailed information about vehicle issues, helping you diagnose problems quickly and effectively.
9.3. Cost Savings
By diagnosing and repairing problems yourself, you can save money on expensive shop repairs.
9.4. Improved Vehicle Performance
By addressing issues promptly, you can improve your vehicle’s performance, fuel economy, and reliability.
9.5. Increased Vehicle Lifespan
Regular diagnostics and maintenance can extend your vehicle’s lifespan, helping you get the most out of your investment.
10. Staying Updated with Automotive Diagnostic Technology
The field of automotive diagnostics is constantly evolving, with new technologies and procedures being developed all the time. Staying updated with these advancements is essential for effective vehicle maintenance.
10.1. Industry Publications
Read industry publications and websites to stay informed about the latest diagnostic technologies and procedures. Examples include Automotive Engineering International, Motor Age, and Auto Service Professional.
10.2. Training Courses
Attend training courses and workshops to learn about new diagnostic tools and techniques. Many manufacturers and industry organizations offer training programs.
10.3. Online Forums and Communities
Participate in online forums and communities to exchange information and ideas with other vehicle owners and technicians. Examples include Automotive Forums, iATN, and Reddit’s r/MechanicAdvice.
10.4. Trade Shows and Conferences
Attend trade shows and conferences to see the latest diagnostic tools and technologies in action. Examples include the SEMA Show and AAPEX.
11. Frequently Asked Questions (FAQs)
1. What is an OBD2 port?
The OBD2 (On-Board Diagnostics II) port is a standardized interface in vehicles used to access the vehicle’s computer system for diagnostics and monitoring. It is required in all cars and light trucks sold in the United States since 1996.
2. Where is the OBD2 port located in my car?
The OBD2 port is typically located under the driver’s side dashboard, near the steering column. In some vehicles, it may be in the center console or under the passenger side dashboard.
3. Can I use any diagnostic tool with my car’s OBD2 port?
Yes, as long as the diagnostic tool is OBD2 compliant. However, some tools may have limited functionality depending on the vehicle’s make and model.
4. Do I need to turn on the engine to use a diagnostic tool?
No, you typically only need to turn the ignition to the “on” position without starting the engine to power the OBD2 port and the diagnostic tool.
5. What do diagnostic trouble codes (DTCs) mean?
DTCs are alphanumeric codes that indicate a specific fault in the vehicle’s system. Each character in the code provides information about the system, the type of fault, and the location of the problem.
6. Can I clear DTCs myself after repairing a problem?
Yes, you can clear DTCs using a diagnostic tool after repairing the underlying issue. However, it is important to verify that the problem has been resolved before clearing the codes.
7. What is live data monitoring?
Live data monitoring allows you to view real-time sensor data from the vehicle’s computer system. This can help identify intermittent issues and monitor component performance.
8. What is freeze frame data?
Freeze frame data captures a snapshot of sensor values at the moment a DTC was set. This can provide valuable clues about the conditions that led to the fault.
9. What is bi-directional control?
Bi-directional control allows you to send commands to the vehicle’s computer system to activate or deactivate specific components. This can help isolate faults and verify component functionality.
10. How often should I use a diagnostic tool on my car?
You should use a diagnostic tool whenever you notice a problem with your vehicle, such as a check engine light, poor fuel economy, or engine misfire. Regular diagnostics can also help detect potential problems early and prevent costly repairs.
12. Conclusion
Understanding where the diagnostic tool attaches to on your car—specifically, the OBD2 port—is the first step in effective vehicle diagnostics. By following the guidelines outlined in this article, you can connect a diagnostic tool, interpret diagnostic trouble codes, and perform advanced diagnostic procedures with confidence. Regular diagnostics and maintenance can help you keep your vehicle running smoothly, save money on repairs, and extend its lifespan. Always rely on reputable resources like CAR-TOOL.EDU.VN for accurate information and guidance.
Ready to take control of your vehicle’s diagnostics? Contact us at 456 Elm Street, Dallas, TX 75201, United States or via Whatsapp at +1 (641) 206-8880 for expert advice and support. Visit CAR-TOOL.EDU.VN today and let our team assist you with all your automotive diagnostic needs.