Car Air Conditioning Diagnostic pinpoints cooling issues, and CAR-TOOL.EDU.VN can help you understand the process and identify potential problems. Addressing these issues promptly ensures your driving comfort and prevents further damage, extending the life of your vehicle’s AC system. For assistance with auto AC inspection or climate control diagnostics, reach out to us.
Contents
- 1. Understanding Car Air Conditioning Diagnostic
- 2. Preliminary Checks for Car AC Diagnostic
- 2.1. Checking the Cooling Fans
- 2.2. Checking for Obstructions
- 2.3. Cabin Air Filter Inspection
- 3. Essential Tools for Car Air Conditioning Diagnostic
- 3.1. Manifold Gauge Set
- 3.2. UV Leak Detection Kit
- 3.3. Voltmeter
- 3.4. Thermometer
- 3.5. Vacuum Pump
- 4. Common Car AC Problems and Their Diagnostic Steps
- 4.1. AC System is Cool but Not Cold
- 4.2. AC Compressor Issues
- 4.3. Refrigerant Leaks
- 4.4. Electrical Problems
- 5. Step-by-Step Guide to Car Air Conditioning Diagnostic
- 5.1. Initial Inspection
- 5.2. Pressure Testing
- 5.3. Leak Detection
- 5.4. Component Testing
- 5.5. Final Evaluation
- 6. Understanding AC System Components
- 6.1. AC Compressor
- 6.2. Condenser
- 6.3. Evaporator
- 6.4. Expansion Valve
- 6.5. Accumulator/Drier
- 7. Car AC Diagnostic: Addressing Specific Problems
- 7.1. No Cold Air
- 7.2. Weak Airflow
- 7.3. AC Works Intermittently
- 7.4. Unusual Noises
- 8. Utilizing CAR-TOOL.EDU.VN for Car AC Diagnostic
- 8.1. Finding Detailed Information
- 8.2. Comparing Repair Tools
- 8.3. Accessing User Reviews
- 8.4. Locating Reputable Suppliers
- 9. Maintaining Your Car’s AC System
- 9.1. Regular Inspections
- 9.2. Filter Replacement
- 9.3. Refrigerant Recharge
- 9.4. System Cleaning
- 9.5. Professional Service
- 10. Why Choose CAR-TOOL.EDU.VN for Your Car AC Diagnostic Needs?
- 10.1. Detailed Information on Components
- 10.2. Comparisons of Repair Tools
- 10.3. User Reviews and Ratings
- 10.4. Access to Reputable Suppliers
- FAQ: Car Air Conditioning Diagnostic
1. Understanding Car Air Conditioning Diagnostic
Car air conditioning diagnostic is the process of identifying the causes of problems in a vehicle’s AC system. Auto AC inspection involves a series of checks and tests to pinpoint issues that affect cooling performance. Addressing these problems quickly can prevent further damage and maintain a comfortable driving environment.
The primary goal of car AC diagnostic is to ensure the system functions efficiently, providing consistent cooling. Effective climate control diagnostics involves identifying issues such as refrigerant leaks, compressor problems, and electrical faults.
- Visual Inspection: A thorough examination of components like the compressor, condenser, evaporator, and hoses.
- Performance Testing: Assessing the system’s ability to cool the air to the desired temperature.
- Leak Detection: Identifying refrigerant leaks using specialized tools.
- Pressure Testing: Checking the system’s pressure levels to ensure they are within the correct range.
- Component Checks: Testing individual components like the compressor clutch, expansion valve, and blower motor.
Comprehensive car air conditioning diagnostic helps ensure your vehicle’s AC system operates effectively, keeping you comfortable no matter the weather. Identifying problems early can prevent costly repairs and maintain optimal performance.
 Car Air Conditioning Diagnostic
2. Preliminary Checks for Car AC Diagnostic
Before diving into complex diagnostics, perform these preliminary checks to identify common issues.
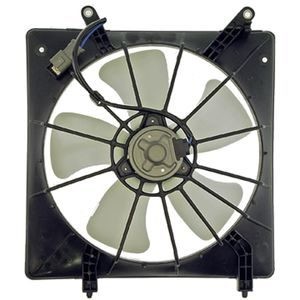
2.1. Checking the Cooling Fans
Verify that the cooling fans on the condenser or radiator are running when the AC is turned on. According to a study by the University of Michigan Transportation Research Institute, cooling fan malfunctions are a significant cause of AC inefficiency.
How to Check:
- Turn on the car’s AC to the maximum setting.
- Observe the cooling fans to see if they are spinning.
- If the fans are not running, check the fuses and relays.
- If the fuses and relays are intact, the fan motor may be faulty.
A properly functioning cooling fan ensures adequate airflow over the condenser, which is essential for cooling the refrigerant.
2.2. Checking for Obstructions
Inspect the condenser for any obstructions such as leaves, bugs, or dirt that could restrict airflow. A clean condenser is vital for efficient heat exchange, which is necessary for cooling the refrigerant.
How to Check:
- Visually inspect the front of the condenser for any debris.
- Use a soft brush or compressed air to remove any obstructions.
- Ensure that the fins on the condenser are not bent or damaged.
Maintaining a clear path for airflow across the condenser maximizes its cooling efficiency.
2.3. Cabin Air Filter Inspection
Check the cabin air filter to ensure it is not clogged. A clogged cabin air filter can severely restrict airflow into the vehicle’s cabin, reducing the effectiveness of the AC system.
How to Check:
- Locate the cabin air filter compartment (usually behind the glove box or under the dashboard).
- Remove the filter and inspect it for dirt and debris.
- If the filter is dirty, replace it with a new one.
Replacing a dirty cabin air filter improves airflow and enhances the AC system’s cooling performance.
3. Essential Tools for Car Air Conditioning Diagnostic
Having the right tools is crucial for effective car air conditioning diagnostic. Here’s a list of essential tools:
3.1. Manifold Gauge Set
A manifold gauge set is used to measure the high-side and low-side pressures in the AC system. These measurements can help diagnose various issues, such as low refrigerant levels or compressor problems.
Features:
- High-pressure and low-pressure gauges
- Color-coded hoses
- Various fittings to connect to different AC systems
- Carrying case for easy storage and transport
Using a manifold gauge set allows you to accurately assess the system’s pressure and identify potential issues.
3.2. UV Leak Detection Kit
A UV leak detection kit includes a UV dye and a UV light. The dye is injected into the AC system, and the UV light is used to find leaks by illuminating the dye.
Components:
- UV dye injector
- UV dye
- UV light
- Safety glasses
A UV leak detection kit is an effective way to find even the smallest refrigerant leaks.
3.3. Voltmeter
A voltmeter is used to check for voltage getting to the AC compressor clutch. This can help determine if the clutch is receiving power and functioning correctly.
Features:
- Digital display
- Various voltage ranges
- Test leads with probes
A voltmeter is essential for diagnosing electrical issues in the AC system.
3.4. Thermometer
A thermometer is used to measure the temperature of the air coming from the AC vents. This can help assess the system’s cooling performance.
Types:
- Digital thermometer
- Infrared thermometer
Using a thermometer provides a quick and easy way to evaluate the AC system’s cooling ability.
3.5. Vacuum Pump
A vacuum pump is used to evacuate the AC system before recharging it with refrigerant. This removes air and moisture, which can damage the system.
Features:
- Two-stage pump
- High vacuum rating
- Durable construction
A vacuum pump is essential for ensuring the AC system is free of contaminants before recharging.
4. Common Car AC Problems and Their Diagnostic Steps
Identifying common AC problems and knowing how to diagnose them is essential for maintaining your vehicle’s AC system.
4.1. AC System is Cool but Not Cold
If the AC is blowing moderately cool air but not reaching the desired coldness, several factors could be responsible.
Diagnostic Steps:
- Check Cooling Fans: Ensure the condenser and radiator fans are functioning properly.
- Inspect for Obstructions: Look for any debris blocking airflow to the condenser.
- Cabin Air Filter: Verify that the cabin air filter is clean and not restricting airflow.
- Pressure Check: Use a manifold gauge set to check the high-side and low-side pressures.
- Refrigerant Level: Low refrigerant levels can cause inadequate cooling.
Addressing these issues can improve the AC system’s cooling efficiency.
4.2. AC Compressor Issues
The AC compressor is a critical component of the AC system. Problems with the compressor can lead to poor cooling performance.
Diagnostic Steps:
- Clutch Engagement: Check if the compressor clutch is engaging when the AC is turned on.
- Voltage Check: Use a voltmeter to ensure voltage is reaching the compressor.
- Refrigerant Level: Low refrigerant can prevent the clutch from engaging.
- Compressor Condition: Inspect the compressor for any signs of damage or wear.
Properly diagnosing compressor issues can help determine if a replacement or repair is needed.
4.3. Refrigerant Leaks
Refrigerant leaks are a common cause of AC problems. Low refrigerant levels can lead to poor cooling and compressor damage.
Diagnostic Steps:
- Visual Inspection: Check for any visible signs of leaks, such as oily residue around fittings and hoses.
- UV Leak Detection: Use a UV leak detection kit to find leaks by injecting UV dye into the system.
- Component Checks: Inspect the condenser, evaporator, compressor, and hoses for leaks.
Finding and fixing refrigerant leaks is crucial for maintaining the AC system’s performance.
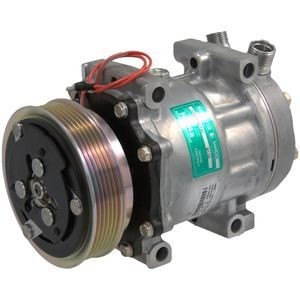 Checking AC Compressor
4.4. Electrical Problems
Electrical issues can prevent the AC system from functioning correctly. These can include blown fuses, faulty relays, or wiring problems.
Diagnostic Steps:
- Fuse Check: Inspect all fuses related to the AC system.
- Relay Check: Test the relays to ensure they are functioning properly.
- Wiring Inspection: Look for any damaged or corroded wires.
- Voltage Testing: Use a voltmeter to check for voltage at various points in the system.
Addressing electrical problems can restore the AC system’s functionality.
5. Step-by-Step Guide to Car Air Conditioning Diagnostic
Follow these steps for a systematic approach to diagnosing car AC problems.
5.1. Initial Inspection
Begin with a visual inspection of the AC system components.
Steps:
- Check the condenser and radiator for obstructions.
- Inspect the hoses and fittings for leaks or damage.
- Verify that the cooling fans are functioning properly.
- Check the cabin air filter for dirt and debris.
5.2. Pressure Testing
Use a manifold gauge set to measure the high-side and low-side pressures in the system.
Steps:
- Connect the manifold gauge set to the AC system.
- Start the engine and turn on the AC.
- Record the high-side and low-side pressure readings.
- Compare the readings to the vehicle’s specifications.
5.3. Leak Detection
If the pressure readings are low, use a UV leak detection kit to find refrigerant leaks.
Steps:
- Inject UV dye into the AC system.
- Use a UV light to inspect the components for leaks.
- Look for glowing dye around fittings, hoses, and components.
5.4. Component Testing
Test individual components, such as the compressor, expansion valve, and blower motor, to ensure they are functioning correctly.
Steps:
- Use a voltmeter to check for voltage at the compressor clutch.
- Inspect the expansion valve for any signs of damage or blockage.
- Test the blower motor to ensure it is blowing air through the vents.
5.5. Final Evaluation
After completing the diagnostic steps, evaluate the results to determine the cause of the AC problem and the necessary repairs.
Steps:
- Review the pressure readings, leak test results, and component test results.
- Identify the root cause of the AC problem.
- Determine the necessary repairs or replacements.
- Provide a detailed estimate for the repairs.
6. Understanding AC System Components
A thorough understanding of AC system components is crucial for effective diagnostic.
6.1. AC Compressor
The AC compressor is the heart of the AC system, responsible for circulating refrigerant.
Function:
- Compresses the refrigerant from a low-pressure gas to a high-pressure gas.
- Circulates the refrigerant throughout the system.
Common Issues:
- Leaks
- Clutch failure
- Internal damage
6.2. Condenser
The condenser dissipates heat from the refrigerant.
Function:
- Cools the high-pressure, high-temperature refrigerant gas.
- Converts the refrigerant back into a liquid state.
Common Issues:
- Leaks
- Obstructions
- Damage to fins
6.3. Evaporator
The evaporator absorbs heat from the cabin air.
Function:
- Absorbs heat from the air passing through it.
- Cools the air before it enters the cabin.
Common Issues:
- Leaks
- Blockages
- Corrosion
6.4. Expansion Valve
The expansion valve regulates refrigerant flow into the evaporator.
Function:
- Controls the amount of refrigerant entering the evaporator.
- Reduces the pressure and temperature of the refrigerant.
Common Issues:
- Blockages
- Malfunctioning
- Incorrect flow
6.5. Accumulator/Drier
The accumulator or drier removes moisture and contaminants from the refrigerant.
Function:
- Removes moisture and contaminants from the refrigerant.
- Protects the compressor from damage.
Common Issues:
- Saturation
- Internal failure
- Leaks
7. Car AC Diagnostic: Addressing Specific Problems
Different problems require specific diagnostic approaches.
7.1. No Cold Air
If the AC is not blowing any cold air, the problem could be due to several factors.
Diagnostic Steps:
- Check Refrigerant Level: Use a manifold gauge set to check the refrigerant level.
- Compressor Check: Verify that the compressor is engaging and functioning properly.
- Electrical Check: Inspect the fuses, relays, and wiring related to the AC system.
- Component Testing: Test the expansion valve and blower motor.
7.2. Weak Airflow
Weak airflow from the AC vents can be caused by a clogged cabin air filter or a problem with the blower motor.
Diagnostic Steps:
- Cabin Air Filter: Check and replace the cabin air filter if it is dirty.
- Blower Motor: Test the blower motor to ensure it is functioning properly.
- Duct Inspection: Inspect the air ducts for any obstructions.
7.3. AC Works Intermittently
If the AC works sometimes but not others, the problem could be due to an electrical issue or a faulty component.
Diagnostic Steps:
- Electrical Connections: Check all electrical connections for corrosion or damage.
- Relay Check: Test the relays to ensure they are functioning properly.
- Component Testing: Test the compressor clutch and expansion valve.
7.4. Unusual Noises
Unusual noises from the AC system can indicate a problem with the compressor or other components.
Diagnostic Steps:
- Compressor Inspection: Inspect the compressor for any signs of damage or wear.
- Component Check: Check the pulleys and belts for wear or misalignment.
- System Flush: If there is contamination, consider flushing the system.
8. Utilizing CAR-TOOL.EDU.VN for Car AC Diagnostic
CAR-TOOL.EDU.VN offers detailed information and resources to assist with car AC diagnostic.
8.1. Finding Detailed Information
CAR-TOOL.EDU.VN provides comprehensive information on various AC system components, diagnostic procedures, and repair tips.
8.2. Comparing Repair Tools
Use CAR-TOOL.EDU.VN to compare different repair tools, such as manifold gauge sets, UV leak detection kits, and vacuum pumps.
8.3. Accessing User Reviews
Read reviews from other users to get insights into the performance and reliability of different AC repair tools.
8.4. Locating Reputable Suppliers
CAR-TOOL.EDU.VN helps you find reputable suppliers for AC system components and repair tools.
9. Maintaining Your Car’s AC System
Regular maintenance is essential for keeping your car’s AC system in top condition.
9.1. Regular Inspections
Perform regular inspections of the AC system to identify potential problems early.
9.2. Filter Replacement
Replace the cabin air filter regularly to ensure good airflow.
9.3. Refrigerant Recharge
Recharge the AC system with refrigerant as needed to maintain optimal cooling performance.
9.4. System Cleaning
Clean the condenser and evaporator to remove any dirt or debris.
9.5. Professional Service
Schedule professional AC service at least once a year to ensure the system is functioning properly.
10. Why Choose CAR-TOOL.EDU.VN for Your Car AC Diagnostic Needs?
CAR-TOOL.EDU.VN provides detailed information, comparisons, and reviews to help you make informed decisions about your car AC diagnostic and repair needs. Our platform is designed to help both professional technicians and DIY enthusiasts find the right tools and information for their specific needs.
10.1. Detailed Information on Components
CAR-TOOL.EDU.VN offers in-depth information about various car components, including AC compressors, condensers, evaporators, and expansion valves. This allows users to understand the function and common issues associated with each component.
10.2. Comparisons of Repair Tools
Our website provides detailed comparisons of various repair tools, helping you choose the best tools for your specific diagnostic and repair needs. Compare features, prices, and user reviews to make an informed decision.
10.3. User Reviews and Ratings
Read user reviews and ratings to get insights into the performance and reliability of different products. These reviews can help you avoid costly mistakes and choose tools that are trusted by other users.
10.4. Access to Reputable Suppliers
CAR-TOOL.EDU.VN helps you find reputable suppliers for car components and repair tools. We partner with trusted vendors to ensure you have access to high-quality products at competitive prices.
Ready to get started? Contact CAR-TOOL.EDU.VN today at 456 Elm Street, Dallas, TX 75201, United States or via WhatsApp at +1 (641) 206-8880 for expert advice and support on all your car AC diagnostic needs. Visit our website at CAR-TOOL.EDU.VN for more information.
FAQ: Car Air Conditioning Diagnostic
Q1: What are the basic steps for car AC diagnostic?
A1: The basic steps include visual inspection, pressure testing, leak detection, and component testing to identify issues like refrigerant leaks or compressor problems.
Q2: What tools do I need for car AC diagnostic?
A2: Essential tools include a manifold gauge set, UV leak detection kit, voltmeter, thermometer, and vacuum pump for comprehensive diagnostics.
Q3: How do I check for refrigerant leaks in my car AC system?
A3: Use a UV leak detection kit. Inject UV dye into the system, then use a UV light to find leaks by looking for glowing dye around fittings and components.
Q4: What causes weak airflow from my car AC vents?
A4: Weak airflow is often caused by a clogged cabin air filter or a problem with the blower motor. Check and replace the filter, and test the blower motor.
Q5: How often should I service my car AC system?
A5: Schedule professional AC service at least once a year to ensure the system is functioning properly and to catch potential issues early.
Q6: What does it mean if my car AC is blowing warm air?
A6: This could indicate low refrigerant levels, a malfunctioning compressor, or electrical issues. Start by checking the refrigerant level and inspecting the compressor.
Q7: Can I recharge my car AC system myself?
A7: While it’s possible, it’s best to have a professional do it. They have the right tools and knowledge to ensure it’s done safely and effectively, preventing damage to the system.
Q8: What are the signs of a failing AC compressor?
A8: Signs include unusual noises, weak airflow, and the AC not blowing cold air. Inspect the compressor for leaks and check the clutch engagement.
Q9: Why is my car AC working intermittently?
A9: Intermittent AC function can be due to electrical issues, such as loose connections or faulty relays, or a failing compressor clutch.
Q10: How can CAR-TOOL.EDU.VN help with my car AC diagnostic needs?
A10: CAR-TOOL.EDU.VN offers detailed information on components, comparisons of repair tools, user reviews, and access to reputable suppliers, helping you make informed decisions for your AC diagnostic and repair needs.
Don’t let AC problems keep you from enjoying a comfortable ride. Contact CAR-TOOL.EDU.VN at 456 Elm Street, Dallas, TX 75201, United States or via WhatsApp at +1 (641) 206-8880 for expert assistance and top-quality tools. Visit our website at CAR-TOOL.EDU.VN today.