Is your Honda’s maintenance light on, and you’re not sure how to turn it off? Resetting your Honda maintenance light is a straightforward process, and CAR-TOOL.EDU.VN is here to guide you through it with easy-to-follow instructions for various Honda models, ensuring your vehicle’s maintenance schedule remains accurate. Properly resetting the maintenance minder improves vehicle health monitoring, helps avoid potential mechanical issues, and maintains your Honda’s resale value.
Contents
- 1. What is the Honda Maintenance Minder System?
- 2. Why is Resetting the Honda Maintenance Light Important?
- 3. How to Reset the Honda Maintenance Light: Step-by-Step Guide
- 3.1. Resetting the Maintenance Light on Honda Accord
- 3.2. Resetting the Maintenance Light on Honda Civic
- 3.3. Resetting the Maintenance Light on Honda CR-V
- 3.4. Resetting the Maintenance Light on Honda HR-V
- 3.5. Resetting the Maintenance Light on Honda Pilot
- 3.6. Resetting the Maintenance Light on Honda Odyssey
- 3.7. Resetting the Maintenance Light on Honda Passport
- 3.8. Resetting the Maintenance Light on Honda Ridgeline
- 4. Understanding Honda Maintenance Minder Codes
- 5. What Do Oil Life Percentages Mean on Your Honda?
- 6. Accuracy of Honda’s Maintenance Minder System
- 7. Can You Perform Car Maintenance and Reset Codes Yourself?
- 8. The Importance of Professional Honda Service
- 9. Following Maintenance Minder Recommendations for Warranty
- 10. Returning a Leased Honda with the Maintenance Light On
- 11. Common Mistakes When Resetting the Maintenance Light
- 12. Tools and Equipment Needed for DIY Honda Maintenance
- 13. Benefits of Using Genuine Honda Parts
- 14. How Often Should You Change Your Honda’s Oil?
- 15. Tips for Extending the Life of Your Honda
- 16. Diagnosing Common Honda Problems
- 17. Maintaining Your Honda’s Brakes
- 18. Checking and Replacing Fluids in Your Honda
- 19. Maintaining Your Honda’s Tires
- 20. Importance of Wheel Alignment for Hondas
- 21. Tips for Improving Your Honda’s Fuel Efficiency
- 22. How to Choose the Right Mechanic for Your Honda
- 23. Understanding Honda Warranty Coverage
- 24. Preparing Your Honda for Winter
- 25. Maintaining Your Honda’s Air Conditioning System
- 26. Importance of Regular Car Washes for Your Honda
- 27. Using CAR-TOOL.EDU.VN for Honda Maintenance Information
- 28. How to Find Honda Service Manuals
- 29. Why is My Honda Maintenance Light Still On?
- 30. Connecting with CAR-TOOL.EDU.VN for Expert Advice
1. What is the Honda Maintenance Minder System?
The Honda Maintenance Minder system is an intelligent system designed to monitor your vehicle’s condition and alert you when it’s time for routine maintenance, enhancing vehicle longevity. Introduced in 2005, this system eliminates guesswork by tracking factors like engine operation, mileage, and oil quality to provide accurate service recommendations. This technology simplifies car ownership and ensures timely upkeep, reducing the risk of major repairs.
 Honda Maintenance Minder
2. Why is Resetting the Honda Maintenance Light Important?
Resetting the maintenance light after servicing your Honda is important to maintain correct service intervals and avoid potential mechanical problems, thereby extending vehicle life. Failure to reset the system can result in inaccurate maintenance alerts, leading to missed service appointments and possible damage to your vehicle, which could void your warranty. By keeping the Maintenance Minder accurate, you ensure your Honda receives the right care at the right time.
3. How to Reset the Honda Maintenance Light: Step-by-Step Guide
Resetting the Honda maintenance light varies slightly depending on your model and year, but here are detailed steps for popular Honda models, guaranteeing ease of use. Always refer to your owner’s manual for the most precise instructions specific to your vehicle.
3.1. Resetting the Maintenance Light on Honda Accord
To reset the maintenance light on a Honda Accord, follow these steps to ensure your maintenance schedule is accurately tracked.
- Power Mode: Set the power mode to ON.
- Display Maintenance Minder: Roll the right selector wheel until the Maintenance Minder screen appears.
- Enter Reset Mode: Press and hold the right selector wheel for about 10 seconds to enter the reset mode.
- Select Item to Reset: Roll the right selector wheel to select a maintenance item to reset or choose “All Due Items.” You can also select “Cancel” to exit the process.
- Reset Selected Item: Press the right selector wheel to reset the selected item.
- Repeat: Repeat from step 3 for other items you wish to reset.
3.2. Resetting the Maintenance Light on Honda Civic
Resetting the maintenance light on your Honda Civic is essential for keeping your maintenance alerts accurate and timely.
- Power Mode: Set the power mode to ON.
- Press HOME Button: Press the (HOME) button.
- Display Wrench Icon: Roll the left selector wheel until the (WRENCH) icon is displayed.
- Go to Maintenance Minder Screen: Press the left selector wheel to navigate to the Maintenance Minder screen.
- Enter Reset Mode: Press and hold the left selector wheel for about 10 seconds to enter the reset mode.
- Select Item to Reset: Roll the left selector wheel to select a maintenance item to reset, or to select “All due items.” You can also select “Cancel” to end the process.
- Reset Selected Item: Press the left selector wheel to reset the selected item.
- Repeat: Repeat from step 5 for other items you wish to reset.
3.3. Resetting the Maintenance Light on Honda CR-V
Follow these steps to reset the maintenance light on your Honda CR-V, ensuring your vehicle’s maintenance schedule remains accurate.
- Power Mode: Set the power mode to ON.
- Press HOME Button: Press the (HOME) button.
- Display Wrench Icon: Roll the left selector wheel until the (WRENCH) icon is displayed.
- Go to Maintenance Minder Screen: Press the left selector wheel to navigate to the Maintenance Minder screen.
- Enter Reset Mode: Press and hold the left selector wheel for about 10 seconds to enter the reset mode.
- Select Item to Reset: Roll the left selector wheel to select a maintenance item to reset, or to select “All due items.” You can also select “Cancel” to end the process.
- Reset Selected Item: Press the left selector wheel to reset the selected item.
- Repeat: Repeat from step 5 for other items you wish to reset.
3.4. Resetting the Maintenance Light on Honda HR-V
To properly reset the maintenance light on your Honda HR-V, follow these steps to maintain accurate service intervals.
- Power Mode: Set the power mode to ON.
- Press HOME Button: Press the (HOME) button.
- Display Wrench Icon: Roll the left selector wheel until the (WRENCH) icon is displayed.
- Go to Maintenance Minder Screen: Press the left selector wheel to navigate to the Maintenance Minder screen.
- Enter Reset Mode: Press and hold the left selector wheel for about 10 seconds to enter the reset mode.
- Select Item to Reset: Roll the left selector wheel to select a maintenance item to reset, or to select “All due items.” You can also select “Cancel” to end the process.
- Reset Selected Item: Press the left selector wheel to reset the selected item.
- Repeat: Repeat from step 5 for other items you wish to reset.
3.5. Resetting the Maintenance Light on Honda Pilot
These steps will guide you through resetting the maintenance light on your Honda Pilot, ensuring accurate maintenance tracking.
- Power Mode: Set the power mode to ON.
- Press HOME Button: Press the (HOME) button.
- Display Wrench Icon: Roll the left selector wheel until the (WRENCH) icon is displayed.
- Go to Maintenance Minder Screen: Press the left selector wheel to navigate to the Maintenance Minder screen.
- Enter Reset Mode: Press and hold the left selector wheel for about 10 seconds to enter the reset mode.
- Select Item to Reset: Roll the left selector wheel to select a maintenance item to reset, or to select “All due items.” You can also select “Cancel” to end the process.
- Reset Selected Item: Press the left selector wheel to reset the selected item.
- Repeat: Repeat from step 5 for other items you wish to reset.
3.6. Resetting the Maintenance Light on Honda Odyssey
Follow these steps to reset the maintenance light on your Honda Odyssey, keeping your vehicle’s service alerts on track.
- Power Mode: Set the power mode to ON.
- Display Engine Oil Life: Display the engine oil life.
- Enter Reset Mode: Press and hold the (ENTER) button for about 10 seconds to enter the reset mode.
- Select Item to Reset: Press the (ARROWS) to select a maintenance item to reset, or to select “All Due Items.” You can also select “Cancel” to end the process.
- Reset Selected Item: Press the ENTER button to reset the selected item.
- Repeat: Repeat from step 5 for other items you wish to reset.
3.7. Resetting the Maintenance Light on Honda Passport
These steps are essential for resetting the maintenance light on your Honda Passport, ensuring you receive timely and accurate maintenance alerts.
- Power Mode: Set the power mode to ON.
- Display Engine Oil Life: Display the engine oil life.
- Enter Reset Mode: Press and hold the (ENTER) button for about 10 seconds to enter the reset mode.
- Select Item to Reset: Press the (ARROWS) to select a maintenance item to reset, or to select “All Due Items.” You can also select “Cancel” to end the process.
- Reset Selected Item: Press the ENTER button to reset the selected item.
- Repeat: Repeat from step 5 for other items you wish to reset.
3.8. Resetting the Maintenance Light on Honda Ridgeline
To reset the maintenance light on your Honda Ridgeline, follow these steps to ensure your maintenance minder is correctly configured.
- Power Mode: Set the power mode to ON.
- Display Engine Oil Life: Display the engine oil life.
- Enter Reset Mode: Press and hold the (RESET) button for about 10 seconds to enter the reset mode.
- Select Reset: Select “Reset” with the (ARROWS) or (INFORMATION) button, then push the (RESET) button.
- Confirmation: A maintenance reset complete message will be displayed on the multi-information display. The engine oil life display returns to 100%.
- Cancel (Optional): To cancel the oil life reset mode, select “Cancel,” then push the (RESET) button.
4. Understanding Honda Maintenance Minder Codes
Knowing what the Honda Maintenance Minder codes mean helps you stay on top of your vehicle’s needs, ensuring it runs smoothly. These codes indicate specific maintenance tasks required to keep your Honda in optimal condition.
| Code | Maintenance Due |
|---|---|
| A | Replace engine oil |
| B | Replace engine oil and oil filter Inspect front and rear brakes Check parking brake adjustment Check expiration date for temporary tire repair kit bottle Inspect tie rod ends, steering gearbox and boots Inspect suspension components Inspect driveshaft boots Inspect brake hoses and lines (ABS/VSA included) Inspect all fluid Inspected exhaust system Inspect fuel lines |
| 1 | Rotate tires |
| 2 | Replace air cleaner element Replace dust and pollen filter Inspect drive belt |
| 3 | Replace transmission fluid |
| 4 | Replace spark plugs Inspect valve clearance Replace timing belt Inspect water pump |
| 5 | Replace engine coolant |
| 6 | Replace rear differential fluid |
| 7 | Replace brake fluid |
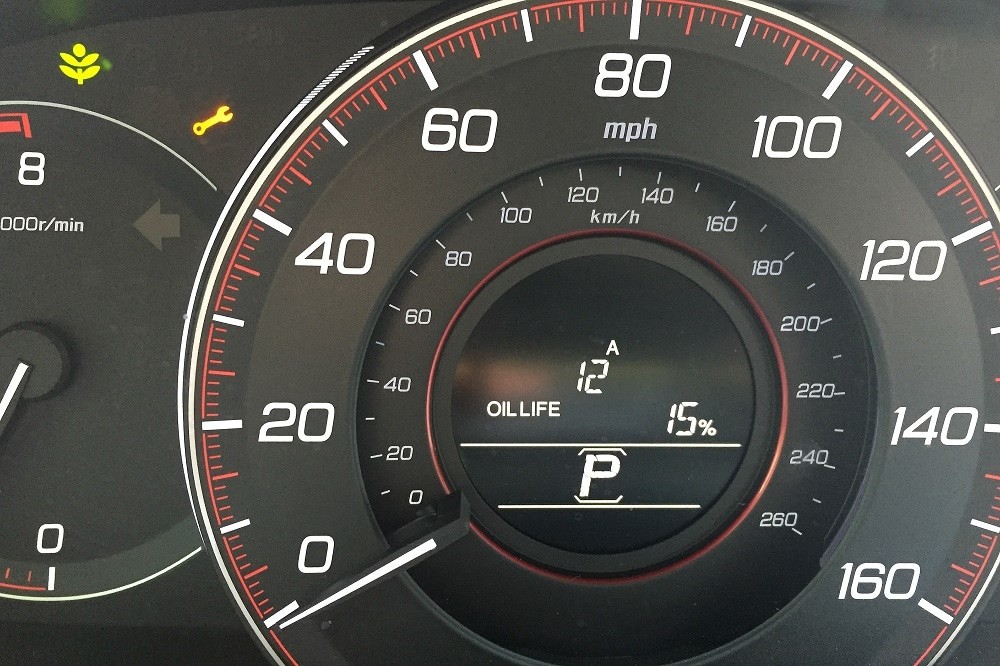
5. What Do Oil Life Percentages Mean on Your Honda?
Understanding oil life percentages in your Honda helps you anticipate and schedule necessary maintenance, promoting engine health.
- 15% Oil Life: Service is due soon; schedule an appointment at your earliest convenience, typically within 1,000 miles.
- 5% Oil Life: Service is due ASAP, with a recommended limit of no more than 200-300 miles.
- 0% Oil Life: Your vehicle is overdue for service and requires an immediate oil change to prevent engine damage.
Honda recommends an oil change every 5,000-10,000 miles, depending on driving conditions, or when the Maintenance Minder reaches 5%, whichever occurs first, ensuring optimal engine performance.
6. Accuracy of Honda’s Maintenance Minder System
Honda’s Maintenance Minder system is designed for accuracy, using sensors and algorithms to monitor oil health and driving conditions, providing reliable maintenance alerts. The system considers factors such as engine load, temperature, mileage, and the type of oil used, ensuring tailored and precise maintenance recommendations. This accuracy helps prevent unnecessary services while ensuring critical maintenance is performed on time.
7. Can You Perform Car Maintenance and Reset Codes Yourself?
Many Honda owners opt to perform minor maintenance tasks like oil changes and filter replacements themselves, which can save money and provide a sense of accomplishment, leading to cost savings. While DIY maintenance is possible, using CAR-TOOL.EDU.VN to find the right tools and parts ensures the job is done correctly, maintaining your vehicle’s condition. For more complex maintenance, consulting a professional is recommended.
8. The Importance of Professional Honda Service
Having an authorized Honda dealer perform maintenance ensures your vehicle’s history is accurately documented, which can significantly impact its resale value, according to automotive industry standards. Dealerships use genuine Honda parts and have trained technicians who understand the intricacies of your vehicle, providing peace of mind. Additionally, a comprehensive service history can positively influence your vehicle’s CARFAX report, potentially increasing its market value.
9. Following Maintenance Minder Recommendations for Warranty
Adhering to Maintenance Minder recommendations is crucial for maintaining your Honda’s warranty, protecting you from potential repair costs, based on Honda’s warranty terms. Neglecting recommended maintenance, as determined by your service history, can void the warranty, leaving you responsible for repair expenses. Regular maintenance at a certified dealership ensures all services are recorded, safeguarding your warranty coverage.
10. Returning a Leased Honda with the Maintenance Light On
Returning a leased Honda with the maintenance light on may result in turn-in fees, so completing necessary maintenance before returning the vehicle is advisable, according to lease agreements. While policies vary by location and leasing company, addressing maintenance needs before the lease ends can help avoid unexpected charges. Contact your leasing company or Honda dealer to understand specific return policies and potential fees.
11. Common Mistakes When Resetting the Maintenance Light
Avoiding common mistakes when resetting the maintenance light ensures accurate maintenance tracking and prevents potential issues. Here are some common pitfalls:
- Incorrect Procedure: Using the wrong reset procedure for your specific Honda model. Always consult your owner’s manual.
- Failing to Confirm Reset: Not verifying that the maintenance light has been successfully reset after performing the procedure.
- Resetting Without Servicing: Resetting the light without actually performing the necessary maintenance, which can lead to neglected vehicle care.
- Ignoring Other Warning Lights: Focusing solely on the maintenance light and overlooking other critical warning lights on the dashboard.
12. Tools and Equipment Needed for DIY Honda Maintenance
Having the right tools and equipment makes DIY Honda maintenance easier and more efficient, saving time and money. Here’s a list of essential items:
- Wrench Set: A comprehensive set of wrenches to handle various bolt sizes.
- Socket Set: A socket set for removing and tightening nuts and bolts.
- Oil Filter Wrench: A specialized wrench for removing and installing oil filters.
- Drain Pan: A pan to collect used oil during oil changes.
- Jack and Jack Stands: A jack and jack stands for safely lifting and supporting your vehicle.
- Gloves and Safety Glasses: Protective gear to ensure your safety during maintenance tasks.
- OBD-II Scanner: An OBD-II scanner for reading and resetting diagnostic codes.
- Torque Wrench: A torque wrench to ensure bolts are tightened to the correct specification.
CAR-TOOL.EDU.VN offers a wide selection of high-quality tools and equipment to meet all your DIY maintenance needs, enhancing your ability to care for your Honda.
13. Benefits of Using Genuine Honda Parts
Using genuine Honda parts for maintenance and repairs ensures optimal performance, reliability, and safety, aligning with Honda’s engineering standards. Genuine parts are specifically designed for your vehicle, guaranteeing a perfect fit and seamless integration, enhancing overall vehicle longevity. Aftermarket parts may not meet the same quality standards, potentially leading to compatibility issues and reduced performance.
14. How Often Should You Change Your Honda’s Oil?
Changing your Honda’s oil regularly is essential for maintaining engine health and performance, preventing wear and tear. Honda recommends an oil change every 5,000-10,000 miles, depending on driving conditions, or when the Maintenance Minder reaches 5%, whichever comes first, ensuring optimal engine protection. Factors like frequent stop-and-go traffic, towing, and extreme temperatures can affect oil life, necessitating more frequent changes.
15. Tips for Extending the Life of Your Honda
Extending the life of your Honda involves regular maintenance, careful driving habits, and timely repairs, preserving its value and reliability. Here are some key tips:
- Follow Maintenance Schedule: Adhere to the maintenance schedule outlined in your owner’s manual.
- Check Fluid Levels: Regularly check and maintain proper fluid levels, including oil, coolant, brake fluid, and transmission fluid.
- Monitor Tire Pressure: Keep tires properly inflated to ensure even wear and optimal fuel efficiency.
- Drive Smoothly: Avoid harsh acceleration and braking to reduce wear on your vehicle.
- Address Issues Promptly: Address any unusual noises, leaks, or performance issues promptly to prevent further damage.
16. Diagnosing Common Honda Problems
Being able to diagnose common Honda problems can save you time and money by identifying issues early, preventing costly repairs. Here are some typical signs to watch for:
- Check Engine Light: Indicates a potential issue with the engine or emissions system.
- Unusual Noises: Strange sounds like squealing brakes or knocking engine noises can signal underlying problems.
- Fluid Leaks: Leaks of oil, coolant, or other fluids should be addressed immediately.
- Reduced Fuel Efficiency: A sudden drop in fuel economy can indicate engine or drivetrain issues.
- Rough Idling: Rough idling or stalling can be caused by faulty spark plugs, vacuum leaks, or fuel system problems.
17. Maintaining Your Honda’s Brakes
Proper brake maintenance is crucial for safety and preventing costly repairs, ensuring reliable stopping power. Regularly inspect brake pads, rotors, and fluid levels, replacing worn components as needed, and addressing any unusual noises or vibrations promptly. Following these practices helps maintain your Honda’s braking system in optimal condition.
18. Checking and Replacing Fluids in Your Honda
Regularly checking and replacing fluids in your Honda is vital for maintaining its performance and longevity, preventing component damage. Essential fluids include engine oil, coolant, brake fluid, power steering fluid, and transmission fluid, each playing a critical role in vehicle operation. Monitoring fluid levels and replacing them according to the recommended schedule ensures smooth and efficient performance.
19. Maintaining Your Honda’s Tires
Proper tire maintenance is essential for safety, fuel efficiency, and tire longevity, optimizing your driving experience. Regularly check tire pressure, inspect for wear and damage, rotate tires, and ensure proper alignment, promoting even wear and extending tire life. Adhering to these practices ensures your Honda handles well and operates efficiently.
20. Importance of Wheel Alignment for Hondas
Proper wheel alignment is crucial for ensuring even tire wear, optimal handling, and fuel efficiency, improving your Honda’s performance. Misalignment can lead to premature tire wear, pulling to one side, and reduced fuel economy, increasing operating costs. Regular alignment checks and adjustments help maintain your Honda’s handling and extend tire life.
21. Tips for Improving Your Honda’s Fuel Efficiency
Improving your Honda’s fuel efficiency saves money and reduces your environmental impact, making driving more economical. Here are some practical tips:
- Drive at a Consistent Speed: Avoid sudden acceleration and braking, maintaining a steady speed.
- Keep Tires Properly Inflated: Properly inflated tires reduce rolling resistance, improving fuel economy.
- Remove Excess Weight: Reduce unnecessary weight in your vehicle to improve fuel efficiency.
- Use Cruise Control: Use cruise control on the highway to maintain a consistent speed.
- Combine Trips: Combine errands into a single trip to reduce cold starts, which consume more fuel.
22. How to Choose the Right Mechanic for Your Honda
Choosing the right mechanic for your Honda is crucial for ensuring quality service and maintaining your vehicle’s performance, providing peace of mind. Look for a mechanic with Honda-specific experience, certifications, and positive reviews, ensuring they have the expertise to properly care for your vehicle. A reputable mechanic will use quality parts and follow Honda’s recommended service procedures.
23. Understanding Honda Warranty Coverage
Understanding Honda warranty coverage helps protect you from unexpected repair costs and ensures you receive necessary services, preserving your investment. Honda warranties typically cover defects in materials and workmanship, with specific terms and conditions outlined in your warranty booklet. Familiarize yourself with the coverage details, including the duration, components covered, and any exclusions, to ensure you are fully protected.
24. Preparing Your Honda for Winter
Preparing your Honda for winter is essential for ensuring safety and reliability in cold weather conditions, preventing breakdowns. Key steps include checking the battery, inspecting tires, topping off fluids, and ensuring the heating and defrosting systems are working properly, enhancing your vehicle’s performance. Addressing these areas helps prevent cold-weather issues and ensures your Honda remains dependable throughout the winter.
25. Maintaining Your Honda’s Air Conditioning System
Properly maintaining your Honda’s air conditioning system ensures reliable cooling and comfort during hot weather, improving your driving experience. Regularly check the refrigerant levels, inspect the compressor and belts, and replace the cabin air filter, preventing system failures. Addressing these areas helps maintain your Honda’s cooling performance and ensures a comfortable cabin environment.
26. Importance of Regular Car Washes for Your Honda
Regular car washes are important for protecting your Honda’s paint and preventing rust, preserving its appearance and value. Washing your car removes dirt, salt, and other contaminants that can damage the finish and promote corrosion, maintaining its resale value. Regular washing, waxing, and detailing help keep your Honda looking its best and protect it from environmental damage.
27. Using CAR-TOOL.EDU.VN for Honda Maintenance Information
CAR-TOOL.EDU.VN offers a wealth of information and resources for Honda maintenance, providing valuable support for vehicle owners. Our website provides detailed guides, product reviews, and expert advice to help you properly care for your Honda, enhancing your understanding of car care. Whether you’re performing DIY maintenance or seeking professional service, CAR-TOOL.EDU.VN offers valuable insights to help you keep your Honda running smoothly.
28. How to Find Honda Service Manuals
Accessing Honda service manuals provides detailed information for performing maintenance and repairs, empowering you with the knowledge needed for vehicle care. Honda service manuals offer step-by-step instructions, diagrams, and specifications for various maintenance tasks, enhancing your understanding. You can typically find service manuals through Honda dealerships, online retailers, or public libraries, making it easier to perform DIY maintenance.
29. Why is My Honda Maintenance Light Still On?
If your Honda maintenance light remains on after resetting it, several factors could be responsible, potentially indicating unresolved issues. Common reasons include:
- Incorrect Reset Procedure: Ensure you are using the correct reset procedure for your specific Honda model and year.
- Unresolved Maintenance Issues: The maintenance light may remain on if the required maintenance tasks have not been completed.
- Faulty Sensors: A faulty sensor may be triggering the maintenance light, even after a reset.
- Underlying Mechanical Problems: Underlying mechanical problems may be causing the maintenance light to stay on, requiring professional diagnosis.
30. Connecting with CAR-TOOL.EDU.VN for Expert Advice
Need more specific guidance on maintaining your Honda or resetting the maintenance light? Contact CAR-TOOL.EDU.VN for expert advice and personalized support. Our team of experienced technicians can provide tailored recommendations and answer your questions, making car maintenance easier.
Don’t hesitate to reach out!
Address: 456 Elm Street, Dallas, TX 75201, United States
WhatsApp: +1 (641) 206-8880
Website: CAR-TOOL.EDU.VN
By understanding your Honda’s maintenance needs and following these steps, you can keep your vehicle running smoothly and efficiently.